In one of my previous articles, I had written on how to Create an Entity Data Model From a Database. A DotNetCurry.com reader Phillip posted a question in the comments section, asking if it was possible to use the same model in multiple projects.
The answer is – To consume an Entity model in separate projects, you have to create the model in its own project, i.e. a class library project. Let us see how. The steps of creating the model is similar to the one I wrote in my previous article, so I won’t be explaining them over here again.
Create an Entity Data Model as a Separate project
Here are the steps to create a model as a separate project.
Step 1: Open Visual Studio 2010 > File > New Project > Windows Template > Class Library > Give the project a name ‘MyEntityModel’ > OK

Delete the default Class1.cs that gets created in the project.
Step 2: Right click on the project in Solution Explorer > Add > New Item. Select the Data Template > ADO.NET Entity Data Model and click Add.

In the Entity Data Model Wizard, choose ‘Generate From Database’ and click Next

Create a new Data Connection or choose from an existing one. Since we already created the Data Connection in my previous article, we will use an existing Connection

The Entity Connection Settings will be stored in the App.Config file as ‘NorthwindEntities’.
Step 3: Now choose the Database Objects you want to include in your Entity Data Model (EDM). This time, I chose two tables ‘Customers’ and ‘Orders’ as well as two Stored Procedures too as shown below, and renamed the model namespace as ‘NorthwindModel’. Click Finish to complete the wizard.

Build the project in Release mode. A model defined by the Entity Data Model is ready and can now be used in your applications.
Exploring the MetaData Artifact Processing property
Double click to open the model and check it’s MetaData Artifact Processing property in the Properties window, which is by default set to ‘Embed in Output Assembly’, as shown below.
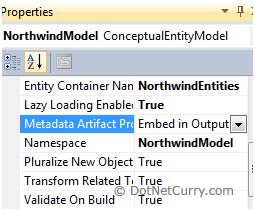
This property is very useful in scenarios where you want to use the use the model in different projects. Since the model is created as a class library project (.dll), all you need to do now is make a reference to the .dll in your project and supply the connection string. The project using this model, finds the schema files (.csdl, .mls, .ssdl) through the metadata property. Remember that all the schema files are embedded into the .dll as resources. Open the App.config file and check the connection string entry, which contains the schema files entries, as shown in the screenshot below.

Note: If you are new to schema files, read my article Exploring how the Entity Data Model (EDM) works.
You can now use this model in multiple projects like a Console Application, ASP.NET Project, a Windows Forms project or a WPF Project. Make sure you have build the project (Go to Build > Build MyEntityModel) and there are no errors.
Using the Entity Model in a Console Application
We will now use the model we created above, in a Console Application.
Step 1: Open Visual Studio 2010 > File > New Project > In the templates, select Windows > Console Application. Make sure the target framework is ‘.NET Framework 4.0’. I have called the application ‘ConsoleAppUsingMyModel’. Click Ok.
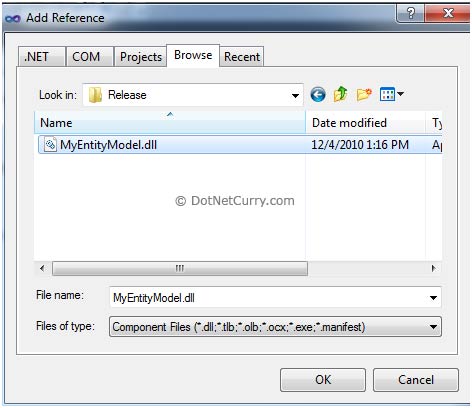
Step 2: Let us now add a reference to the model we created earlier, in this console application. Right click the project > Add Reference > Browse Projects Tab and browse to the MyEntityModel project. Go to the 'bin' folder > Release and select the MyEntityModel.dll as shown below. Click OK.
Also make sure you add a reference to the System.Data.Entity, this time using the .NET tab

Step 3: In this final step, our console application needs to have the information about the connection string which contains the metadata and details of the database connection.
Note: If you skip this step and directly query the model, you will get an error The specified named connection is either not found in the configuration, not intended to be used with the EntityClient provider, or not valid.
Now you can either create your own .config file in this project and add the connectionstring entry of your model or simply copy the App.config file that you created in the MyEntityModel project, in your Console App project. We will adopt the simpler way. Right click the project > Add Existing Item > Go to the MyEntityModel project and add the App.config file.
Step 4: Once the steps shown above are completed, you now need to query against the model in order to fetch data. We will write code that displays the CustomerId and CompanyName of customers who have placed orders after the 1st of January, 1998.
Open Program.cs and write the following query in your Main method

You should get the following output

That’s it! You have now created a model that can be used in multiple projects. Check my entire Entity Framework 4.0 article series over here.
The entire source code of this article can be downloaded over here
This article has been editorially reviewed by Suprotim Agarwal.
C# and .NET have been around for a very long time, but their constant growth means there’s always more to learn.
We at DotNetCurry are very excited to announce The Absolutely Awesome Book on C# and .NET. This is a 500 pages concise technical eBook available in PDF, ePub (iPad), and Mobi (Kindle).
Organized around concepts, this Book aims to provide a concise, yet solid foundation in C# and .NET, covering C# 6.0, C# 7.0 and .NET Core, with chapters on the latest .NET Core 3.0, .NET Standard and C# 8.0 (final release) too. Use these concepts to deepen your existing knowledge of C# and .NET, to have a solid grasp of the latest in C# and .NET OR to crack your next .NET Interview.
Click here to Explore the Table of Contents or Download Sample Chapters!
Was this article worth reading? Share it with fellow developers too. Thanks!
Suprotim Agarwal, MCSD, MCAD, MCDBA, MCSE, is the founder of
DotNetCurry,
DNC Magazine for Developers,
SQLServerCurry and
DevCurry. He has also authored a couple of books
51 Recipes using jQuery with ASP.NET Controls and
The Absolutely Awesome jQuery CookBook.
Suprotim has received the prestigious Microsoft MVP award for Sixteen consecutive years. In a professional capacity, he is the CEO of A2Z Knowledge Visuals Pvt Ltd, a digital group that offers Digital Marketing and Branding services to businesses, both in a start-up and enterprise environment.
Get in touch with him on Twitter @suprotimagarwal or at LinkedIn