Line of Business (LOB) Application using Silverlight 4, WCF 4, EF 4 and Commanding Architecture
Posted by: Mahesh Sabnis ,
on 12/15/2010,
in
Category Silverlight 2, 3, 4 and 5
Abstract: In this article, we will see how to create a sample LOB application using Silverlight 4.0. We will see how different application layers in Silverlight 4.0 can be isolated from each other. Since the UI is not associated with any compiled code, even if a layer is changed, it does not require any recompilation of the UI.
Recently while conducting a training at one of my clients, the participants and I had a good discussion about effective utilization of Silverlight 4.0 for Enterprise application development. The contents of this discussion motivated me to implement a small Line of Business (LOB) application which uses the latest technologies like Silverlight 4.0, WCF 4, Entity Framework (EF) and Commanding architecture.
For this article, I have also referred to the videos and documentation shown during the Silverlight FireStarter event which showcased some excellent presentations for developing Business applications using Silverlight. I have used the following architecture for my application:
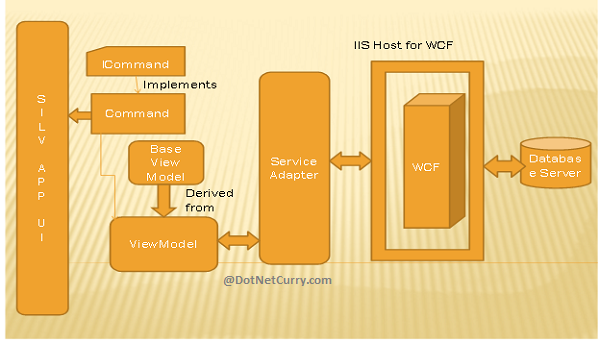
In the screenshot shown above, I have a WCF Service which is hosted on IIS 7.0. This service is consumed using a Silverlight 4.0 (SL4) application. Instead of creating the proxy of the WCF service in the SL4 code behind (MainPage.Xaml.Cs), I have created an intermediate class name ‘ServiceAdapter’ which consumes the proxy object for WCF service. The ‘BaseViewModel’ class is responsible for notification of the properties which are changed on/by the user interface. The ‘ViewModel’ class is inherited from ‘BaseViewModel’ class. This class is responsible for accepting input from UI and also provides values to display in UI controls using DataBinding. The ‘Command’ class implements ICommand interface which is responsible for handling actions performed on the user interface. The Silverlight UI contains UI elements which can be populated using Databinding and the properties exposed by ‘ViewModel’ class.
The advantage of the above architecture is the all layers are isolated from each other. E.g. UI does not have any knowledge about WCF service and the relation between UI and the ViewModel is managed using Command class.
Creating a WCF Service
In this step, we will create the WCF serviced. The service uses the ADO.NET Entity Framework.
Step 1: Open VS2010 and create a blank solution, name it as ‘SL4_BizApp’. In this solution, add a new WCF Service project, name it as ‘WCF_DataService’ targeting the .NET 4.0 Framework.
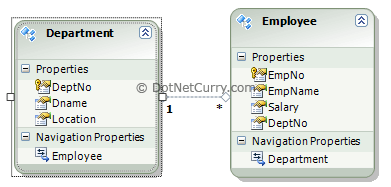
Step 2: In this WCF Project, add ADO.NET Entity Framework and name it as ‘CompanyEDMX.edmx’. The Designer will look similar to the one shown below:
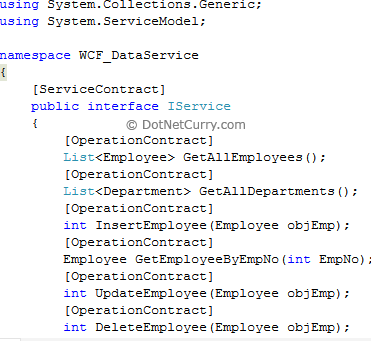
Step 3: Rename ‘IService1.cs’ to ‘IService.cs’ and add the following OperationContract in it
Step 4: Rename ‘Service1.svc’ to ‘WCF_Service.svc’ and implement the ‘IService’ interface in the service class as below:
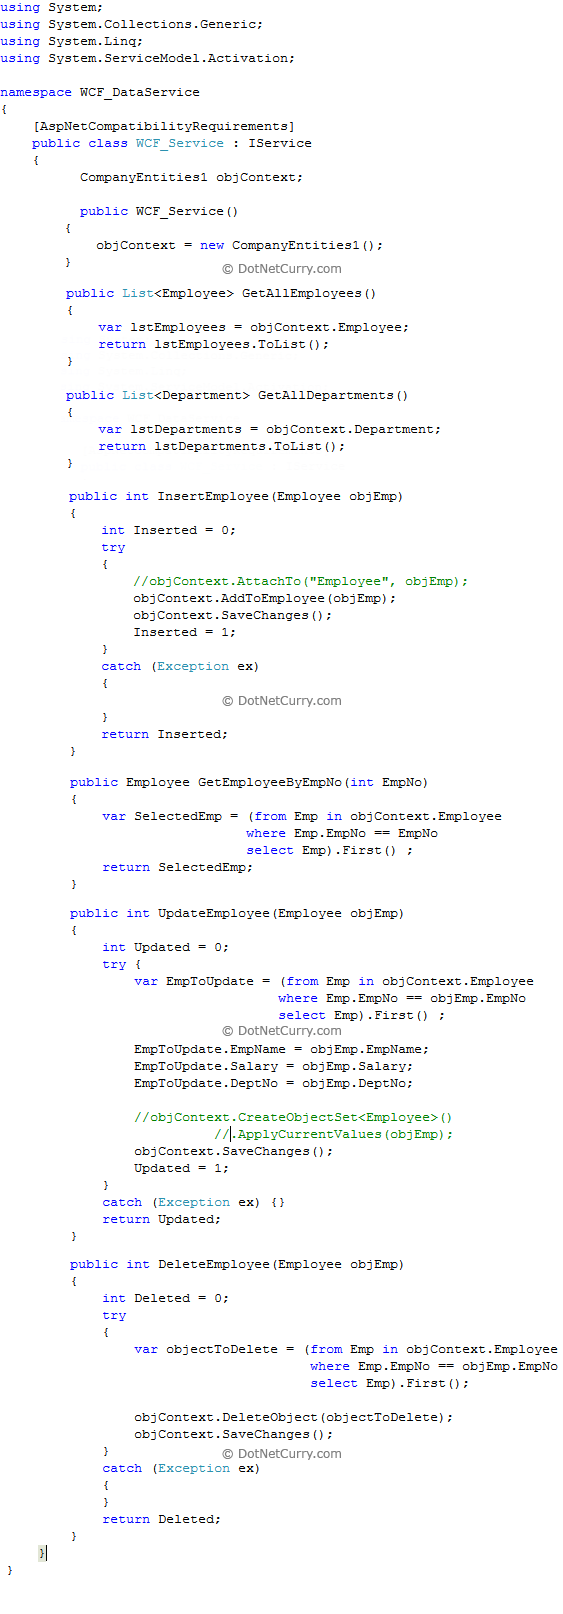
The above class makes call to ADO.NET Entity Framework and perform CRUD operations.
Step 5: Publish the service on IIS.
Creating the Silverlight Application
This is the client application which consumes the WCF service.
Step 1: In the solution created above, add a new Silverlight application, name it as ‘SL4_Biz_App’. Make sure that the Silverlight framework is targeted to Silverlight 4.0.
Step 2: In this application, add a ‘Service Reference’ to WCF service and name it as ‘MyRef’. In this project add following folders
-
ServiceAdapter: The container for the class consuming WCF service, defines proxy and makes asynchronous call to WCF service methods from the proxy.
-
CommandStore: The container for the class implementing ICommand interface. This class is responsible for handling actions from UI.
-
ViewModelStore: The container for the class defining methods making call to method from the ServiceAdapter and also defines public properties which will be bound with Silverlight UI using Databinding.
Step 3: In the ‘ServiceAdapter’ add a new class, name it as ‘ServiceAdapter’ and write the following code in it
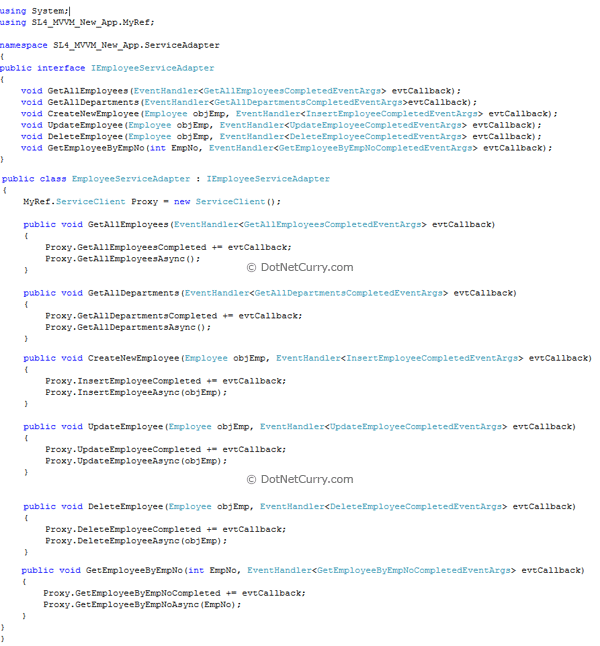
The above class defines a proxy for the WCF service ‘ServiceClient’ class consumed in Silverlight application, using service reference. This class implements ‘IEmployeeServiceAdapter’ interface. This interface defines methods which accepts ‘EventHandler<>’ parameter for collecting result of asynchronous method call.
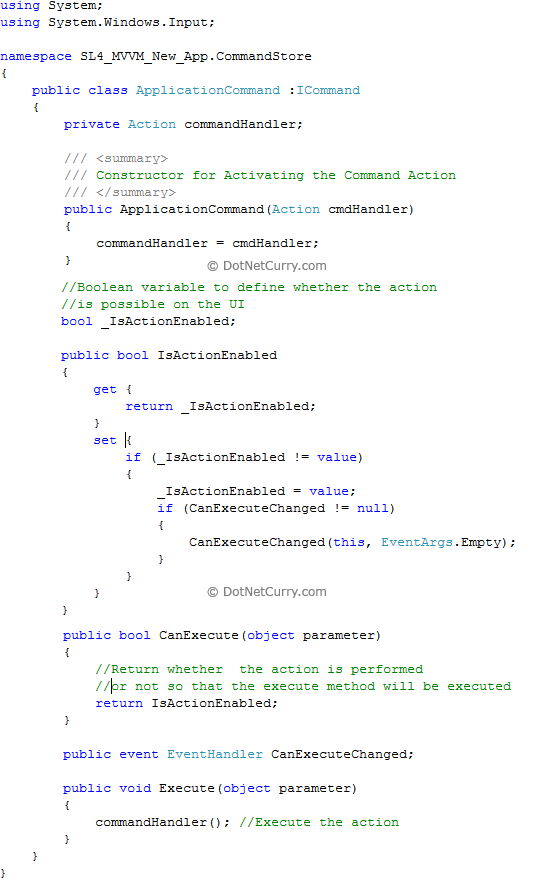
Step 4: In the ‘CommandStore’ folder, add a new class and name it as ‘ApplicationCommand’. This class defines processes for forwarding events occuring on the UI. This class implements ‘ICommand’ interface and defines ‘Action’ delegate used to encapsulate methods from the ViewModel class and execute them.
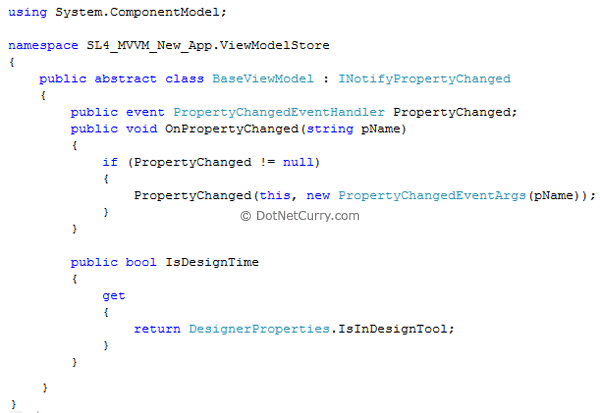
Step 5: In the ‘ViewModelStore’ folder, add two new classes and name them as ‘BaseViewModel’ and ‘MainPageEmployeeViewModel’. The ‘BaseViewModel’ class implements ‘INotifyPropertyChanged’ interface and defines OnPropertyChangded() method. This method raises the ‘PropertyChanged’ event from the ‘INotifyPropertyChanged’ interface. This class also defines public property named ‘IsDesignTime’ property which checks whether the element is to be populated at design time. The code for ‘BaseViewModel’ class is as below
The ‘MainPageEmployeeViewModel’ class inherits from ‘BaseViewModel’. This class defines an instance of the ‘ServiceAdapter’ class and makes call to its methods. This class also defines command class

The class defines ‘Employees’, ‘Departments’ and ‘SelectedEmployee’ properties which will be bound to UI elements for displaying app employees and departments respectivel, returned from the service. ‘SelectedEmployee’ property is used to display selected employee from the ‘Employees’ collection. This property is also used to accept Employee information for Insert, Update and Delete operations. Please read comments applied on the constructor. Every property defined in the above class calls ‘OnPropertyChanged()’ method from the base class. These properties notifies to and from UI for the data to be bound with UI elements.
Step 6: Open MainPage.xaml and write the following Xaml
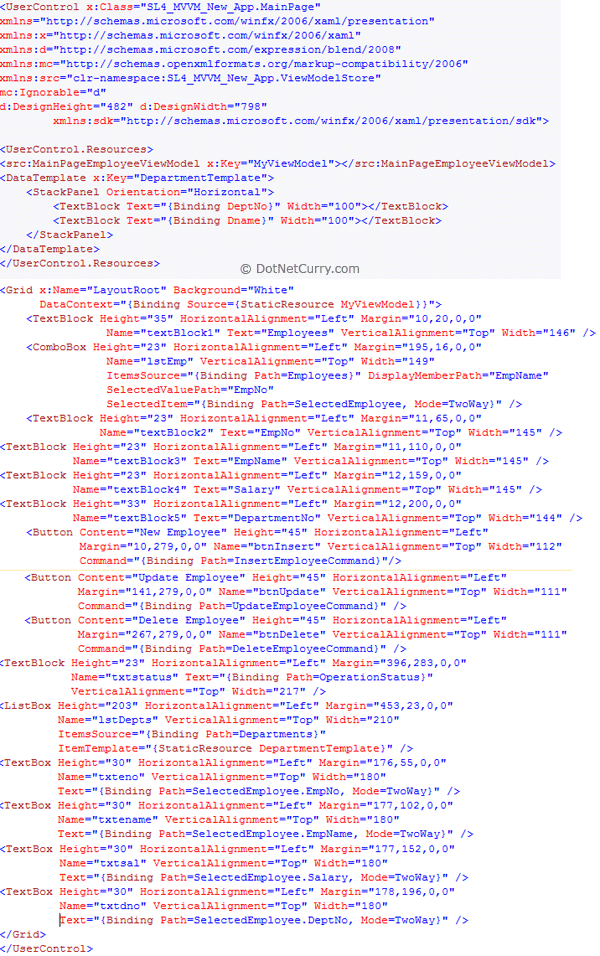
The above xaml defines an object of ‘MainPageEmployeeViewModel’ class. This object is bound to the Grid element. It also defines the DataTemplate for displaying Department details. The ComboBox is bound with the ‘Employees’ property of the ‘MainPageEmployeeViewModel’. The SelectedItem property is bound with the ‘SelectedEmployee’ property of the Employee type of the ‘MainPageEmployeeViewModel’ class. The Textboxes are bound with various properties of the ‘SelectedEmployee’ property type.
Note: Here you can use Databinding mechanism in VS2010 as shown below
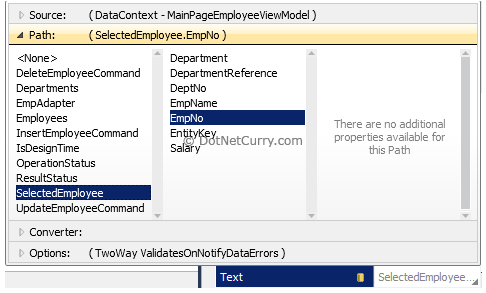
The ListBox ‘lstDepts’ is bound with the ‘Departments’ property of the ‘MainPageEmployeeViewModel’. The ‘Command’ property of buttons are bound with the Command properties defined in ‘MainPageEmployeeViewModel’ class. The design will be shown below:
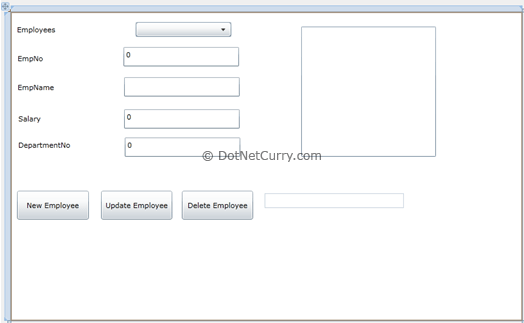
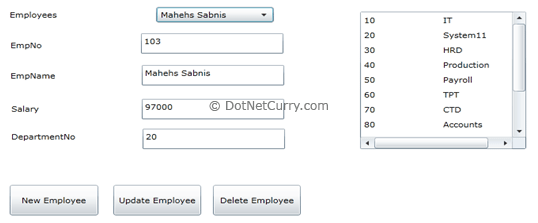
Step 7: Run the application and test the functionality for Insert, Update and Delete. The result will be as shown below, when a record is selected from the Employees combobox.
Note: When the page is loaded the ‘Update Employee’ and ‘Delete Employee’ buttons will be disabled. Once the record is selected from the combobox, they will be enabled.
Conclusion: Using this approach, different application layers in Silverlight 4.0 can be isolated from each other. Since the UI is not associated with any compiled code, even if any other layer is changed, it does not require any recompilation of the UI.
References: http://www.silverlight.net/learn/tutorials/silverlight-4/using-the-mvvm-pattern-in-silverlight-applications/
The entire source code of this article can be downloaded over here
This article has been editorially reviewed by Suprotim Agarwal.
C# and .NET have been around for a very long time, but their constant growth means there’s always more to learn.
We at DotNetCurry are very excited to announce The Absolutely Awesome Book on C# and .NET. This is a 500 pages concise technical eBook available in PDF, ePub (iPad), and Mobi (Kindle).
Organized around concepts, this Book aims to provide a concise, yet solid foundation in C# and .NET, covering C# 6.0, C# 7.0 and .NET Core, with chapters on the latest .NET Core 3.0, .NET Standard and C# 8.0 (final release) too. Use these concepts to deepen your existing knowledge of C# and .NET, to have a solid grasp of the latest in C# and .NET OR to crack your next .NET Interview.
Click here to Explore the Table of Contents or Download Sample Chapters!
Was this article worth reading? Share it with fellow developers too. Thanks!
Mahesh Sabnis is a DotNetCurry author and a Microsoft MVP having over two decades of experience in IT education and development. He is a Microsoft Certified Trainer (MCT) since 2005 and has conducted various Corporate Training programs for .NET Technologies (all versions), and Front-end technologies like Angular and React. Follow him on twitter @
maheshdotnet or connect with him on
LinkedIn