Bind Entity Framework 4 Model to ASP.NET GridView
Posted by: Suprotim Agarwal ,
on 12/27/2011,
in
Category Entity Framework
Abstract: In this article we will see how to bind an Entity Framework model that has been created in a different project, to an ASP.NET GridView.
If you have been following my Entity Framework 4.0 series, we have covered some basics of the What, Why and How of Entity Framework 4.0 and also performed some CRUD operations with it. In this article, we will see how to bind an Entity Data Model to the ASP.NET GridView and display data.
There have been a couple of articles written by others in the past that shows how to bind an Entity Model with an ASP.NET GridView and other controls. Although these articles are valid in their own context, however they do not show you how to create an Entity model independent of the ASP.NET project. What’s different about this article is that we will use a model that has been created separately, i.e. in a different project and then bind this model to an ASP.NET GridView. I will use the same model created in one of my previous articles Create an Entity Framework Model and Use it in Multiple Projects. So let’s get started.
Step 1: Create a Blank ASP.NET Empty Web Site. You can also create the default ASP.NET Web Site, but since it comes with additional files and code, I will go with the blank ASP.NET site option. Make sure .NET Framework 4.0 is selected as the framework

Once the project is created, right click the project in the Solution Explorer > Add New Item > Web Form > OK.
Step 2: We now have to add the Entity Model that we created earlier. Once you have downloaded the source code, Right click your project in the Solution Explorer > Add Reference > Go to the Browse Tab and browse to the MyEntityModel.dll in the debug/release folder of the project that we created earlier. Adding a reference to the project gives you access to the classes in that project
Step 3: The next step is to add the connection string used in the model. Open the project with the Entity model we created earlier and copy the connecting string from the App.Config file to the web.config, as shown below:

Copying the connection string gives us the ability to access the metadata of the Model as well as the connection to the data source, i.e. the Northwind database.
Step 4: Having added a reference to the Entity Model and setting the connection string, we are now ready to use the Entity Model in our ASP.NET applicaton. To do so, drag and drop a GridView and EntityDataSource in the Default.aspx page.
Click the smart tag of the EntityDataSource > click on Configure Data Source and a wizard pops up. Choose the ‘Named Connection’ radio button and select ‘NorthwindEntities’ from the dropdown, as shown below. Click Next.

In the ‘Configure Data Selection’ form, choose ‘Customers’ in the EntityTypeName and EntityTypeFilter fields. Select some columns from the Customers table as shown below and click Finish

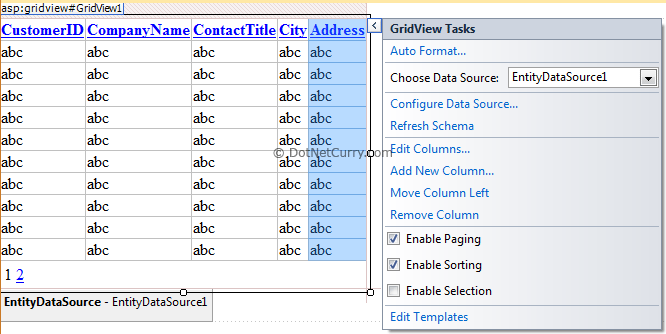
Step 5: With our EntityDataSource ready, you just have to configure the GridView to use the EntityDataSource. Click on the smart tag of the GridView and choose the EntityDataSource as the data source. Also enable paging and sorting as shown below.
Now if you run the application now, you will get the following error:
For the EntityDataSource, if the query specifies a projection and paging is enabled, a sort expression must be defined. Either set the OrderBy property or set AutoGenerateOrderByClause to true.
The MSDN documentation describes the reason as “When the AutoGenerateOrderByClause property of the EntityDataSource control is set to true, the control automatically generates an ORDER BY clause from the parameter in the ParameterCollection assigned to the OrderByParameters property. This eliminates the need to explicitly assign an ORDER BY clause to the OrderBy property”
In order to make the sample work, we have to add the AutoGenerateOrderByClause to the EntityDataSouce. Make the following changes in the EntityDataSource, as shown below:

The code shown above automatically generates the ORDER BY clause and uses the DefaultValue attribute of the Parameter element to set the value of the parameter.
That’s it. Run the application and you now have a GridView bound to your independent Entity Model.

The entire source code of this article can be downloaded over here.
This article has been editorially reviewed by Suprotim Agarwal.
C# and .NET have been around for a very long time, but their constant growth means there’s always more to learn.
We at DotNetCurry are very excited to announce The Absolutely Awesome Book on C# and .NET. This is a 500 pages concise technical eBook available in PDF, ePub (iPad), and Mobi (Kindle).
Organized around concepts, this Book aims to provide a concise, yet solid foundation in C# and .NET, covering C# 6.0, C# 7.0 and .NET Core, with chapters on the latest .NET Core 3.0, .NET Standard and C# 8.0 (final release) too. Use these concepts to deepen your existing knowledge of C# and .NET, to have a solid grasp of the latest in C# and .NET OR to crack your next .NET Interview.
Click here to Explore the Table of Contents or Download Sample Chapters!
Was this article worth reading? Share it with fellow developers too. Thanks!
Suprotim Agarwal, MCSD, MCAD, MCDBA, MCSE, is the founder of
DotNetCurry,
DNC Magazine for Developers,
SQLServerCurry and
DevCurry. He has also authored a couple of books
51 Recipes using jQuery with ASP.NET Controls and
The Absolutely Awesome jQuery CookBook.
Suprotim has received the prestigious Microsoft MVP award for Sixteen consecutive years. In a professional capacity, he is the CEO of A2Z Knowledge Visuals Pvt Ltd, a digital group that offers Digital Marketing and Branding services to businesses, both in a start-up and enterprise environment.
Get in touch with him on Twitter @suprotimagarwal or at LinkedIn