Localize a Silverlight 4 Application
Posted by: Suprotim Agarwal ,
on 1/28/2011,
in
Category Silverlight 2, 3, 4 and 5
Abstract: In this article, I will demonstrate how to localize a Silverlight 4 application. In simple words, localization is the customization of applications for a given culture or locale.
In this article, I will demonstrate how to localize a Silverlight application. In simple words, localization is the customization of applications for a given culture or locale. If you have been doing ASP.NET development, you probably are already familiar with localizing applications. The process of localizing a Silverlight application is quite similar, i.e. using Resource files. You create a resource file for each culture or language your application plans to support and Silverlight will use the CurrentUICulture of the UI thread to decide which resource to use. Let us see the steps in detail.
Note: Whenever I talk to developers about localization, they often refer to localization as translation of text in different languages. Although that’s true, localization is much more than that. Depending on the culture, you can display icons, images, flow of text (right to left or vice-versa), audio and much more, for a specific culture or language that your application supports.
Step 1: Create a new Silverlight project and call it ‘SliverlightLocalize’. Drag and drop a textbox from the Toolbox to the Silverlight designer.
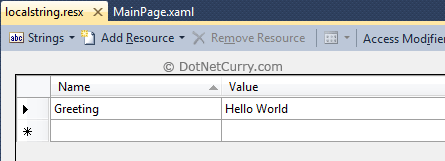
Step 2: Right click your Silverlight project > Add > New Item > Select ‘Resources File’ and rename it as localstring.resx. In the resource file, add a Name and Value as shown below

Also make sure the access modifier combo box says ‘Public’.

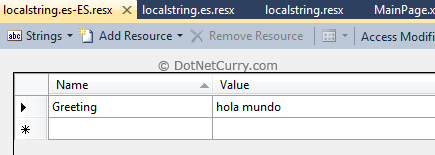
Step 3: Let us add support for the Spanish language in our application. Make a copy of this resource file by copying it from the project in the Solution Explorer and pasting it back ‘twice’ inside the project. Rename it to localstring.es.resx and localstring.es-ES.resx. What we have done is created an invariant resource file (es), as well as a culture-specific resource file(es-ES). This is a good practice often referred to as the fallback culture practice and you should adopt this for every language/culture you support.
Now type the Spanish translation for Hello World in both the files as shown below

Step 4: Copy all the three resource files in the Properties folder of your project (you can also use a separate folder). The structure should look similar to the following

Step 5: Now that the resource files are set, let us bring them to use. Open MainPage.xaml (where you added the textbox) and add a namespace that points to the local namespace of the resource file.

Now use the localized resource string as a static resource

Now write the following mark up in the TextBox control to data-bind to the static resource

Step 6: If you are an ASP.NET developer, you may be tempted to run the application since you have done all that’s needed to localize the application. However in Silverlight, there are some additional steps. You need to update your Silverlight project to set the <SupportedCultures> attribute. Right click on the project and choose ‘Unload project’. Right click the project again and choose ‘Edit SilverlightLocalize.csproj’. This brings up the metadata. Look for the <SupportedCultures> tag and add modify it to add the Spanish culture to it.

Note: If you are supporting multiple cultures, add all of them, separated with a comma
Now right click on your project and say ‘Reload Project’.
You are all set. Run the application. Got an error? This is due to a bug in how Visual Studio handles the resource constructor. You may encounter an error that says “No matching constructor found on type”

This error occurs since the resource file class constructor is still set to ‘internal’. So open localstring.Designer.cs and change the constructor access modifier to ‘public’.

Note: Make sure that every time you open the resource designer to add new Name/Value entries, change the constructor access modifier to ‘public’. I told you, its buggy and annoying too.
Run the application again. You should see ‘Hello World’ if the culture on your machine is not set to Spanish. On my machine, the culture set is English.

The resource file to be used, is determined by the CurrentUICulture which in turn is based on the culture set on the user’s machine. So to test the Spanish resource file, you can easily override this setting using the following code in the App.xaml constructor:

Now if you run the application, you will see the text in Spanish.

I hope you liked the article and I thank you for viewing it.
The entire source code of this article can be downloaded over here
This article has been editorially reviewed by Suprotim Agarwal.
C# and .NET have been around for a very long time, but their constant growth means there’s always more to learn.
We at DotNetCurry are very excited to announce The Absolutely Awesome Book on C# and .NET. This is a 500 pages concise technical eBook available in PDF, ePub (iPad), and Mobi (Kindle).
Organized around concepts, this Book aims to provide a concise, yet solid foundation in C# and .NET, covering C# 6.0, C# 7.0 and .NET Core, with chapters on the latest .NET Core 3.0, .NET Standard and C# 8.0 (final release) too. Use these concepts to deepen your existing knowledge of C# and .NET, to have a solid grasp of the latest in C# and .NET OR to crack your next .NET Interview.
Click here to Explore the Table of Contents or Download Sample Chapters!
Was this article worth reading? Share it with fellow developers too. Thanks!
Suprotim Agarwal, MCSD, MCAD, MCDBA, MCSE, is the founder of
DotNetCurry,
DNC Magazine for Developers,
SQLServerCurry and
DevCurry. He has also authored a couple of books
51 Recipes using jQuery with ASP.NET Controls and
The Absolutely Awesome jQuery CookBook.
Suprotim received the prestigious Microsoft MVP award for 17 consecutive years, until he resigned from the program in 2025. In a professional capacity, he is the CEO of A2Z Knowledge Visuals Pvt Ltd, a digital group that offers Digital Marketing and Branding services to businesses, both in a start-up and enterprise environment.
Get in touch with him on Twitter @suprotimagarwal or at LinkedIn