Coded UI Test (CUIT) – Variations and Editing with Visual Studio 2010
Posted by: Gouri Sohoni ,
on 6/1/2011,
in
Category Visual Studio
Abstract: In this article we will explore advanced features of CUIT like adding multiple UI maps, re-using code, how the CUIT Editor helps and I will also list the best practices of using CUIT in VS 2010.
In our previous articles, we have discussed How CUIT can be Created By Recording Actions and secondly By using Existing Action Recordings. In this article we will explore advanced features of CUIT like adding multiple UI maps, re-using code, how the CUIT Editor helps and I will also list the best practices of using CUIT in VS 2010.
Multiple UI Maps
While generating code using CUIT, a new class is created in the UIMap for each object that has user interaction. So if there are a large number of objects, the UIMap will grow in size and will become very bulky. Similarly if multiple users are creating tests, the application will become very large and difficult to handle as there is a single UIMap associated with each test project by default. In order to overcome this issue, multiple UI maps can be created. Splitting the UIMap will provide following benefits:
It is recommended to create multiple UI maps if the application under test is a complex one with lots of User controls in it.
Adding a UI Map is a very straight forward process as listed in the steps below:
Step 1: Using Solution Explorer, create a folder under which multiple UI maps will be added named UIMaps
Step 2: Now right click on this folder and select Add > New Item. Select Coded UI Test Map from the dialog of adding a new item
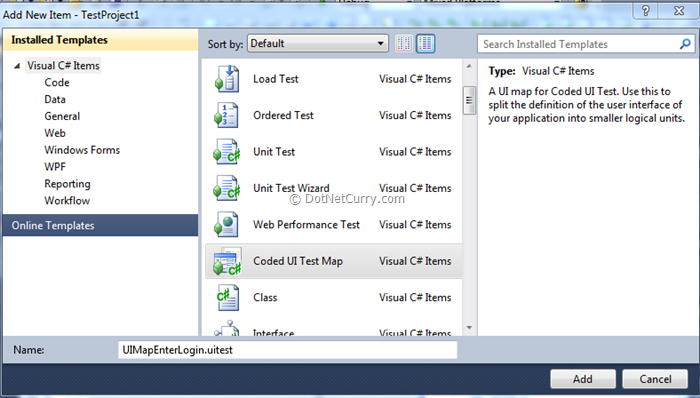
Step 3: The CUIT Builder is automatically started when a new UI Map is added. Record the actions, add assertions as required and you can continue adding as many UI Maps as required.
Many a times, certain features of the application are repeated in various UI Maps. Instead of recording this feature separately with every UI Map, it can be put in the default UI Map and the method can be called from multiple places by re-using the code. Remember that the calling methods need to be specifically taken care of, in case you are adding multiple UI maps. The calling of the method will be automatically handled for the methods which are in the default UI Map.
Important: Do not modify the designer file for UI Map (UIMap.Designer.cs) as it gets regenerated every time from the XML file. In order to write custom code, change the partial class (UIMap.cs) instead.
Re-using the code
Any code which can be repeatedly used, can be put in a common method. This method can be called from other test methods to re-use the existing code. The recording of authentication can be such an example.
CUIT Builder Best Practices
-
Use CUIT Builder as far as possible.
-
Never modify the designer file for UI Map
-
Keep a modular approach for recording test methods. Use logical break in a method recording so that re-cording will remain limited.
-
Use meaningful method names for future usage
-
Create separate UI Map for different modules in the application
-
Create any assertion by using CUIT Builder so that the assert method also gets added
-
When the User Interface changes, certain features like change in color or position do not require re-cording.
-
When you need to re-record, use the same name so that it will overwrite the previous method.
The CUIT Editor gets installed with Feature Pack 2 and can be downloaded from this site and is available for MSDN subscribers. You need to first install quick fix named KB2403277. Once the feature pack is installed, the CUIT editor will be available for usage by selecting the UIMap.UITest and later selecting Open or double clicking on it. The following menu is shown after right click
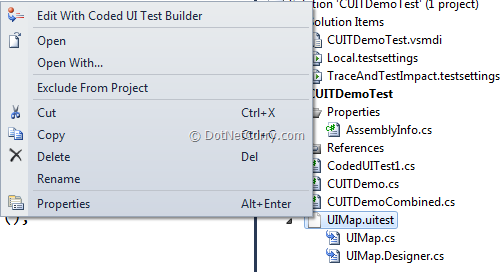
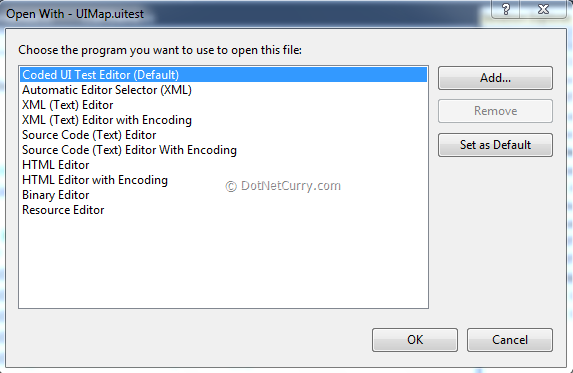
If you select ‘Open with Option’, then following screen is displayed where the default one is with the CUIT Editor
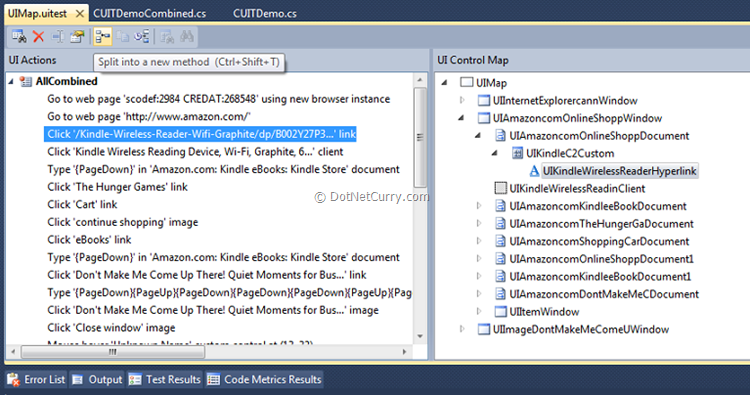
With the editor, the various icons you can see are for Find, Delete, Rename, Properties, Split into a new method, Move Code, Insert Delay, Locate particular UI control and Locate All.
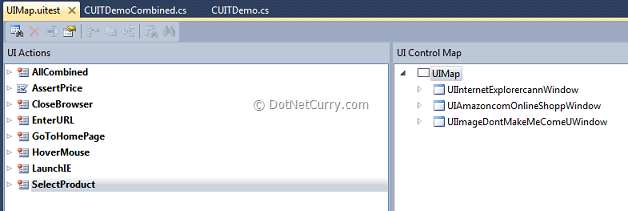
With the CUIT Editor, you can easily modify the tests you have already created. It provides us choices like find, delete, rename, split, move code and insert delay. This is the place where providing meaningful names for the methods you have created, will come handy. You can easily spot the required methods to be changed with the suitable names. Shown below is the first view of the CUIT Editor. You can see that many of the controls are greyed currently.
As you can observe in the image shown below, all the different actions are clubbed in a single method which can be split across. Splitting various actions into multiple methods will provide a modular approach which in turn will help in maintenance. Having a modular approach also reduces the actions to be re-recorded.
We can introduce delay in seconds with the help of CUIT Editor as shown
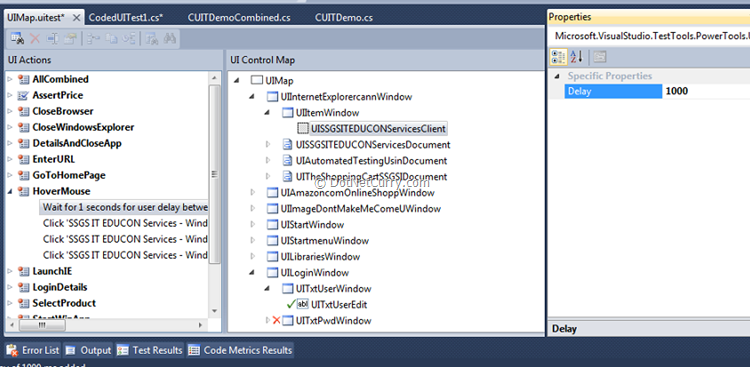
We can set the default setting for delay as 1000 milliseconds which can be customized as per our requirement. The recorded methods can also be used for finding out a UI control. You can view the recording of a Windows Application and the control finding combined, with following screen
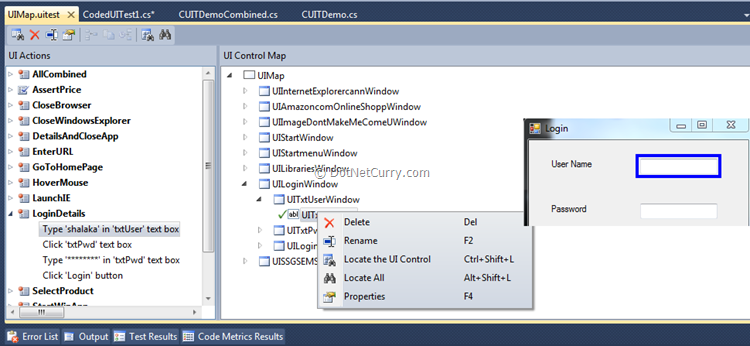
The textbox which is found, can be seen as highlighted in the screenshot.
Conclusion
In this article, we discussed certain variations with the Coded UI Test in terms of reusing code, adding multiple UI maps and also how the CUIT editor helps. In the next article, we will discuss how a normal Coded UI Test can be converted to Data Driven CUIT.
This article has been editorially reviewed by Suprotim Agarwal.
C# and .NET have been around for a very long time, but their constant growth means there’s always more to learn.
We at DotNetCurry are very excited to announce The Absolutely Awesome Book on C# and .NET. This is a 500 pages concise technical eBook available in PDF, ePub (iPad), and Mobi (Kindle).
Organized around concepts, this Book aims to provide a concise, yet solid foundation in C# and .NET, covering C# 6.0, C# 7.0 and .NET Core, with chapters on the latest .NET Core 3.0, .NET Standard and C# 8.0 (final release) too. Use these concepts to deepen your existing knowledge of C# and .NET, to have a solid grasp of the latest in C# and .NET OR to crack your next .NET Interview.
Click here to Explore the Table of Contents or Download Sample Chapters!
Was this article worth reading? Share it with fellow developers too. Thanks!
Gouri is a Trainer and Consultant on Azure DevOps and Azure Development. She has an experience of three decades in software training and consulting. She is a graduate from Pune University and PGDCA from Pune University. Gouri is a Microsoft Most Valuable Professional (MVP) - Developer Technologies (Azure DevOps), Microsoft Certified Trainer (MCT) and a Microsoft Certified Azure DevOps Engineer Expert. She has conducted over 150 corporate trainings on various Microsoft technologies. She is a speaker with Pune User Group and has conducted sessions on Azure DevOps, SQL Server Business Intelligence and Mobile Application Development. Gouri has written more than 75 articles on Azure DevOps, TFS, SQL Server Business Intelligence and SQL Azure which are published on
www.sqlservercurry.com and
www.dotnetcurry.com. You can connect with her on
LinkedIn.