We have come to the final part of creating a simple Project Tracking Website using AngularJS and ASP.NET WebAPI series in which we saw how to consume ASP.NET WebAPIs in AngularJS and also explored how to use various components of AngularJS to create an end-to-end app. This AngularJS series has been reviewed by Ravi Kiran.
Before starting with our article, we will first recap what we have covered so far in this series:
Editorial Note: In the near future, we will be adding two more articles to this series – Validation in AngularJS & Testing different components in AngularJS.
Today we will look at how to perform Insert/Update/Delete operations in our Project tracking website. For this we will first design the Insert screens. We will add the following insert forms into respective folders –
- ProjectInsert.html
- UserStoryInsert.html
- EmployeeInsert.html
- ProjectTaskInsert.html
Write the following code for ProjectInsert.html. Complete the other forms similar to the ProjectInsert.html form. Code for ProjectInsert.html –
<form class="form-horizontal" name="insertEmployeeForm">
    <fieldset>
        <legend>Insert New Project</legend>
        <div class="form-group">
            <label for="projectName" class="col-lg-2 control-label">Project Name</label>
            <div class="col-lg-10">
                <input type="text" required class="form-control" ng-model="project.projectName" placeholder="Project Name">
            </div>
        </div>
        <div class="form-group">
            <label for="startDate" class="col-lg-2 control-label">Start Date</label>
            <div class="col-lg-10">
                <input type="date" required class="form-control" ng-model="project.startDate">
            </div>
        </div>
        <div class="form-group">
            <label for="endDate" class="col-lg-2 control-label">End Date</label>
            <div class="col-lg-10">
                <input type="date" required class="form-control" ng-model="project.endDate">
            </div>
        </div>
        <div class="form-group">
            <label for="clientName" class="col-lg-2 control-label">Client Name</label>
            <div class="col-lg-10">
                <input type="text" required class="form-control" ng-model="project.clientName" placeholder="Client Name">
            </div>
        </div>
        <div class="form-group">
            <div class="col-lg-10 col-lg-offset-2">
                <a href="#Projects" class="btn btn-default">Cancel</a>
                <a href="#Projects" ng-click="InsertProject(project)" class="btn btn-primary">Insert Employee</a>
            </div>
        </div>
    </fieldset>
</form>
Take a closer look at the form. It uses the ng-model directive which we have used during our employee search. This directive allows to push the data from view to model which is declared in our controller. Now it’s time to create a method under our ProjectService.js file which will make a call to the ASP.NET Web API Post method to insert data into our Projects table. The code is shown below –
(function () {
    var projectService = function ($http,$log) {
        var projects = function () {
            return $http.get("http://localhost:2464/api/ptprojects")
                        .then(function (serviceResp) {
                            return serviceResp.data;
                        });
        };
        var insertProject = function (project) {
            return $http.post("http://localhost:2464/api/ptprojects", project)
            .then(function ()
            {
                $log.info("Insert Successful");
                return;
            });
        };
        return {
            projects: projects,
            insertProject:insertProject
        };
    };
    var module = angular.module("ProjectTrackingModule");
    module.factory("projectService", projectService);
}());
In the above JavaScript, we have declared insertProject() function which makes a call to the POST method of our Web API. The function takes project as a parameter which will be send via view. We are then making our function available to the controllers and directives. We are also using AngularJS $log service to log the successful calls to the service.
Now it’s time to call the insertProject() function into our controller. Open ProjectsController.js file and write the following code in the same –
(function () {
    var ProjectsController = function ($scope, projectService,$log) {
        var projects = function (data) {
            $scope.Projects = data;
        };
        var project = {
            projectID: null,
            projectName: null,
            startDate: null,
            endDate: null,
            clientName: null
        };
        $scope.project = project;
        var errorDetails = function (serviceResp) {
            $scope.Error = "Something went wrong ??";
        };
        $scope.insertProject=function (project) {
            projectService.insertProject(project).then(projectService.projects().then(projects, errorDetails));

        };
        projectService.projects().then(projects, errorDetails);
        $scope.Title = "Project Details Page";
    };
    app.controller("ProjectsController", ProjectsController);
}());
In the controller code, we have declared project object as a model which we are exposing it to our view. We have created a method insertProject() which gives a call to our service method by passing project object as a parameter. Now we will add the route for our view as shown here:
.when("/NewProject", {
            templateUrl: "ProjectManagement/ProjectInsert.html",
            controller: "ProjectsController"
})
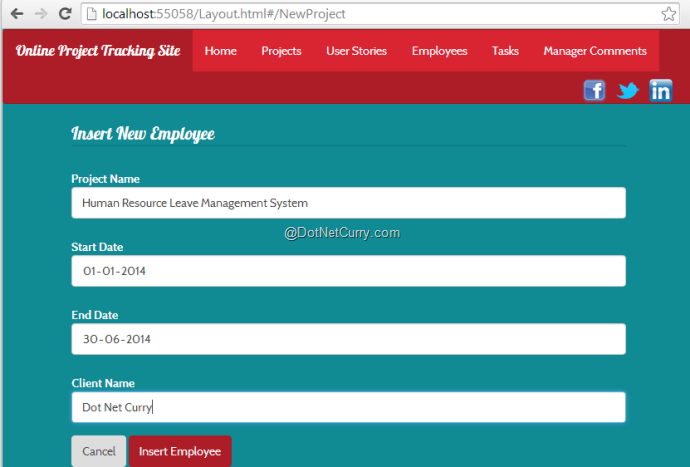
That’s all. Now run your project and try inserting some data. You should see a similar output for insert screen as shown here:

Update Operation
Now we will perform an Update operation on our Projects table. We will first add a View with the name ProjectModify.html and add the following code in it:
<form class="form-horizontal" name="modifyProjectForm" ng-init="init()">
    <fieldset>
        <legend>Modify Project</legend>
        <div class="form-group">
            <label for="projectName" class="col-lg-2 control-label">Project ID</label>
            <div class="col-lg-10">
                <input type="text" required class="form-control" ng-model="existingProject.projectID" readonly>
            </div>
        </div>
        <div class="form-group">
            <label for="projectName" class="col-lg-2 control-label">Project Name</label>
            <div class="col-lg-10">
                <input type="text" required class="form-control" ng-model="existingProject.projectName" placeholder="Project Name">
            </div>
        </div>
        <div class="form-group">
            <label for="startDate" class="col-lg-2 control-label">Start Date</label>
            <div class="col-lg-10">
                <input type="date" required class="form-control" ng-model="existingProject.startDate">
            </div>
        </div>
        <div class="form-group">
            <label for="endDate" class="col-lg-2 control-label">End Date</label>
            <div class="col-lg-10">
                <input type="date" required class="form-control" ng-model="existingProject.endDate">
            </div>
        </div>
        <div class="form-group">
            <label for="clientName" class="col-lg-2 control-label">Client Name</label>
            <div class="col-lg-10">
                <input type="text" required class="form-control" ng-model="existingProject.clientName" placeholder="Client Name">
            </div>
        </div>
        <div class="form-group">
            <div class="col-lg-10 col-lg-offset-2">
                <a href="#Projects" class="btn btn-default">Cancel</a>
                <a href="#Projects" ng-click="ModifyProject(existingProject)" class="btn btn-primary">Update Employee</a>
            </div>
        </div>
    </fieldset>
</form>
Now we will modify the ProjectsService.js file by adding the singleProject() and modifyProject() methods. The singleProject() method will access the Project details based on the ProjectID parameter. After fetching the existing project, we will modify the same using modifyProject(). The code is as shown here:
var singleProject = function (id) {
    return $http.get("http://localhost:2464/api/ptprojects/"+id)
                .then(function (serviceResp) {
                    return serviceResp.data;
                });
};
var modifyProject = function (project) {
    return $http.put("http://localhost:2464/api/ptprojects", project)
    .then(function () {
        $log.info("Update Successful");
        return;
    });
};

return {
    projects: projects,
    insertProject: insertProject,
    modifyProject: modifyProject
};
Now we will add a route to this function with parameter. Open app.js file and add a when() method as shown here:
.when("/ModifyProject/:projectID", {
    templateUrl: "ProjectManagement/ProjectModify.html",
    controller: "ProjectsController"
})
The first parameter which is “/ModifyProject/:projectID” is specifying the navigation path with URL parameter. The parameters are specified with the help of :parameter name syntax. We will be able to access value of this parameter in our controller using the $routeParams service of ngRoute module. Let’s see how the controller code will look like –
ProjectsController.js –
(function () {
    var ProjectsController = function ($scope, projectService,$log,$routeParams) {
        var projects = function (data) {
            $scope.Projects = data;
        };
        var singleProject = function (data) {
            $scope.existingProject = data;
            $log.info(data);
        };
        $scope.init = function () {
            projectService.singleProject($routeParams.projectID).then(singleProject, errorDetails);
        };
        var project = {
            projectID: null,
            projectName: null,
            startDate: null,
            endDate: null,
            clientName: null
        };
        $scope.project = project;
        projectService.projects().then(projects, errorDetails);

        var errorDetails = function (serviceResp) {
            $scope.Error = "Something went wrong ??";
        };
        $scope.InsertProject=function (project) {
            projectService.insertProject(project).then(projectService.projects().then(projects, errorDetails));
        };
        $scope.ModifyProject = function (existingProject) {
            $log.info(existingProject);
            projectService.modifyProject(existingProject).then(projectService.projects().then(projects, errorDetails));
        };
        $scope.DeleteProject = function (project) {
            $log.info(project);
            projectService.deleteProject(project).then(projectService.projects().then(projects, errorDetails));
        };

        $scope.Title = "Project Details Page";
    };
    app.controller("ProjectsController", ProjectsController);
}());
In the above controller, we are injecting the $routeParams object using which we will be able to get the parameter values from the URL. We are passing the value received from $routeParams object to singleProject method defined in the service. Then this method will give a call to Init() function which is adding the data into our model existingProject. We are using this model into our ProjectModify.html view using ng-init directive. Now to call the view and pass the parameter value via URL, we will modify the ProjectDetails.html page by replacing button “Modify” as shown below –
<a href="#ModifyProject/{{proj.projectID}}" class="btn btn-info">Modify</a>
This link button will call a view using ModifyProject route with the parameter projectID which is coming from our Projects collection. Look at the entire source code of ProjectDetails.html page for more details.
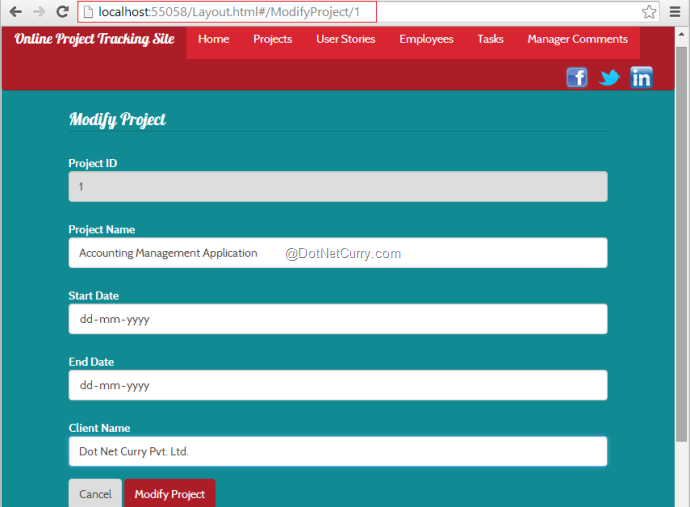
Now run the project and click on Modify button. It will show you the Project ID in the URL and the record into the ProjectModify.html page as shown here:

Click on Modify Project button and see the changes in the database. I am leaving the Delete operation as an exercise. Repeat these steps to perform the Insert/Update/Delete operations in all our the screens.
I hope you enjoyed this article where we saw how to perform Insert/Update operations using ASP.NET Web APIs in AngularJS.
Download the entire source code of this article (Github)
This article has been editorially reviewed by Suprotim Agarwal.
C# and .NET have been around for a very long time, but their constant growth means there’s always more to learn.
We at DotNetCurry are very excited to announce The Absolutely Awesome Book on C# and .NET. This is a 500 pages concise technical eBook available in PDF, ePub (iPad), and Mobi (Kindle).
Organized around concepts, this Book aims to provide a concise, yet solid foundation in C# and .NET, covering C# 6.0, C# 7.0 and .NET Core, with chapters on the latest .NET Core 3.0, .NET Standard and C# 8.0 (final release) too. Use these concepts to deepen your existing knowledge of C# and .NET, to have a solid grasp of the latest in C# and .NET OR to crack your next .NET Interview.
Click here to Explore the Table of Contents or Download Sample Chapters!
Was this article worth reading? Share it with fellow developers too. Thanks!
Pravinkumar, works as a freelance trainer and consultant on Microsoft Technologies. He is having over 10 years of experience in IT and is also a Microsoft Certified Trainer(MCT). He has conducted various corporate trainings on all versions of .NET Technologies including .NET, SharePoint Server, Microsoft SQL Server, Silverlight, ASP.NET, Microsoft PerformancePoint Server 2007 (Monitoring). He is passionate about learning new technologies from Microsoft. You can contact Pravinkumar at dabade[dot]pravinkumar [attherate] gmail[dot]com