Angular is a framework for building client applications in HTML and JavaScript, or by using a language like TypeScript, which ultimately compiles to JavaScript.
In this tutorial, we will build an Angular 4 application using TypeScript.
This article is published from the DNC Magazine for Developers and Architects. Download or Subscribe to this Free magazine [PDF] to access all previous, current and upcoming editions.
A brief Angular 4 History
So far, three major Angular versions have been released – Angular v1.x (a.k.a AngularJS), Angular 2 and the newly released Angular 4 (also known as Angular). AngularJS has had a few major releases of its own with v1.1, v1.2 and so on, but let us stick with v1.x for all purposes of discussion.
Angular v1.x and v2 are quite different in terms of architecture.
While Angular v1.x (also known as AngularJS) was based on an MVC architecture, Angular 2 is based on a component/services architecture. Considering Angular was moving from MV* (Model View Whatever) pattern to components focused approach, the framework features were very different from each other and caused many application developers to rewrite a major portion of their code base.
However, Angular v2 to v4 is a very different story. It is a rather progressive enhancement. A majority of changes are non-breaking.
Angular 4 was released on 23rd March ’17.
What happened to Angular v3?
MonoRepo: Angular 2 has been a single repository, with individual packages downloadable through npm with the @angular/package-name convention. For example @angular/core, @angular/http, @angular/router so on.
Considering this approach, it was important to have a consistent version numbering among various packages. Hence, the Angular team skipped a major version 3. It was to keep up the framework with Angular Router’s version. Doing so will help avoid confusions with certain parts of the framework on version 4, while the others on version 3.
Angular 4 Enhancements
Consider the following enhancements in Angular v4,
- This release has considerable improvements in bundle size. Some have reported up to 60% reduction in Angular bundles’ file size
- The ngc, AOT compiler for Angular and TypeScript is much faster
- Angular 4 is compatible with TypeScript’s newer versions 2.1 and 2.2. TypeScript release helps with better type checking and enhanced IDE features for Visual Studio Code. The changes helped the IDE detect missing imports, removing unused declarations, unintentionally missing “this” operator etc.
This article and the code sample demonstrates an Angular 4 application using TypeScript and Bootstrap 4. Please note that Bootstrap 4 is an alpha release at the time of writing this article.
Editorial Note: This article assumes you are familiar with developing applications using Angular. If you are new to Angular, check some of our Angular tutorials. If you are new to TypeScript, read our TypeScript Tutorial
Getting Started with Angular 4 project - SetUp
Angular CLI
Angular CLI is a preferred way to get started with an Angular project (v2.x and above). It not only saves time, but also makes it easy to maintain the code base during the course of the project, with features to add additional components, services, routing etc. Refer to the appendix at the end of this article for an introduction to Angular CLI.
Get Angular CLI at https://cli.angular.io/ .
Angular CLI latest version
Since the CLI project is available as an NPM package, so you can install angular-cli globally on your system by running the following command:
npm install -g angular-cli@latest
However if you already have Angular CLI installed and want to upgrade to the latest version of Angular CLI, run the following commands:
npm uninstall -g angular-cli
npm cache clean
npm install -g angular-cli@latest
To create a new project with Angular CLI, run the following command
ng new DinoExplorer
DinoExplorer is the name of the new project. You may optionally use --routing parameter to add routing to the Angular project.
However, if you prefer to configure and install Angular and Webpack manually, refer to the Get started with Angular 4 (manual way) section in the appendix.
The latest version of Angular CLI (v1.0) makes scaffolding possible with Angular 4. If you are using an older version, upgrade to Angular CLI. A new project created using Angular CLI now references Angular 4. Refer to figure 1.
Scaffolding makes it possible to add new components, routes or services etc. from the command line.
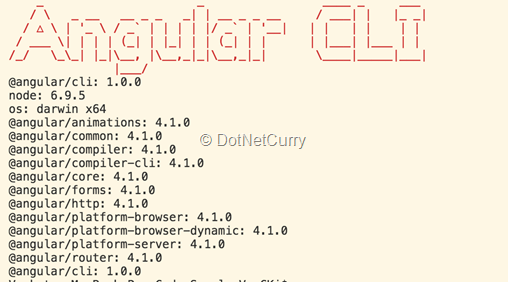
Figure 1: Version details for various libraries with ng -v command
Upgrade from Angular v2 to v4
However, to upgrade an existing project to Angular 4, run following npm install commands which upgrades Angular and TypeScript on a Mac or Linux machine.
npm install @angular/{common,compiler,compiler-cli,core,forms,http,platform-browser,platform-browser-dynamic,platform-server,router,animations}@latest typescript@latest –save
It installs the latest stable version of twelve libraries including TypeScript. At the time of writing, this article uses the latest stable version for libraries which is Angular v4.1.0 and TypeScript v2.2.0
Upgrade Angular and TypeScript on a Windows machine
The command to upgrade Angular and TypeScript on a Windows machine is as follows:
npm install @angular/common@latest @angular/compiler@latest @angular/compiler-cli@latest @angular/core@latest @angular/forms@latest @angular/http@latest @angular/platform-browser@latest @angular/platform-browser-dynamic@latest @angular/platform-server@latest @angular/router@latest @angular/animations@latest typescript@latest --save
Add Bootstrap 4 to Angular project
Install bootstrap Alpha release using NPM:
npm install --save bootstrap@4.0.0-alpha.6
We chose a specific version to ensure future releases doesn’t break the sample. Optionally, run the following command to install the latest pre-release package.
npm install –save bootstrap@next
Once the package is downloaded, add Bootstrap references in .angular-cli.json.
Modify styles configuration to add Bootstrap CSS
styles": [
    "../node_modules/bootstrap/dist/css/bootstrap.min.css",
    "styles.css"
],
Modify scripts configuration to add jQuery, Bootstrap and Tether JS files.
"scripts": [
    "../node_modules/jquery/dist/jquery.min.js",
    "../node_modules/tether/dist/js/tether.min.js",
    "../node_modules/bootstrap/dist/js/bootstrap.min.js"
],
Angular 4 - Code Sample
Let us explore the Angular and Bootstrap features with the code sample provided with this article. It has three views.
a. Basic: For demonstrating ng-template feature using *ngIf directive. More details described later in the article.
b. Dinosaur List: A home page that shows dinosaur list. The list is responsive using Bootstrap 4 (Alpha). Cards and the content inside align according to screen size.
c. Random Dino: Randomly picks and shows a dinosaur card. By design, the response is delayed by four seconds. This is to simulate a loading message while an observable is asynchronously retrieving data.
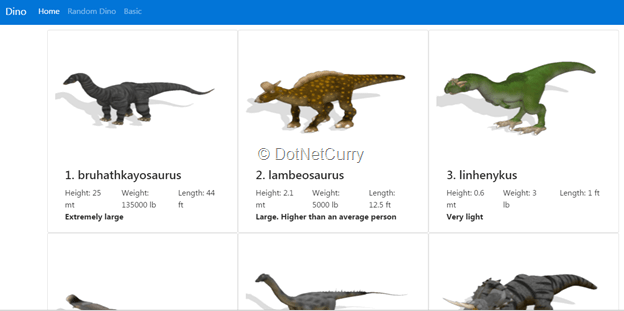
Figure 2 Demo app with dinosaur list screen
Visual Studio Code IDE
Visual Studio Code, an open source IDE from Microsoft, has good integration with TypeScript and Angular. With the new features in TypeScript 2.2, this IDE can detect missing and unused imports, missing this operator and also allows for quick refactoring.
Editorial Note: If you are new to Visual Studio Code, here’s a productivity guide.
The Visual Studio Code extensions’ eco system provides many useful features.
Angular 4 TypeScript Snippets is one such extension. It’s a collection of snippets readily available for creating a component, service, pipe, module etc. Start typing “a-“ in VS Code, and it shows list of available snippets. See figure 3 for details on Angular artifacts that we can create with the extension.
Imagine we chose to create a component. Tab through to provide component selector, template file name and component class name etc. The Component skeleton file is ready to use. This is an alternative to using Angular CLI for creating a new component.
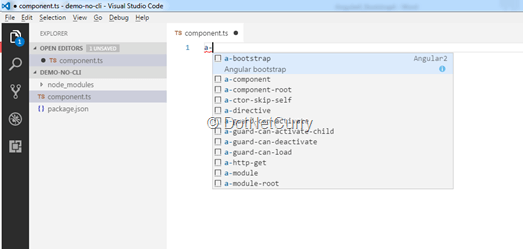
Figure 3 Angular 4 TypeScript snippet extension options
Angular 4 New Features and Angular v2 vs 4 Differences
The following sections elaborate Angular 4 features and certain differences with Angular 2.x.
Template changes to ng-template
If you are upgrading from Angular 2.x to Angular 4, all template elements have to change to ng-template. The following code will result in a warning.
<template [ngIf]="isVisible"> Conditional statement </template>
Template parse warnings: The <template> element is deprecated. Use <ng-template> instead
Refactor it to:
<ng-template [ngIf]="isVisible"> Conditional statement </ng-template>
TypeScript’s Strict Null Check options is around the corner
In TypeScript 2.0, a Strict Null Check option has been introduced. It restricts assigning null or undefined only to variables that are defined with that type.
Consider the following example,
let num1: number;
num1 = null;
console.log(num1);
Strict null checks mode prevents assigning null to a number.
D:\StrictNullCheck-sample>tsc sample.ts --strictNullChecks
sample.ts(2,1): error TS2322: Type 'null' is not assignable to type 'number'.
We can explicitly declare num1 to be of type null to allow assigning to it:
let num1: number | null ;
num1 = null;
console.log(num1);
However, this option is not fully supported yet. Angular doesn’t build with strictNullCheck enabled in tsconfig.json.
Angular made relevant changes to support the feature in Angular 4.1. However, a bug in TypeScript is keeping the feature at bay. Keep an eye on these Angular and TypeScript issues for updates –
1. https://github.com/angular/angular/issues/15432 (strictNullChecks support in v4.0 is broken)
2. https://github.com/angular/angular/pull/15405 (https://github.com/angular/angular/pull/15405)
3. https://github.com/Microsoft/TypeScript/issues/10078
Angular *ngIf/then/else
With Angular 2, we could use *ngIf directive to conditionally show a section of the template. With Angular 4, support for else has been added. Consider the following template code:
<div>
    <span>I show-up when isTrue is true.</span>
</div>

<ng-template #tmplWhenFalse > I show-up when isTrue is false </ng-template>
When isTrue value is true, instead of showing the span inline, we could offload to another template.
<button class="btn btn-primary" (click)="toggle()"> Toggle </button>
<div></div>
<ng-template #tmplWhenTrue >I show-up when isTrue is true. </ng-template>
<ng-template #tmplWhenFalse > I show-up when isTrue is false </ng-template>
Consider a snippet from code sample below. It has three conditional blocks.
A dinosaur could be:
- light weight with less than 100 pounds or
- medium sized with less than 10,000 pounds or
- of extremely large size with greater than 10,000 pounds.
The ngIf checks dino object weight property:
1. When it’s less than 100 pounds show #bird template.
2. The else template has another ‘if’ condition to see if it’s less than 10000 pounds. When true, show the #large template
3. When both the above conditions fail, show the #extraLarge template.
<div></div>
    <ng-template #bird> <strong>Very light</strong></ng-template>
    <ng-template #large> <div><strong>Large. Higher than an average person</strong></div></ng-template>
    <ng-template #extraLarge> <strong>Extremely large</strong></ng-template>
</div>
Working with Observables and *ngIf/else
While rendering an observable on a template, we can show loading message or a spinner gif with the *ngIf directive. Specify else template to show while async observable is not ready with data.
The directive also supports creating a local variable. Notice a local variable dino (let dino) to refer to the async object. Consider following code.
<!—show else template “working” while loading observable with data. Notice async filter for dino observable -->
  <div>
    <div class="card col-8">
      <div class="col-4">
              <img class="card-img-top" src="assets/images/{{dino.name}}.png">
      </div>
      <div class="card-block">
        <h4 class="card-title">{{dino.name}}</h4>
<!--removing dinosaur card details for readable snippet. Refer to code sample for complete code. -->
    </div>
    <!-- card end -->
  </div>
  <ng-template #working>
    <div>Loading...</div>
  </ng-template>
In the sample, to mimic delayed loading, the component calls next() on an observable subject after four seconds.
Refer to following code snippet,
this.dino = new Subject(); // to mimic delayed loading the component calls next on observable subject after four seconds. setTimeout( () => this.dino.next(dataset.dinosaurs[Math.round((Math.random() * 5))]) , 4000);
Angular Upgrade Guide
Angular Upgrade Guide is a useful tool to review things to consider while upgrading from Angular 2.x to Angular 4 or above. Access the tool at https://angular-update-guide.firebaseapp.com/
Angular Animations
In Angular 2.x, animations were part of @angular/core. It was part of the bundle even if the application never used animations. With Angular 4, animations related artifacts have been moved out of @angular/core. It helps reduce production bundle size.
To use animations, import BrowserAnimationsModule from @angular/platform-browser/animations. Reference the module in imports array of @NgModule
Angular future release schedule
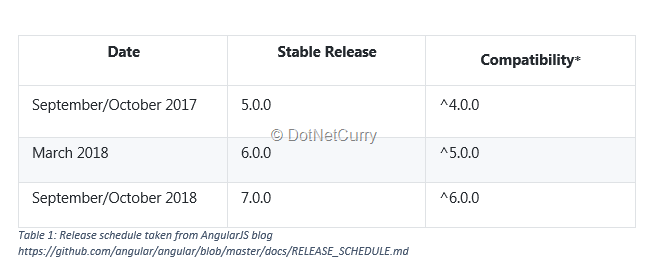
Refer to the major release schedule in Table 1. The details are quoted from this link (bit.ly/dnc-ang-release). Please keep a tab on the page for any changes to the schedule, considering it is still tentative.
Tentative Schedule after March 2017
Bootstrap 4 in Angular
Bootstrap 4 is a rewrite of its previous version (v3). The newer version is built with SASS and it also supports Flexbox. One of the core features of Bootstrap is the grid system, which helps develop responsive layout.
Bootstrap 4 has enhanced breakpoints with better support for handheld mobile devices. It now supports five breakpoints as opposed to four in Bootstrap 3. Refer to following details,
|
< 576 px
|
Extra Small ( col-xs-*)
|
|
>= 576 px
|
Small ( col-sm-*)
|
|
>= 768 px
|
Medium (col-md-*)
|
|
>= 992 px
|
Large (col-lg-*)
|
|
>= 1200 px
|
Extra Large (col-xl-*)
|
Grid system changes compared to Bootstrap 3:
- In the new Bootstrap 4 grid system, the extra small (col-xs-*) breakpoint is modified to a width less than 576px. In the previous version (v3), anything less than 768 px was considered extra small.
- Bootstrap 4, anything greater than 1200px is extra-large. This width was labelled large in previous version. As mentioned in the table above, the large breakpoint (col-lg-*) is now greater than or equal to 992px.
To learn more about Bootstrap 4, refer to the articles Bootstrap 4 – New Features and Migrating from Bootstrap 3 to 4.
Consider the following code.
<div class="card-text">
  <div class="row">
    <div class="col-lg-4 col-xs-12 col-sm-6 ">
      Height: {{dino.height}} mt
    </div>
    <div class="col-lg-4  col-xs-12 col-sm-6">
      Weight: {{dino.weight}} lb
    </div>
    <div class="col-lg-4  col-xs-12 col-sm-6">
      Length: {{dino.length}} ft
    </div>
  </div>
</div>
It uses break points for extra-small (< 578 px), small (>= 576px) and large (> 1200px). It is applied on three dinosaur fields, height, weight and length.
On an extra small screen, each field/div element takes up all twelve segments to show each field/div element in a row.
On a small (and medium) screen, it takes six segments fitting two fields/div elements in a row and pushing the third field/div element to next row.
On a large screen, each field/div element occupies four out of twelve segments. Hence it shows the three fields/div elements in one row (twelve segments in total).
Our code sample follows a similar approach to align cards on the page.
<div class="card col-lg-4 col-sm-6 col-xs-12">

</div>
- It shows dinosaur cards in a single column on an extra small screen with col-xs-12; takes up all twelve segments. Refer to figure 4.
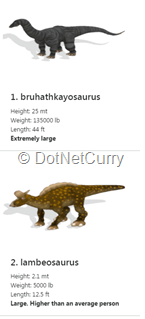
Figure 4: Extra Small screen. Dinosaur cards and height, weight and length fields aligned in a single row
- Dinosaur cards are aligned to two columns on a small and medium screen with col-sm-6; takes up six segments, i.e, half a row. Refer to figure 5.
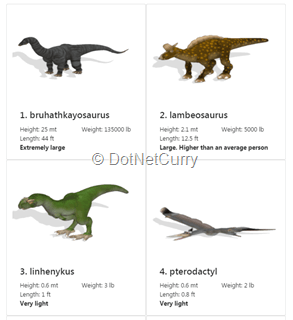
Figure 5: On a Small (and medium screen) two dinosaur cards are shown in a row. Two fields (Height, weight and length) are shown in a row
- Dinosaur cards are aligned to three columns on a large and extra-large screen with col-lg-4, takes up four segments, i.e, 1/3rd of a row. Refer to figure 6.
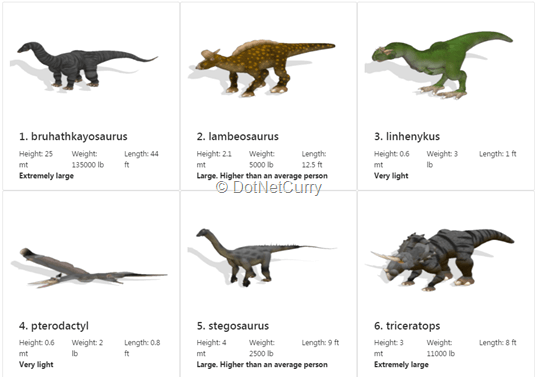
Figure 6: on a large (and extra-large) screen, three dinosaur cards shown in a row. Height, weight and length fields show in a single row
Conclusion
Angular went through a good amount of transition from Angular 1.x, MV* model, to the framework we know today.
The purpose of the transition is to effectively support new features in JavaScript, as well as sync up with the latest web development standards. When used with TypeScript, it is on steroids with support for types, integration with IDE like Visual Studio Code and many other useful features.
In the process, Angular 1 to 2 upgrade included many breaking changes. However, upgrading to future versions of Angular are expected to be smooth with minimal or no breaking changes. The Angular framework will continue to evolve to support more features and make the developer’s job easy.
This is a good thing. Obviously we do not want a stagnated framework. On a lighter note, dinosaurs are exciting in museums and for developers, they can be seen only in code samples (:
Download the entire source code of this article (Github).
Appendix
1. Introduction to Angular CLI
Angular CLI is an easy and effective way to get started with an Angular project (v2 and above). It scaffolds an Angular project with Webpack (or JSPM/SystemJS), TypeScript, unit tests’ skeleton, routing (optional) etc.
During the course of the project, it also helps to add Angular artifacts to the repository. We can add components, services, directives, pipes, classes, guards, interfaces, enums and modules to the project.
The tool is in line with Angular style guide.
Install Angular CLI with the following command
npm i -g @angular/cli
Create a new Angular project with
ng new my-angular-project
After installation, to run the project execute the following command
ng serve
To add a new component use the following command
ng g component my-component
2. Get started with Angular 4 (manual way)
Consider the following steps to get started with an Angular 4 and Webpack (for bundling) incase you do not chose to go ahead with Angular CLI.
i) Initialize an npm package with the following command. Provide values like package name, description, version etc. when prompted.
npm init
ii) Use the package.json from the code sample – manual-starter folder. Notice all Angular packages are latest and above 4.0.0 (indicated by ^)
"@angular/common": "^4.0.0",
    "@angular/compiler": "^4.0.0",
    "@angular/core": "^4.0.0",
    "@angular/forms": "^4.0.0",
    "@angular/http": "^4.0.0",
    "@angular/platform-browser": "^4.0.0",
    "@angular/platform-browser-dynamic": "^4.0.0",
    "@angular/router": "^4.0.0",
iii) Webpack Configuration files: The webpack.conf.js is at the root of the project. It branches to three more configuration files a) webpack.dev.js b) webpack.prod.js and c) webpack.common.js.
iv) Use the start script to run webpack dev server using dev configuration. Consider following script command.
  "scripts": {
    "start": "webpack-dev-server --inline --progress --port 8080",
v) Webpack creates three bundles, with the application bundled into app.js
entry: {
    'polyfills': './src/polyfills.ts',
    'vendor': './src/vendor.ts',
    'app': './src/main.ts'
},
vi) Root for the Angular application is main.ts. It bootstraps the application. It loads the main Angular module, which in this example is located in app/app.module.ts
vii) app.module.ts starts with the main component app.component.ts, located in the same folder
References
For more about Angular CLI NPM repo with documentation, follow the link https://www.npmjs.com/package/angular-cli
Angular 4 release notes: http://angularjs.blogspot.in/2017/03/angular-400-now-available.html
Configuring Webpack with Angular https://angular.io/docs/ts/latest/guide/webpack.html
Bootstrap 4, breakpoint list https://v4-alpha.getbootstrap.com/layout/grid/#grid-options
Release schedule reference https://github.com/angular/angular/blob/master/docs/RELEASE_SCHEDULE.md
Angular Upgrade tool https://angular-update-guide.firebaseapp.com/
Dinosaur data for the code sample – https://dinosaur-facts.firebaseio.com/
Dinosaur images for code sample- spore.com
This article has been editorially reviewed by Suprotim Agarwal.
C# and .NET have been around for a very long time, but their constant growth means there’s always more to learn.
We at DotNetCurry are very excited to announce The Absolutely Awesome Book on C# and .NET. This is a 500 pages concise technical eBook available in PDF, ePub (iPad), and Mobi (Kindle).
Organized around concepts, this Book aims to provide a concise, yet solid foundation in C# and .NET, covering C# 6.0, C# 7.0 and .NET Core, with chapters on the latest .NET Core 3.0, .NET Standard and C# 8.0 (final release) too. Use these concepts to deepen your existing knowledge of C# and .NET, to have a solid grasp of the latest in C# and .NET OR to crack your next .NET Interview.
Click here to Explore the Table of Contents or Download Sample Chapters!
Was this article worth reading? Share it with fellow developers too. Thanks!
V Keerti Kotaru is an author and a blogger. He has authored two books on Angular and Material Design. He was a Microsoft MVP (2016-2019) and a frequent contributor to the developer community. Subscribe to V Keerti Kotaru's thoughts at his
Twitter account. Checkout his past blogs, books and contributions at
kvkirthy.github.io/showcase.