ASP.NET Core 2.1 included the first official release of the redesigned SignalR. It’s been completely rewritten for ASP.NET Core, although it provides a model similar to the one in the previous version of SignalR.
This article introduces the main concepts and building blocks of SignalR by implementing a minimalistic version of StackOverflow.com using an ASP.NET Core backend, and a Vue.js frontend. A toy version compared to the full site, this example will be enough to explore the real-time functionality provided by SignalR.
We will also explore how to integrate its JavaScript client with the popular Vue frontend framework, as we add bi-directional communication between the client and the server through the SignalR connection.
I hope you will enjoy this article and find it a useful introduction to SignalR and a practical example on how to integrate it with one of the fastest growing frontend frameworks.
The companion source code for the article can be found on GitHub.
Using ASP.NET Core Signal with Vue.js
1. Setting up the SignalR project
Before we can start introducing the functionality provided by SignalR, we need a project that we can use as an example. In this section, we will create a new project that provides a minimalistic version of StackOverflow.com. It will be a fairly basic site that simply allows creating questions, voting on them and adding answers to the questions. However, this will be enough to later introduce some real-time features using SignalR.
Let’s start by creating a new folder called so-signalr (or any other name you like). During the next sections, we will work through the frontend and backend projects of our mini Stack Overflow site.
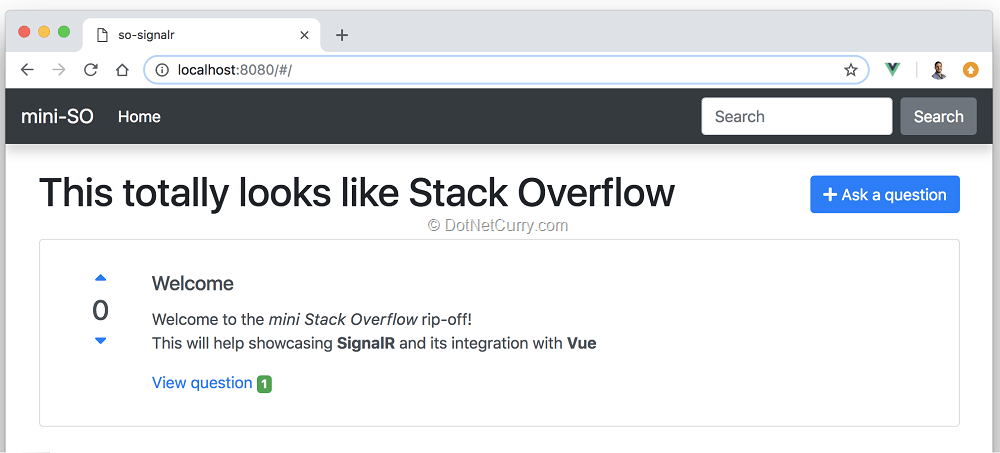
Figure 1, The Stack Overflow killer once we are done
It is worth mentioning that the main purpose of the article is to explore SignalR, and not so much how to build an API with ASP.NET Core, or a frontend with Vue.js. I won’t get into much detail when building the example application. If you are unfamiliar with any of these or have trouble following along, I suggest you to check their official documentation sites and the previous articles published (links given below), then come back to this article.
ASP.NET Core Tutorials - www.dotnetcurry.com/tutorials/aspnet-core
Vue.js Tutorials - www.dotnetcurry.com/tutorials/vuejs
If you are already familiar, feel free to jump into section 2 and download the branch starting-point from GitHub.
Disclaimer. I prefer to think in terms of events and listeners while the official SignalR documentation thinks in terms of RPC calls and methods. Through this article, you will keep reading about events and listeners, but you can make the mental translation into RPC calls and methods if you prefer so.
Creating the backend
Let’s begin by making sure you have version 2.2 of ASP.NET Core installed by running dotnet --version. If you have an older version, download the latest SDK from the official site.
Next, open a terminal inside the so-signalr folder and run the following command to initialize a new ASP.NET Core project which will provide the REST API for our site:
dotnet new webapi –n server
You should now have a new folder so-signalr/server containing the ASP.NET Core project with our backend.
All we have to do now is to replace the default example API with one that we can use for the questions and answers (Q&A) of a site like Stack Overflow. Create a new folder named Models, and inside add two new files named Question.cs and Answer.cs. These will be simple POCO classes defining the base entities of our site:
public class Question
{
    public Guid Id { get; set; }
    public string Title { get; set; }
    public string Body { get; set; }
    public int Score { get; set; }
    public List<Answer> Answers { get;set; }
}
public class Answer
{
    public Guid Id { get; set; }
    public Guid QuestionId { get; set; }
    public string Body { get; set; }
}
These are intentionally simple. As mentioned before, all we need is a simple site inspired by Stack Overflow where we use some of the features provided by SignalR.
Next, replace the example controller with a new one that allows adding new questions and answers, as well as voting on them. A simple in-memory storage will be enough for the purposes of this article, but feel free to replace this with a different storage approach if you are so inclined to.
[Route("api/[controller]")]
[ApiController]
public class QuestionController : ControllerBase
{
    private static ConcurrentBag<Question> questions = new ConcurrentBag<Question> {
        new Question {
            Id = Guid.Parse("b00c58c0-df00-49ac-ae85-0a135f75e01b"),
            Title = "Welcome",
            Body = "Welcome to the _mini Stack Overflow_ rip-off!\nThis will help showcasing **SignalR** and its integration with **Vue**",
            Answers = new List<Answer>{ new Answer { Body = "Sample answer" }}
        }
    };
    [HttpGet()]
    public IEnumerable GetQuestions()
    {
        return questions. Select(q => new {
            Id = q.Id,
            Title = q.Title,
            Body = q.Body,
            Score = q.Score,
            AnswerCount = q.Answers.Count
        });
    }
    [HttpGet("{id}")]
    public ActionResult GetQuestion(Guid id)
    {
        var question = questions.SingleOrDefault(t => t.Id == id);
        if (question == null) return NotFound();

        return new JsonResult(question);
    }
    [HttpPost()]
    public Question AddQuestion([FromBody]Question question)
    {
        question.Id = Guid.NewGuid();
        question.Answers = new List<Answer>();
        questions.Add(question);
        return question;
    }
    [HttpPost("{id}/answer")]
    public ActionResult AddAnswerAsync(Guid id, [FromBody]Answer answer)
    {
        var question = questions.SingleOrDefault(t => t.Id == id);
        if (question == null) return NotFound();

        answer.Id = Guid.NewGuid();
        answer.QuestionId = id;
        question.Answers.Add(answer);
        return new JsonResult(answer);
    }
    [HttpPatch("{id}/upvote")]
    public ActionResult UpvoteQuestionAsync(Guid id)
    {
        var question = questions.SingleOrDefault(t => t.Id == id);
        if (question == null) return NotFound();

        // Warning, this increment isnt thread-safe! Use Interlocked methods
        question.Score++;
        return new JsonResult(question);
    }
}
This is a fairly straightforward controller managing a list of questions kept in memory, where every question has a list of answers and a score. The API allows questions to be voted (a similar endpoint for down voting can be easily implemented. If you want, you can check out the source in GitHub) as well as adding new questions and answers.
Finally, let’s enable CORS, since our frontend will be a Vue application served independently from our backend API. To do so, we need to update the Startup class. Add the following line to the ConfigureServices method:
services.AddCors();
Finally add the following line to the Configure method, before the UseMvc call, so we allow any CORS request coming from our frontend, with a fairly broad set of permissions. In a real application, you might want to be more restrictive with the methods and headers you allow. It also hardcodes the address of the frontend, which you might want to store as part of your configuration:
app.UseCors(builder =>
    builder
        .WithOrigins("http://localhost:8080")
        .AllowAnyMethod()
        .AllowAnyHeader()
        .AllowCredentials()
);
That’s it, we have a REST API that can be targeted from our frontend and provides the functionality we need to disrupt the Q&A market. You should be able to start the project with dotnet run, which should start your backend listening at http://localhost:5000 (where 5000 is the default port unless you change it in Program.cs) and finally navigate to http://localhost:5000/api/question. You should see a JSON file with the list of questions, containing the one initialized in our in-memory collection.
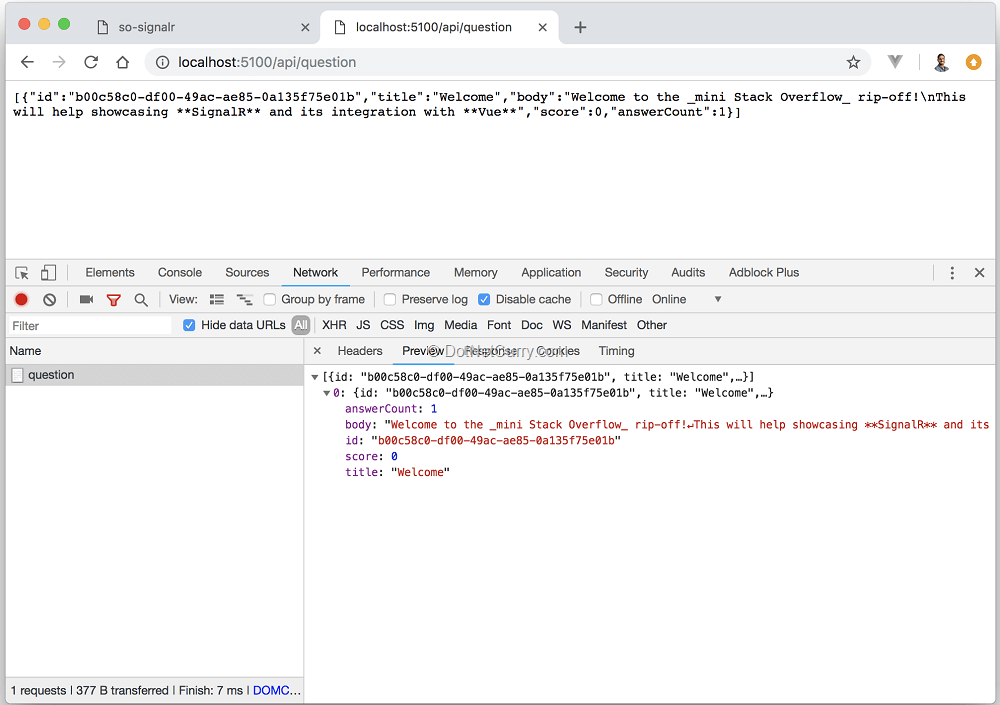
Figure 2, testing the API
It is now time to turn our attention to the frontend.
Creating the frontend
Our next task is to create a Vue project that provides the user interface of our minimalistic Stack Overflow site, and uses the backend we just finished in the earlier section. We will use the Vue CLI 3, which you can install as a global npm package.
Open a terminal inside the root folder and initialize a new Vue project with the command:
vue create client
When prompted to pick a preset, select “Manually select features”. Leave Babel and Linter selected, then select Router option with the space bar before pressing enter. Check the screenshot for the remaining options, but feel free to use your preferred ones as long as you add the router.

Figure 3, creating the client project with the Vue CLI 3
If you have version 2 of the cli, you should be able to follow along, use vue init to create the project and npm run dev to run it.
We will complete the setup by installing a few extra libraries that will help us build a not so barebones frontend:
- Axios provides the HTTP client we will use to send requests to our backend
- Bootstrap-vue and font-awesome provide the styling and UX components
- Vue-markdown allows us to render questions and answers markdown text as HTML
Open a terminal in the client folder or cd into it. Then install them all with a single command:
npm install --save-dev axios bootstrap-vue @fortawesome/fontawesome-free vue-markdown
If you would rather use different libraries or none at all and build the simplest frontend possible, you can still do so and follow along.
In order to run the frontend, you just need to open a terminal, navigate to the client folder and run the command npm run serve. This will start a webpack dev server with auto reload, so as soon as you change your code, the frontend is refreshed. You should see a message telling you that it is available on http://localhost:8080.
Let’s now update the contents of the generated project so it resembles something similar to Stack Overflow. First replace the contents of the src/main.js file so it imports and wires the extra libraries we installed:
import Vue from 'vue'
import App from './App'
import router from './router'
import axios from 'axios'
import BootstrapVue from 'bootstrap-vue'
import 'bootstrap/dist/css/bootstrap.css'
import 'bootstrap-vue/dist/bootstrap-vue.css'
import '@fortawesome/fontawesome-free/css/all.css'

Vue.config.productionTip = false

// Setup axios as the Vue default $http library
axios.defaults.baseURL = 'http://localhost:5000' // same as the Url the server listens to
Vue.prototype.$http = axios

// Install Vue extensions
Vue.use(BootstrapVue)

new Vue({
  router,
  render: h => h(App)
}).$mount('#app')
Nothing extraordinary, we are just importing the extra libraries we have installed and performing any initialization required with Vue. Next update the contents of App.vue so our project contains a navbar with a main area where each of the pages will be rendered:
<template>
  <div id="app">
    <nav class="navbar navbar-expand-md navbar-dark bg-dark shadow">
      <a class="navbar-brand" href="#/">mini-SO</a>
      <button class="navbar-toggler" type="button" data-toggle="collapse" data-target="#main-navbar" aria-controls="main-navbar" aria-expanded="false" aria-label="Toggle navigation">
        <span class="navbar-toggler-icon"></span>
      </button>

      <div class="collapse navbar-collapse" id="main-navbar">
        <ul class="navbar-nav mr-auto">
          <li class="nav-item active">
            <a class="nav-link" href="#/">Home <span class="sr-only">(current)</span></a>
          </li>
        </ul>
        <form class="form-inline my-2 my-lg-0">
          <input class="form-control mr-sm-2" type="text" placeholder="Search" aria-label="Search">
          <button class="btn btn-secondary my-2 my-sm-0" type="submit">Search</button>
        </form>
      </div>
    </nav>

    <main role="main" class="container mt-4">
      <router-view/>
    </main>
  </div>
</template>

<script>
export default {
  name: 'App'
}
</script>
This looks complicated but it is a basic navbar using bootstrap styling. Feel free to ignore the navbar altogether, the important part is to have a <router-view /> element where each of the client pages will be rendered.
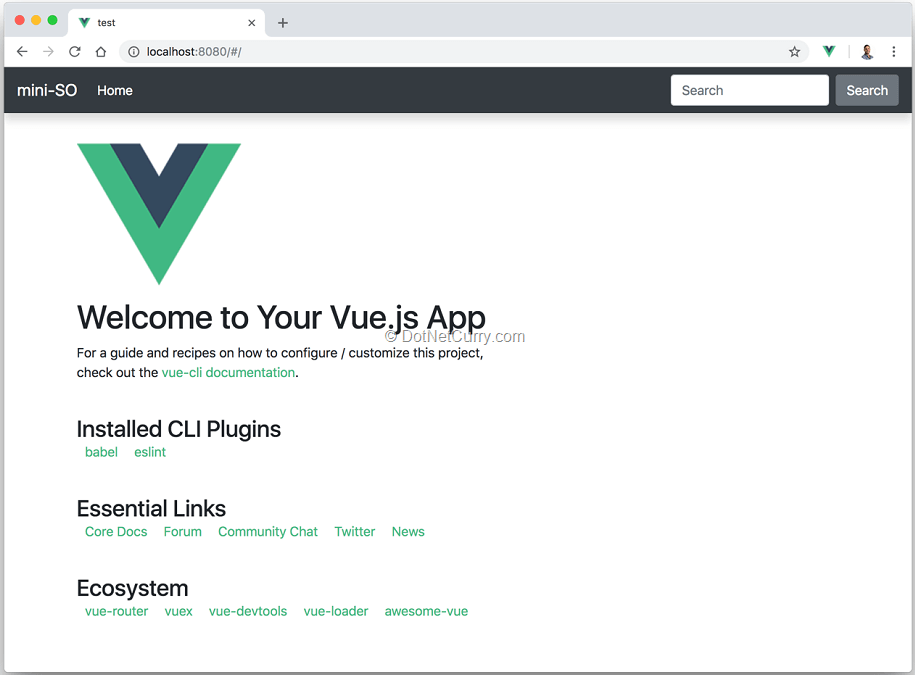
Figure 4, we now have a navbar!
Let’s now replace the default page with the home page for our project, one where we will display the list of questions. Remove the existing files inside the src/views folder, then create a new file home.vue inside:
<template>
  <div>
    <h1>
      This totally looks like Stack Overflow
      <button v-b-modal.addQuestionModal class="btn btn-primary mt-2 float-right">
        <i class="fas fa-plus"/> Ask a question
      </button>
    </h1>
    <ul class="list-group question-previews mt-4">
      <question-preview
        v-for="question in questions"
        :key="question.id"
        :question="question"
        class="list-group-item list-group-item-action mb-3" />
    </ul>
    <add-question-modal @question-added="onQuestionAdded"/>
  </div>
</template>

<script>
import QuestionPreview from '@/components/question-preview'
import AddQuestionModal from '@/components/add-question-modal'

export default {
  components: {
    QuestionPreview,
    AddQuestionModal
  },
  data () {
    return {
      questions: []
    }
  },
  created () {
    this.$http.get('/api/question').then(res => {
      this.questions = res.data
    })
  },
  methods: {
    onQuestionAdded (question) {
      this.questions = [question, ...this.questions]
    }
  }
}
</script>

<style>
.question-previews .list-group-item{
  cursor: pointer;
}
</style>
It simply retrieves a list of question previews from our backend API and renders them in a list, as well as provides a button and a modal to create a new question. The component data contains a list of questions which is initially empty and is updated with the list retrieved from the backend as soon as the component gets added to the page. As you can see, it uses two components:
- The <question-preview /> component is used to render a single question preview.
- The <add-question-modal /> component provides a modal with a form for adding a new question. This component will submit the new question to the server and emit an event ‘question-added’ that can be listened to, so the new question preview is added to the list.
Of course, these two components don’t exist yet, so let’s add them. Start by adding a new file add-question-modal.vue inside the src/components folder with the following contents:
<template>
  <b-modal id="addQuestionModal" ref="addQuestionModal" hide-footer title="Add new Question" @hidden="onHidden">
    <b-form @submit.prevent="onSubmit" @reset.prevent="onCancel">
      <b-form-group label="Title:" label-for="titleInput">
        <b-form-input id="titleInput"
                      type="text"
                      v-model="form.title"
                      required
                      placeholder="Please provide a title">
        </b-form-input>
      </b-form-group>
      <b-form-group label="Your Question:" label-for="questionInput">
        <b-form-textarea id="questionInput"
                      v-model="form.body"
                      placeholder="What do you need answered?"
                      :rows="6"
                      :max-rows="10">
        </b-form-textarea>
      </b-form-group>

      <button class="btn btn-primary float-right ml-2" type="submit" >Submit</button>
      <button class="btn btn-secondary float-right" type="reset">Cancel</button>
    </b-form>
  </b-modal>
</template>

<script>
export default {
  data () {
    return {
      form: {
        title: '',
        body: ''
      }
    }
  },
  methods: {
    onSubmit (evt) {
      this.$http.post('api/question', this.form).then(res => {
        this.$emit('question-added', res.data)
        this.$refs.addQuestionModal.hide()
      })
    },
    onCancel (evt) {
      this.$refs.addQuestionModal.hide()
    },
    onHidden () {
      Object.assign(this.form, {
        title: '',
        body: ''
      })
    }
  }
}
</script>
This component provides a bootstrap-vue modal component and some form controls to enter the title and body of a new question. When the user submits the form, the question is sent to the server and an event is emitted with the response from the server so it can be added to the list of previews displayed in the home.vue component.
Next add a new file question-preview.vue inside the same components folder with these contents:
<template>
  <li class="card container" @click="onOpenQuestion">
    <div class="card-body row">
      <question-score :question="question" class="col-1" />
      <div class="col-11">
        <h5 class="card-title">{{ question.title }}</h5>
        <p><vue-markdown :source="question.body" /></p>
        <a href="#" class="card-link">
          View question <span class="badge badge-success">{{ question.answerCount }}</span>
        </a>
      </div>
    </div>
  </li>
</template>

<script>
import VueMarkdown from 'vue-markdown'
import QuestionScore from '@/components/question-score'

export default {
  components: {
    VueMarkdown,
    QuestionScore
  },
  props: {
    question: {
      type: Object,
      required: true
    }
  },
  methods: {
    onOpenQuestion () {
      this.$router.push({name: 'Question', params: {id: this.question.id}})
    }
  }
}
</script>
This is a simple component that renders a bootstrap card with the question preview. Whenever the user clicks on the question, it will navigate to the question details page which we will add in a minute. It also uses one more component <question-score /> that will render the current score, as well as buttons to up/down vote.
Continue adding the question-score.vue file inside the components folder with these contents:
<template>
  <h3 class="text-center scoring">
    <button class="btn btn-link btn-lg p-0 d-block mx-auto" @click.stop="onUpvote"><i class="fas fa-sort-up" /></button>
    <span class="d-block mx-auto">{{ question.score }}</span>
    <button class="btn btn-link btn-lg p-0 d-block mx-auto" @click.stop="onDownvote"><i class="fas fa-sort-down" /></button>
  </h3>
</template>
<script>
export default {
  props: {
    question: {
      type: Object,
      required: true
    }
  },
  methods: {
    onUpvote () {
      this.$http.patch(`/api/question/${this.question.id}/upvote`).then(res => {
        Object.assign(this.question, res.data)
      })
    },
    onDownvote () {
      this.$http.patch(`/api/question/${this.question.id}/downvote`).then(res => {
        Object.assign(this.question, res.data)
      })
    }
  }
}
</script>

<style scoped>
.scoring .btn-link{
  line-height: 1;
}
</style>
We have some bootstrap styling to render the question score along with the voting buttons. When the buttons are clicked, a request is sent to the server and the question preview is updated with the server response.
Now update the router inside src/router.js so it renders our completed home page:
import Vue from 'vue'
import Router from 'vue-router'
import HomePage from '@/views/home'

Vue.use(Router)

export default new Router({
  routes: [
    {
      path: '/',
      name: 'Home',
      component: HomePage
    }
  ]
})
The finished site should be reloaded automatically (if not, manually reload). You should see the list of questions and will be able to add new ones:
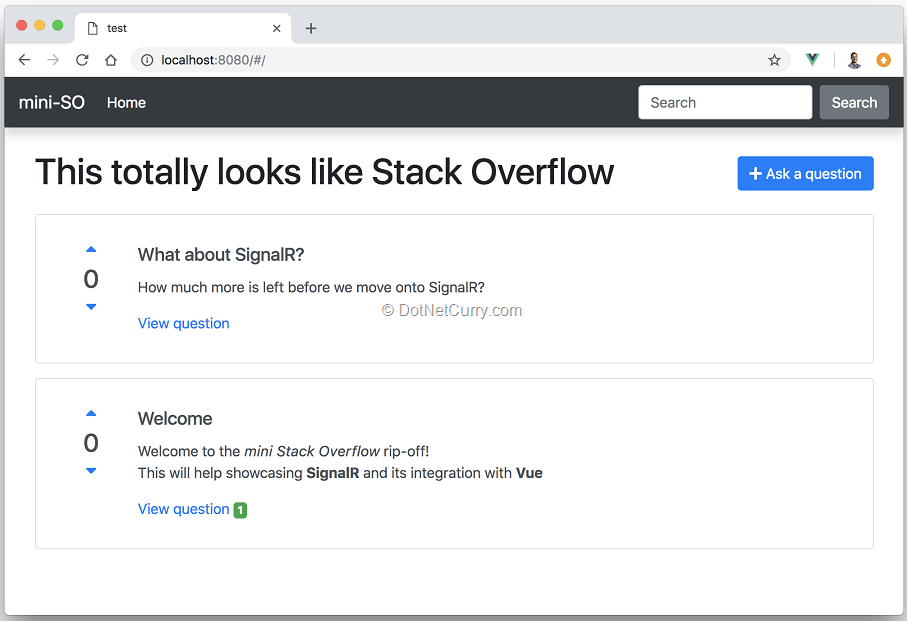
Figure 5, our site now lists questions and allows users to create them
All that’s left now is to add the question details page. Users will navigate to this page whenever they click on one of the previews. The click handling code is already part of the <question-preview /> component, but the page does not exist yet.
Let’s add this page next. Create a new file question.vue inside the src/views folder with the following contents:
<template>
  <article class="container" v-if="question">
    <header class="row align-items-center">
      <question-score :question="question" class="col-1" />
      <h3 class="col-11">{{ question.title }}</h3>
    </header>
    <p class="row">
      <vue-markdown class="offset-1 col-11">{{ question.body }}</vue-markdown>
    </p>
    <ul class="list-unstyled row" v-if="hasAnswers">
      <li v-for="answer in question.answers" :key="answer.id" class="offset-1 col-11 border-top py-2">
        <vue-markdown>{{ answer.body }}</vue-markdown>
      </li>
    </ul>
    <footer>
      <button class="btn btn-primary float-right" v-b-modal.addAnswerModal><i class="fas fa-edit"/> Post your Answer</button>
      <button class="btn btn-link float-right" @click="onReturnHome">Back to list</button>
    </footer>
    <add-answer-modal :question-id="this.questionId" @answer-added="onAnswerAdded"/>
  </article>
</template>

<script>
import VueMarkdown from 'vue-markdown'
import QuestionScore from '@/components/question-score'
import AddAnswerModal from '@/components/add-answer-modal'

export default {
  components: {
    VueMarkdown,
    QuestionScore,
    AddAnswerModal
  },
  data () {
    return {
      question: null,
      answers: [],
      questionId: this.$route.params.id
    }
  },
  computed: {
    hasAnswers () {
      return this.question.answers.length > 0
    }
  },
  created () {
    this.$http.get(`/api/question/${this.questionId}`).then(res => {
      this.question = res.data
    })
  },
  methods: {
    onReturnHome () {
      this.$router.push({name: 'Home'})
    },
    onAnswerAdded (answer) {
      if (!this.question.answers.find(a => a.id === answer.id)) {
        this.question.answers.push(answer)
      }
    }
  }
}
</script>
This page gets the question Id from the route parameters, loads the full question details with the list of answers, and proceeds to display them on that page. It also contains buttons to get back to the home page or add a new answer. The <add-answer-modal /> component is really similar to the one we created for adding questions, except for the fact an answer doesn’t have a title. I won’t copy it here but if you have trouble adding it, check the source on GitHub.
All that’s left is to update the vue-router with a new route for the question page. If you remember, the code handling the click on a question preview had the following navigation:
this.$router.push({name: 'Question', params: {id: this.question.id}})
We just need to add a new route inside the src/router.js file like:
export default new Router({
  routes: [
    … // previous route
    {
      path: '/question/:id',
      name: 'Question',
      component: QuestionPage
    }
  ]
})
..where the QuestionPage is imported as import QuestionPage from '@/views/question'. If you navigate to your site again in the browser, you should now have a very simple questions and answers site that lets you see a list of questions, open one of them to see its answers, add new questions/answers and vote on questions.
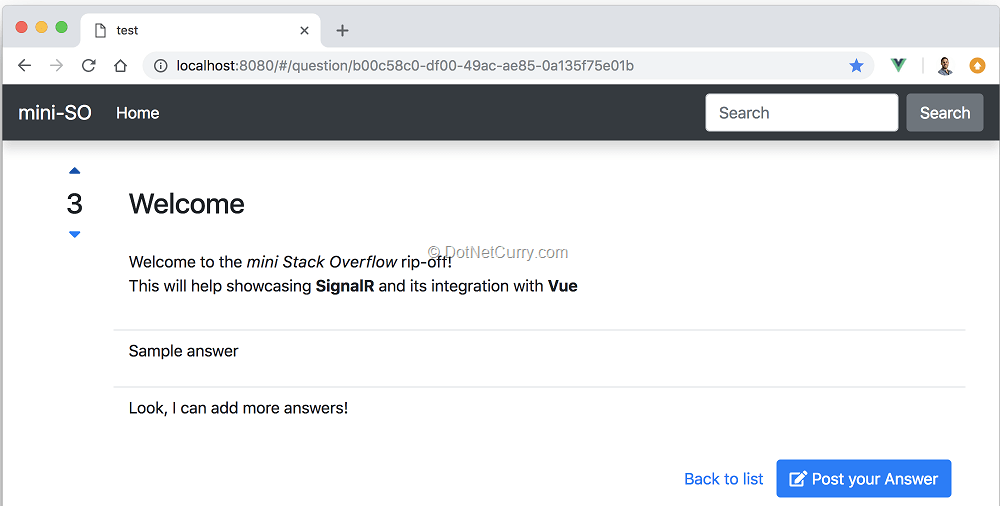
Figure 6, the question details page listing answers and allowing new answers to be added
At this point we have a simple site but interesting enough to build upon with the real-time functionality provided by SignalR.
2. Creating and connecting to SignalR Hubs
It is now time to start digging into the main point of the article, which is SignalR. The library is already part of the Microsoft.AspNetCore.App meta package which comes installed by default when using any of the default ASP.NET Core templates.
Let’s start by adding a SignalR Hub to our backend ASP.NET Core application. A Hub is the main building block in SignalR. It abstracts a connection between client and server and provides the API for sending events in both directions.
Create a new folder named Hubs inside the server project and add a new QuestionHub.cs file. There we will create our hub which is just a class that inherits from the base Hub class:
using Microsoft.AspNetCore.SignalR;

namespace server.Hubs
{
    public class QuestionHub: Hub
    {
    }
}
Now let’s modify our server Startup class to enable SignalR and register our Hub. Update the ConfigureServices method with:
services.AddSignalR();
Then update the Configure method in order to make our Hub available to clients:
app.UseSignalR(route =>
{
    route.MapHub<QuestionHub>("/question-hub");
});
Our clients will then be able to connect with our hub at http://localhost:5000/question-hub. Let’s probe that this really works by updating our client application so it establishes a connection to the Hub.
Like we mentioned before, the Hub abstracts the connection between the client and the server and provides the necessary API to send/receive events at both ends. There is a number of clients available in different languages, including JavaScript, which will manage establishing a connection to a Hub, as well as sending/receiving events.
Install the JavaScript client by opening a terminal in the client folder and running the command:
npm install --save-dev @aspnet/signalr
Now add a new file question-hub.js inside the client src folder. Using the SignalR client to connect to the Hub is as simple as:
import { HubConnectionBuilder, LogLevel } from '@aspnet/signalr'

const connection = new HubConnectionBuilder()
  .withUrl('http://localhost:5000/question-hub')
  .configureLogging(LogLevel.Information)
  .build()

connection.start()
Then update your src/main.js file to simply import the file we just created:
import './question-hub'
Make sure the client is running, restart it if you stopped it when installing the SignalR client library. You should now be able to open the developer tools, reload the page and see several requests if you filter by /question-hub. There will be an ajax call used to negotiate the protocol to be used in the connection, and assuming your browser support web sockets, then you will see a web socket opened.
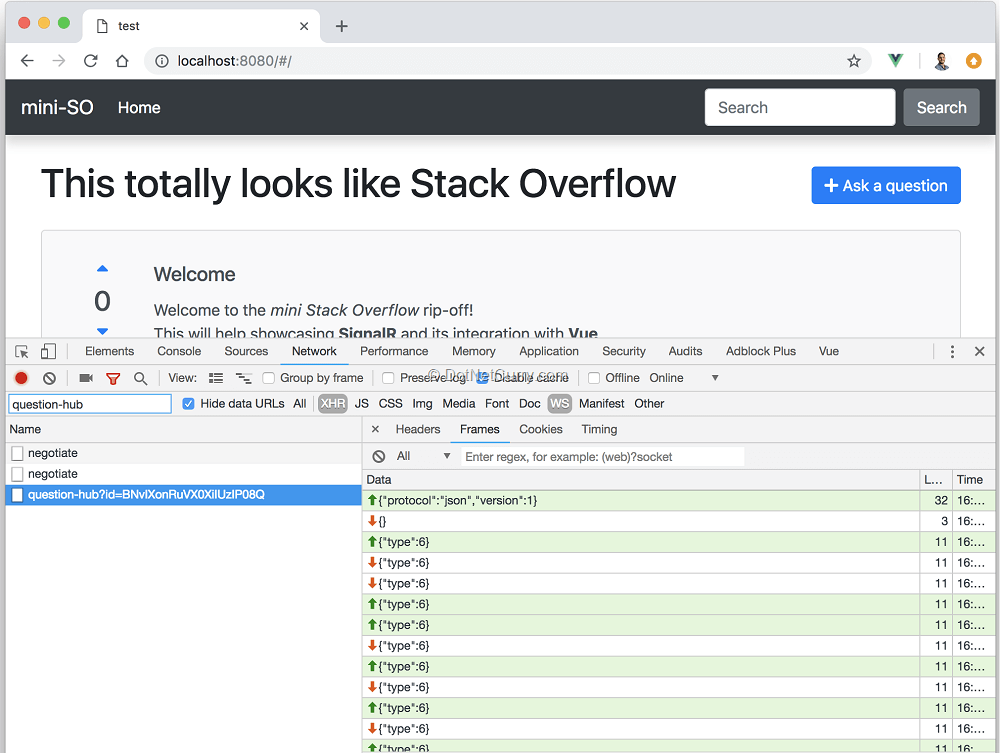
Figure 7, establishing a connection to the question Hub
Creating a Vue plugin
Our frontend is a Vue application, with an objective to send and receive SignalR events inside the Vue components. To better achieve this objective, we will need to eventually integrate the SignalR JavaScript client with Vue. A Vue plugin is the best way to add new global functionality to Vue.
Let’s convert the code inside question-hub.js into a Vue plugin. Right now, it will simply establish the connection, but we will keep coming back to this file as we add the functionality needed to send/receive events. In order to create a plugin, we just need to export an object with an install function, where the first argument is the Vue object:
import { HubConnectionBuilder, LogLevel } from '@aspnet/signalr'
export default {
  install (Vue) {
    const connection = new HubConnectionBuilder()
      .withUrl('http://localhost:5100/question-hub')
      .configureLogging(LogLevel.Information)
      .build()

    connection.start()
  }
}
Then update the src/main.js file so our plugin is installed before the vue application is started. Replace the previous import line with import QuestionHub from './question-hub', then add the following line right before initializing the Vue app:
Vue.use(QuestionHub)
That’s it, we now have a Vue plugin that initializes the connection to the question Hub provided by our backend. Before we start sending events through the Hub connection, there are a couple of improvements we can do.
Firstly, we can remove the hardcoded host from the install function of our Vue plugin. We can read this from the baseURL we configured for axios, where axios is available as Vue.prototype.$http. We can then replace the line
.withUrl('http://localhost:5000/question-hub')
with
.withUrl(`${Vue.prototype.$http.defaults.baseURL}/question-hub`)
Secondly, we can provide some simple strategy to reconnect if the Hub connection is closed. This is something that the JavaScript client doesn’t do by default as advised by the official documentation. The simplest approach is to try and reconnect if notified of the connection close event. Replace the line connection.start() with the following block:
let startedPromise = null
function start () {
  startedPromise = connection.start().catch(err => {
    console.error('Failed to connect with hub', err)
    return new Promise((resolve, reject) =>
      setTimeout(() => start().then(resolve).catch(reject), 5000))
  })
  return startedPromise
}
connection.onclose(() => start())

start()
If the connection is closed, we simply try to connect again. In the event we couldn’t establish the connection, it retries after 5 seconds. This is admittedly simple! As advised in the docs, you might end up adding some throttling that increases the time between retries.
It is worth highlighting that we are keeping a variable startedPromise, which is a promise resolved when the connection is established. This will be very useful later, as it will let us wait for the connection to be established before trying to send an event to the server!
Note: if you are using dotnet watch run to run the server application, you will start experiencing the watch process crashing once you add the reconnect code. This seems to happen because of the Hub connection keeping the port in use so the restarted server process cannot start listening on the same port.
I haven’t found any solution other than restarting the watch process. The alternative is to disable the reconnect code in development, but then you will need to manually reconnect after server-side changes by reloading the page in the browser.
3. Server to client events
So far, we have created a Hub on the server and added a plugin to our Vue app that establishes a connection to the Hub. It is time to start sending events through the connection, beginning with events from the server to the client. Within the context of our application, notifying the client whenever there is a question score change is a great candidate to test this part of SignalR.
Sending an event from the controller
The Hub class we inherit from in QuestionHub provides the API needed to send events to clients through the Hub connection. A Hub method like the following one will send an event named “MyEvent” to the client:
public async Task SendMyEvent()
{
  await Clients.All.SendAsync("MyEvent");
}
You can add any extra parameters after the event name, and they will be serialized and received on the client. If you need a more granular control over whom to send the events to, the Clients object provides methods that lets you decide whom to send the event to. Check the documentation for more info.
However, in order to notify the client whenever the question score changes, we will need to send the events from the controller’s action handling the /upvote and /downvote endpoints. Whenever you need to send events from a place other than the Hub itself, SignalR provides the HubContext. Inject a HubContext<THub> into the controller as in:
private readonly IHubContext<QuestionHub> hubContext;
public QuestionController(IHubContext<QuestionHub> questionHub)
{
    this.hubContext = questionHub;
}
We could now add the following line to our UpvoteQuestionAsync method, which will send the event QuestionScoreChange to any client connected to the question Hub (after converting the method into an async Task<ActionResult> method):
await this.hubContext
  .Clients
  .All
  .SendAsync("QuestionScoreChange", question.Id, question.Score);
We could do the same from the DownvoteQuestionAsync which would finish our server side changes to notify clients of question score changes. However, we can still do better and avoid having to hardcode the event name by using a strongly typed Hub/HubContext.
Create the following interface:
public interface IQuestionHub
{
    Task QuestionScoreChange(Guid questionId, int score);
}
Then update our Hub so it inherits from Hub<T> as in:
public class QuestionHub: Hub<IQuestionHub>
Next update the controller to receive a HubContext<Thub, T> as in:
private readonly IHubContext<QuestionHub, IQuestionHub> hubContext;
public QuestionController(IHubContext<QuestionHub, IQuestionHub> questionHub)
{
    this.hubContext = questionHub;
}
Now, rather than using the SendAsync method of the Hub, you will be able to use the methods defined by the interface. The name of the event received in the client will be the same as the name of the interface method, in this case QuestionScoreChange. Now update the UpvoteQuestionAsync and DownvoteQuestionAsync methods with the following line to send the event:
await this.hubContext
  .Clients
  .All
  .QuestionScoreChange(question.Id, question.Score);
Let’s now see how to receive the event on the client and have the components update with the new question score.
Receiving events on the client
On the client side, we have established a connection inside the src/question-hub.js file, but this isn’t available to client components. In order to make it available, we will update the Vue prototype so every component has a $questionHub property they can use to listen to events.
We can easily achieve this by creating a new Vue instance, which provides a powerful events API by default. We can then listen to server-side events coming from the SignalR connection and propagate them through the $questionHub internal event bus. Add the following lines to the install method of our question-hub Vue plugin, right after creating the connection:
// use new Vue instance as an event bus
const questionHub = new Vue()
// every component will use this.$questionHub to access the event bus
Vue.prototype.$questionHub = questionHub
// Forward server side SignalR events through $questionHub, where components will listen to them
connection.on('QuestionScoreChange', (questionId, score) => {
  questionHub.$emit('score-changed', { questionId, score })
})
As you can see, we are listening to the QuestionScoreChange event coming from the server, and we are forwarding it as a new score-changed event through the internal event bus $questionHub that our components have access to.
We could have directly added the SignalR connection object as Vue.prototype.$questionHub = connection, so we could directly use the SignalR client API within our Vue components. Although this could be a simpler approach, I instead decided to follow the one described earlier due to the following considerations:
- The Vue components will be completely ignorant of the SignalR JavaScript API. Instead they will use the familiar events API already present in Vue.
- The translation between SignalR events and the internal events through the $questionHub event bus allows us to use event names following a more idiomatic Vue style like score-changed rather than the method names of the IHubContext interface like QuestionScoreChanged. We can also wrap the arguments into a single object without having to define a DTO class to be used in the IHubContext interface.
- The small layer decoupling Vue code from the SignalR API provided by our plugin is the natural place to add more advanced functionality - like ensuring the connection is established before trying to send an event to the server (more on this later) or automatically cleaning up event handlers (outside the scope of the article, but we will see how to manually clean them up).
Making the SignalR connection directly available to Vue components might work better for you or you might prefer to do so. In that case, simply add Vue.prototype.$questionHub = connection as part of the plugin installation. You would then directly use the SignalR JavaScript API through this.$questionHub inside any component. You should be able to follow the rest of the article even if you use this approach.
The event is now being received on the client and any component could listen to it using the $questionHub event bus. Let’s update the question-score component so it listens to any score-changed events coming through the $questionHub. Vue’s lifecycle provides the perfect place to start listening to the event as part of its created hook:
export default {
  props: {
    question: {
      type: Object,
      required: true
    }
  },
  created () {
    // Listen to score changes coming from SignalR events
    this.$questionHub.$on('score-changed', this.onScoreChanged)
  },
  methods: {
    … existing onUpvote and onDownvote methods

    // This is called from the server through SignalR
    onScoreChanged ({questionId, score }) {
      if (this.question.id !== questionId) return
      Object.assign(this.question, { score })
    }
  }
}
The component now receives the score-change event, unwraps the questionId and score properties, and updates its score, assuming questionId of the event matches the one for the question in the component props.
The final piece is to clean up the event listener once the component is destroyed. Simply add a new beforeDestroy lifecycle method, similar to the created one where we stop listening to the event:
beforeDestroy () {
  // Make sure to cleanup SignalR event handlers when removing the component
  this.$questionHub.$off('score-changed', this.onScoreChanged)
},
That’s it! Try opening two different browser windows and vote on a question in one window to see the updated score in the other window:
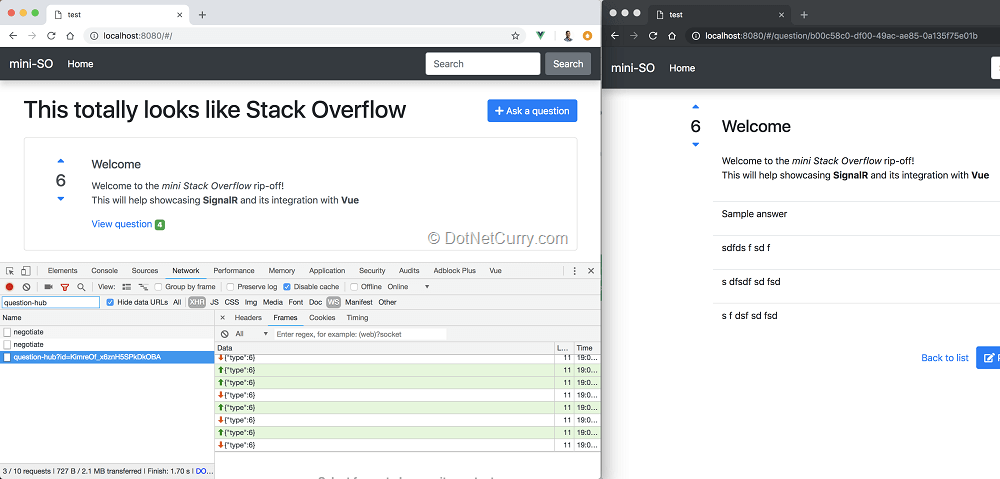
Figure 8, receiving score change events from the server
Adding another event with changes to the answers count would be very similar. I won’t go through it here so we can move on, but you can check the source on GitHub if you want.
4. Client to server events
As we have seen so far, receiving events from the server in the client is very straightforward. Let’s now see if the opposite i.e. sending events from the client to the server, is equally easy.
We will add the following events from the client:
- Whenever the client navigates to the details page of a particular question, an event will be sent to the server. This event notifies the server that a specific client is actively looking at a specific question.
- Whenever navigating away from the details page, another event will be sent to the server. This second event notifies the server that a particular client is no longer looking at a specific question.
Apart from demonstrating how to send an event from the client, these will let us explore yet another SignalR feature, the groups. We will use the groups for sending an event from the server whenever a new answer is added to a question. However instead of sending it to every client connected to the Hub, we will only send it to clients actively looking at that particular question, which will be associated with a group.
Sending events from the client
The SignalR JavaScript API allows sending events as well as receiving them. If events were received using the on method, they are sent using the invoke method. The name reflects the fact that the event name provided needs to match the name of a method in the QuestionHub class.
Since we have the intermediate layer provided by our question-hub Vue plugin, we will add two new methods to the $questionHub object hiding the details of the SignalR API:
questionHub.questionOpened = (questionId) => {
  return connection.invoke('JoinQuestionGroup', questionId)
}
questionHub.questionClosed = (questionId) => {
  return connection.invoke('LeaveQuestionGroup', questionId)
}
These methods send each an event to the server, named JoinQuestionGroup and LeaveQuestionGroup respectively. The data provided with each event is simply the questionId.
Adding a listener on the server side is pretty straightforward.
SignalR expects the event names to exactly match a method in the Hub class (hence the event names like C# methods), which will be invoked whenever the event is received. Let’s add them to our QuestionHub class. At this point, they won’t do much other than writing to the log:
private readonly ILogger logger;
public QuestionHub(ILogger<QuestionHub> logger)
{
    this.logger = logger;
}
public Task JoinQuestionGroup(Guid questionId)
{
    this.logger.LogInfo($"Client {Context.ConnectionId} is viewing {questionId}");
}
public Task LeaveQuestionGroup(Guid questionId)
{
    this.logger.LogInfo($"Client {Context.ConnectionId} is no longer viewing {questionId}");
}
Next update the question.vue page to send these events whenever the page is opened or closed. We just need to use the created and beforeDestroy lifecycle events like we did before:
created () {
  // Load the question and notify the server we are watching the question
  this.$http.get(`/api/question/${this.questionId}`).then(res => {
    this.question = res.data
    return this.$questionHub.questionOpened(this.questionId)
  })
},
beforeDestroy () {
  // Notify the server we stopped watching the question
  this.$questionHub.questionClosed(this.questionId)
},
Run the application, open a question and go back to the home page. You should see the entries we added when receiving an event from the client in the server logs.
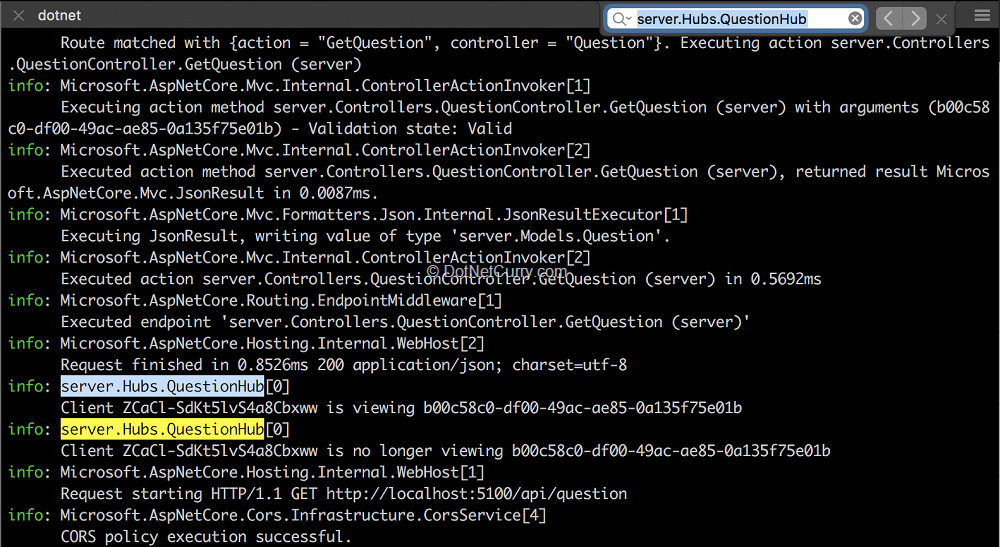
Figure 9, receiving events on the server
Before we move on, let’s solve a problem with the current code inside question-hub.js for sending the events. To illustrate, open the details page of a question and then refresh the browser page, you will see the following error in the browser console:
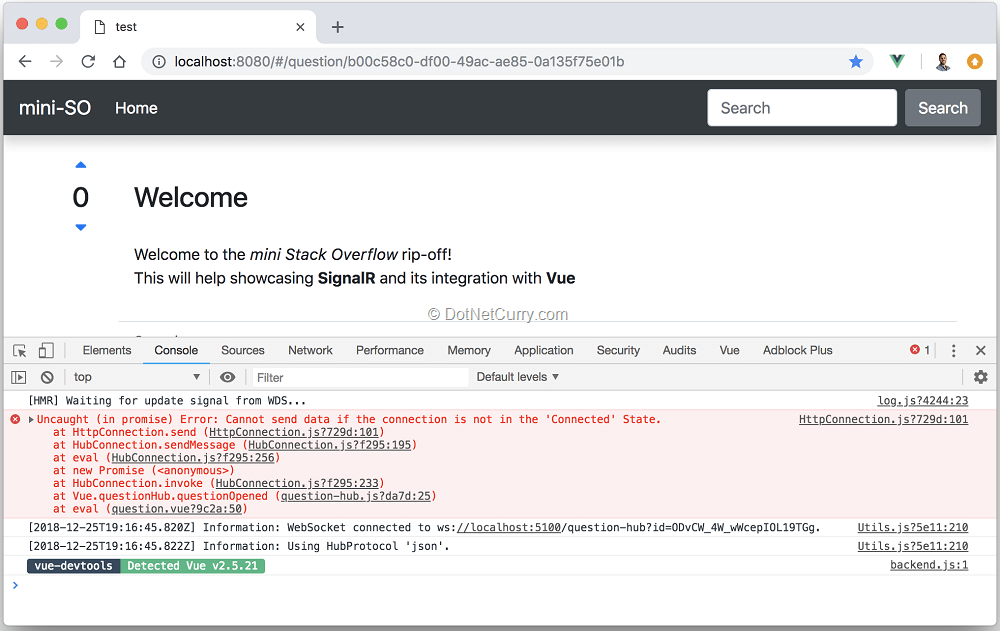
Figure 10, trying to send an event before the connection is established
This is because we are starting the application directly on the question page, which tries to send the event as soon as the page component is created. However, most likely the connection to the Hub hasn’t been established yet. We can solve this problem by using the startedPromise that gets assigned a promise that’s only resolved once the connection is established.
Update the methods added to $questionHub as follows:
questionHub.questionOpened = (questionId) => {
  return startedPromise
    .then(() => connection.invoke('JoinQuestionGroup', questionId))
    .catch(console.error)
}
questionHub.questionClosed = (questionId) => {
  return startedPromise
    .then(() => connection.invoke('LeaveQuestionGroup', questionId))
    .catch(console.error)
}
Now these methods will wait for the connection to be established before trying to send any event, getting rid of the error. This is also one of the reasons why we don’t let components directly access the SignalR connection! (As discussed in Section 3)
Using SignalR Groups
Up to this point, the server receives an event whenever the client opens and closes one of the question pages. We will use these events to add the client to a group specific for the question, using the questionId as the group name.
This way, by sending an event to all clients in a group, we will be able to send the event only to clients viewing a specific question, as opposed to every client connected to the Hub. Another classic example for groups would be creating a group per each room in a chat application.
Using groups is really easy, but in order to add a client to a group we need to know its connectionId. This is really simple from within the Hub class, since we have access to the Context.ConnectionId. Updating the JoinQuestionGroup and LeaveQuestionGroup methods to add/remove the current client from the question group is as easy as:
public async Task JoinQuestionGroup(Guid questionId)
{
    await Groups.AddToGroupAsync(Context.ConnectionId, questionId.ToString());
}
public async Task LeaveQuestionGroup(Guid questionId)
{
    await Groups.RemoveFromGroupAsync(Context.ConnectionId, questionId.ToString());
}
Doing the same from outside the Hub class would be much more complicated since you won’t have access to that Context property. The client-side API also hides the connectionId. This seems to be deliberate and I can only guess why they decided to do so. Rethink your approach if you find yourself having to use the connectionId outside the Hub class!
We can now send a new event whenever a new answer is added, but only to clients currently part of the group for that question.
Begin by adding a new method to the IQuestionHub interface
Task AnswerAdded(Answer answer);
..then update the AddAnswerAsync action of the QuestionController so we send that event to the question group:
await this.hubContext
  .Clients
  .Group(id.ToString())
  .AnswerAdded(answer);
This completes the server side.
From the client point of view, there is no difference between listening to the new AnswerAdded SignalR event or the previous QuestionScoreChange event. Add a new listener to the question-hub Vue plugin like:
connection.on('AnswerAdded', answer => {
  questionHub.$emit('answer-added', answer)
})
And then update the question.vue page so that it listens to the new event and includes the answer in the list (where the function onAnswerAdded already exists in the component):
created () {
  // previous code
  …
  this.$questionHub.$on('answer-added', this.onAnswerAdded)
},
beforeDestroy () {
  // previous code
  …
  this.$questionHub.$off('answer-added', this.onAnswerAdded)
},
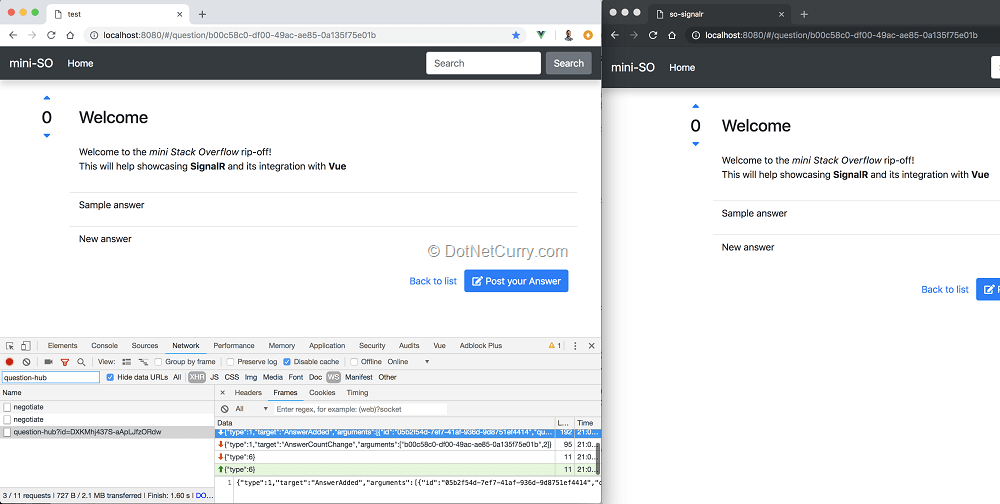
Figure 11, receiving new answer events when viewing a question
That’s it, now clients viewing a question will be notified if an answer is added to that question. Any other client who isn’t viewing that same question won’t be notified.
Conclusion
SignalR is a simple but powerful library for implementing real time functionality in ASP.NET Core applications. This article, although lengthy, only scratched the surface of what’s available, without having even gotten near concerns like hosting, authentication or scaling.
The main building blocks like the Hub, HubContext or individual events are relatively straightforward to understand and use. Perhaps the strongly typed interfaces that can be combined with the Hub and HubContext, like the IQuestionHub created in this article, are one of the most confusing pieces (For example, it took me a while to realize those interfaces don’t need to be implemented at all by the Hub class).
Reading the documentation is highly recommended as it provides enough detail on how to get started and move onto advanced topics. I still find it easier to think in terms of events rather than methods though. If you are too used to libraries like socketio, doing the same mental translation might help you when digging into SignalR, which talks about RPC calls and methods, rather than events and listeners.
Personally, I also appreciate the JavaScript client being a minimal API, as opposed to trying to do everything for you. It does little but what it does, it does well - like connecting to a hub, sending/receiving events and serializing/deserializing parameters. How to integrate with your frontend framework of choice or add robustness like auto-reconnect, is up to you. Being a minimal API also gives you greater freedom when integrating into your app/framework. The discussion we had in section 3 is an example of this freedom.
This article was technically reviewed by Damir Arh.
This article has been editorially reviewed by Suprotim Agarwal.
C# and .NET have been around for a very long time, but their constant growth means there’s always more to learn.
We at DotNetCurry are very excited to announce The Absolutely Awesome Book on C# and .NET. This is a 500 pages concise technical eBook available in PDF, ePub (iPad), and Mobi (Kindle).
Organized around concepts, this Book aims to provide a concise, yet solid foundation in C# and .NET, covering C# 6.0, C# 7.0 and .NET Core, with chapters on the latest .NET Core 3.0, .NET Standard and C# 8.0 (final release) too. Use these concepts to deepen your existing knowledge of C# and .NET, to have a solid grasp of the latest in C# and .NET OR to crack your next .NET Interview.
Click here to Explore the Table of Contents or Download Sample Chapters!
Was this article worth reading? Share it with fellow developers too. Thanks!
Daniel Jimenez Garciais a passionate software developer with 10+ years of experience who likes to share his knowledge and has been publishing articles since 2016. He started his career as a Microsoft developer focused mainly on .NET, C# and SQL Server. In the latter half of his career he worked on a broader set of technologies and platforms with a special interest for .NET Core, Node.js, Vue, Python, Docker and Kubernetes. You can
check out his repos.