The world of .NET has changed rapidly in the recent years, becoming a modern cross-platform environment aware of modern challenges. These challenges in the past were solved traditionally with the knowledge and expertise of other languages and frameworks. But today, .NET developers can apply their strengths and skills to solve complex problems.
For example, today one can use .NET to build a website without the need for JavaScript or to classify images with a Machine Learning model. This is made possible by two recent additions to the .NET ecosystem, Blazor and ML.NET.
Blazor is a framework that lets .NET developers build client web applications entirely in .NET, without the need for a JavaScript framework. It leverages technologies such as SignalR and WebAssembly in order to support different hosting models, of which the server-side one based on SignalR is now part of ASP.NET Core (The client-side WebAssembly model is still experimental as of today).
On the other hand, ML.NET is a new offering from Microsoft that provides an open source and cross platform framework for Machine Learning. It allows .NET developers to leverage their existing knowledge and skills while supporting popular existing Machine Learning technologies such as TensorFlow and ONNX.
Through the rest of the article we will explore how Blazor and ML.NET can be used to build a sample website that lets users upload images which will be classified by a pre-trained TensorFlow model using ML.NET. Enjoy!

Figure 1, our target, a Blazor website classifying images with ML.NET
You can find the source code on GitHub.
Creating the ML.NET model
Machine Learning lets you use existing well-known data in order to create a model, which can later be used with previously unseen data to make predictions.
For example, one can use a pre-classified set of images with objects in them (a canoe, a teddy bear, a coffee pot, etc.) and create a model that can be used to identify the object in an image. The act of building a model is called training a model, and the data used to train it is called the training dataset.
The ML.NET framework provides an API that lets developers implement the following workflow:
- Define the data schema, for example a bitmap image
- Define transformations over the initial data, for example resizing the image and extracting the pixels
- Train the model using a training dataset, the defined transformations and one of the available algorithms.
- Evaluate the accuracy and precision of the model using a second dataset, the evaluation dataset (which is different from the training dataset!)
- Save the model so it can be used to make future predictions
You can see a simple example that puts together all these concepts in the official docs.
Creating an ML.NET model using an existing TensorFlow model
As mentioned in the introduction, ML.NET is compatible with TensorFlow, one of the most popular frameworks for building Machine Learning models. You can use an existing TensorFlow model as the starting point to derive further knowledge, as in this article of the docs. However, you can also use ML.NET to simply load an existing TensorFlow model and use it to make predictions.
In this article, we will implement an application that follows an idea similar to this excellent article by Cesar de la Torre. We will use an existing TensorFlow model that has been trained for image recognition so it can identify the object in a given image and classify it into one of 1000 different categories. This model follows the Google’s Inception architecture, and has been trained on a popular academical dataset for image recognition called ImageNet. While you could train the model yourself, for example following the instructions from TensorFlow’s official Github, you can also download a fully trained model file from one of Microsoft’s examples here or from Google. (The important files are the .pb with the model and the .txt with labels.)
Let’s begin to create our application. Create an empty solution, then add a console project named ModelBuilder to the solution. Later in the article we will add a second project to the solution with the Blazor application.
Once the solution and project are created, we need to install several NuGet packages that will be used to build the model. Make sure to install all of:
- Microsoft.ML
- Microsoft.ML.ImageAnalytics
- Microsoft.ML.TensorFlow
- SciSharp.TensorFlow.Redist
Next, create a folder named TFInceptionModel and download the pre-trained TensorFlow model files from Microsoft’s example.

Figure 2, creating the ModelBuilder console application
As the final setup step, we will make sure that the working directory when launching the project is set to the project folder. This will allow us to reference folders and files relative to the project root in a way that works regardless whether the project is run with Visual Studio or dotnet run in the console (More info on this GitHub issue). Update the ModelBuilder.csproj file adding the following entry to the property group:
<RunWorkingDirectory>$(MSBuildProjectDirectory)</RunWorkingDirectory>
Let’s finally begin to add some code. Start by adding a DataModel folder. Inside, create a new class ImageInputData with the following contents:
public class ImageInputData
{
    [ImageType(224, 224)]
    public Bitmap Image { get; set; }
}
This will be our entry to the model we will begin creating next, it simply tells ML.NET that we will use a bitmap image of 224×224 pixels. This matches the size used to train the downloaded TensorFlow model.
Next add a new ModelBuilder class to the project. This is where we will define the ML.NET model that will:
1. load a bitmap image
2. resize it as 224×224 and extract its pixels
3. run it through the downloaded TensorFlow model
Following ML.NET’s API, we would define a pipeline with the loading and transformation steps, then train the model using a training dataset and finally evaluate its accuracy. Since we will be directly using the pre-trained TensorFlow model, we can skip the training and evaluation steps. The steps to build the model would then look like:
public ModelBuilder(string tensorFlowModelFilePath, string mlnetOutputZipFilePath)
{
    _tensorFlowModelFilePath = tensorFlowModelFilePath;
    _mlnetOutputZipFilePath = mlnetOutputZipFilePath;
}

public void Run()
{
    // Create new model context
    var mlContext = new MLContext();

    // Define the model pipeline:
    //    1. loading and resizing the image
    //    2. extracting image pixels
    //    3. running pre-trained TensorFlow model
    var pipeline = mlContext.Transforms.ResizeImages(
            outputColumnName: "input",
            imageWidth: 224,
            imageHeight: 224,
            inputColumnName: nameof(ImageInputData.Image)
        )
        .Append(mlContext.Transforms.ExtractPixels(
            outputColumnName: "input",
            interleavePixelColors: true,
            offsetImage: 117)
        )
        .Append(mlContext.Model.LoadTensorFlowModel(_tensorFlowModelFilePath)
            .ScoreTensorFlowModel(
                outputColumnNames: new[] { "softmax2" },
                inputColumnNames: new[] { "input" },
                addBatchDimensionInput: true));

    // Train the model
    // Since we are simply using a pre-trained TensorFlow model,
    // we can "train" it against an empty dataset
    var emptyTrainingSet =
        mlContext.Data.LoadFromEnumerable(new List<ImageInputData>());
    ITransformer mlModel = pipeline.Fit(emptyTrainingSet);

    // Save/persist the model to a .ZIP file
    // This will be loaded into a PredictionEnginePool by the
    // Blazor application, so it can classify new images
    mlContext.Model.Save(mlModel, null, _mlnetOutputZipFilePath);
}
As you can see, we are mostly resizing the images and extracting the pixels into the format used to train the TensorFlow model (Same size, offset and pixel interleave order), then we simply use the pre-trained TensorFlow model. If you are curious about the name of the input and output columns, these also need to match the names used by the TensorFlow model. You can check this out yourself by loading the .pb file into a TensorFlow explorer such as netron:
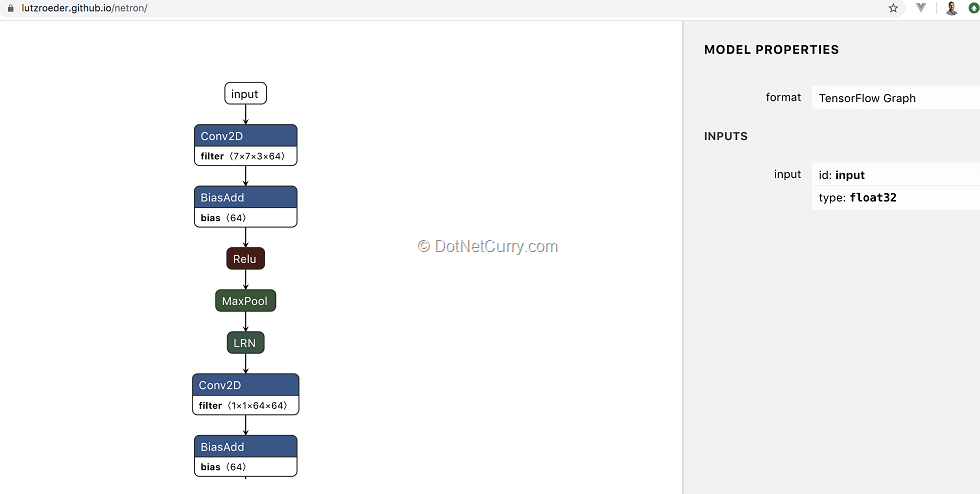
Figure 3, inspecting TensorFlow model with Netron to get the input name “input”
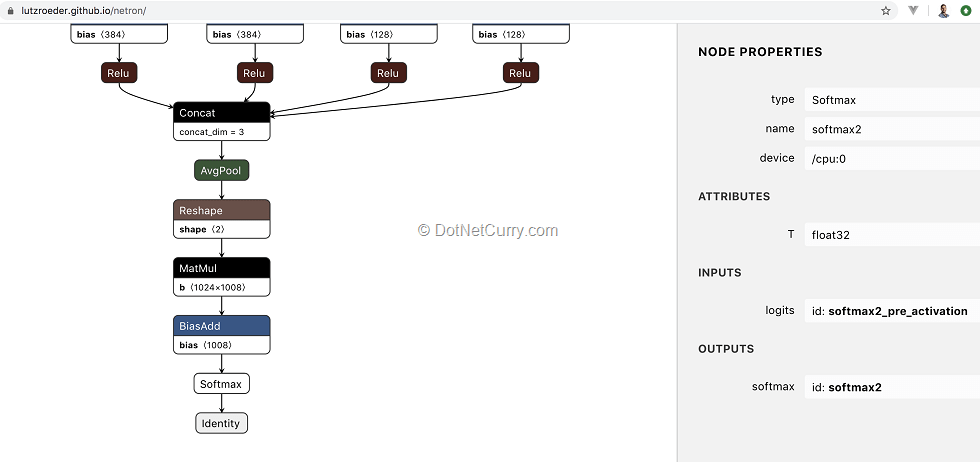
Figure 4, inspecting TensorFlow model with Netron to get the output name "softmax2"
All we have to do now is to modify Program.cs so it calls our ModelBuilder class in order to generate the model and save it to a .zip file:
static void Main(string[] args)
{
    var tensorFlowModelPath = "TFInceptionModel/tensorflow_inception_graph.pb";
    var mlnetOutputZipFilePath = "PredictionModel.zip";
    var modelBuilder = new ModelBuilder(tensorFlowModelPath, mlnetOutputZipFilePath);
    modelBuilder.Run();

    Console.WriteLine($"Generated {Path.GetFullPath(mlnetOutputZipFilePath)}");
}
You should now be able to build and run the application using either Visual Studio or dotnet run, which will generate a file named PredictionModel.zip at the root of the project folder.
Using the ML.NET model to make predictions
So far, we have created a model and saved it to a .zip file, but we haven’t used it yet to try and identify the object inside a given image. Let’s see how we can use our model to make predictions!
To begin with, create a new folder SampleImages at the solution root and download the following images from Microsoft’s example. We will ask the model to classify the first image broccoli.jpg:

Figure 5, a sample broccoli image to try our model
Next, create a new class ImageLabelPredictions inside the DataModel folder. This class simply represents the output of the model, the array of probabilities assigned to each of the 1000 labels the model was trained on (Remember we downloaded a txt file with the names of each of the labels):
public class ImageLabelPredictions
{
    [ColumnName("softmax2")]
    public float[] PredictedLabels { get; set; }
}
Now we can follow the instructions available in the ML.NET official docs that explains how to use the ML.NET model to make predictions. We will add some code at the end of the ModelBuilder.Run method.
Let’s begin by loading the model from the zip file we just created:
DataViewSchema predictionPipelineSchema;
mlModel = mlContext.Model.Load(_mlnetOutputZipFilePath, out predictionPipelineSchema);
Next we need to create a Prediction Engine from our trained model. This lets us classify one image at a time, which is enough for our purposes. Check the ML.NET docs for a batch mode example.
var predictionEngine = mlContext.Model
    .CreatePredictionEngine<ImageInputData, ImageLabelPredictions>(mlModel);
As you can see, the engine receives an ImageInputData instance as input and returns an ImageLabelPredictions output. In order to classify an image, we need to load the image into an instance of ImageInputData and call the Predict method of the engine:
var image = (Bitmap)Bitmap.FromFile("../SampleImages/broccoli.jpg");
var input = new ImageInputData{ Image = image };
var prediction = predictionEngine.Predict(input);
The output prediction variable is an instance of the ImagePredictionLabel class, containing an array of 1000 elements. Each element of the array represents the probability assigned by the model to each of the labels. We can then find the maximum probability and its associated label name:
var maxProbability = prediction.PredictedLabels.Max();
var labelIndex = prediction.PredictedLabels.AsSpan().IndexOf(maxProbability);
var allLabels = System.IO.File.ReadAllLines("TFInceptionModel/imagenet_comp_graph_label_strings.txt");
var classifiedLabel = allLabels[labelIndex];
Console.WriteLine($"Test image broccoli.jpg predicted as '{classifiedLabel}' with probability {100 * maxProbability}%");
That’s it! If you build and run the project, you should see an output in the console similar to the following one:
$ dotnet run
...
Test image broccoli.jpg predicted as 'broccoli' with probability 99.99056%
Generated PredictionModel.zip
Using System.Drawing on Mac or Linux
The code above relies on System.Drawing in order to convert the image into a Bitmap. While System.Drawing is now part of .NET Core, and thus cross-platforms, you might still need to install its dependencies.
More specifically, you will need to install the GDI+ libraries for your system. You can try the following commands:
# Linux
sudo apt install libc6-dev
sudo apt install libgdiplus
# Mac
brew install mono-libgdiplus
Integrating the ML.NET model in a Blazor website
So far, we have created a console application which creates a Machine Learning model and saves it as a zip file. ML.NET provides the necessary APIs to integrate the model in any application in order to make predictions with it. In this second half of the article, we will integrate the model within a Blazor application so users can upload images which will be identified using the previously generated model.
Begin by adding a new server-side Blazor project to the solution, named BlazorClient. Once generated, install the following NuGet packages. We will use them to upload files and to use the ML.NET model:
- Microsoft.Extensions.ML
- BlazorInputFile (It’s in prerelease so it won’t show in the Visual Studio NuGet unless you check “Include prerelease”)
After installing BlazorInputFile, update the _Host.cshtml file located inside the Pages folder. You will need to add its JavaScript file right before the closing </body> tag:
http://_content/BlazorInputFile/inputfile.js
We will also need to add a reference to the ModelBuilder project. From the BlazorClient, we will use the ImageInputData and ImagePredictionLabels classes as the input/output of the model prediction engine respectively.
Deploy model and label files to the bin folder
In order to use the generated model, we will need to use both the zip and label files. ML.NET provides an API to load models both from the local file system or a remote network location. To keep things simple, we will load it from the local file system.
Update the .csproj file of the ModelBuilder project so both the generated zip model and labels file are copied to the output folder:
<ItemGroup>
  <None Update="PredictionModel.zip">
    <CopyToOutputDirectory>PreserveNewest</CopyToOutputDirectory>
  </None>
  <None Update="TFInceptionModel\imagenet_comp_graph_label_strings.txt">
    <CopyToOutputDirectory>PreserveNewest</CopyToOutputDirectory>
  </None>
</ItemGroup>
After this change, whenever we build the BlazorClient, the model and labels will be copied to the output folder alongside the ModelBuilder DLL.
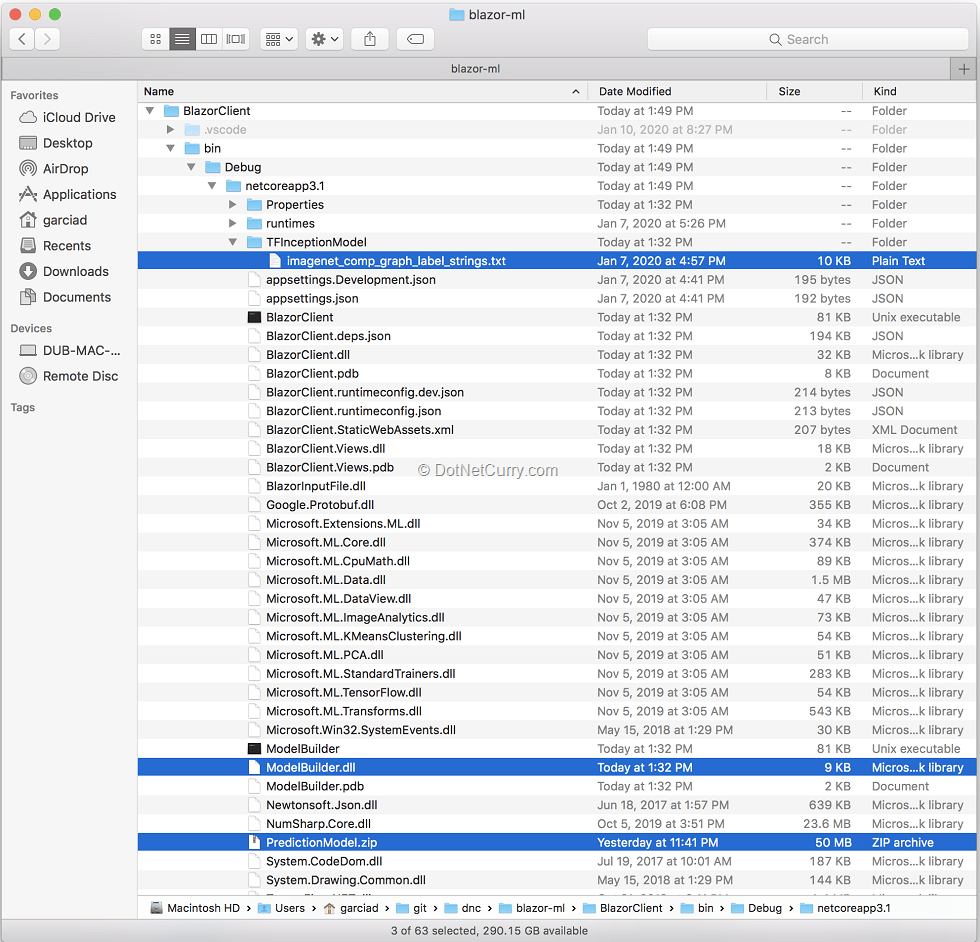
Figure 6, ModelBuilder DLL, model zip file and labels copied to the output folder
This way we will read both model and labels file from the local file system. The only thing we need is a little utility to get the full path to a file inside the current bin folder (as opposed to the entry folder where dotnet run was called). Create a small utility class PathUtilities since we will need it in a couple of places:
public class PathUtilities
{
  public static string GetPathFromBinFolder(string relativePath)
  {
      FileInfo _dataRoot = new FileInfo(typeof(Program).Assembly.Location);
      string assemblyFolderPath = _dataRoot.Directory.FullName;

      string fullPath = Path.Combine(assemblyFolderPath, relativePath);
      return fullPath;
  }
}
Setting up a Prediction Engine Pool
In the previous section we saw how we could create a Prediction Engine and use it to make predictions, identifying objects in new images. The approach worked fine while we had a console application and used the model with one image at a time.
However, the Prediction Engine is not thread safe. This means we need a slightly different approach in the context of a Blazor application, which is inherently multi-threaded like any other ASP.NET web application. Luckily, ML.NET already provides a thread safe solution designed to be used in the context of web applications and services, the Prediction Engine Pool.
Setting up the Prediction Engine Pool is very straightforward, with ML.NET providing the necessary dependency injection extensions. Add the following registration to the ConfigureServices method of the Startup class:
services.AddPredictionEnginePool<ImageInputData, ImageLabelPredictions>()
        .FromFile(PathUtilities.GetPathFromBinFolder("PredictionModel.zip"));
It is as simple as it looks. We register a Prediction Engine Pool by telling ML.NET where to find the zip file with the model and which specific classes are to be used as input/output when making predictions.
· When registering the engine pool, ML.NET lets you load the model both from the local file system (using the FromFile extension method) or a network location (using the FromUri extension method). In both cases, optional parameters let you automatically reload the model whenever a new version of the model is published, either using a FileSystemWatcher or polling the network location.
Once registered, we can inject instances of PredictionEnginePool<ImageInputData, ImageLabelPredictions>, the class which exposes the Predict method that will let us identify images.
Creating a prediction service
Now that we have registered the PredictionEnginePool, we could directly use it from a Blazor page/component via the @inject directive. However, as we saw earlier when testing the generated model, there is a bit of boilerplate needed to use the Predict method. We need to load the image into a Bitmap, create the ImageInputData instance, call the Predict method and finally find the label with the highest probability and map it to the actual label name.
Let’s instead create a service class where we can hide these details. Begin by creating a new class ImageClassificationResult inside the existing Data folder. Rather than using the raw model output, which contains an array of 1000 probabilities (one per label) which has to be interpreted, our service will return a simpler class with the name of the highest probability label and its actual probability:
public class ImageClassificationResult
{
    public string Label { get; set; }
    public float Probability { get; set; }
}
Now let’s create the service class that encapsulates the boilerplate needed to run the model. Add an ImageClassificationService class also inside the Data folder with the following contents:
public ImageClassificationService(PredictionEnginePool<ImageInputData, ImageLabelPredictions> predictionEnginePool)
{
    _predictionEnginePool = predictionEnginePool;
    // Read the labels from txt file available in the output bin folder
    string labelsFileLocation = PathUtilities.GetPathFromBinFolder(
        Path.Combine("TFInceptionModel", "imagenet_comp_graph_label_strings.txt"));
    _labels = System.IO.File.ReadAllLines(labelsFileLocation);
}

public ImageClassificationResult Classify(MemoryStream image)
{
    // Convert to image to Bitmap and load into an ImageInputData
    Bitmap bitmapImage = (Bitmap)Image.FromStream(image);
    ImageInputData imageInputData = new ImageInputData { Image = bitmapImage };

    // Run the model
    var imageLabelPredictions = _predictionEnginePool.Predict(imageInputData);

    // Find the label with the highest probability
    // and return the ImageClassificationResult instance
    float[] probabilities = imageLabelPredictions.PredictedLabels;
    var maxProbability = probabilities.Max();
    var maxProbabilityIndex = probabilities.AsSpan().IndexOf(maxProbability);
    return new ImageClassificationResult()
    {
      Label = _labels[maxProbabilityIndex],
      Probability = maxProbability
    };
}
The service receives the PredictionEnginePool through dependency injection. It also reads the labels file once as part of the constructor, so they are already loaded in memory by the time an image needs to be classified.
The implementation of the Classify method follows the very same steps we took when testing the generated model as part of the ModelBuilder project. The main difference is that we receive the image as an instance of MemoryStream, which is then transformed into a Bitmap using the System.Drawing utilities (with the system dependencies we already saw in the case of Mac and Linux). Using a MemoryStream will let us easily integrate with the code that will receive user uploaded images from a Blazor page.
Finally, let’s register the service within the dependency injection container so it can be later injected into the Blazor pages/components. Add the following line to the ConfigureServices method of the Startup class:
services.AddSingleton<ImageClassificationService>();
Uploading images
It is time to start building the user interface using Blazor. Let’s add a new Razor component named Identify.razor inside the Pages folder. This page will let users upload one or multiple images using the BlazorInputFile component, so if you haven’t yet installed it using NuGet, do so now.
@page "/identify"
@using System.Collections.Generic
@using BlazorClient.Data
@using BlazorInputFile

<div class="container">
  <h1>Identify image</h1>

  <p>
    This component allows sending an image to run the image recognition model.
    Select an image to start the upload and recognition process.
  </p>
  <form>
    <InputFile multiple OnChange="OnImageFileSelected" accept="image/*"/>
  </form>

  <div class="row my-4">
    @foreach (var image in selectedImages)
    {
      <div class="col-4">
        <p>@image.Name</p>
      </div>
    }
  </div>
</div>


@code {
    List<IFileListEntry> selectedImages = new List<IFileListEntry>();

    void OnImageFileSelected(IFileListEntry[] files)
    {
        selectedImages.AddRange(files);
    }
}
You can also add a link to your new page in the left-hand menu of the website. Simply edit the NavMenu.razor file located inside the Shared folder, adding a new item that navigates to the /identify route associated with the page you just created:
<li class="nav-item px-3">
  <NavLink class="nav-link" href="identify">
    <span class="oi oi-list-rich" aria-hidden="true"></span> Identify image
  </NavLink>
</li>
Right now, this results in a very uninteresting page that lets users select the image files, the names of which are then rendered in the page.

Figure 7, the first unimpressive iteration of our page
There are a few interesting details though!
As we already mentioned, we use the BlazorInputFile component for users to select files which will then be uploaded to the server.
Notice how we have added the accept="image/*" attribute to the InputFile component exposed by BlazorInputFile. While this isn’t a property specifically allowed by the Blazor component, it uses a property dictionary in order to capture all the additional unknown properties which are then added directly to the HTML input element. Read more about this technique in the Blazor docs.
We have also added an event handler for its OnChange event, where we have access to an array of IFileListEntry. Each IFileListEntry instance contains information about an individual file selected by the user, including a Data property of type Stream. We will later use this property in order to upload the image to the server into a MemoryStream instance that can be then used with the ImageClassificationService. This piece, which we will be needing in a moment, looks as follows:
var file = files.FirstOrDefault();
var downloadedFileData = new MemoryStream();
await file.Data.CopyToAsync(downloadedFileData);
Let’s now create a model class that identifies each selected image. This model will contain the code seen in the previous paragraph that lets us upload the image from the IFileListEntry into a MemoryStream, as well as a property with the classification result.
Note: Apart from keeping the page/component code cleaner, using a specific model class will let us extract/process the data we need from the IFileListEntry. We will later see how this will come really handy as we add a button for users to remove one of the uploaded files, which can cause Blazor to destroy and re-initialize some components.
Add a new class SelectedImage inside the Data folder:
public class SelectedImage
{
    private IFileListEntry _file;
    public ImageClassificationResult ClassificationResult { get; set; }
    public string Name => _file.Name;

    public SelectedImage(IFileListEntry file)
    {
        _file = file;
    }

    public async Task<MemoryStream> Upload()
    {
        var fileStream = new MemoryStream();
        await _file.Data.CopyToAsync(fileStream);
        return fileStream;
    }
}
Now update the Blazor page so it stores a list of SelectedImage instead of IFileListEntry:
List<SelectedImage> selectedImages = new List<SelectedImage>();

void OnImageFileSelected(IFileListEntry[] files)
{
    selectedImages.AddRange(
      files.Select(f => new SelectedImage(f)));
}
Creating a child component for individual images
We are now ready to create a specific Blazor component that will render an individual image and its ML.NET classification result. This will follow a classic parent-child relationship between the previous Identify.razor page and the new child component.
Add a new IdentifyImage.razor component inside the Shared folder. For now, the component will receive a SelectedImage as parameter and will render a bootstrap card (The Blazor project template comes with Bootstrap4 CSS framework preconfigured) with the name of the file:
@using BlazorClient.Data

<div class="card mb-2">
  <div class="card-header">
    @Image.Name
  </div>
  <div class="card-body">
    We will render here the classification result
  </div>
</div>

@code {
    [Parameter]
    public SelectedImage Image { get; set; }
}
This way we can update the template of the parent Identify.razor page so it renders this component for each of the images:
@foreach (var image in selectedImages)
{
  <div class="col-4">
    <IdentifyImage Image="image" />
  </div>
}
You should see something like the following screenshot:

Figure 8, the page now using a child component for each individual file
Let’s now allow users to remove one of the uploaded images. This is a good excuse to study how a child can communicate back to its parent, since the child IdentifyImage.razor component needs to let the parent Identify.razor page know which image should be removed.
Update the IdentifyImage.razor component with a new EventCallback parameter and a method to trigger it:
[Parameter]
public EventCallback<SelectedImage> OnClear { get; set; }

async Task TriggerOnClear()
{
    await OnClear.InvokeAsync(Image);
}
Now update the component template with a button whose click event will execute the TriggerOnClear method:
<p class="card-text">
  <button class="btn btn-secondary" @onclick="TriggerOnClear">Clear</button>
</p>
The changes in the child IdentifyImage.razor component are finished. Now we need to listen to the EventCallback in the parent component, which should remove the image from the list of selected images.
First add a new method to be triggered by the callback:
void OnClear(SelectedImage image)
{
    selectedImages.Remove(image);
}
Then update the template in order to bind the method to the EventCallback.
<IdentifyImage @key="image" Image="image" OnClear="OnClear" />
Notice the usage of the @key special directive. This directive is critical for Blazor to be able to minimize the work needed when removing elements, as described in its official docs.
Note: Even with this directive, I have been surprised by Blazor recreating component instances which were not affected. For example, given a list of 3 images, removing the second image will result on the component for the 3rd image to be removed and recreated! Make sure to take this into account when relying on component lifecycle events.
If you build and run, the page should look similar to the following screenshots, where users are able to upload multiple files, which can later be removed:
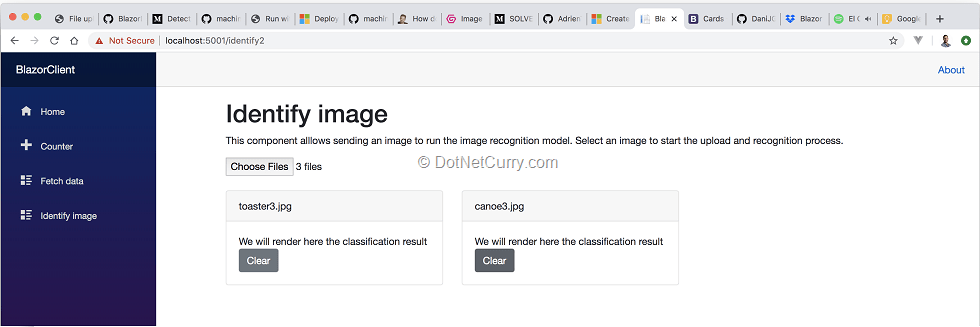
Figure 9, updated page and component allowing users to remove uploaded images
Using the Classification service from the individual image component
It is now time to join all the pieces and run the image classification model for each of the uploaded images. All we need to do is:
- Inject the ImageClassificationService into the image component
- Upload the image into a MemoryStream, using the Upload method of the SelectedImage class
- Run the Classify method of the service, rendering the result in the card body
Begin by injecting the service into the IdentifyImage.razor component:
@inject ImageClassificationService ClassificationService
Then we will run the image classification during the component initialization, one of its lifecycle events. We will store the result in the ClassificationResult property of the SelectedImage class:
protected override async Task OnInitializedAsync()
{
    if (Image.ClassificationResult != null) return;
    using(var fileStream = await Image.Upload())
    {
        Image.ClassificationResult = ClassificationService.Classify(fileStream);
    }
}
Notice how we do nothing when the image has already been classified. This prevents us from re-running the model if Blazor recreates the component.
Finally, update the component template in order to render the classification result. In case the result isn’t ready, we will render some text letting the user know that the upload and classification process is in progress. Add the following elements inside the card-body element of the template:
<p class="card-text text-center my-2">
  @if (Image.ClassificationResult != null)
  {
    @:Classified as <strong>@Image.ClassificationResult.Label</strong>
    @:with <strong>@Image.ClassificationResult.Probability</strong> probability
  }
  else
  {
    <em>Processing...</em>
  }
</p>
Rebuild and run the Blazor application. You should finally be able to upload and classify images, as in the following screenshot:
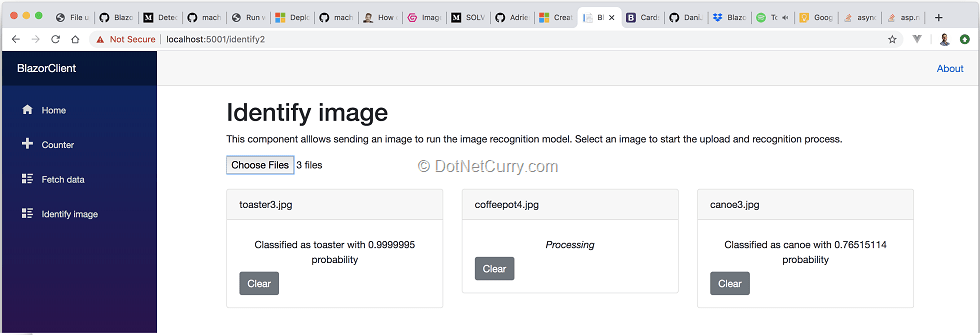
Figure 10, classifying uploaded images
Polishing the UX by rendering each image and adding and upload progress indicator
While the app is perfectly functional, the UX is very rough. Fortunately, we can improve it with some simple changes.
First, we can render the uploaded image, which will make the UX much nicer. We can update the SelectedImage class so we capture the base64 string of the uploaded image. This way, we will be able to add an HTML img element that renders said base64 string.
public string Base64Image { get; private set; }

public async Task<MemoryStream> Upload()
{
    ... earlier method contents ...

    // Get a base64 so we can render an image preview
    Base64Image = Convert.ToBase64String(fileStream.ToArray());
    return fileStream;
}
Now update the template of the IdentifyImage.razor component and add the following img element right before the card-body element:
@if (Image.Base64Image != null)
{
  <img src="data:image/png;base64, @Image.Base64Image" class="card-img-top" alt="@Image.Name">
}
That’s it, the uploaded images will now be rendered as well.
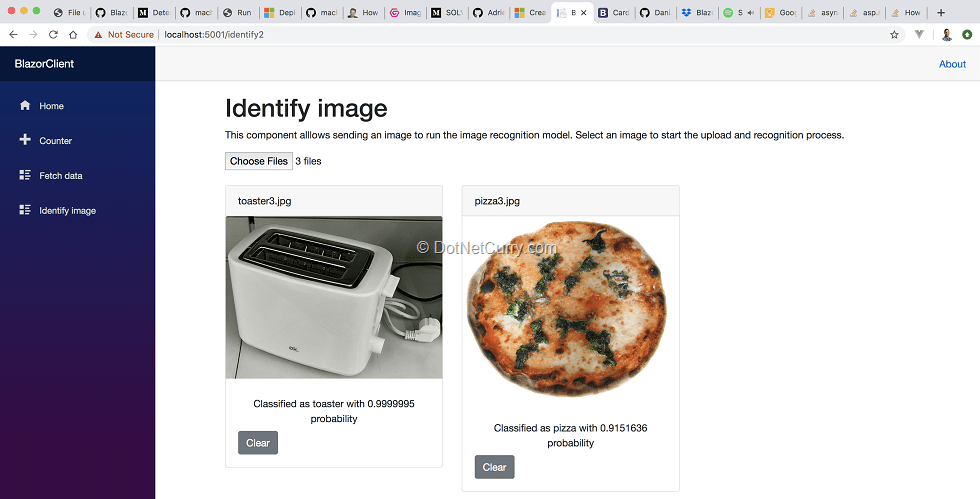
Figure 11, rendering uploaded images
The final improvement we will make is to show a Bootstrap progress bar that gives the user feedback on the upload progress.
Update the SelectedImage class with a new read-only property that returns the uploaded percentage by calculating how many of the total file bytes have been read so far:
public double UploadedPercentage => 100.0 * _file.Data.Position / _file.Size;
Next update the template of the IdentifyImage component so it renders the progress bar using the calculated percentage:
<div class="progress">
  <div class="progress-bar" role="progressbar"
   style="width: @Image.UploadedPercentage%"
   aria-valuenow="@Image.UploadedPercentage"
   aria-valuemin="0"
   aria-valuemax="100"/>
</div>
However, if you build and run the project, you will notice that the bar is stuck at 0 during a file upload! That is because Blazor doesn’t know it needs to update the UX during the file upload. In cases like this, we need to notify Blazor that component dependent state has changed by invoking the StateHasChanged method.
Update the Upload method of the SelectedImage class so we can provide an Action to be invoked to report progress:
public async Task<MemoryStream> Upload(Action OnDataRead)
{
    EventHandler eventHandler = (sender, eventArgs) => OnDataRead();
    _file.OnDataRead += eventHandler;

    ... existing code ...

    _file.OnDataRead -= eventHandler;
    return fileStream;
}
Then update the OnInitializedAsync method of the IdentifyImage.razor component so it invokes the StateHasChanged method during the upload process:
await Image.Upload(() => InvokeAsync(StateHasChanged))
This way, Blazor now has to update the UX during the upload process. If you build and run the project, you should finally see a working progress bar.
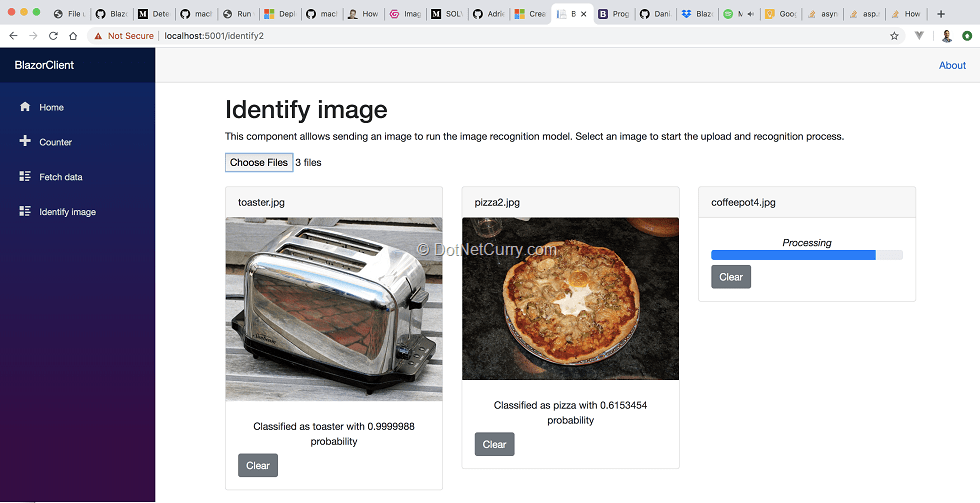
Figure 12, giving feedback on the upload process with a progress bar
Conclusion
It is a very interesting time to be a .NET developer. Thanks to Blazor and ML.NET, we have seen how leveraging your current C# and .NET skills, it is now possible to build a SPA web application and a Machine Learning model that lets you identify objects in images.
Microsoft seems really excited about both technologies, not without a reason. These were areas traditionally outside the scope of .NET developers, who at best had to master additional skills, and at worse would avoid them.
While currently they are not as fully featured as established SPA and Machine Learning solutions, they are already perfectly functional and have been designed so they are extensible and compatible with existing technologies.
I can’t wait to see how far Microsoft and communities like ours, can push them!
Download the entire source code of this article on GitHub.
This article was technically reviewed by Damir Arh.
This article has been editorially reviewed by Suprotim Agarwal.
C# and .NET have been around for a very long time, but their constant growth means there’s always more to learn.
We at DotNetCurry are very excited to announce The Absolutely Awesome Book on C# and .NET. This is a 500 pages concise technical eBook available in PDF, ePub (iPad), and Mobi (Kindle).
Organized around concepts, this Book aims to provide a concise, yet solid foundation in C# and .NET, covering C# 6.0, C# 7.0 and .NET Core, with chapters on the latest .NET Core 3.0, .NET Standard and C# 8.0 (final release) too. Use these concepts to deepen your existing knowledge of C# and .NET, to have a solid grasp of the latest in C# and .NET OR to crack your next .NET Interview.
Click here to Explore the Table of Contents or Download Sample Chapters!
Was this article worth reading? Share it with fellow developers too. Thanks!
Daniel Jimenez Garciais a passionate software developer with 10+ years of experience who likes to share his knowledge and has been publishing articles since 2016. He started his career as a Microsoft developer focused mainly on .NET, C# and SQL Server. In the latter half of his career he worked on a broader set of technologies and platforms with a special interest for .NET Core, Node.js, Vue, Python, Docker and Kubernetes. You can
check out his repos.