that had the ng-controller attribute specified.
Adding a new Route, ng-Controller and a new View
Adding a new Route is easy, because the $routeProvider’s when method returns a $routeProvider so we can simply chain another when like this
$routeProvider.when(
"/", {
templateUrl: "timeline",
controller: "TimelineController"
}).when(
"/status/:id", {
templateUrl: "status",
controller: "StatusController"
});
What the new route is telling us is, the path /status comes with a parameter called id and the template to use is name ‘status’ and it should use the StatusController to get relevant details.
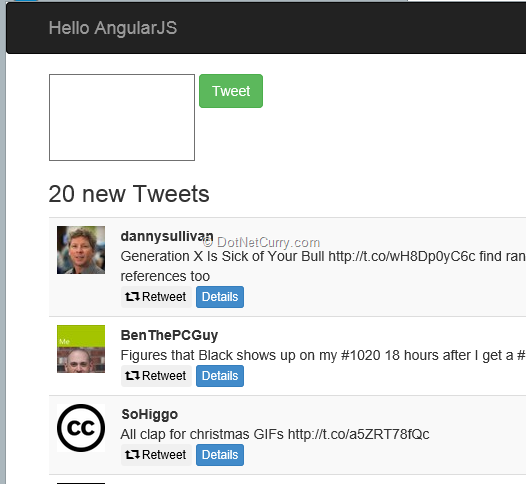
Next in the Index.cshtml, we’ll add an anchor tag and style it like a bootstrap button. We’ll also set the href to point to the status page and pass the status ID to it. This is accomplished with the following markup:
{{item.Id}}">Details
Note the #/ notation for URL. This is a part of HTML spec where URL starting with # doesn’t cause a postback, instead the browser looks for the anchor in the same page. Running the App will give us a result as shown below.

Setting up the new ng-Controller
Now let’s setup the StatusController in the hello-angular.js file.
ngTwitter.controller("StatusController", function ($scope, $http, $routeParams,
TwitterService)
{
var resultPromise = $http.get("/Home/Status/"+ $routeParams.id);
resultPromise.success(function (data)
{
$scope.status = data;
});
});
As we can see in the delegate, we have a new parameter getting injected called $routeParams. Thanks to our Route definition which specified the parameter as id and the URL in the View that sets up the id value, Angular sets up $routeParams as follows:
{ id: 1234567898 }
In the controller we setup a status object to be used as the view Model in $scope. Value of $scope.status is populated by our Server’s Status action method. We are revisiting $http service here so we have to use the promise to wait for Success callback to be called before we can set the value to $scope.status.
Adding new action method in HomeController to get Status from Twitter
In the HomeController we’ll add a new Status Action method. But before we do that, we’ll add a couple of properties to our TweetViewModel class. We’ll add FavoritedCount, RetweetedCount and HasMedia (a Boolean).
public class TweetViewModel
{
public string ImageUrl { get; set; }
public string ScreenName { get; set; }
public string MediaUrl { get; set; }
public string Tweet { get; set; }
public string Id { get; set; }
public string FavoriteCount { get; set; }
public string RetweetCount { get; set; }
public bool HasMedia { get; set; }
}
Next we refactor the translation of Status object into TweetViewModel from the Linq query to a helper method GetTweetViewModel
private TweetViewModel GetTweetViewModel(Status tweet)
{
var tvm = new TweetViewModel
{
ImageUrl = tweet.User.ProfileImageUrl,
ScreenName = tweet.User.Identifier.ScreenName,
MediaUrl = GetTweetMediaUrl(tweet),
Tweet = tweet.Text,
Id = tweet.StatusID,
FavoriteCount = tweet.FavoriteCount.ToString(),
RetweetCount = tweet.RetweetCount.ToString(),
};
tvm.HasMedia = !string.IsNullOrEmpty(tvm.MediaUrl);
return tvm;
}
Finally we add the Status action method to call Twitter using Linq2Twitter
[HttpGet]
public JsonResult Status(string id)
{
Authorize();
string screenName = ViewBag.User;
IEnumerable friendTweets = new List();
if (string.IsNullOrEmpty(screenName))
{
return Json(friendTweets, JsonRequestBehavior.AllowGet);
}
twitterCtx = new TwitterContext(auth);
friendTweets =
(from tweet in twitterCtx.Status
where tweet.Type == StatusType.Show &&
tweet.ID == id
select GetTweetViewModel(tweet))
.ToList();
if (friendTweets.Count() > 0)
return Json(friendTweets.ElementAt(0), JsonRequestBehavior.AllowGet);
else
return Json(new TweetViewModel { Tweet = "Requested Status Not Found" },
JsonRequestBehavior.AllowGet);
}
Adding the ‘status’ View
In the Index.cshtml, we add the following markup that will constitute the Status view.
Most of the markup is easy to understand. We are using the type=”text/ng-template” directive to declare this snippet as a template and tying it up with our route using the id=status.
If you remember in the Client Side controller we had added the data to $scope.status hence status is the name of our view model object, so while binding values, we use status.*
Towards the end we have a div with an ng-show directive with the value set to ‘status.HasMedia’. This is a directive we are using to dynamically show/hide any attached image that a tweet may have. Point to note is that value of ng-show is not escaped using {{ … }} impliying ng-show needs the binding expression from which to get the value and not the value itself.
All done.
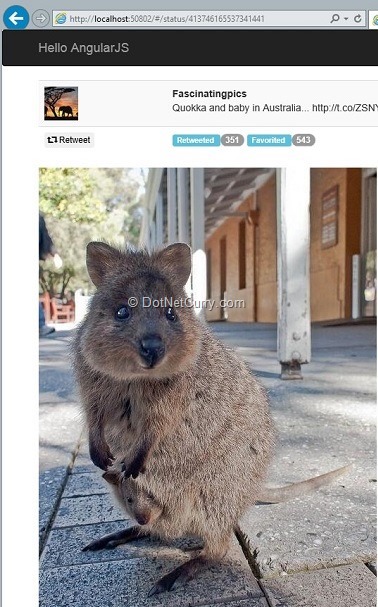
Run the application now and click on the details button to navigate to the status page. As we can see below we have an amusing image shared by the user Fascinatingpics.

Broken Retweet functionality
The hawk-eyed will note that the Retweet functionality is broken. This is because, while trying to show how to use a second controller, I left out the retweet method in our TimelineController. Actually the status functionality doesn’t need a separate controller of its own. To fix this we do the following:
1. Update status route to point to TimelineController
"/status/:id", {
templateUrl: "status",
controller: "TimelineController"
})
2. Update our TwitterService with a new status function, this will also require us to use the $http service that we’ll simply request Angular to inject. The status function will do the $http.get to retrieve the Status
ngTwitter.factory("TwitterService", function ($resource, $http)
{
return {
timeline: $resource("/Home/Tweet"),
status: function (id)
{
return $http.get("/Home/Status/" + id);
}
}
});
3. Next in the TimelineController, we’ll request for the $routeParams service and put an if condition to check whether $routeParams has the id property and if so, call the status method on the service and wait for the promise to return successfully.
ngTwitter.controller("TimelineController", function ($scope, $http, $routeParams, TwitterService)
{
if ($routeParams.id)
{
var statusPromise = TwitterService.status($routeParams.id);
statusPromise.success(function (data)
{
$scope.status = data;
});
}
else
{
$scope.tweets = TwitterService.timeline.query({}, isArray = true);
}
// rest of the code remains the same
…
}
That pretty much covers it and now our status view also uses the TimelineController. Thus now the retweet function will work perfectly!

Super sweet, we just verified a use-case for custom directives! We added the Retweet button in a new view and things just worked!
Making Directives self-contained
In our previous section, we abandoned the StatusController and stuffed everything back into TimelineController. That was an ugly hack. After all we want the Retweet functionality to be self-contained and reusable and Directives are meant to help create reusable components. Let’s see how we can do this.
Fortunately there is one concept about Directives that we haven’t visited yet and that is Directive specific controllers. Yup, directives can have their own controllers as well, so we’ll use this feature to further modularize our controller.
Custom Controller Directives
Currently our Retweet Directive is defined as follows:
ngTwitter.directive("retweetButton", function ()
{
return {
restrict: "E",
replace: true,
scope: {
text: "@",
clickevent: "&"
},
template: ""
};
});
It uses a local scope that is limited to the properties defined in here (that is text and clickevent properties). This scope overrides the global $scope. This is a key point to keep in mind when using Controllers for Directives.
We can update the above Directive as follows to have its own Controller
ngTwitter.directive("retweetButton", function ($http, $routeParams)
{
return {
restrict: "E",
replace: true,
transclude: true,
controller: function ($scope, $element)
{
// do what it takes to retweet
},
template: ""
};
});
Notice a few significant things:
1. We have let go of the custom scope, because we want access to the $scope.
2. As a result of the above, we have given up on the {{ text }} template in our HTML template for the button.
3. We’ve also removed the ng-click attribute from the button template and put the ng-transclude attribute back.
4. In the controller function we have $element which is an instance of the button from the template.
Moving the Retweet functionality into the Directive’s Controller
Well, we’ll need to move the Retweet functionality from the TimelineController into the retweetButton directive’s own controller. We add the highlighted code below to our Directive.
ngTwitter.directive("retweetButton", function ($http, $routeParams)
{
return {
restrict: "E",
replace: true,
transclude: true,
controller: function ($scope, $element)
{
$element.on("click", function ()
{
var resultPromise = $http.post("/Home/Retweet/", $scope.status);
resultPromise.success(function (data)
{
if (data.success)
{
alert("Retweeted successfully");
}
else
{
alert("ERROR: Retweeted failed! " + data.errorMessage);
}
});
});
},
template: ""
};
});
Let’s see what this does line by line:
1. We assign a click event handler to the $element which is essentially the button defined in the template.
2. When the click event fires, we use the $http object to do an http post and pass it the $scope.status object to this.
3. What does this $scope.status contain? Well that depends on the controller. As things are defined now, if we are in the Status Controller it provides us with the status object that is the current tweet as we can see from the controller below.
ngTwitter.controller("StatusController", function ($scope, $http, $routeParams,
TwitterService)
{
var resultPromise = $http.get("/Home/Status/" + $routeParams.id);
resultPromise.success(function (data)
{
$scope.status = data;
});
});
4. However if we are in the TimelineController, this will return undefined because there is no status object in the TimelineController. Instead we have the tweets object. When looping through the tweet object, we use the following markup and template in the index.cshtml

|
{{item.ScreenName}}
{{item.Tweet}}
|
Note we are using the ‘item’ instance from the tweets collection. If we rename the item instance to status we are done and the $scope.status in the Directive’s controller will be valid.
1. Once we have the $scope.status object sorted out, rest of the code is about handling the return value from the server and displaying a success or failure notice.
We can now remove the $scope.retweet function from the TimelineController.
If we run the application now, we’ll see that the ‘Retweet’ text has gone missing. This is because we are now transcluding text from the Directive markup into the Template. So we’ll have to update the Directive markup as follows in two places (the timeline and status templates)
Retweet
With this change done we are good to go.
The Final Demo Time
Run the application and put a breakpoint in the click event handler of the directive’s controller.

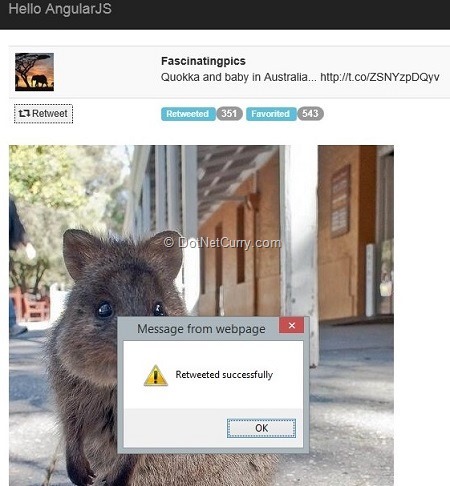
Click on Retweet for something you would like to share and it should use the new Directive Controller’s click event handler

Now navigate to the Details page of a Tweet

Click retweet, you should see the same breakpoint being hit again. Voila!

And that’s finally a wrap for now!
Conclusion
That was a not-so-quick introduction to some fundamental concepts of Angular JS. We saw how to do Data Binding, fetch and submit Data, create Custom Directives and refactor to some best practices.
We built a Twitter reader over the course of the article, highlighting how well AngularJS was suited to interact with HTTP APIs. Combined with its routing capabilities, AngularJS provides a nice platform for the category of web applications that is now termed as SPAs or Single Page Applications.
It is worth mentioning that Visual Studio 2013 has first class support for Angular JS and it recognizes Angular Directives in your markup and treat them accordingly.
You can also subscribe to our Free .NET Magazine and read the entire article (Download Issue 10 – Jan/Feb 2014).
Download the entire source code of the app (Github)
This article has been editorially reviewed by Suprotim Agarwal.
C# and .NET have been around for a very long time, but their constant growth means there’s always more to learn.
We at DotNetCurry are very excited to announce The Absolutely Awesome Book on C# and .NET. This is a 500 pages concise technical eBook available in PDF, ePub (iPad), and Mobi (Kindle).
Organized around concepts, this Book aims to provide a concise, yet solid foundation in C# and .NET, covering C# 6.0, C# 7.0 and .NET Core, with chapters on the latest .NET Core 3.0, .NET Standard and C# 8.0 (final release) too. Use these concepts to deepen your existing knowledge of C# and .NET, to have a solid grasp of the latest in C# and .NET OR to crack your next .NET Interview.
Click here to Explore the Table of Contents or Download Sample Chapters!
Was this article worth reading? Share it with fellow developers too. Thanks!
Sumit is a .NET consultant and has been working on Microsoft Technologies since his college days. He edits, he codes and he manages content when at work. C# is his first love, but he is often seen flirting with Java and Objective C. You can follow him on twitter at @
sumitkm or email him at sumitkm [at] gmail