Visual Studio 2015 Preview comes with new ASP.NET 5 templates for application development. If you haven’t used these templates earlier, check out my previous article Unified ASP.NET 5 - Using MVC 6, WEB API and Entity Framework 7 in an Application. The new templates come with many enhancements including Project.json where we can specify project dependencies, and config.json to define application level information e.g. Database connection string etc.
In this article, we will be using ASP.NET 5 for developing a business application which will make use of SQL Server Database, EntityFramework 7.0.0 beta, Angular.js, etc.
The scenario discussed in this application is of a simple Visitor Management System, which is used at the security gates of various IT companies. We will build a single page application (SPA) where visitors’ entries are maintained.
Section 1: Database design for the application
We will start with designing the database for the application. Since the application is for Visitor Management, we need Departments, Employees and Visitors tables. We will be creating a database using Sql Server 2012 with the following table scripts.
DepartmentMaster
CREATE TABLE [dbo].[DepartmentMaster] (
    [DeptNo]   INT          IDENTITY (1, 1) NOT NULL,
    [DeptName] VARCHAR (50) NOT NULL,
    PRIMARY KEY CLUSTERED ([DeptNo] ASC)
);
Employee
CREATE TABLE [dbo].[Employee] (
    [EmpNo]     INT          IDENTITY (1, 1) NOT NULL,
    [EmpName]   VARCHAR (50) NOT NULL,
    [ContactNo] VARCHAR (15) NOT NULL,
    [PhoneNo]   VARCHAR (10) NOT NULL,
    [Extension] VARCHAR (6)  NOT NULL,
    [DeptNo]    INT          NOT NULL,
    PRIMARY KEY CLUSTERED ([EmpNo] ASC),
    FOREIGN KEY ([DeptNo]) REFERENCES [dbo].[DepartmentMaster] ([DeptNo])
);
Visitor
CREATE TABLE [dbo].[Visitor] (
    [VisitorId]    INT           IDENTITY (1, 1) NOT NULL,
    [VisitorName]  VARCHAR (50)  NOT NULL,
    [ContactNo]    VARCHAR (15)  NOT NULL,
    [Organization] VARCHAR (50)  NOT NULL,
    [Address]      VARCHAR (100) NOT NULL,
    [City]         VARCHAR (50)  NOT NULL,
    [Purpose]      VARCHAR (50)  NOT NULL,
    [VisitDate]    DATETIME      NOT NULL,
    [EmpNo]        INT           NOT NULL,
    PRIMARY KEY CLUSTERED ([VisitorId] ASC),
    FOREIGN KEY ([EmpNo]) REFERENCES [dbo].[Employee] ([EmpNo])
);
Section 2: Creating ASP.NET 5 Application using Visual Studio 2015 Preview
In this section we will create an ASP.NET 5 Application. The Visual Studio 2015 Preview provides template for creating ASP.NET 5 Application with the following templates:
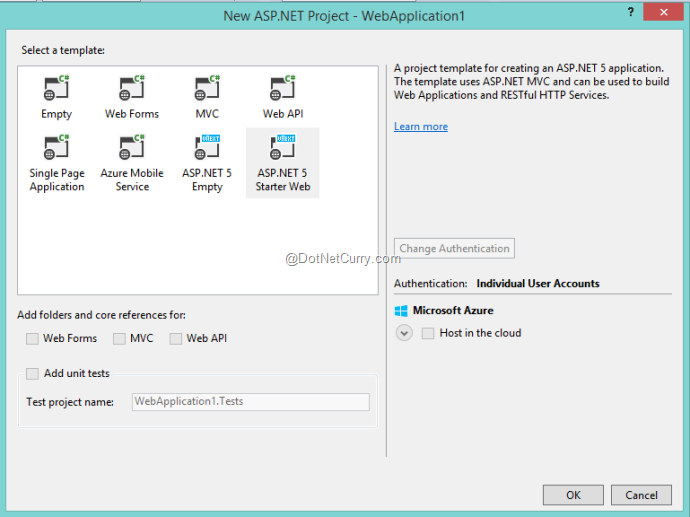
We will be selecting ASP.NET 5 Empty project template for our example. The project structure of the ASP.NET 5 Empty template is as follows:

The wwwroot folder contains assemblies and packages to be deployed. The Dependencies folder contains the project dependencies. We will use it later in one of the steps. In this project, add folders of name Models, Views and Controllers.
Step 1: Since we need to make use of EntityFramework 7.0.0-beta, MVC 6, Razor, Routing and Angular.js in our project, we need to add the necessary references as dependencies. We can define these dependencies using project.json file. Open this file and add the required dependencies in it.
"dependencies": {
    "Microsoft.AspNet.Server.IIS": "1.0.0-beta1",
    "EntityFramework": "7.0.0-beta1",
    "EntityFramework.Commands": "7.0.0-beta1",
    "EntityFramework.SqlServer": "7.0.0-beta1",
    "EntityFramework.Migrations": "7.0.0-beta1",
    "Microsoft.AspNet.Mvc": "6.0.0-beta1",
    "Microsoft.Framework.ConfigurationModel.Json": "1.0.0-beta1",
    "Microsoft.AspNet.Diagnostics": "1.0.0-beta1",
    "Microsoft.AspNet.Mvc.Razor": "6.0.0-beta1",
    "Microsoft.AspNet.Routing": "1.0.0-beta1",
    "angularjs": "1.3.8.0"
},
We have to make use of Angular.js framework in the application and hence we need to define tasks for deploying the necessary files in the project. In VS 2015 Preview, we have default integration with the Grunt JavaScript library for managing client-side script task. If you are new to Grunt, read Using Grunt.js to Merge and Minify JavaScript files in an ASP.NET MVC Application. VS 2015 preview also provides integration with Bower, a package manager for the web. This is used to manage all dependencies required by the app e.g. Libraries, Frameworks, utilities, etc. Bower takes care of searching, downloading and saving necessary dependencies used by the web application. Since in our project, we require Angular.js Frameworks to be used and deployed, we require the Bower package manager. Hence we need to configure the installation of Bower using Grunt, in project.json. Add the following Script section in the project.json file.
"scripts": {
    "postrestore": [ "npm install" ],
    "prepare": [ "grunt bower:install" ]
}
Step 2: In the project, add Bower JSON Configuration File and Grunt Configuration file, as shown in the screenshot below.
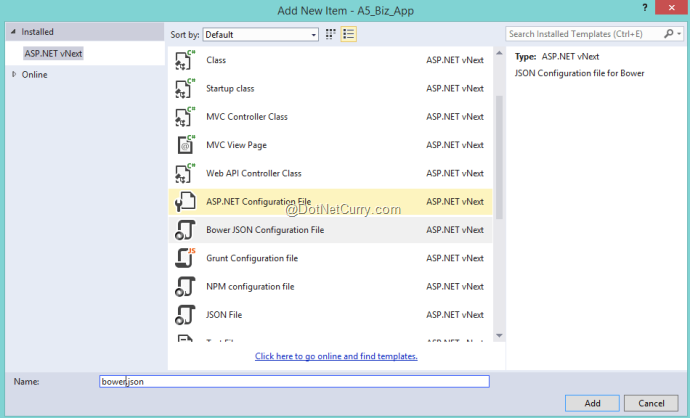
Open bower.json and specify the Angular.js Framework information with version no.
{
    "name": "A5_Biz_App",
    "private": true,
    "dependencies": {
        "angularjs": "1.3.8"
    },
    "exportsOverride": {
        "angularjs": {
            "js": "angular.{js,min.js,.min.js.map}"
        }
    }
}
Open Gruntfile.js and write logic for installing bower. This will install bower and add the framework specified by bower in the wwwroot/lib directory.
module.exports = function (grunt) {
    grunt.initConfig({
        bower: {
            install: {
                options: {
                    targetDir: "wwwroot/lib",
                    layout: "byComponent",
                    cleanTargetDir: false
                }
            }
        }

    });

    // This command registers the default task which will install bower packages into wwwroot/lib
    grunt.registerTask("default", ["bower:install"]);

    // The following line loads the grunt plugins.
    // This line needs to be at the end of this this file.
    grunt.loadNpmTasks("grunt-bower-task");
};
In step 1 and 2, we have initialized the basic dependencies for the application. Now it’s time for working with the models, views, etc.
Step 3: Open Config.json and add the Connection String of the database in it:
{
    "Data": {
        "DefaultConnection": {
            "ConnectionString": "Data Source=.;Initial Catalog=Visitors;Integrated Security=SSPI"
        }
    }
}
Step 4: In the Models folder, add a new class file of name ModelRepository.cs. This file will contain classes mapped with the Database tables created in Section 1.
using System;
using Microsoft.Data.Entity.Metadata;
using Microsoft.Data.Entity;
using System.ComponentModel.DataAnnotations;
using System.ComponentModel.DataAnnotations.Schema;
using System.Collections.Generic;

namespace A5_Biz_App.Models
{
    [Table("DepartmentMaster")]
    public class DepartmentMaster
    {
        [Key]
        public int DeptNo { get; set; }
        public string DeptName { get; set; }
        public virtual ICollection<Employee> Employees { get; set; }
    }

    [Table("Employee")]
    public class Employee
    {
        [Key]
        public int EmpNo { get; set; }
        public string EmpName { get; set; }
        public string ContactNo { get; set; }
        public string PhoneNo { get; set; }
        public string Extension { get; set; }
        public int DeptNo { get; set; }

        public virtual DepartmentMaster Department { get; set; }
    }

    [Table("Visitor")]
    public class Visitor
    {
        [Key]
        public int VisitorId { get; set; }
        public string VisitorName { get; set; }
        public string ContactNo { get; set; }
        public string Organization { get; set; }
        public string Address { get; set; }
        public string City { get; set; }
        public string Purpose { get; set; }
        public DateTime VisitDate { get; set; }
        public int EmpNo { get; set; }

        public virtual Employee  Employee { get; set; }
    }

    public class VisitorContext : DbContext
    {
        public DbSet<DepartmentMaster> Departments { get; set; }
        public DbSet<Employee> Employees { get; set; }
        public DbSet<Visitor> Visitors { get; set; }

        protected override void OnConfiguring(DbContextOptions options)
        {
            options.UseSqlServer(Startup.Configuration.Get("Data:DefaultConnection:ConnectionString"));
        }

        protected override void OnModelCreating(ModelBuilder modelBuilder)
        {
            base.OnModelCreating(modelBuilder);
            modelBuilder.Entity<DepartmentMaster>().Key(x => x.DeptNo);
            modelBuilder.Entity<Employee>().Key(x => x.EmpNo);
            modelBuilder.Entity<Visitor>().Key(x => x.VisitorId);
        }
    }

}
We have DepartmentMaster, Employee and Visitor classes mapped with corresponding Tables in the ‘Visitors’ Database. The VisitorContext class connects to the Sql Server database using OnConfiguring method. The DbContextOptions object passed to this method contains UseSqlServer() method. This method reads connection string from the Config.json. The OnModelCreating() method class is used to define mapping between model classes corresponding to the Database tables.
Step 5: Since we have a relationship between DepartmentMaster-to-Employee and Employee-to-Visitor, we need to create View Model classes to read data from multiple models with relation. To do this in the Models folder, add a new class file of name ViewModels.cs with the following code:
using System;

namespace A5_Biz_App.Models
{
    public class DepartmentViewModel
    {
        public int DeptNo { get; set; }
        public string DeptName { get; set; }
    }

    public class EmployeeViewModel
    {
        public int EmpNo { get; set; }
        public string EmpName { get; set; }
        public string ContactNo { get; set; }
        public string PhoneNo { get; set; }
        public string Extension { get; set; }
    }
}
Step 6: We are building this application using Unified ASP.NET 5, which includes MVC 6 and WEB API. We need to specify in ASP.NET 5 the use of MVC 6 Framework and routing. To do so, we need to add some code in the Startup.cs.
using Microsoft.AspNet.Builder;
using Microsoft.Framework.ConfigurationModel;
using Microsoft.AspNet.Hosting;
using Microsoft.AspNet.Routing;
using Microsoft.Framework.DependencyInjection;
using A5_Biz_App.Models;

namespace A5_Biz_App
{
    public class Startup
    {

        public static IConfiguration Configuration { get; set; }
        public Startup(IHostingEnvironment env)
        {
            Configuration = new Configuration().AddJsonFile("Config.json").AddEnvironmentVariables();
        }

        /// <summary>
        /// Define the use of EntityFramework and use of MVC
        /// </summary>
        /// <param name="services"></param>
        public void ConfigureServices(IServiceCollection services)
        {
            services.AddEntityFramework().AddSqlServer().AddDbContext<VisitorContext>();
            services.AddMvc();
        }

        /// <summary>
        /// Define Routing
        /// </summary>
        /// <param name="app"></param>
        public void Configure(IApplicationBuilder app)
        {
            app.UseMvc(r => r.MapRoute(
                name: "default",
                template: "{controller}/{action}/{id?}",
                defaults: new { controller = "Visitors", action = "Index" }));


        }
    }
}
The ConfigurationServices() method has IServiceCollection interface. This is used to inject dependency in the project. In the current application, we are using EntityFramework 7.0.0-beta which is defined using AddEntityFramework() method of IServiceCollection. The AddMvc () method indicates the use of MVC 6 for the application.
The Configure () method defines routing used for MVC.
Step 7: In the Controllers folder of the project, add a new WEB API Controller class of name ManageVisitorsAPIController. In this class, add method for reading Departments, Employees, and Visitors and also add method for Posting Visit.
using System;
using System.Collections.Generic;
using System.Linq;
using Microsoft.AspNet.Mvc;
using A5_Biz_App.Models;


namespace A5_Biz_App.Controllers.Controllers
{
    [Route("api/ManageVisitorsAPI")]
    public class ManageVisitorsAPIController : Controller
    {
        VisitorContext ctx;
        public ManageVisitorsAPIController(VisitorContext c)
        {
            ctx = c;
        }

        // GET: api/values
        [HttpGet("Departments")]
        public IEnumerable<DepartmentViewModel> Get()
        {
            var Depts = from d in ctx.Departments
                        select new DepartmentViewModel()
                        {
                            DeptNo = d.DeptNo,
                            DeptName = d.DeptName
                        };

            return Depts.ToList() ;
        }


        [HttpGet("Employees/{dno}")]
        public IEnumerable<EmployeeViewModel> GetEmps(int dno)
        {
            List<EmployeeViewModel> Emps = new List<EmployeeViewModel>();
            Emps = (from e in ctx.Employees
                    where e.DeptNo == dno
                    select new EmployeeViewModel()
                    {
                        EmpNo = e.EmpNo,
                        EmpName = e.EmpName,
                        ContactNo = e.ContactNo,
                        PhoneNo = e.PhoneNo,
                        Extension = e.Extension
                    }).ToList();
            return Emps;
        }

        [HttpGet("Visitors/{id}")]
        public List<Visitor> GetVisitors(int id)
        {
            var visotors = (from v in ctx.Visitors
                            where v.EmpNo == id
                            select v).ToList();
            return visotors;
        }

        // POST api/values
         [HttpPost]
        public Visitor Post([FromBody]Visitor visitor)
        {
            ctx.Visitors.Add(visitor);
            ctx.SaveChanges();
            return visitor;
        }

    }
}
Each action method is defined with routing expression so that it can be accessed using Http. In the Controllers folder, add a new MVC Controller class of name VisitorsController. In the Views folder, add a new Subfolder of name Visitors in this folder and add a new View of name Index.cshtml. We will add UI elements in the view later.
Step 8: In the Visual Studio 2015 Preview, navigate to the View menu > Other Windows > Task Runner Explorer as shown below:
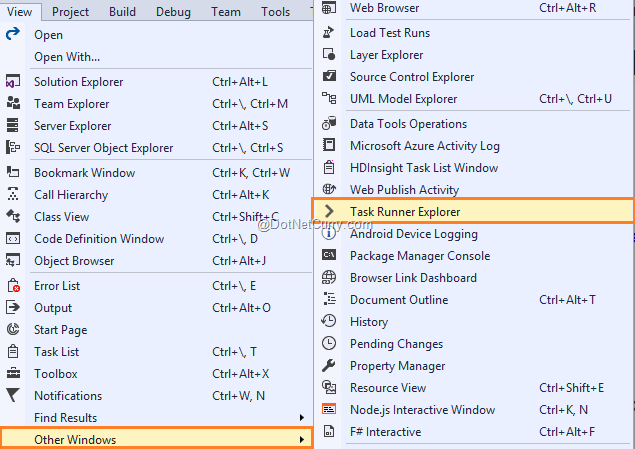
This will show Grunt tasks:
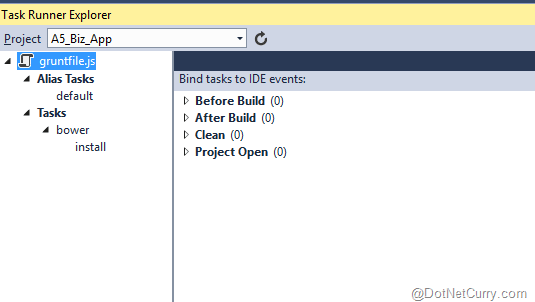
In the Tasks > bower, right click on install and select Run:
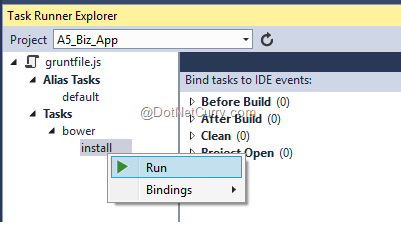
This will show the packages copied in the wwwroot/lib folder:

The Angular.js installation can be seen with changed project structure:
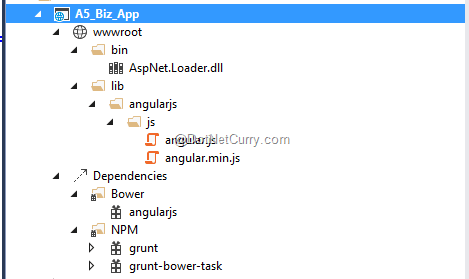
The wwwroot folder now shows the bin folder with AspNet.Loader.dll assembly and the lib folder with angular.js files in it. So finally we got the deployable directory. Now it’s time for us to define client-side logic.
Step 9: In the wwwroot/lib/angularjs/js folder, add JavaScript files for the client-Side logic.
app.js
var app;
(function () {
    app = angular.module("bizModule", []);
})();
Above is the Angular Module, an entry point for the application.
Service.js
/// <reference path="~/lib/angularjs/js/angular.min.js" />
/// <reference path="app.js" />


app.service('bizService', function ($http) {


    //Create new record
    this.post = function (visitor) {
        var request = $http({
            method: "post",
            url: "/api/ManageVisitorsAPI",
            headers: { 'Content-Type': 'application/json;charset=utf-8' },
            data:visitor
        });

        return request;
    }
    //Get Visitors Records based on EmpNo
    this.getVisitors = function (EmpNo) {
        return $http.get("/api/ManageVisitorsAPI/Visitors/" + EmpNo);
    }

    //Get All Employees
    this.getEmployees = function (dno) {
        return $http.get("/api/ManageVisitorsAPI/Employees/" + dno);
    }

    //Get All Departments
    this.getDepartments = function () {
        return $http.get("/api/ManageVisitorsAPI/Departments");
    }
});
The service.js contains methods to encapsulate Ajax calls to WEB API. These method are used to perform GET operations on Departments, Employees, Visitors and post method for Visitors.
controller.js
/// <reference path="~/lib/angularjs/js/angular.min.js" />
/// <reference path="service.js" />

app.controller('bizController', function ($scope, $http, bizService) {

    ////The Default Department
    $scope.Department = {
        DeptNo: 0,
        DeptName:''
    };

    $scope.Employee = {
        EmpNo: 0,
        EmpName: '',
        PhoneNo: '',
        Extension:''
    };

    var d = new Date();
    $scope.date = d;

    loadDepartments();

    //Function to Load Departments
    function loadDepartments()
    {
        //Get Departments
        var promiseGetDepartments = bizService.getDepartments(); //The method from service

        promiseGetDepartments.then(function (d) {
            $scope.Departments = d.data;
        },function (err) {
                $scope.status = "Unable to load department";
       });

    }

    //Function to load employees
    $scope.loadEmployees = function () {
        var dno = $scope.Department.DeptNo;
        //Get Employees when the Call to Department Successdes
        var promisegetemployees = bizService.getEmployees(dno); //the method from service

        promisegetemployees.then(function (d) { $scope.Employees = d.data; },
            function (err) {
                $scope.status = "unable to load employees";
            });
    }


    //Function to get the selected Employee Details

    $scope.getEmployeeDetails = function (){
        $scope.ContactNoEmp = $scope.Employee.ContactNo;
        $scope.EmpNo = $scope.Employee.EmpNo;
    }

    //Function  to Save Visit

    $scope.save = function () {

       var visitor = {};
       visitor.VisitorName = $scope.VisitorName;
       visitor.ContactNo = $scope.ContactNo;
       visitor.Organization = $scope.Organization;
       visitor.Address = $scope.Address;
       visitor.City = $scope.City;
       visitor.Purpose = $scope.Purpose;
       visitor.VisitDate = new Date();
       visitor.EmpNo = $scope.EmpNo;

        var promisePost = bizService.post(visitor);

        promisePost.then(function (d) {
            $scope.VisitorId = d.data.VisitorId;

            $scope.status = "Visit is Saved";
        }, function (err) {
            $scope.status = "There is error";
        });
    }
});
The above controller contains method for retrieving Departments and Employees information, using loadDepartments() and loadEmployees() methods. The Save() method gets visitors information from the View.
Step 10: Open Index.cshtml and add the HTML markup and the Angular.js DataBinding in it:
<html ng-app="bizModule">
<head>
    <title>Biz App</title>
    <style type="text/css">
        table {
            width: 900px;
            border: medium;
        }

        td {
            border: thin;
        }

        .c1 {
            width: 300px;
        }
        .dv{
            border:medium;
            width:500px;
        }
        body{
            background-color:darkorange;
        }
    </style>

</head>

<body ng-controller="bizController">
    <h1>Visitor Management System</h1>
    <div>
        <span>Date:{{date | date:'dd-MM-yyyy'}}</span>
    </div>
    <table>

        <tr>
            <td>
                Visitor id:
            </td>
            <td>
                <input type="text" id="visitorid" ng-model="VisitorId" readonly="readonly" />
            </td>
        </tr>
        <tr>
            <td class="c1">Visitor Name:</td>
            <td>
                <input type="text" id="visitorname" ng-model="VisitorName" />
            </td>
            <td></td>
            <td class="c1">
                Mobile No:
            </td>
            <td>
                <input type="text" id="visitorcontactno" ng-model="ContactNo" />
            </td>
        </tr>

        <tr>
            <td class="c1">Address:</td>
            <td>
                <input type="text" id="visitoraddress" ng-model="Address" />
            </td>
            <td></td>
            <td class="c1">
                Company From:
            </td>
            <td>
                <input type="text" id="visitorcompany" ng-model="Organization" />
            </td>
        </tr>
        <tr>
            <td class="c1">City:</td>
            <td>
                <input type="text" id="visitorcity" ng-model="City" />
            </td>
            <td></td>
            <td class="c1">
                Purpose:
            </td>
            <td>
                <textarea id="visitorcontactno" ng-model="Purpose"></textarea>
            </td>
        </tr>
        <tr></tr>
    </table>
    <hr />
    <table style="width:800px">
        <tr>
            <td class="c1">
                Department:
            </td>
            <td>
                <select id="lstdept" ng-model="Department" ng-init="Department.DeptName"
                        ng-options="dept as dept.DeptName for dept in Departments"
                        ng-change="loadEmployees()"></select>
            </td>
            <td class="c1">
                Employee Name:
            </td>
            <td>
                <select id="lstemp" ng-model="Employee"
                        ng-options="emp as emp.EmpName for emp in Employees" ng-change="getEmployeeDetails()">

                </select>
            </td>
            <td>
                <div class="dv">
                    <table>
                        <tr>
                            <td>
                                <span>The Mobile No: {{Employee.ContactNo}}</span>
                            </td>
                        </tr>
                        <tr>
                            <td>
                                <span>The Phone No: {{Employee.PhoneNo}}</span>
                            </td>
                        </tr>
                        <tr>
                            <td>
                                <span>The Extension No: {{Employee.Extension}}</span>
                            </td>
                        </tr>
                    </table>


                </div>
            </td>
        </tr>
        <tr>
            <td>
                <input type="button" id="btnsave" value="Save" ng-click="save()" />
            </td>
        </tr>
    </table>
    <div>
        <span ng-model="status"></span>
    </div>
    <script src="~/lib/angularjs/js/angular.min.js"></script>
    <script src="~/lib/angularjs/js/app.js"></script>
    <script src="~/lib/angularjs/js/service.js"></script>
    <script src="~/lib/angularjs/js/controller.js"></script>
</body>
</html>
The above HTML refers to the Angular.js and other JavaScript files we have added in the project. The <input> elements are bound with the various $scope declarations defined in controller.js. The <select> elements are bound with Departments and Employees $scope to show Departments and Employees Information.
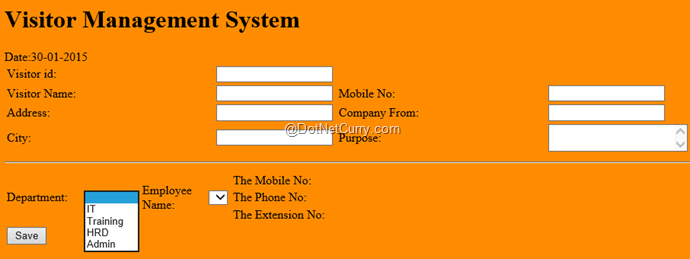
Run the Application and it will show Departments info as below:
Enter Visitor Details as shown below:
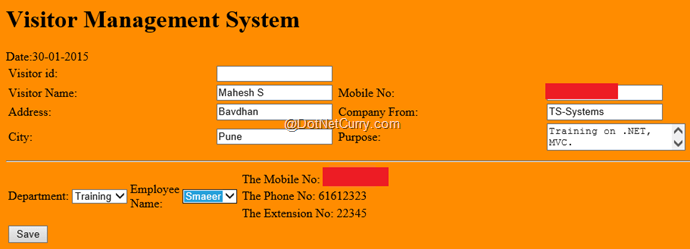
Click on Save button, the Visitor Id will be displayed. Likewise the view and functionalities for Edit Visit, Get Visits, etc. can be added in the application.
Conclusion: Visual Studio 2015 with Unified ASP.NET 5 provides some handy features for developing business applications. In-built support for JavaScript libraries like Bower and Grunt help to manage project dependencies for the application, keeping a low maintenance for the web application.
This article has been editorially reviewed by Suprotim Agarwal.
C# and .NET have been around for a very long time, but their constant growth means there’s always more to learn.
We at DotNetCurry are very excited to announce The Absolutely Awesome Book on C# and .NET. This is a 500 pages concise technical eBook available in PDF, ePub (iPad), and Mobi (Kindle).
Organized around concepts, this Book aims to provide a concise, yet solid foundation in C# and .NET, covering C# 6.0, C# 7.0 and .NET Core, with chapters on the latest .NET Core 3.0, .NET Standard and C# 8.0 (final release) too. Use these concepts to deepen your existing knowledge of C# and .NET, to have a solid grasp of the latest in C# and .NET OR to crack your next .NET Interview.
Click here to Explore the Table of Contents or Download Sample Chapters!
Was this article worth reading? Share it with fellow developers too. Thanks!
Mahesh Sabnis is a DotNetCurry author and a Microsoft MVP having over two decades of experience in IT education and development. He is a Microsoft Certified Trainer (MCT) since 2005 and has conducted various Corporate Training programs for .NET Technologies (all versions), and Front-end technologies like Angular and React. Follow him on twitter @
maheshdotnet or connect with him on
LinkedIn