Twitter Bootstrap is a smooth, powerful and popular HTML, CSS and JavaScript framework for front-end web development. This framework is compatible with most modern browsers and devices. The advantage of using Bootstrap framework is it provides ready to use style for most of your UI elements including Forms, Tables, Lists, etc.
In this article, we will use the Bootstrap Framework in an ASP.NET MVC application. This application will be used to store Person Information in a database.
I am using Visual Studio Community Edition for creating this sample.
Step 1: Open Visual Studio 2013 and create a new MVC application of the name ‘MVC5_Bootstrap’. In this application add a new SQL Server Database in the App_Data folder and call it SurveyDB.mdf. In this database add the following table.
CREATE TABLE [dbo].[PersonInformation] (
    [PersonId]     INT           IDENTITY (1, 1) NOT NULL,
    [FirstName]    VARCHAR (50)  NOT NULL,
    [MiddleName]   VARCHAR (50)  NOT NULL,
    [LastName]     VARCHAR (50)  NOT NULL,
    [Address]      VARCHAR (100) NOT NULL,
    [City]         VARCHAR (50)  NOT NULL,
    [State]        VARCHAR (50)  NOT NULL,
    [PhoneNo]      VARCHAR (50)  NULL,
    [MobileNo]     VARCHAR (50)  NULL,
    [EmailAddress] VARCHAR (50)  NOT NULL,
    [Occupation]   VARCHAR (50)  NOT NULL,
    PRIMARY KEY CLUSTERED ([PersonId] ASC)
);
Step 2: In the Models folder, add an ADO.NET EF of name SurveyEDMX, follow the wizard, select SurveyDB.mdf and the PersonInformation table. After completion of the wizard the mapping will be displayed as shown in the following figure.
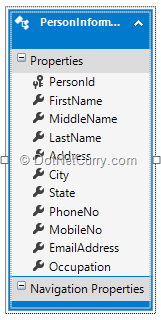
Step 3: In the Controllers folder of the project, add an empty MVC controller of the name PersonController. This controller will have an Index action method. From this method scaffold an empty View. In the Controllers folder add a WEB API Controller of name PersonAPIController, with actions using Entity Framework. This will generate methods for performing CRUD operations.
Step 4: Since we will be using DataBinding with HTML UI elements we will use the Knockout.js JavaScript library. This is a lightweight MVVM library used in Client-Side web development. Use the NuGet Package Manager to add the Knockout.js library as shown in the following figure.
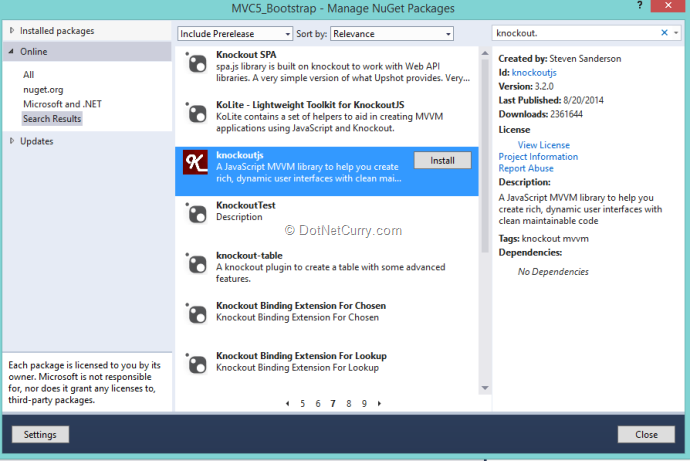
To apply rich styles we need to add the Bootstrap framework in the project as shown in the following figure

The project also needs jQuery library to make Ajax calls. Use the Manage NuGet Package to add jQuery library.
Step 5: In the Scripts folder add a new subfolder of name ‘MyScripts’. In this folder we will define our ViewModel using the Knockout.js library. In this folder, add a new JavaScript file named PersonInfo.js. Add the following code in this file.
/// <reference path="../jquery-2.1.3.min.js" />
/// <reference path="../knockout-3.2.0.js" />


(function () {
    var viewModel = function () {
        var self = this;

        var IsUpdatable= false;

        self.PersonId = ko.observable(0);
        self.FirstName = ko.observable("");
        self.MiddleName = ko.observable("");
        self.LastName = ko.observable("");
        self.Address = ko.observable("");
        self.City = ko.observable("");
        self.State = ko.observable("");
        self.PhoneNo = ko.observable("");
        self.MobileNo = ko.observable("");
        self.EmailAddress = ko.observable("");
        self.Occupation = ko.observable("");


        var PersonInfo = {
            PersonId: self.PersonId,
            FirstName: self.FirstName,
            MiddleName: self.MiddleName,
            LastName: self.LastName,
            Address: self.Address,
            City: self.City,
            State: self.State,
            PhoneNo: self.PhoneNo,
            MobileNo: self.MobileNo,
            EmailAddress: self.EmailAddress,
            Occupation: self.Occupation
        };

        self.Persons = ko.observable([]);

        self.Message = ko.observable("");

        self.Occupations =ko.observableArray(["Employeed","Self-Employeed","Doctor","Teacher","Other"]);
        self.SelectedOccupation = ko.observable();

        self.SelectedOccupation.subscribe(function (text) {
            self.Occupation(text);
        });


        self.States = ko.observableArray(["Jammu and Kashmir", "Delhi", "Himachal Pradesh",
        "Uttarakhand", "Punjab", "Hariyana", "Uttar Pradesh", "Rajasthan",
        "Madhya Pradesh", "Odissa", "Assam", "Arunchal Pradesh", "Manipur",
        "Mizoram", "Tripura", "Manupur", "Nagaland", "Jharkhand", "Bihar", "Sikkim",
        "Maharashtra", "Gujarat", "GOA", "Karnatak", "Telangana", "Simandhra",
        "Tamilnadu","Kerla","Andaman and Nikobar"]);

        self.SelectedState = ko.observable();

        self.SelectedState.subscribe(function (text) {
            self.State(text);
        });


        loadInformation();

        function loadInformation() {

            $.ajax({
                url: "/api/PersonAPI",
                type:"GET"
            }).done(function (resp) {
                self.Persons(resp);
            }).error(function (err) {
                self.Message("Error! " + err.status);
            });
        }

        self.getSelected = function (per) {
            self.PersonId(per.PersonId);
            self.FirstName(per.FirstName);
            self.MiddleName(per.MiddleName);
            self.LastName(per.LastName);
            self.Address(per.Address);
            self.City(per.City);
            self.State(per.State);
            self.PhoneNo(per.PhoneNo);
            self.MobileNo(per.MobileNo);
            self.EmailAddress(per.EmailAddress);
            self.Occupation(per.Occupation);
            IsUpdatable = true;
            $("#modalbox").modal("show");
        }

        self.save = function () {
            if (!IsUpdatable) {

                $.ajax({
                    url: "/api/PersonAPI",
                    type: "POST",
                    data: PersonInfo,
                    datatype: "json",
                    contenttype: "application/json;utf-8"
                }).done(function (resp) {
                    self.PersonId(resp.PersonId);
                    $("#modalbox").modal("hide");
                    loadInformation();
                }).error(function (err) {
                    self.Message("Error! " + err.status);
                });
            } else {
                $.ajax({
                    url: "/api/PersonAPI/"+self.PersonId(),
                    type: "PUT",
                    data: PersonInfo,
                    datatype: "json",
                    contenttype: "application/json;utf-8"
                }).done(function (resp) {
                    $("#modalbox").modal("hide");
                    loadInformation();
                    IsUpdatable = false;
                }).error(function (err) {
                    self.Message("Error! " + err.status);
                    IsUpdatable = false;
                });

            }
        }

        self.delete = function (per) {
            $.ajax({
                url: "/api/PersonAPI/" + per.PersonId,
                type: "DELETE",
            }).done(function (resp) {
                loadInformation();
            }).error(function (err) {
                self.Message("Error! " + err.status);
            });
        }

    };
    ko.applyBindings(new viewModel());
})();
The above code has the following specifications:
- declare Observables for working with PersonInformation. These observables will be used for DataBinding with UI.
- PersonInfo object which will be used for performing Create and Update operations.
- States and Occupations, the observable arrays, currently hard-coded for various states in India and occupation types respectively.
- loadInformation () is used for loading information of Persons by making call to WEB API.
- save () is used for creating and updating the person information. This function works on the IsUpdatable Boolean object to decide whether to create new person record or to update it.
- delete () is used to delete the person.
- getSelected () is used for selecting and displaying a specific person.
Step 6: Open Index.cshtml and add the following HTML markup in it
<script src="~/Scripts/jquery-2.1.3.min.js"></script>
<script src="~/Scripts/bootstrap.min.js"></script>


<div class="panel panel-primary">
    <h1>People Information Portal</h1>
</div>

<input type="button" id="btnaddperson" class="btn btn-small btn-primary" value="Add Person"/>
<hr/>
<div class="panel panel-default pre-scrollable">
    <table class="table table-striped table-bordered table-responsive table-condensed table-hover">
        <thead>
            <tr>
                <th>Id</th>
                <th>First Name</th>
                <th>Last Name</th>
                <th>City</th>
                <th>State</th>
                <th>MobileNo</th>
            </tr>
        </thead>
        <tbody data-bind="foreach:Persons">
            <tr>
                <td>
                    <span data-bind="text:PersonId"></span>
                </td>
                <td>
                    <span data-bind="text:FirstName"></span>
                </td>
                <td>
                    <span data-bind="text:LastName"></span>
                </td>
                <td>
                    <span data-bind="text:City"></span>
                </td>
                <td>
                    <span data-bind="text:State"></span>
                </td>
                <td>
                    <span data-bind="text:MobileNo"></span>
                </td>
                <td>
                    <button class="btn glyphicon glyphicon-pencil" data-bind="click:$root.getSelected" />
                </td>
                <td>
                    <button class="glyphicon glyphicon-trash" data-bind="click:$root.delete" />
                </td>
            </tr>
        </tbody>
    </table>
</div>


<div id="modalbox" class="modal">
    <div class="modal-dialog">
        <div class="modal-content">
            <div class="modal-header">
                <h1>Register New Person</h1>
            </div>
            <div class="modal-body">
                <table class="table table-condensed table-striped table-bordered">
                    <tr>
                        <td>First Name:</td>
                        <td>
                            <input type="text" data-bind="value:FirstName" class="form-control"/>
                        </td>
                    </tr>
                    <tr>
                        <td>Middle Name:</td>
                        <td>
                            <input type="text" data-bind="value:MiddleName" class="form-control" />
                        </td>
                    </tr>
                    <tr>
                        <td>Last Name:</td>
                        <td>
                            <input type="text" data-bind="value:LastName" class="form-control" />
                        </td>
                    </tr>
                    <tr>
                        <td>Address</td>
                        <td>
                            <textarea data-bind="value:Address" class="form-control"></textarea>
                        </td>
                    </tr>
                    <tr>
                        <td>City:</td>
                        <td>
                            <input type="text" data-bind="value:City" class="form-control" />
                        </td>
                    </tr>
                    <tr>
                        <td>State:</td>
                        <td>
                            <select data-bind="options:States,optionsCaption:'Select State',value:SelectedState" class="form-control" />
                        </td>
                    </tr>
                    <tr>
                        <td>Phone No:</td>
                        <td>
                            <input type="text" data-bind="value:PhoneNo" class="form-control" />
                        </td>
                    </tr>
                    <tr>
                        <td>Mobile No:</td>
                        <td>
                            <input type="text" data-bind="value:MobileNo" class="form-control" />
                        </td>
                    </tr>
                    <tr>
                        <td>Email Address:</td>
                        <td>
                            <input type="email" data-bind="value:EmailAddress" class="form-control" />
                        </td>
                    </tr>
                    <tr>
                        <td>Occupation:</td>
                        <td>
                            <select type="text" data-bind="options:Occupations,optionsCaption:'Select Option',value:SelectedOccupation" class="form-control" />
                        </td>
                    </tr>
                </table>
            </div>
            <div class="modal-footer">
                <button class="btn btn-default" data-dismiss="modal">Close</button>
                <button class="btn btn-primary" data-bind="click:save">Ok</button>
            </div>
        </div>
    </div>
</div>


<script src="~/Scripts/knockout-3.2.0.js"></script>
<script src="~/Scripts/MyScripts/PersonInfo.js"></script>
<script type="text/javascript">
    $(function () {
        var modelbox = function () {
            $("#modalbox").modal("show");
        };
        $("#btnaddperson").on('click', modelbox);

    });
</script>
You can see various HTML elements which are applied with classes provided by bootstrap:
- Table Styles
- Table-bordered : Table with border.
- Table-striped : Table with alternate background.
- Table-hover : Table with hover state rows.
- Table-condensed: The compact table
- Form-control - The look and feel on the various input types.
- Icon buttons:
- glyphicon-pencil: The button with stylus used for edit.
- glyphicon-pencil: The button for delete.
- Button Styles
- The Modal Box: The Bootstrap provides the Model dialog box using class modal.
Run the Application and the following UI will be displayed

Click on Add Person the following dialog box will be displayed
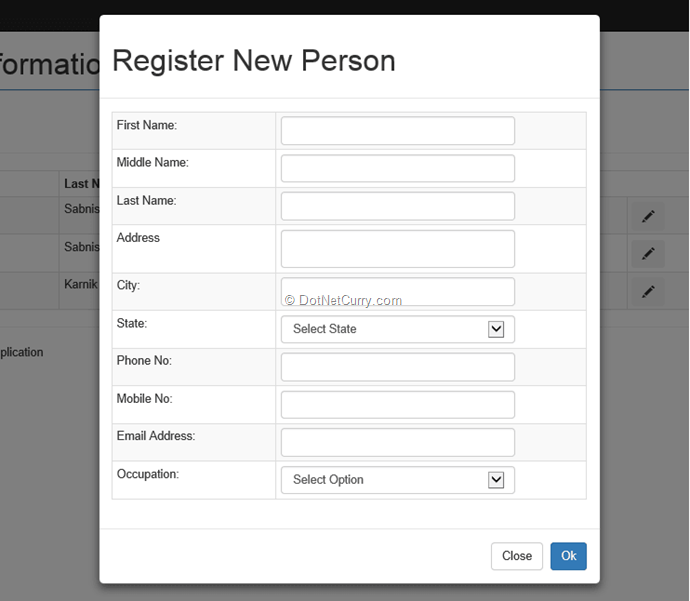
Enter Data in it and click on OK button, the following result will be displayed
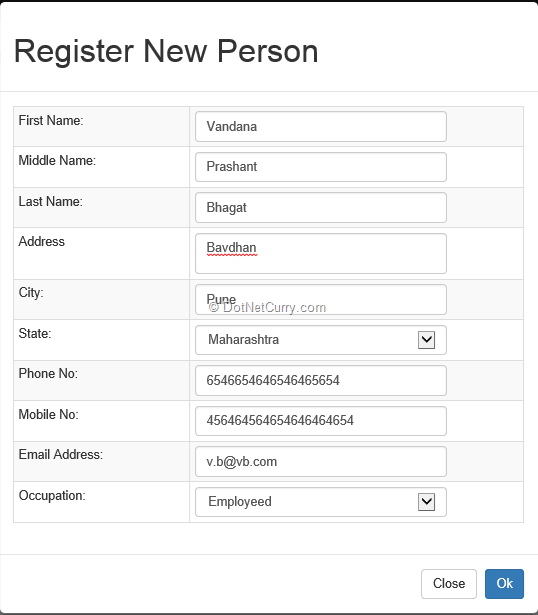
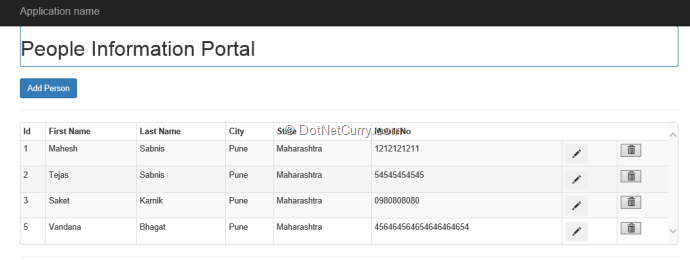
The Edit and Delete functionality can be tested by clicking on the respective buttons.
Conclusion: Any ASP.NET MVC 5 application’s UI can be made richer in no time using the Bootstrap framework. The ready UI classes for various controls makes the application more interactive to the end-user.
Download the entire source code of this article (Github)
This article has been editorially reviewed by Suprotim Agarwal.
C# and .NET have been around for a very long time, but their constant growth means there’s always more to learn.
We at DotNetCurry are very excited to announce The Absolutely Awesome Book on C# and .NET. This is a 500 pages concise technical eBook available in PDF, ePub (iPad), and Mobi (Kindle).
Organized around concepts, this Book aims to provide a concise, yet solid foundation in C# and .NET, covering C# 6.0, C# 7.0 and .NET Core, with chapters on the latest .NET Core 3.0, .NET Standard and C# 8.0 (final release) too. Use these concepts to deepen your existing knowledge of C# and .NET, to have a solid grasp of the latest in C# and .NET OR to crack your next .NET Interview.
Click here to Explore the Table of Contents or Download Sample Chapters!
Was this article worth reading? Share it with fellow developers too. Thanks!
Mahesh Sabnis is a DotNetCurry author and a Microsoft MVP having over two decades of experience in IT education and development. He is a Microsoft Certified Trainer (MCT) since 2005 and has conducted various Corporate Training programs for .NET Technologies (all versions), and Front-end technologies like Angular and React. Follow him on twitter @
maheshdotnet or connect with him on
LinkedIn