ASP.NET 5 (currently in RC1), is a significant release for building .NET web applications. ASP.NET 5 is open source and provides several features including cross-platform support, built-in dependency injection, IIS-Hosting or Self-hosting. This is a single aligned stack which provides WEB UI, MVC 6 and WEB API. More information on this release can be obtained over here. ASP.NET 5 RC1 can be downloaded from this link.
Before moving ahead, make sure you have installed the Free Visual Studio 2015 Community Edition or Visual Studio 2015 Enterprise.
In this article, we will implement an application using MVC 6, EF 7 and SQL Server database. The application allows users to store products by category. We will begin the application by creating a database and tables. Since this article uses a Release Candidate (RC) version of ASP.NET 5, there could be some changes when the final version of ASP.NET 5 is released.
Creating Database
Open Sql Server and run the following Sql Script in it:
Create database Store
This will create a database of name Store. We will use this database to create tables using our MVC 6 application.
Creating ASP.NET MVC 6 application
In this section we will create a MVC 6 application using Visual Studio 2015. We will observe the project structure of the application and then we will add Models, Controllers and Views in it.
Step 1: One Visual Studio and create a new ASP.NET Application, name it as MVC6_App as shown in the following Image
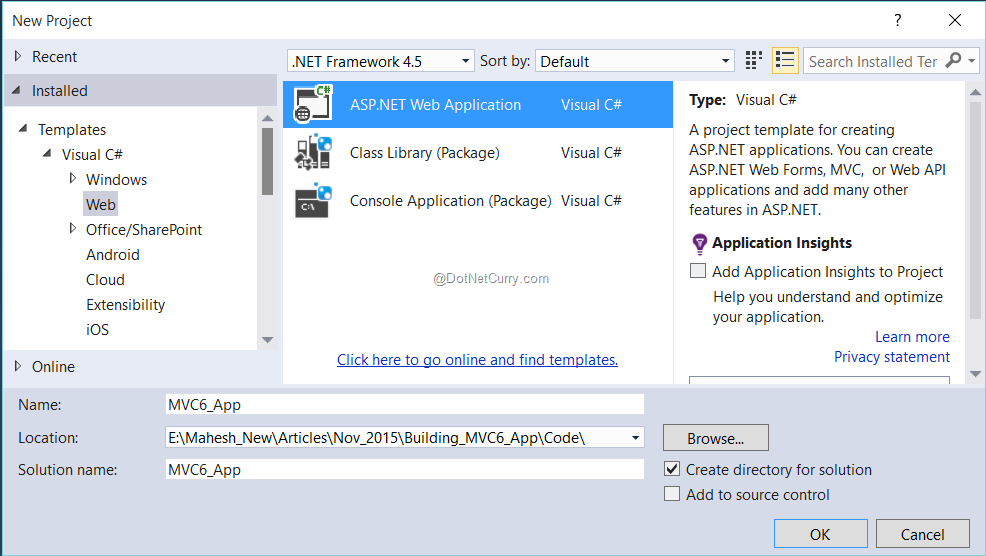
Click on Ok and in the next window select Empty from ASP.NET 5 Templates as shown in the following image

Here we have 3 templates, the first Empty can be used for creating Web UI, MVC 6 applications from scratch. The WEB API and Web Application templates can be used to create WEB API and ready MVC 6 application respectively. We will use the Empty template to create a MVC 6 application from scratch.
Step 2: After creating the project, the project structure will be as shown in the following image

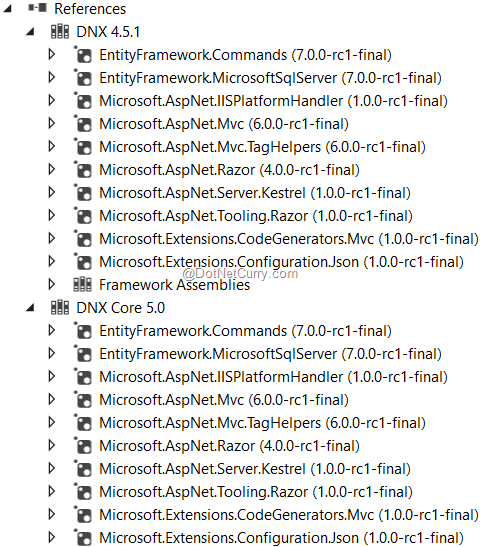
The ASP.NET 5 RC1 uses .NET Execution Environment (DNX). This is an SDK and runtime environment which has everything to build and run .NET Apps on Windows, Mac and Linux. More information on DNX can be obtained from this link. The project shows necessary references for the project.
The wwwroot contains front-end resources like CSS, JavaScript libraries, images, etc. Dependencies allows you to configure the dependencies for the project e.g. loading external JavaScript library like jQuery, Knockout.js, Bootstrap, etc. and using Bower and npm tools. project.json is used to configure all dependent reference assemblies for the application. This file provides intellisense for assemblies and their versions so that we can select a necessary reference for developing application. Startup.cs is an entry point for the application. This file is used to define the environment for the application, e.g. Using MVC, EntityFramework, etc.
Step 3: Open project.json file:
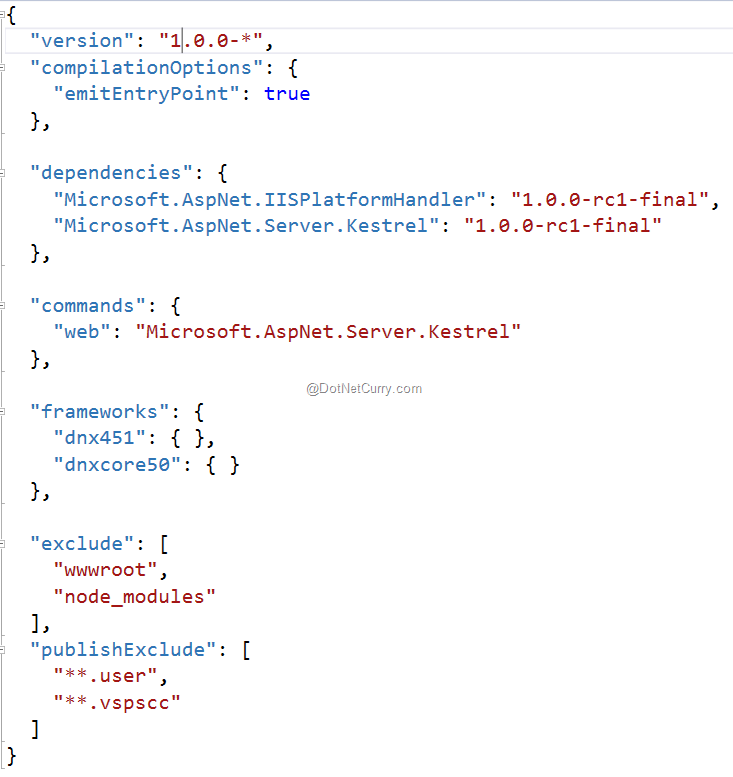
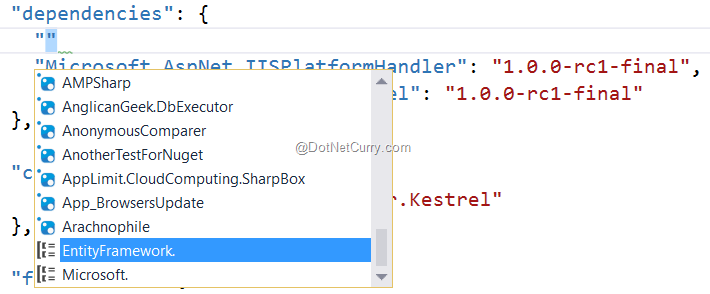
We will add dependencies for our application in the dependencies section. This will show intellisense as shown in the following image
Add dependencies in the application as shown here (red marked)
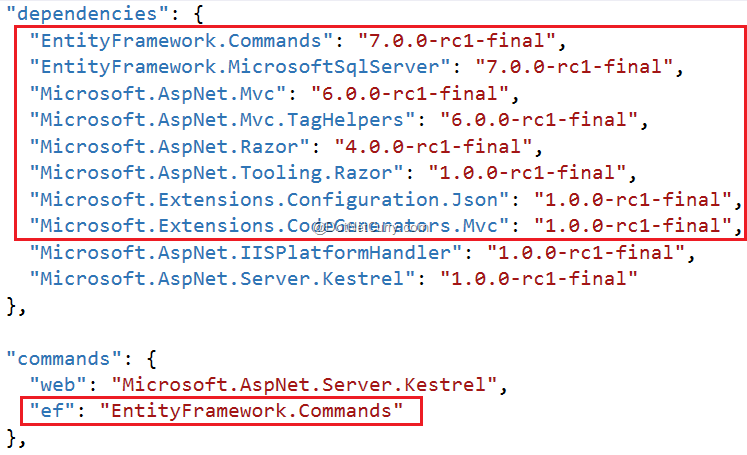
Dependencies and their purpose is as given here:
- EntityFramework.Commands: Used for DB Migrations so that CLR Classes can be migrated and mapped with Database over the database connection.
- EntityFramework.MicrosoftSqlServer: Used to specify the Database used as Sql Server.
- Microsoft.AspNet.Mvc: Indicates that MVC 6 will be used for the application.
- Microsoft.AspNet.Razor: Represents the Razor View Engine.
- Microsoft.Extensions.Configuration.Json: This allows to load and read configuration from JSON files in the application. These configurations will set Db Connection string.
The commands section of the project.json file will allow us to use DB Migration Commands from the Command prompt. We will use this in forthcoming steps.
Once you save the file, the project will show the references added in the project as shown in the following image.
Defining Models for the Application
Step 1: In this step we will add necessary models in the application. We ware designing this application for performing simple CRUD operations for products based on categories. To implement it, add a new folder in the project of name Models. In this folder add a new class file of name ModelClasses.cs with the following code in it:
using System.Collections.Generic;
using System.ComponentModel.DataAnnotations;

namespace MVC6_App.Models
{
    public class Category
    {
        [Key]
        public int CategoryId{ get; set; }
        public string CategoryName { get; set; }
        public virtual ICollection<Product> Products { get; set; }
    }

    public class Product
    {
        [Key]
        public int ProductId { get; set; }
        public string ProductName { get; set; }
        public int Price { get; set; }
        public int CategoryId { get; set; }
        public virtual Category Category { get; set; }
    }
}
The above code contains Category and Product classes. The Product class contains the reference for the Category class. This means that there will be reference relationship between Category and Product. The Category class contains the Product collection representing One-To-Many relationship.
Build the Project.
Adding Controller and Views
In this step we will add Controllers and Views based on EntityFramework.
Step 1: In the project add a new folder of name Controllers. Right-Click on the folder and select Add > Controller, option. This will display a window as shown here:
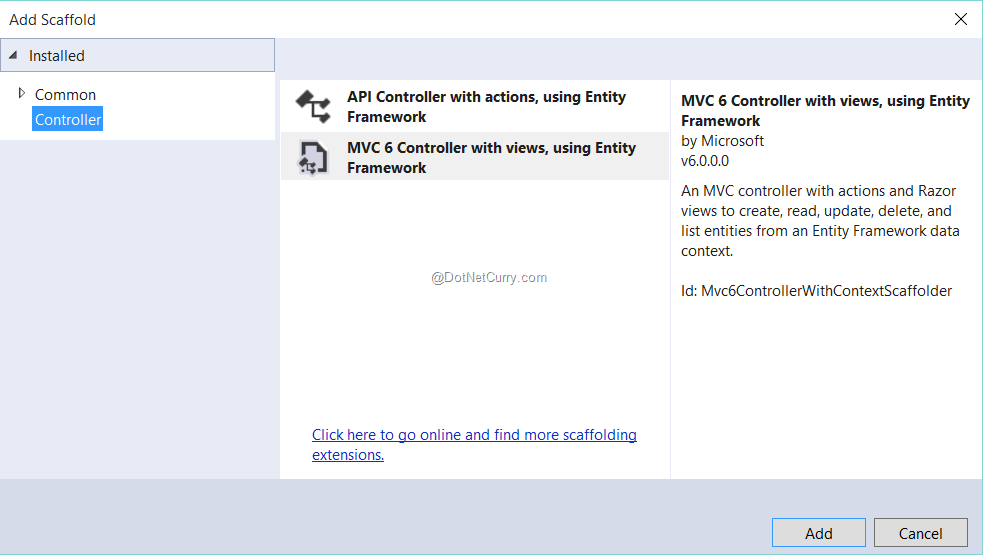
On clicking the Add button the following window will be displayed. In this window select Model class name, add the DbContext class by clicking on the + button. Keep the Generate Views and Use Layout View checkbox checked and uncheck all other. We will generate controller for Category as shown in the following Image
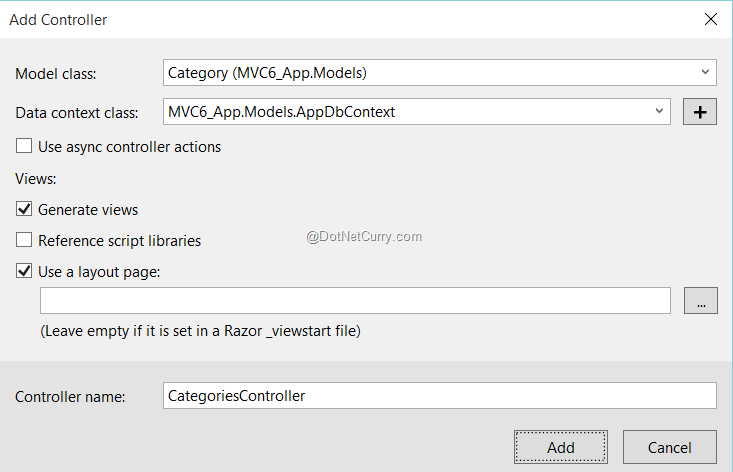
After clicking the Add button, the project will show CategoriesController class added in the Controllers folder with necessary CRUD methods. The project will be added with the Views folder and Categories subfolder in it with Views for performing CRUD operations. Repeat the same steps for Product Model to generate controller and views for product.
In the Models folder, the AppDbContext.cs file will be added with the following code:
public class AppDbContext : DbContext
{
    private static bool _created = false;

    public AppDbContext()
    {
        if (!_created)
        {
            _created = true;
            Database.EnsureCreated();
        }
    }

    protected override void OnConfiguring(DbContextOptionsBuilder optionsBuilder)
    {
    }

    protected override void OnModelCreating(ModelBuilder builder)
    {
    }

    public DbSet<Category> Category { get; set; }

    public DbSet<Product> Product { get; set; }
}
Configuring Connection String, MVC 6 and Working with EF 7 to implement DB Migrations to generate tables in Database
This is a major step of the project. Here we need to make sure that the application model should Map with the corresponding tables in Sql server database. To implement it, we need to add some code in the Startup.cs class. We also need to add a Database connection string in the project.
Step 1: To define the database connection string in the project, add a new ASP.NET Configuration file as shown in the following image. This file is similar to the web.config file which we have used in previous versions of ASP.NET and MVC.
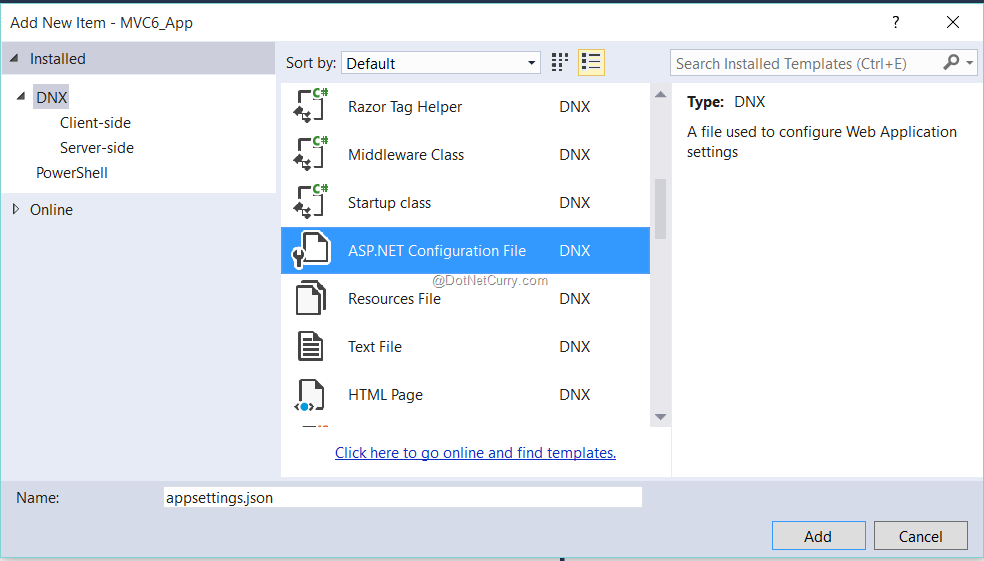
This file will show default connection string for the local db server. We will change it for our database which we created in the beginning of the application. The name of our database is Store. The file will be as below:
{
    "Data": {
        "DefaultConnection": {
            "ConnectionString": "Server=.;Database=Store;Trusted_Connection=True;"
        }
    }
}
Step 2: In the Startup.cs, add the following property for Configuration so that we can load the appSettings.json file.
public IConfigurationRoot Configuration { get; set; }
Add the constructor in the Startup class with the following code:
public Startup(IHostingEnvironment env)
{
    // Set up configuration sources.
    var builder = new ConfigurationBuilder()
        .AddJsonFile("appsettings.json")
        .AddJsonFile($"appsettings.{env.EnvironmentName}.json", optional: true);

    builder.AddEnvironmentVariables();
    Configuration = builder.Build();
}
This code loads and reads the appSettings.json file.
Step 3: We will have some code in ConfigureServices () method of the Startup class. This configures the EntityFramework for the application with Sql Server and the connection string. By default the code contains connection string for the local DB which we will change as shown in the following code:
public void ConfigureServices(IServiceCollection services)
{
    services.AddEntityFramework()
        .AddSqlServer()
        .AddDbContext<AppDbContext>(options =>
            options.UseSqlServer(Configuration["Data:DefaultConnection:ConnectionString"]));
services.AddMvc();
}
The services.AddMvc() adds the MVC service in the IServiceCollection. This is the interface used for providing inbuilt dependency injection in ASP.NET 5.
Step 4: In the Configure() method, add the following code to use MVC and routing for request processing.
app.UseStaticFiles();
app.UseMvc(routes =>
{
    routes.MapRoute(
        name: "default",
        template: "{controller=Home}/{action=Index}/{id?}");
});
The above code also uses the UseStaticFiles() method. This method is used to read and use CSS and jQuery files from the project in the View.
Step 5: To execute the Migration Commands follow these steps carefully.
- Right-Click on the Project and select the Open in File Explorer option to open the project in the Explorer.
In the explorer, Right-Click on any folder with ctrl+shift combination and select Open Command Window here as shown in the following image

- This will open the Command Prompt. Now using cd.. command go the Project name. Run the following commands from the command prompt:
dnu restore
dnvm use 1.0.0-rc1-final -p
dnx ef migrations add Initial
dnx ef database update
The above commands have the following importance:
· dnu restore - This command is used to look for the dependencies in the project.json file and download them.
· dnvm use <VERSION_NUMBER> - This command is for .NET version manager. This represents command line utilities to update and configure .NET runtime. This will add the current ASP.NET 5 runtime in the environment variable.

· dnx - This is .NET Execution environment currently being used for EntityFramework. This is already defined in project.json file in commands section.
After executing these commands, the project will be added with the Migrations folder with following files:
· <yyyymmddRandonNumber>_initial.cs - This is the initial class derived from Migration class and contains code for creating table based on model classes.
· AppDbContextModelSnapshot.cs - The AppDbContextModelSnapshot class which is used as model builder with model class properties and its types.
Build the application.
If you open the Database server here, the Store database will contains Category and Product table in it.
Understanding Views in MVC 6
In MVC 6, there are some changes in Views. In earlier releases of MVC, we had HTML Helper methods for generating UI elements and Model binding. As an example they are given as @Html.EditorFor. In case of MVC 6 view we have been provided with new attributes for Model binding.
Open Create.cshtml from Categories subfolder of the Views folder. This file contains the following markup:
@model MVC6_App.Models.Category

@{
    Layout = "_Layout";
    ViewData["Title"] = "Create";
}

<h2>Create</h2>

<form  asp-action="Create">

    <div class="form-horizontal">
        <h4>Category</h4>
        <hr />
        <div asp-validation-summary="ValidationSummary.ModelOnly" class="text-danger"></div>
        <div class="form-group">
            <label asp-for="CategoryName" class="col-md-2 control-label"></label>
            <div class="col-md-10">
                <input asp-for="CategoryName" class="form-control" />
                <span asp-validation-for="CategoryName" class="text-danger" />
            </div>
        </div>
        <div class="form-group">
            <div class="col-md-offset-2 col-md-10">
                <input type="submit" value="Create" class="btn btn-default" />
            </div>
        </div>
    </div>
</form>
The < form > tag has an asp-action attribute which is set to Create. This means that when the form is posted (or submitted) this will execute the Create with HttpPost action method of Categories Controller class. Alternatively the additional attributes for the < form > tag can be set as asp-controller, this is set to the controller name where the view is submitted. The asp-validation-summary attribute is used to display the validation summary. The asp-for attribute is used for Model Binding. The asp-validation-for attribute is used for Model validation.
To execute these attributes, we already have added the following..
"Microsoft.AspNet.Mvc.TagHelpers": "6.0.0-rc1-final"
..dependency assembly.
To execute these attributes right-click on the Views folder, add new item of type, MVC View Imports page as shown in the following image
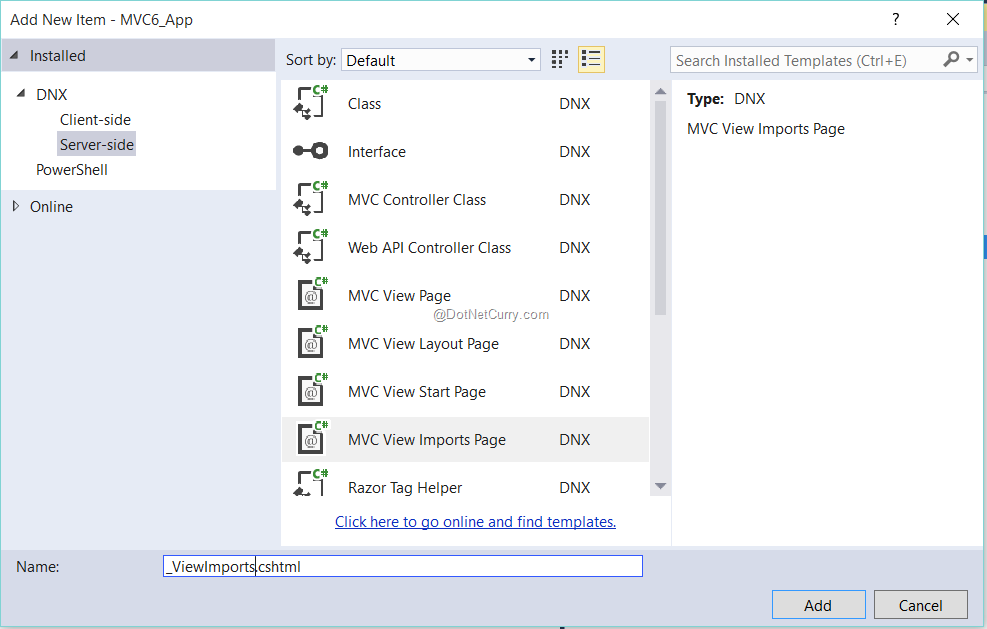
In this view add the following imports
@addTagHelper "*, Microsoft.AspNet.Mvc.TagHelpers"
This will execute all the asp- attributes.
Adding Bootstrap to the project
To define bootstrap styles for the Views, we need to use the Bower package manager. In the project add a new Bower Configuration File (Bower.json), in this file add the following dependencies:
"dependencies": {
"jquery": "2.1.4",
"bootstrap": "3.3.6"
}
This will add the jQuery and Bootstrap in the wwwroot folder as shown in the following image
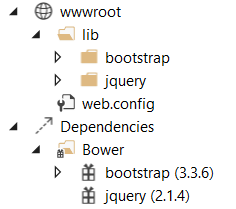
Refer the jQuery and the Bootstrap in the _Layout.cshtml file as shown following code:
<link rel="stylesheet" href="~/lib/bootstrap/dist/css/bootstrap.css" />
<script src="~/lib/jquery/dist/jquery.js"></script>
<script src="~/lib/bootstrap/dist/js/bootstrap.js"></script>
To use the Layout page in each View, add the following line in each view (Categories and Products controller)
Layout = "_Layout";
Adding the Home Controller
Step 1: To add a Home controller, right-click on the Controllers folder and select Add-New Item. This will show the Add New Item window. Add the MVC Controller Class from this window. This will add the HomeController class in the Controllers folder with Index action method.
Step 2: In the Views folder, add a new folder of name Home. In this folder add a new MVC View using Add > New Item window. In this Index.cshtml add the following markup
<html>
 <head>
     <link rel="stylesheet" href="~/lib/bootstrap/dist/css/bootstrap.min.css" />
 </head>
 <body>
     <table class="table table-bordered table-striped">
         <tr>
             <td>
                 <a asp-controller="Categories" asp-action="Index">Categories</a>
             </td>
             <td>
                 <a asp-controller="Products" asp-action="Index">Product</a>
             </td>
         </tr>
     </table>
 </body>
</html>
In the above code, we are defining the links for Categories and Products controllers for their Index action method using asp-action attribute.
Running the application
Run the application, the home page will be displayed as shown in the following image:
Click on Categories, the Index views will be displayed: (Sample Test data is already added in the Category table of the Store database)

Click on the Create New link, the Create view will be displayed:

Conclusion: ASP.NET 5 has been re-created from the ground up in order to stay relevant in the changing developer ecosystem. These changes improves performance, provide a faster development experience, and allows the same app to run cross platform on Linux and Mac. In this tutorial, we saw how to create a simple web app using ASP.NET MVC 6 and Entity Framework (EF) 7 using ASP.NET 5 RC1. We also saw some of the new tooling inside of Visual Studio 2015. EF 7 provides a completely new approach for data model layer creation. The new attributes for views makes html markup easy and simple.
Download the entire source code of this article (Github)
This article has been editorially reviewed by Suprotim Agarwal.
C# and .NET have been around for a very long time, but their constant growth means there’s always more to learn.
We at DotNetCurry are very excited to announce The Absolutely Awesome Book on C# and .NET. This is a 500 pages concise technical eBook available in PDF, ePub (iPad), and Mobi (Kindle).
Organized around concepts, this Book aims to provide a concise, yet solid foundation in C# and .NET, covering C# 6.0, C# 7.0 and .NET Core, with chapters on the latest .NET Core 3.0, .NET Standard and C# 8.0 (final release) too. Use these concepts to deepen your existing knowledge of C# and .NET, to have a solid grasp of the latest in C# and .NET OR to crack your next .NET Interview.
Click here to Explore the Table of Contents or Download Sample Chapters!
Was this article worth reading? Share it with fellow developers too. Thanks!
Mahesh Sabnis is a DotNetCurry author and a Microsoft MVP having over two decades of experience in IT education and development. He is a Microsoft Certified Trainer (MCT) since 2005 and has conducted various Corporate Training programs for .NET Technologies (all versions), and Front-end technologies like Angular and React. Follow him on twitter @
maheshdotnet or connect with him on
LinkedIn