Dynamic Menus in ASP.NET MVC 4 using EF Code First and jQuery
Posted by: Sumit Maitra ,
on 5/24/2012,
in
Category ASP.NET MVC
Abstract: By default ASP.NET MVC Project Templates come with a Menu that is hardcoded for each controller. However in a real-life scenario, more often than not, we need our Menus to be dynamic and loaded and managed with certain amount of flexibility. In this article, we will see how to create a single level Dynamic Menu using EF code first and jQuery in an MVC Application.
Default static ASP.NET MVC Project Templates are a good starting point, however projects with even medium complexity need certain amount of flexibility. In this article, we will create a simple single level menu system that will group child menu items and give the flexibility of setting the Label, Action and Controller names at run-time.
This article uses the code from the Live Tile jQuery Plugin article that we wrote earlier on www.devcurry.com
The Backend
We will use SQL Server to store and EF to manage the Menu definitions. Our schema is as follows. The Menu class is our container or logical grouping for MenuItems.

MenuItems encapsulate the Item details:
- Id - Identifier
- Name – Label used in Menu
- ActionName – Name of action to be invoked
- ControllerName – Name of controller in which the action resides
- Url – If Action Name is empty, one can provide a direct URL that the menu should point to.
- ParentMenu – A navigation property to the container Menu

We persist them in SQL Server using EF Code First.
Building the UI for Administration of the Menus
We start off with our LiveTile project that was built from an empty MVC4 project. It has only got Index.cshtml under Home. We will build the Administration as well as the Menu on top of this.
Step 1: Copy the _Layout.cshtml and rename the new file as _LayoutAdmin.cshtml. Change the header to ‘LifeTile.js Admin’
Step 2: We create a Controller using the standard MVC Scaffolder that we can bring up by Right clicking on ‘Controllers’ folder and selecting ‘Add Controller’.

- Click on Advanced Options and select _LayoutAdmin.cshtml as the master page. This is important because we want the menu to be cached for regular pages that use the default master pages. On the other hand the Admin page will be setup to not use any caching so that changes to the Menu are reflected immediately.

- Finish the Controller creation by click the ‘Add’ button. This will scaffold all the methods and views required for Menu creation. Now we repeat the same for MenuItem and create a new controller MenuItemController using the same Data Context and the Admin specific master page.

Step 3: Next we update the connection string in the web.config by changing the Name to LiveTileDB and the connectionString to point to the correct catalog.

Step 4: Then we update the DBContext such that it uses the correct connection string. As seen below, we pass it to the base in the Constructor.

We have also overridden OnModelCreating and passed it the Initializer ‘CreateDatabaseIfNotExists’. This ensures EF simply creates the DB if it does not exist.
Step 5: MenuItems don’t really exist on their own, they HAVE to be a part of some Menu. So let’s delete the MenuItem\Index.cshtml.
Step 6: MenuItems instead will be shown in the Details page of the Menu. So we update the Menu\Details.cshtml as follows

We are adding the rendering details for MenuItems in the Menu\Details page itself. Not only that, for each MenuItem, we are setting up the Edit and Delete action link that will enable us to Edit and Delete the MenuItems from the Details page itself. At the bottom we have also added the ‘Create’ MenuItem Action link.
Step 6: Update the MenuItem Controller. In the above step, we have seen that all the action links pass additional parameters for the HTTP GET operation. This is to let the controller know which Menu the Menu Item is associated to. To accommodate this, we update the MenuItemController as follows
Creation Action

Edit Action

Delete Action

With the Details View and Controller setup like this, we are ready to create Menus and MenuItems. Run the Application and navigate to /Menu to get the following:

Click on Create New and add a new Menu called ‘Main’.
Click on the Details to get to the Details page.

Click on Add Menu Item and add a MenuItem with Name = Home, Action=Index, Controller=Home.
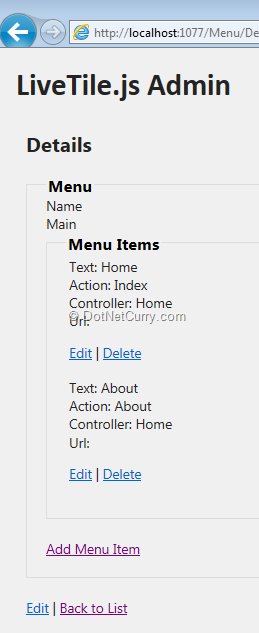
Add another with Name = About, Action = About, Controller=Home. The Details page will now look as follows

So now our backend is all set with a Menu and a few MenuItems. Time to get the rendering work in place!
Rendering the Menu
Step 1: Add a Partial View called _MenuLayout.cshtml under the Views/Shared folder. Make it Strongly Typed of type Menu.

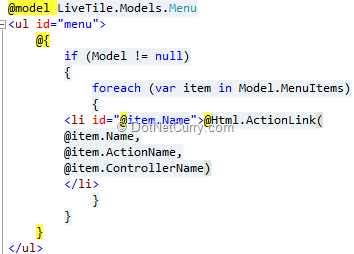
Step 2: Update the View as follows

Thus the Menu is nothing but a List with each menu item being a list item.
Step 3: Update the HomeController.cs with the following action method

This will be called to generate the PartialView of the Menu. Here we have ‘hardcoded’ the Menu name (‘Main’). The method returns just the HTML for the _MenuLayout.cshtml file with the given Model (menu).
Step 4: Update the _Layout.cs

Add a <nav> section with an empty div with id navcontainer. We will replace the contents of this div with the partial view.
Add the following JavaScript at the bottom of the _Layout.cs

This script is nothing but a jQuery postback, it is fired once the document is loaded. And on a successful return ,it simply dumps the response HTML into the container.
Step 5: Update _LayoutAdmin.cs with the same except for one change in the JavaScript. We disable caching for the Admin pages.

Step 6: Prettify it by updating the CSS for converting the <li> elements into a Tab layout.
That’s it, we are done. Run the Application to see the Menu getting rendered.

Navigate to the Admin page at /Menu, make some changes to the Name of the MenuItems and see them getting reflected immediately. Clicking on the Home link will navigate back to Home page. Clicking on About will throw an error because we don’t have an About page yet.
Conclusion
With that, we conclude this post. We saw how to create the backend and related admin screens for a simple Menu system for an ASP.NET MVC 4 application. We also saw how MVC partial views are used, how to deal with Master-Child UI by passing the Master’s Id around and last but not least, how jQuery can be used to do partial postback.
The entire source code of this article can be downloaded over here
See a Live Demo
This article has been editorially reviewed by Suprotim Agarwal.
C# and .NET have been around for a very long time, but their constant growth means there’s always more to learn.
We at DotNetCurry are very excited to announce The Absolutely Awesome Book on C# and .NET. This is a 500 pages concise technical eBook available in PDF, ePub (iPad), and Mobi (Kindle).
Organized around concepts, this Book aims to provide a concise, yet solid foundation in C# and .NET, covering C# 6.0, C# 7.0 and .NET Core, with chapters on the latest .NET Core 3.0, .NET Standard and C# 8.0 (final release) too. Use these concepts to deepen your existing knowledge of C# and .NET, to have a solid grasp of the latest in C# and .NET OR to crack your next .NET Interview.
Click here to Explore the Table of Contents or Download Sample Chapters!
Was this article worth reading? Share it with fellow developers too. Thanks!
Sumit is a .NET consultant and has been working on Microsoft Technologies since his college days. He edits, he codes and he manages content when at work. C# is his first love, but he is often seen flirting with Java and Objective C. You can follow him on twitter at @
sumitkm or email him at sumitkm [at] gmail