ASP.NET MVC team recently integrated the excellent open source library called DotNetOpenAuth (DNOA). DotNetOpenAuth originally was created to add OAuth and OID Authentication capabilities. The library bakes in functionality to let your application to be an OAuth Server or an OAuth client (or both).
Thanks to the integration efforts by the ASP.NET team, integrating DNOA to use an external Open Auth or OID provider is now as easy as un-commenting a few lines of code and registering yourself with the Provider.
Today we will do just that. Given the popularity of Facebook, a vast majority of people have Facebook accounts and if we can use Facebook to authenticate people on our website, we make it easier for the user by not requiring them to remember an additional password for our site.
Getting Started as a Facebook Developer
If you have a Facebook account already, you’ll need to verify it by either providing your Credit Card or Telephone Number. If you are using a phone number the phone should be capable of receiving SMS (Text messages). With this pre-requisite handy, let’s get started.
1. Navigate to https://developers.facebook.com/ and log in with your Facebook ID

2. If you don’t have a verified account, on login to the dev portal, Facebook will ask you to verify the account using Credit Card or Phone number. As mentioned above, they will text you a verification code if you are using the phone number. Put in the code and you are good to go. You should see the above bar at the top of the page.
Registering a Facebook App
Now that we are logged in as Facebook developers, let’s setup an App so that we can leverage it in our own Web Site.
1. Click on Apps in the toolbar, Facebook will show the type of apps you can build for it.

2. As we can see above, the Websites option is what we are looking for. Click on ‘Create a New App’ you’ll get the following popup

3. Pick a Name and a Namespace (though mentioned as optional, provide it here). You can leave the Web Hosting unchecked. Click Continue. Fill in the captcha and you will end up on the configuration page as follows.

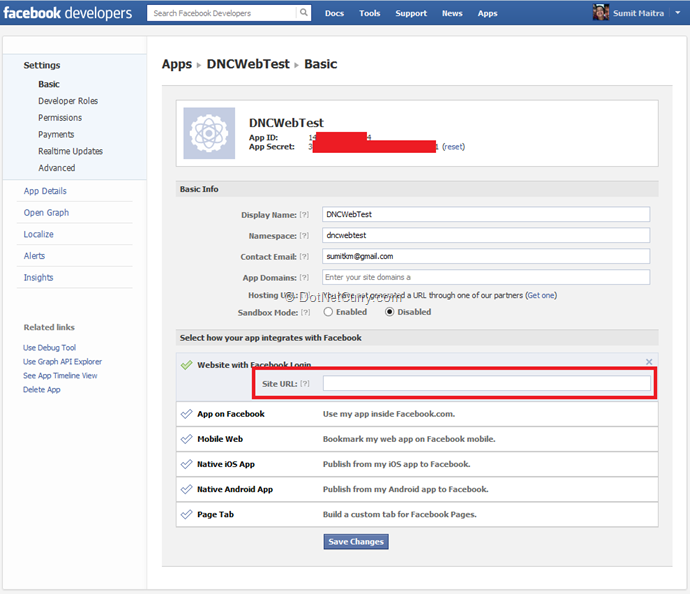
- a. First thing to note above is the App ID and App Secret. These two link your App to Facebook. We will use these shortly
- b. Next expand the Website with Facebook Login field. It is empty currently. We have to come back to it once we have our WebApplication ready.
Now that we are nearly all set with the Facebook App, let’s shift focus to the ASP.NET App and hook the two together.
Creating a new MVC4 Web Application and hooking it up with the Facebook App
1. We start off with the a new MVC4 project in Visual Studio and name it MVC4FacebookAuthentication
2. Next we add two entries in <appSettings> section of our Web.config. These are appId and appSecret. Copy pastes the values from the Facebook Settings Page

3. Secret Next we open the AuthConfig.cs file under App_Start folder and uncomment the RegisterFacebookClient line. We replace the empty values with the values loaded from Web.Config using the ConfigurationManager. And that’s all the configuration that’s required.
public static class AuthConfig
{
public static void RegisterAuth()
{
// To let users of this site log in using their accounts from other sites such as Microsoft, Facebook, and Twitter,
// you must update this site. For more information visit http://go.microsoft.com/fwlink/?LinkID=252166
//OAuthWebSecurity.RegisterMicrosoftClient(
// clientId: "",
// clientSecret: "");
//OAuthWebSecurity.RegisterTwitterClient(
// consumerKey: "",
// consumerSecret: "");
OAuthWebSecurity.RegisterFacebookClient(
appId: ConfigurationManager.AppSettings["AppId"],
appSecret: ConfigurationManager.AppSettings["AppSecret"]);
//OAuthWebSecurity.RegisterGoogleClient();
}
}
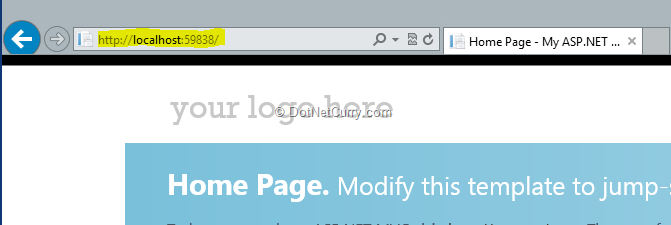
4. Run the app and retrieve the home page URL

5. Go back to the Facebook App Settings page and update the “Site URL” with the above URL. Save the settings. When we move the application to production, we’ll have to update the “Site URL” in the Facebook app to match our production URL.

6. Once the Facebook settings are saved, switch back to the ASP.NET web application and click on Login to navigate to the following page:

7. Click on the ‘Facebook’ Service login button. It will navigate you to the following page.

8. Facebook is telling the end user that they are using their Facebook account with ‘DNCWebTest’ (our application). Once you log in, for the first time you’ll get the following confirmation dialog.

Note that the DNCWebTest app by default has only access to basic info and email address of end user. Once the user clicks “Go to App”, Facebook re-directs back to our app.
When we are logging in for the first time, the Membership provider detects that it’s the first login and registers the new user and requests the user to provide a User name. As we can see below, it uses the email ID provided by Facebook by default

9. The user clicks on Register to link their User name with the Facebook Id that they used to log in with. This Registration page does not come up again. Once the Registration information has been saved, user will be redirected back to the home page where they are now authenticated using Facebook

Under the Hood - The SimpleMemberShipProvider
All this seemingly magical integration is possible; thanks to the new SimpleMemberShipProvider which is now the default MemberShipProvider for ASP.NET MVC4 Internet Projects. Let’s look a little deeper. We start off with the database
1. Open the Web.config and find the DefaultConnection entry in ConnectionStrings section. It will look similar to the following
<connectionStrings>
<add name="DefaultConnection"
connectionString="Data Source=(LocalDb)\v11.0;Initial Catalog=aspnet-Mvc4FacebookAuthentication-20130322131534;
Integrated Security=SSPI;AttachDBFilename=|DataDirectory|\aspnet-Mvc4FacebookAuthentication-20130322131534.mdf"
providerName="System.Data.SqlClient" />
</connectionStrings>
The connection string doesn’t really have anything to do with the provider. It simply uses an instance of (LocalDb) by default and uses a Database Name generated by Visual Studio when the project was created.
This however becomes the connection information that is used out of the box. Initially the database is of course empty. But on first Registration or login request, a set of tables are created by the Membership Provider using this connection information.
2. Let us see what these tables are. Open the Database Explorer and refresh the ‘DefaultConnection’ node. Expand the tables to see the tables created by SimpleMemberShipProvider after the first run.

3. Right click on the UserProfile table and select Show Table Data. As you can see the, UserName registered by the user is stored in the UserProfile table.

4. Next select the webpage_OAuthMembership table, right click on it and select Show Data. This shows the ProviderName and an ID value returned by Facebook that is unique for each user who authenticates. This is tied back to the UserProfile table using the UserId Foreign Key reference.
5. This is the basic amount of data that SimpleMembershipProvider stores when authenticating with one of the external services using OAuth
Conclusion
This concludes this post on using Facebook Authentication for your ASP.NET Web Application. It assumed you (as a developer) have a Facebook login already. If not, go ahead and create an account and then create a Developer profile as explained above.
In future episodes, we will see how to retrieve information from Facebook after you have logged in using Facebook Authentication.
Download the entire source code of this article (Github)
This article has been editorially reviewed by Suprotim Agarwal.
C# and .NET have been around for a very long time, but their constant growth means there’s always more to learn.
We at DotNetCurry are very excited to announce The Absolutely Awesome Book on C# and .NET. This is a 500 pages concise technical eBook available in PDF, ePub (iPad), and Mobi (Kindle).
Organized around concepts, this Book aims to provide a concise, yet solid foundation in C# and .NET, covering C# 6.0, C# 7.0 and .NET Core, with chapters on the latest .NET Core 3.0, .NET Standard and C# 8.0 (final release) too. Use these concepts to deepen your existing knowledge of C# and .NET, to have a solid grasp of the latest in C# and .NET OR to crack your next .NET Interview.
Click here to Explore the Table of Contents or Download Sample Chapters!
Was this article worth reading? Share it with fellow developers too. Thanks!
Suprotim Agarwal, MCSD, MCAD, MCDBA, MCSE, is the founder of
DotNetCurry,
DNC Magazine for Developers,
SQLServerCurry and
DevCurry. He has also authored a couple of books
51 Recipes using jQuery with ASP.NET Controls and
The Absolutely Awesome jQuery CookBook.
Suprotim received the prestigious Microsoft MVP award for 17 consecutive years, until he resigned from the program in 2025. In a professional capacity, he is the CEO of A2Z Knowledge Visuals Pvt Ltd, a digital group that offers Digital Marketing and Branding services to businesses, both in a start-up and enterprise environment.
Get in touch with him on Twitter @suprotimagarwal or at LinkedIn