APIs evolve. With every change, data gets modified which clients may or may not be able to handle appropriately. One solution is to keep our APIs backward compatible by providing different URIs for different versions of our application. So /products which was pointing to /v1/products now starts pointing to /v2/products, but users who want to, can still access the previous version using /v1/products or products?ver=1 depending on how your url redirection is setup. Another solution is to keep the URL constant and use custom HTTP headers to tell users of the version. There are pros and cons to both the approaches.
In ASP.NET Web API, Versioning is needed in cases when we change the server-side logic in methods of our service. In such a case, if we change the hosting URL for the WEB API, then existing clients will suffer and the service provider will face lots of criticism. So how do we manage the WEB API versioning and changes by keeping the same URL as far as possible? The WEB API Controller versioning is possible using the following methods:
- Using Query String
- Custom Request Header
- Adding new controller
In this article, we will implement ASP.NET Web API versioning using Custom Request Header. In the WEB API pipeline, a controller is selected to handle requests. This is implemented using the SelectController method of the DefaultHttpControllerSelector class. This class implements IHttpControllerSelector interface. The SelectController method calls the GetControllerName method. This method accepts HttpRequestMessage object, which is used to evaluate the request header. While implementing the WEB API Versioning using Custom Header, we need to use the DefaultHttpControllerSelector.
Step 1: Open the free Visual Studio 2013 Community Edition and create an empty WEB API application of name ‘WebApi_Versioning_CustomHeaders’.
Step 2: In this project, add following classes in the Models folder.
using System.Collections.Generic;

namespace WebApi_Versioning_CustomHeaders.Models
{
        public class EmployeeInfo
        {
            public int EmpNo { get; set; }
            public string EmpName { get; set; }
            public int Salary { get; set; }
            public string DeptName { get; set; }

        }

        //Default Database Version
        public class EmployeeInfoDatabase : List<EmployeeInfo>
        {
            public EmployeeInfoDatabase()
            {
                Add(new EmployeeInfo() { EmpNo = 1, EmpName = "SS", Salary = 19000, DeptName = "D1" });
                Add(new EmployeeInfo() { EmpNo = 2, EmpName = "MP", Salary = 11100, DeptName = "D2" });
                Add(new EmployeeInfo() { EmpNo = 3, EmpName = "SK", Salary = 12300, DeptName = "D3" });
                Add(new EmployeeInfo() { EmpNo = 4, EmpName = "MS", Salary = 13300, DeptName = "D1" });
                Add(new EmployeeInfo() { EmpNo = 5, EmpName = "SP", Salary = 16400, DeptName = "D2" });
                Add(new EmployeeInfo() { EmpNo = 6, EmpName = "MS", Salary = 17500, DeptName = "D3" });
            }
        }

        //Database Version 1
        public class EmployeeInfoDatabaseV1 : List<EmployeeInfo>
        {
            public EmployeeInfoDatabaseV1()
            {
                Add(new EmployeeInfo() { EmpNo = 1, EmpName = "TS", Salary = 12000, DeptName = "D1" });
                Add(new EmployeeInfo() { EmpNo = 2, EmpName = "MS", Salary = 12100, DeptName = "D2" });
                Add(new EmployeeInfo() { EmpNo = 3, EmpName = "LS", Salary = 12200, DeptName = "D3" });
                Add(new EmployeeInfo() { EmpNo = 4, EmpName = "VB", Salary = 12300, DeptName = "D1" });
                Add(new EmployeeInfo() { EmpNo = 5, EmpName = "PB", Salary = 12400, DeptName = "D2" });
                Add(new EmployeeInfo() { EmpNo = 6, EmpName = "AB", Salary = 12500, DeptName = "D3" });
            }
        }

        //Database Version 1
        public class EmployeeInfoDatabaseV2 : List<EmployeeInfo>
        {
            public EmployeeInfoDatabaseV2()
            {
                Add(new EmployeeInfo() { EmpNo = 1, EmpName = "Tejas", Salary = 13000, DeptName = "D1" });
                Add(new EmployeeInfo() { EmpNo = 2, EmpName = "Mahesh", Salary = 13100, DeptName = "D2" });
                Add(new EmployeeInfo() { EmpNo = 3, EmpName = "Leena", Salary = 13200, DeptName = "D3" });
                Add(new EmployeeInfo() { EmpNo = 4, EmpName = "Vandana", Salary = 1300, DeptName = "D1" });
                Add(new EmployeeInfo() { EmpNo = 5, EmpName = "Prashant", Salary = 13400, DeptName = "D2" });
                Add(new EmployeeInfo() { EmpNo = 6, EmpName = "Aditya", Salary = 13500, DeptName = "D3" });
            }
        }

}
The above code contains EmployeeInfo entity class. We also have EmployeeInfoDatabase, EmployeeInfoDatabaseV1 and EmployeeInfoDatabaseV2 for default, Version 1 and Version 2 respectively.
Step 3: In the Controllers folder, add following WEB API controllers. (Note: Add an Empty WEB API class in Controllers folder. Here I have implemented all ApiController classes in one single class file in the Controllers folder. You can add separate API controller classes in this folder.
using System.Collections.Generic;
using System.Web.Http;
using WebApi_Versioning_CustomHeaders.Models;

namespace WebApi_Versioning_CustomHeaders.Controllers
{
    //Default API Controller
    public class EmployeeAPIController : ApiController
    {
        public List<EmployeeInfo> Get(int id = 0)
        {
            return new EmployeeInfoDatabase();
        }
    }


    //API Controller with Version1
    public class EmployeeAPIV1Controller : ApiController
    {
        public List<EmployeeInfo> Get(int id = 0)
        {
            return new EmployeeInfoDatabaseV1();
        }
    }

    //API Controller with Version2
    public class EmployeeAPIV2Controller : ApiController
    {
        public List<EmployeeInfo> Get(int id = 0)
        {
            return new EmployeeInfoDatabaseV2();
        }
    }
}
The above class file contains 3 API Controller classes:
- EmployeeAPIController - The default ApiController class
- EmployeeAPIV1Controller - Version 1 ApiController class
- EmployeeAPIV2Controller - Version 2 ApiController class
Step 4: To define the custom header request for the WEB API versioning, we need to add a new class in the project. To do so, in the project, add a new folder of name ControllerSelector. In this folder add a new class CustomHeaderControllerSelector. Add the following code in the class:
using System;
using System.Linq;
using System.Net.Http;
using System.Web.Http;
using System.Web.Http.Controllers;
using System.Web.Http.Dispatcher;
using System.Net;

namespace WebApi_Versioning_CustomHeaders.ControllerSelector
{
    public class CustomHeaderControllerSelector : DefaultHttpControllerSelector
    {
        public CustomHeaderControllerSelector(HttpConfiguration cfg) : base(cfg)
        {}

        public override string GetControllerName(System.Net.Http.HttpRequestMessage request)
        {
            string controllerName = base.GetControllerName(request);
            int controllerVersion;
            if (request.Headers.Contains("X-Version"))
            {
                string headerValue = request.Headers.GetValues("X-Version").First();
                //If the X-Version is 0 then return the default version
                if (headerValue == "0") {
                    return controllerName;
                }

                //If the X-Version is 1 or 2 and if the ControllerName contains 'V or v' the return
                //the controller
                if (!String.IsNullOrEmpty(headerValue) && Int32.TryParse(headerValue, out controllerVersion))
                {
                    controllerName = String.Format("{0}v{1}", controllerName, controllerVersion);

                    HttpControllerDescriptor controllerDesc = null;

                    if (!this.GetControllerMapping().TryGetValue(controllerName, out controllerDesc))
                    {
                        string message = "No HTTP resource was found for specified request URI {0} and version {1}";
                        throw new HttpResponseException(request.CreateErrorResponse(HttpStatusCode.NotFound, String.Format(message, request.RequestUri, controllerVersion)));
                    }
                }
            }
            return controllerName;
        }
    }
}
In the above class, if the controller receives the request with the header with the value of X-Version as 0, 1, 2, then corresponding controller will be returned. If the controller name contains ‘V’ or ‘v’ and if X-Version is 1 or 2, then the EmployeeAPIV1Controller or EmployeeAPIV2Controller will be returned.
Register this controller in Global.asax as follows:
GlobalConfiguration.Configuration.Services.Replace(typeof(IHttpControllerSelector),
new CustomHeaderControllerSelector(GlobalConfiguration.Configuration));
Note: Thanks to Chandan Kumar for this tip.
Testing the Application
Here I have used Fiddler to Test the WEB API Versioning.
Editorial Note: If you have never debugged a Web API using fiddler, here’s an old but useful article http://www.devcurry.com/2013/03/debugging-your-aspnet-web-apis-with.html
Run the WEB API Application. Run Fiddler. In Fiddler, go to the ‘Composer’ tab and add the WEB API URL with GET as a method as shown in the following image:

Click on the Execute button. The result will be as follows:

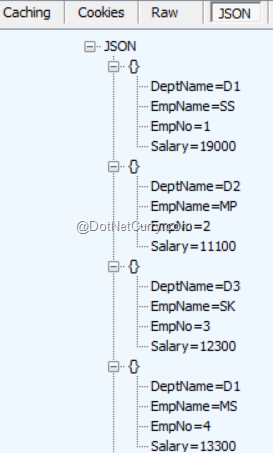
This shows the default result from the default WEB API.
To receive the response from Version 1 or Version 2, we need to add the header value in the request body as shown in the following image:

Likewise, the WEB API version 2 can also be called using the Header value as X-Version: 2.
Creating an AngularJS Client Application to test our Web API versioning
We will create an Angular based client application to test our WEB API with multiple versions.
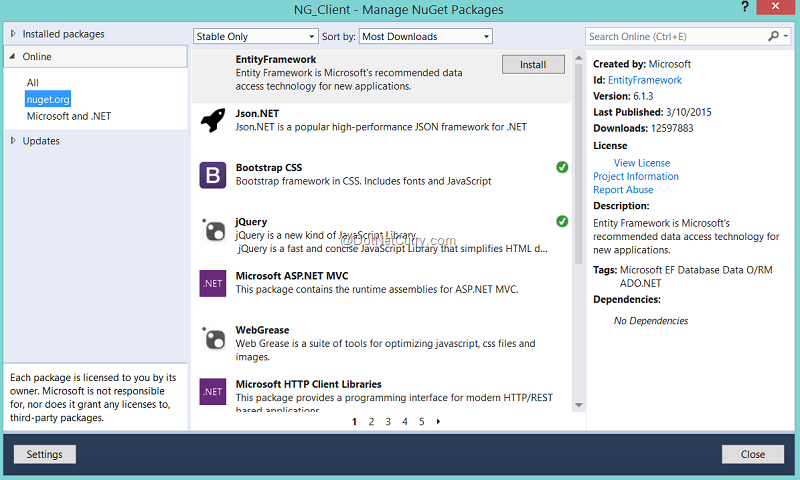
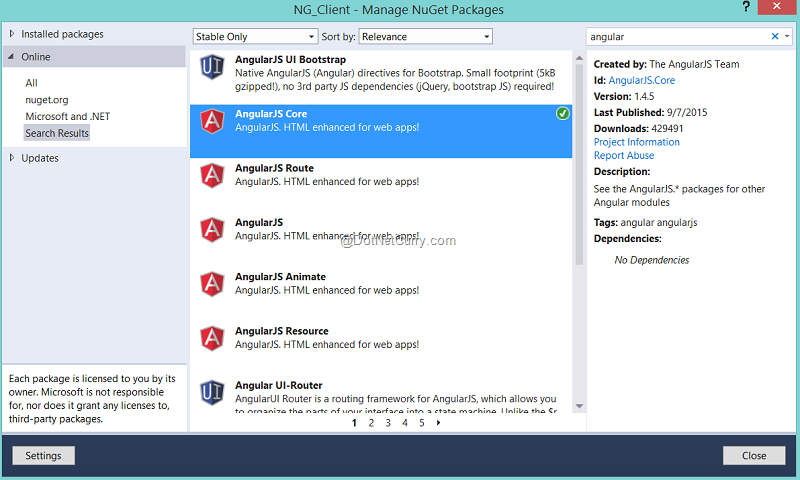
Step 1: In the same solution, add a new Empty ASP.NET application, name it as ‘NG_Client’. In this project, add NuGet package for jQuery, Bootstrap and Angular using NuGet Package Manager as shown in the following image:

The above image shows jQuery and Bootstrap CSS package is already installed. If it isn’t in your machine, install them by clicking the Install button adjacent to it.

Step 2: In the project, add a new HTML page of the name ‘H1_Client.html’. In the Scripts folder, add a new folder of name MyScript. In this folder, add a JavaScript file of name Logic.js with the following code:
var app = angular.module('appmodule', []);

app.service('appservice', function ($http) {
    //The following function makes call to WEB API
    //with header as X-Version:ver
    this.get = function (ver) {
        var response = $http({
            url: "http://localhost:43886/api/EmployeeAPI",
            method: "GET",
            headers: {
                "X-Version":ver
            }
        });
        return response;
    };
});

app.controller('appcontroller', function ($scope, appservice) {
    //Version array, the value 0 is for default WEB API
    $scope.Versions = [0, 1, 2];
    $scope.Version = 1;

    $scope.getData = function () {
        var promise = appservice.get($scope.Version);
        promise.then(function (resp) {
            $scope.Employees = resp.data;
        }, function (err) {
            $scope.Message = "Error " + err.status;
        });
    };
});
The above code defines an Angular module of name appmodule. The appservice, is an Angular service which contains the get() function. This function makes a call to the WEB API and passes the headers value using X-Version. The Angular controller of the name appcontroller performs call to Angular service and retrieves Employees data.
Step 3: In the HTML page, add the following markup with Angular databinding:
<head>
    <title></title>
    <script src="Scripts/jquery-2.1.4.min.js"></script>
    <script src="Scripts/bootstrap.min.js"></script>
    <script src="Scripts/angular.min.js"></script>
    <link href="Content/bootstrap.min.css" rel="stylesheet" />
    <script src="Scripts/MyScript/Logic.js"></script>
</head>
< body ng-controller="appcontroller">
    <h1>WEB API Versioning with Custom Headers</h1>
    <table class="table table-bordered table-striped">
        <tr>
            <td>
                Select Version :
            </td>
            <td>
                <select ng-options="ver for ver in Versions" ng-model="Version"></select>
            </td>
        </tr>
        <tr>
            <td>
                <input type="button" value="Get Data" ng-click="getData()"/>
            </td>
            <td></td>
        </tr>
    </table>
    <hr />
    <table class="table table-bordered table-striped">
        <thead>
            <tr>
                <th>EmpNo</th>
                <th>EmpName</th>
                <th>Salary</th>
                <th>DeptName</th>
            </tr>
        </thead>
        <tbody>
            <tr ng-repeat="Emp in Employees">
                <td>
                    <span>{{Emp.EmpNo}}</span>
                </td>
                <td>
                    <span>{{Emp.EmpName}}</span>
                </td>
                <td>
                    <span>{{Emp.Salary}}</span>
                </td>
                <td>
                    <span>{{Emp.DeptName}}</span>
                </td>
            </tr>
        </tbody>
    </table>
    <div>
        <span></span>
    </div>
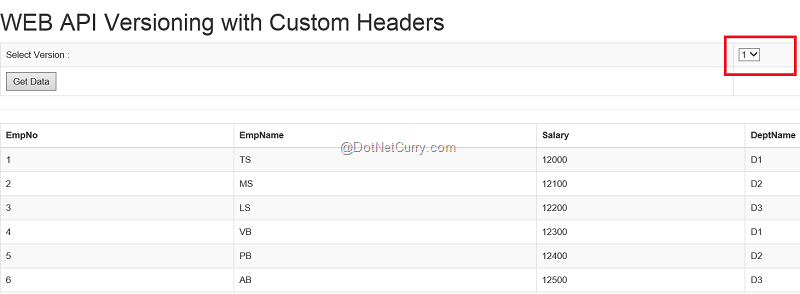
The above markup contains a select/dropdown element which is bound with the Versions array declared in the Angular controller. We can select the WEB API version using the control.
Run the application, the result will be displayed as following:

Select the appropriate version of the API using the DropDown and click of the Get Data button, the result will be as follows:

Conclusion:
There are multiple ways to version an ASP.NET Web API. We have used the Custom request header which I find very useful while managing WEB API versioning.
Download the entire source code of this article (Github)
This article has been editorially reviewed by Suprotim Agarwal.
C# and .NET have been around for a very long time, but their constant growth means there’s always more to learn.
We at DotNetCurry are very excited to announce The Absolutely Awesome Book on C# and .NET. This is a 500 pages concise technical eBook available in PDF, ePub (iPad), and Mobi (Kindle).
Organized around concepts, this Book aims to provide a concise, yet solid foundation in C# and .NET, covering C# 6.0, C# 7.0 and .NET Core, with chapters on the latest .NET Core 3.0, .NET Standard and C# 8.0 (final release) too. Use these concepts to deepen your existing knowledge of C# and .NET, to have a solid grasp of the latest in C# and .NET OR to crack your next .NET Interview.
Click here to Explore the Table of Contents or Download Sample Chapters!
Was this article worth reading? Share it with fellow developers too. Thanks!
Mahesh Sabnis is a DotNetCurry author and a Microsoft MVP having over two decades of experience in IT education and development. He is a Microsoft Certified Trainer (MCT) since 2005 and has conducted various Corporate Training programs for .NET Technologies (all versions), and Front-end technologies like Angular and React. Follow him on twitter @
maheshdotnet or connect with him on
LinkedIn