ASP.NET Web API uses the power of HTTP. As developers, we all know that the HTTP protocol is not just limited to delivering web pages, but is being used to build APIs on top of it that expose services and data. The advantages of HTTP is it is simple and easy to use and all platform supports HTTP. This advantage is exploited by web developers to create HTTP services that are available to a broad range of clients varying from desktop to web to devices. While subscribing for data over HTTP services, the client does not need to use any robust server-side language e.g. C#, Java, etc. Instead a simple JavaScript framework or library can call the HTTP service and perform data Read/Write operations.
In this article, we will build an ASP.NET Web API using MVC 6. In earlier versions of ASP.NET, Web API was provided as a separate Web API framework, but going forward in the ASP.NET 5 release, Web API is merged with MVC, termed as MVC 6. This provides an advantage of creating Web UI using HTML and API services using a single framework.
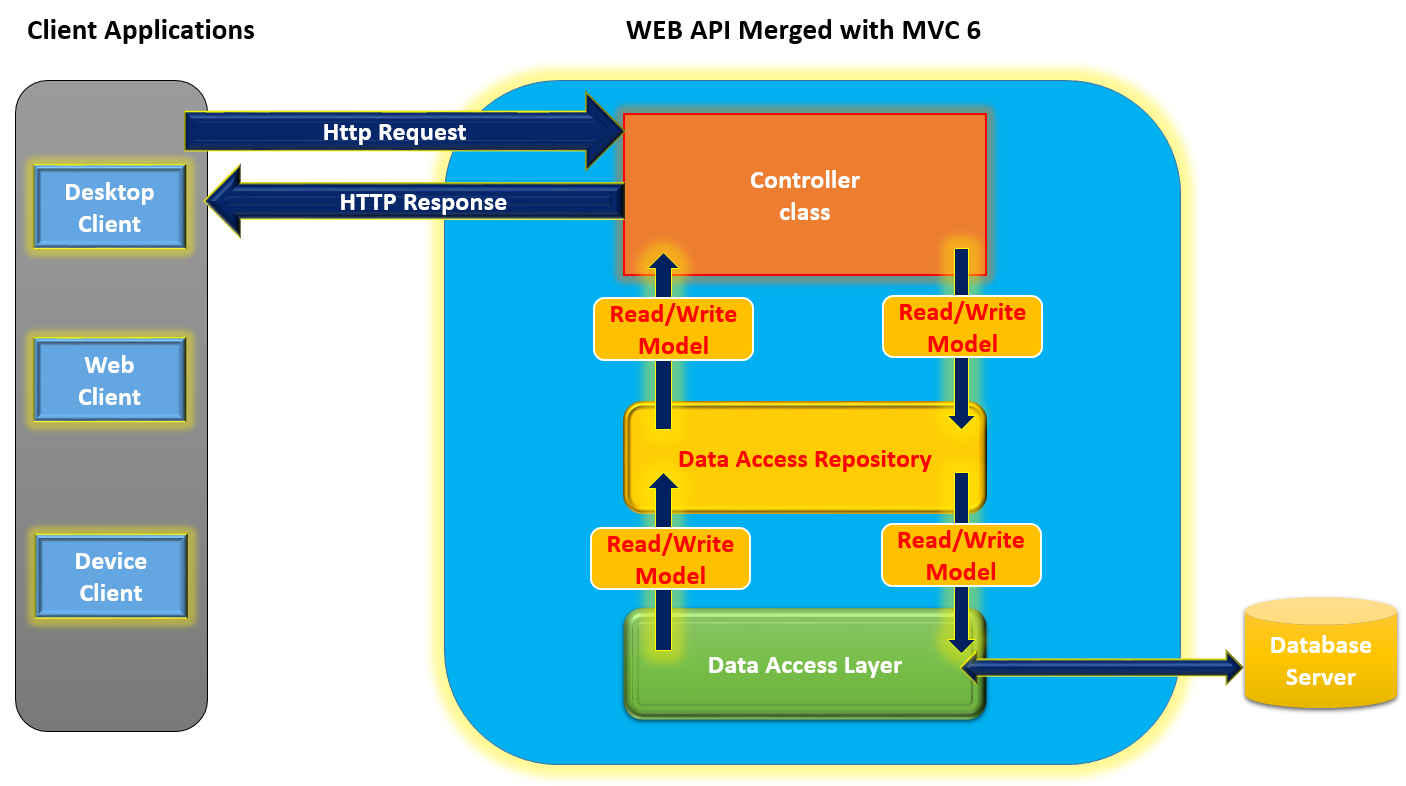
The following diagram explains Web API in application development

The above diagram provides conceptual use of Web API. It is the Controller class which accepts HTTP request messages of type GET, POST, PUT and DELETE. Once the request message is received, the controller class performs server side processing e.g. using Data Access Repository, Data Access Layer and performs the Read/Write operations to the database. The Read/Write operations uses Model objects (or entities). Once the required processing is over on the server-side, the HTTP response is sent back to the client by the controller class. The client can be any type of an application ranging from Desktop to Web to Mobile application.
Implementing the ASP.NET Web API application
To implement the Web API application, we will use Visual Studio 2015 and ASP.NET 5 RC1.
Editorial Note: The ASP.NET 5 RC tools are not installed when you install the Visual Studio 2015 Update 1. In order to make the RC tools available, start a new Web Project > ‘New ASP.NET Project’ window > choose a web application template called ‘Get ASP.NET 5 RC’ template. When you choose that template, the RC version of ASP.NET 5 tools and frameworks get installed.
Step 1: Open Visual Studio 2015 and create a new ASP.NET application as shown in the following image:

Click on the OK button. The following window will be displayed from where we can select the Web API application from ASP.NET 5 Templates as shown in the following image

Step 2: In the project, add a Models folder and add a new class file in it containing the following code
using System.Collections.Generic;

namespace WebAPI_WithMVC6.Models
{
    public class PersonInfo
    {
        public int PersonId { get; set; }
        public string PersonName { get; set; }
        public int Age { get; set; }
        public string Gender { get; set; }
        public string City { get; set; }
    }

    public class PersonData : List<PersonInfo>
    {
        public PersonData()
        {
            Add(new PersonInfo() { PersonId = 1, PersonName = "MS",
                             Age = 39, Gender = "Male", City = "Pune" });
            Add(new PersonInfo() { PersonId = 2, PersonName = "LS",
                              Age = 37, Gender = "Female", City = "Pune" });
            Add(new PersonInfo() { PersonId = 3, PersonName = "TS",
                              Age = 12, Gender = "Male", City = "Pune" });
            Add(new PersonInfo() { PersonId = 4, PersonName = "VB",
                              Age = 32, Gender = "Female", City = "Pune" });
            Add(new PersonInfo() { PersonId = 5, PersonName = "PB",
                              Age = 33, Gender = "Male", City = "Pune" });
            Add(new PersonInfo() { PersonId = 6, PersonName = "AB",
                              Age = 5, Gender = "Male", City = "Pune" });
        }
    }

    public class DataAccess
    {
        public static PersonData Persons;

        public DataAccess()
        {
            Persons = new PersonData();
        }

        public PersonData Get()
        {
            return Persons;
        }

        public PersonInfo Get(int id)
        {
            return Persons.Find(p => p.PersonId == id);
        }

        public PersonData Add(PersonInfo p)
        {
            Persons.Add(p);
            return Persons;
        }

        public PersonData Update(int id, PersonInfo p)
        {
            var per = Persons.Find(px => px.PersonId == id);
            if (per != null)
            {
                Persons.Remove(per);
                Persons.Add(p);
            }
            return Persons;
        }

        public PersonData Delete(int id)
        {
            var per = Persons.Find(px => px.PersonId == id);
            if (per != null)
            {
                Persons.Remove(per);
            }
            return Persons;
        }
    }
}
The above class file contains following classes
· PersonInfo - This is the entity class representing schema for the Person information.
· PersonData - This class is derived from List<PersonInfo> class. This class contains constructor with some initialization data.
· DataAccess - This class performs CRUD operations using PersonInfo class.
Step 3: In the project, add a new folder of the name Repository. This will encapsulate the data access layer and contains logic for accessing the DataAccess class. The repository isolates the data access layer from the controller.
using System.Collections.Generic;
using WebAPI_WithMVC6.Models;

namespace WebAPI_WithMVC6.Repository
{
    public interface IPersonRepository<T, in TPk>  where T : class
    {
        IEnumerable<T> Get();
        T Get(TPk id);
        IEnumerable<T> Add(T obj);
        IEnumerable<T> Update(TPk id, T obj);
        IEnumerable<T> Delete(TPk id);
    }

    public class PersonRepository : IPersonRepository<PersonInfo, int>
    {
        DataAccess objds;
        public PersonRepository()
        {
            objds = new DataAccess();
        }
        public IEnumerable<PersonInfo> Add(PersonInfo obj)
        {
          return  objds.Add(obj);
        }

        public IEnumerable<PersonInfo> Delete(int id)
        {
            return objds.Delete(id);
        }

        public IEnumerable<PersonInfo> Get()
        {
            return objds.Get();
        }

        public PersonInfo Get(int id)
        {
            return objds.Get(id);
        }

        public IEnumerable<PersonInfo> Update(int id, PersonInfo obj)
        {
            return objds.Update(id, obj);
        }
    }
}
The above code is the most important part of the application.
This code contains the IPersonRepository<T,TPk> interface. This is a generic interface where T is class and TPk is the input parameter which is the going to be the id. The class PersonRepository implements IPersonRepository interface and implements its methods. These methods call methods from the DataAccess class which we have created in the Models folder.
Step 4: In the previous step, we have implemented the Repository which this decouples the DataAccess from the Controller. To use this Repository, we need to register it in the ASP.NET 5 dependency Injection container. In the project, we have the Startup.cs class containing the ConfigureServices method. In this method we will register the Repository using the following code:
public void ConfigureServices(IServiceCollection services)
{
    // Add framework services.
    services.AddMvc();
    services.AddSingleton<IPersonRepository<PersonInfo,int>,PersonRepository>();
}
Using the AddSingleton() method, we register the Repository in the Dependency Injection. This method will create a singleton instance for the PersonRepository object.
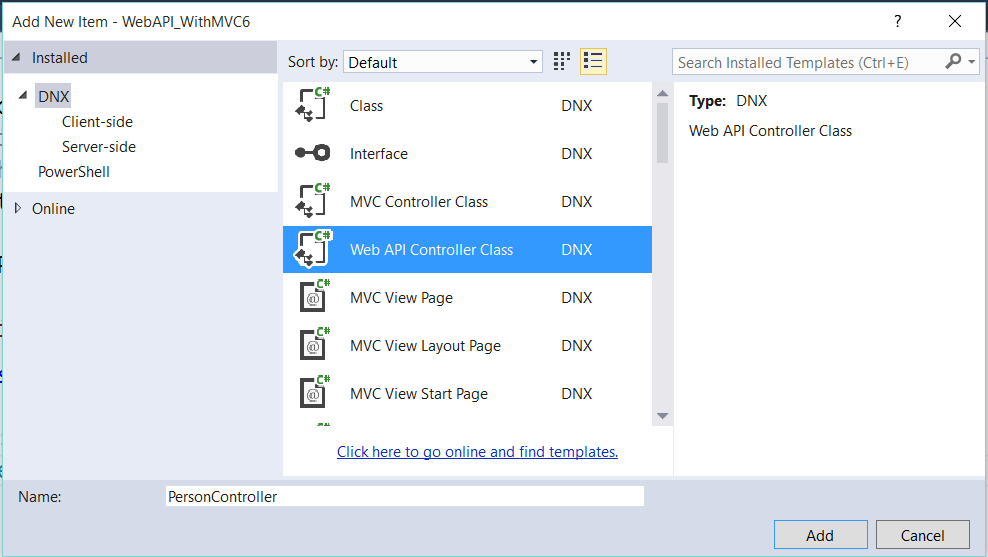
Step 5: In the Controllers folder, add a new Web API Controller class as shown in the following image:

This will add a controller with CRUD action methods. Remove the already available code from the class and add the following code in it:
using System.Collections.Generic;
using Microsoft.AspNet.Mvc;
using WebAPI_WithMVC6.Repository;
using WebAPI_WithMVC6.Models;

namespace WebAPI_WithMVC6.Controllers
{
    [Route("api/[Person]")]
    public class PersonController : Controller
    {
        [FromServices]
        public IPersonRepository<PersonInfo, int> _repository { get; set; }

        [HttpGet]
        public IEnumerable<PersonInfo> Get()
        {
            return _repository.Get();
        }

        [HttpGet("{id}")]
        public PersonInfo Get(int id)
        {
            return _repository.Get(id);
        }

        [HttpPost]
        public IEnumerable<PersonInfo> Post([FromBody]PersonInfo p)
        {
            return _repository.Add(p);
        }

        [HttpPut("{id}")]
        public IEnumerable<PersonInfo> Put(int id, [FromBody]PersonInfo p)
        {
            return _repository.Update(id, p);
        }

        [HttpDelete("{id}")]
        public IEnumerable<PersonInfo> Delete(int id)
        {
            return _repository.Delete(id);
        }
    }
}
In the above code, we have the Route attribute applied on the Controller class. Set the value of the attribute as Route [“api/Person”]
The above code declares the Repository object using the following code:
[FromServices]
public IPersonRepository<PersonInfo, int> _repository { get; set; }
The attribute FromServices tell MVC to inject the IPersonRepository in the current controller. The controller class contains methods for HTTP actions for performing CRUD operations.
Step 6: To launch the Person API, we need to make changes in the launchSettings.json file in the Properties folder of the project. Change the profiles, launchUrl property as shown in the following code:
"profiles": {
    "IIS Express": {
      "commandName": "IISExpress",
      "launchBrowser": true,
      "launchUrl": "api/Person",
      "environmentVariables": {
        "Hosting:Environment": "Development"
      }
    },
Testing Web API in Fiddler
We will test our Web API using Fiddler. Fiddler is an HTTP debugging proxy server application written by Eric Lawrence. This tool can be downloaded from this link.
Launch Web API using F5. Open the Fiddler tool.
Testing GET Operation
In the Composer tab of the fiddler tool, add the following URL,
http://localhost:1135/api/Person
Set the method as GET and click on the Execute button as shown in the following image:

The result will be displayed as shown here:

Testing the POST operation
In the Composer Tab, set the Method as POST, add the following JSON object in the Request body and Content Type as shown in the following image

Click on the Execute Button, the new record will be added and will be shown as per the following image

Likewise PUT and Delete functionality can be tested.
Conclusion
The ASP.NET Web API Framework is merged in MVC 6 and provides an easy mechanism to create API services which can be consumed by various client applications. The dependency injection helps to isolate the data access from the controllers.
Download the entire source code of this article (Github)
This article has been editorially reviewed by Suprotim Agarwal.
C# and .NET have been around for a very long time, but their constant growth means there’s always more to learn.
We at DotNetCurry are very excited to announce The Absolutely Awesome Book on C# and .NET. This is a 500 pages concise technical eBook available in PDF, ePub (iPad), and Mobi (Kindle).
Organized around concepts, this Book aims to provide a concise, yet solid foundation in C# and .NET, covering C# 6.0, C# 7.0 and .NET Core, with chapters on the latest .NET Core 3.0, .NET Standard and C# 8.0 (final release) too. Use these concepts to deepen your existing knowledge of C# and .NET, to have a solid grasp of the latest in C# and .NET OR to crack your next .NET Interview.
Click here to Explore the Table of Contents or Download Sample Chapters!
Was this article worth reading? Share it with fellow developers too. Thanks!
Mahesh Sabnis is a DotNetCurry author and a Microsoft MVP having over two decades of experience in IT education and development. He is a Microsoft Certified Trainer (MCT) since 2005 and has conducted various Corporate Training programs for .NET Technologies (all versions), and Front-end technologies like Angular and React. Follow him on twitter @
maheshdotnet or connect with him on
LinkedIn