What is Continuous Testing?
A very important factor in effective unit testing is how long it takes for the developer to see the test results.
The shorter the time, the more beneficial are the tests. If the tests are only run as part of the nightly build, information about any of them failing will only be available the next morning. By then, the developer would have most likely forgotten some details about the changes that were made the previous day, especially if in the meantime, he/she started working on something else.
Building the project, running the tests on the server immediately after code changes and a commit to source control, mostly avoids this problem, as the results are delayed only for the duration of the build.
Are you a .NET/C# developer looking for a resource covering New Technologies, in-depth Tutorials and Best Practices?
Well, you are in luck! We at DotNetCurry release a digital magazine once every two months aimed at Developers, Architects and Technical Managers and cover ASP.NET Core, C#, Patterns, .NET Core, ASP.NET MVC, Azure, DevOps, ALM, TypeScript, Angular, React, and much more. Subscribe to this magazine for FREE and receive all previous, current and upcoming editions, right in your Inbox. No Gimmicks. No Spam Policy.
Click here to Download the Magazines For Free
Of course, the developer can also run the tests by himself, locally in his own development environment before committing the code. This can save some additional time and prevent him from committing broken code in the first place. But even in this case, he must consciously run the tests in order to see the results, which he will typically do when he has completed some piece of work.
The idea of continuous testing is to make this feedback loop even more tight.
The tests should be run automatically whenever the code changes and the developer should not need to run them manually. This can prove useful even if the developer only writes tests, after he has written the code under test. When he needs to refactor or enhance existing code, these tests will take on the role of regression tests, i.e. they will serve as a safety net from breaking original functionality.
However, continuous testing shows its real worth when the tests are written in advance or in parallel with the code under test, as required by Test Driven Development (TDD).
With the tests being run all the time while the developer is writing the code, test results provide an up-to-date view into the current state of the code – which parts are already implemented correctly and which are still missing or currently broken. This makes the development more effective and satisfying as any fix to the code, results in an almost immediate change in test results.
Continuous Testing Support in Development Tools
Continuous testing is not possible if the development tools don’t offer support for it.
To my knowledge, the first tool to allow continuous testing in the .NET ecosystem was Mighty Moose, also known as ContinuousTests – a Visual Studio extension and command line runner, which started out as a commercial tool, but was later made free and open sourced. Now, it seems completely abandoned and outdated.
This first attempt was soon followed by other third party commercial extensions for Visual Studio. Today, there are three competing solutions available:
- NCrunch from Remco Software,
- DotCover by JetBrains, sold as a part of ReSharper Ultimate bundle, and
- Smart Runner by Typemock, sold together with Typemock Isolator for .NET.
Microsoft’s first shy attempt in this field was a feature that was added to Test Explorer: Run Tests After Build switch made it possible to automatically run the tests after every build.
While this feature didn’t really allow for real continuous testing, it was nevertheless the first step in that direction. A full solution for continuous testing was introduced in Visual Studio 2017 as a feature named Live Unit Testing (Enterprise Edition).
At about the same time, a similar feature was added to the command line tools for .NET Core. You can use the dotnet-watch file watcher to monitor the source code for changes and run the tests in response. It does not integrate with Visual Studio and reports results only to the console window, but can therefore be used with any code editor and on any platform.
In the remainder of this article, we will take a closer look at Microsoft’s current solutions for continuous testing.
Live Unit Testing in VS 2017
Live Unit Testing functionality is only available in the Enterprise edition of Visual Studio 2017.
In the final release of Visual Studio 2017, which was released in March, support was limited to projects targeting the full .NET framework. If you want to use it with .NET Core (1.0, 1.1 or 2.0), you will also need to have update 15.3 installed. At the time of writing, it could be safely installed side-by-side with an existing release version of Visual Studio 2017 without interfering with it.
You can use any of the three most popular test frameworks (MSTest, NUnit and xUnit.net) with Live Unit Testing, however you need to use a recent enough version for all of them, e.g. there’s no support for NUnit 2 and MSTest v1.
Setting up an ASP.NET Core Project
To give Live Unit Testing a try, we will create a new project, based on the ASP.NET Core Web Application (.NET Core) project template. We will choose the Web Application option with No Authentication and Enable Docker Support.
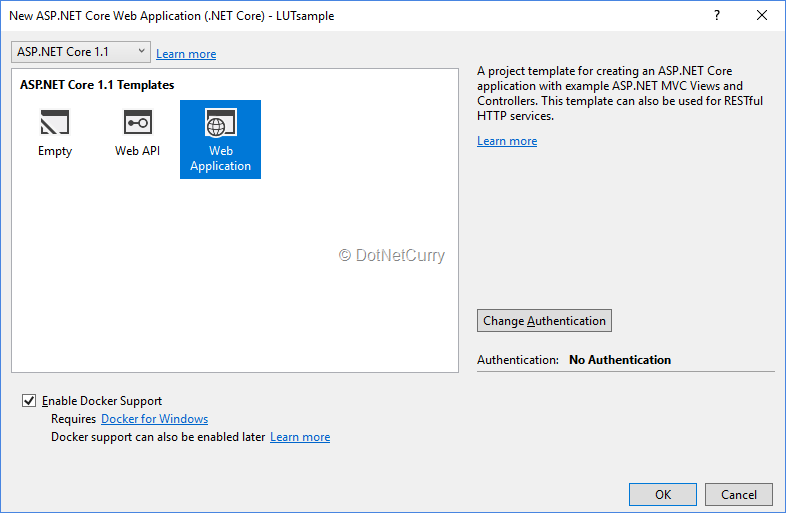
Image 1: New ASP.NET Core project
With these settings, Visual Studio will automatically run the application inside a Linux container on your Windows machine. Of course, this requires Docker for Windows to be installed.
For the tests, we need to add another project to our solution.
As we want to use MSTest test framework, we will choose the Unit Test Project (.NET Core) project template. For xUnit.net tests, we would need to choose the xUnit Test Project (.NET Core) project template instead.
Both project templates take care of installing the test framework and test adapter Nuget packages for the selected test framework, which are required for Visual Studio to recognize the tests and run them. We should also add a reference to the web project from the test project, so that we can later access the application classes from the tests.
To check that everything was set up correctly, we can now Run All the tests from Test Explorer.
It should detect the empty test in the newly created test project and run it. Although the application project is configured to run in Docker, this does not affect the test project. Visual Studio will still run the tests locally in its own dedicated sandbox.
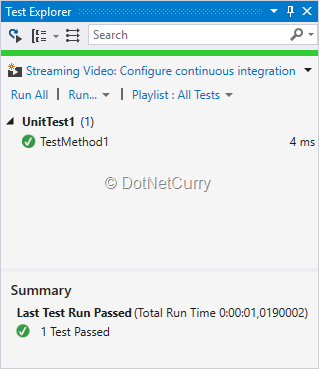
Image 2: Run All tests in Test Explorer
It’s now time to enable Live Unit Testing for our solution via the Start command in the Test > Live Unit Testing menu. To disable it again at a later time, we could use the Pause or Stop command from the same menu.
It’s also worth mentioning that by default you will need to reinitialize Live Unit Testing every time you restart Visual Studio. You can change this behavior with a setting on the Live Unit Testing page of the Options dialog: Start Live Unit testing on solution load.
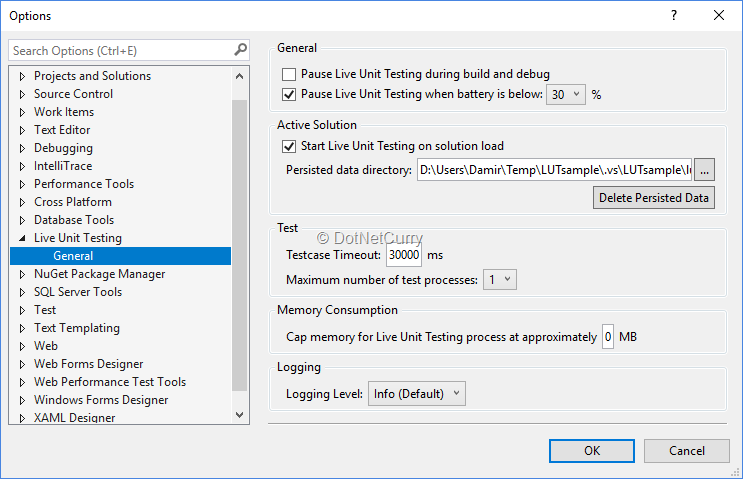
Image 3: Start Live Unit testing on solution load
A Typical Development Cycle
Live Unit Testing shines best when we adhere to Test Driven Development practices and write tests at the same time we are writing the code under test.
Let’s start by adding a service class to our ASP.NET Core project:
using System;

namespace LUTsample.Services
{
    public class FibonacciService
    {
        public int Calculate(int n)
        {
            throw new NotImplementedException();
        }
    }
}
The Calculate function will eventually return the n-th number from the Fibonacci sequence. Until we implement it, it seems appropriate that it throws a NotImplementedException. Before we start implementing it, we should first write a test, specifying the expected result:
using Microsoft.VisualStudio.TestTools.UnitTesting;
using LUTsample.Services;

namespace LUTsample.Tests
{
    [TestClass]
    public class FibonacciTest
    {
        [TestMethod]
        public void Calculate1()
        {
            var fibonacci = new FibonacciService();
            Assert.AreEqual(1, fibonacci.Calculate(1));
        }
    }
}
The test of course fails.
This is also clearly indicated in the code editor window by Live Unit testing as soon as we write the test.
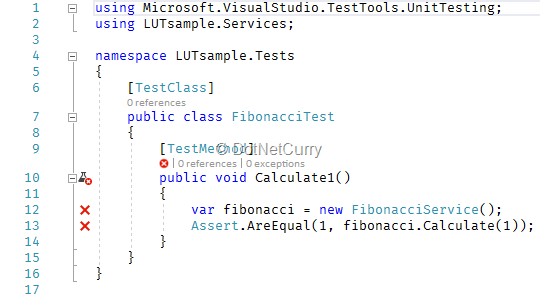
Image 4: Failing test
The glyphs in front of each line of code are an effective way of showing information about test results and code coverage:
- A green check indicates that the line is executed by at least one test and that all covering tests pass.
- A red X indicates that the line is executed by at least one test and that at least one of those tests fails.
- A blue dash indicates that the line is not executed by any test.
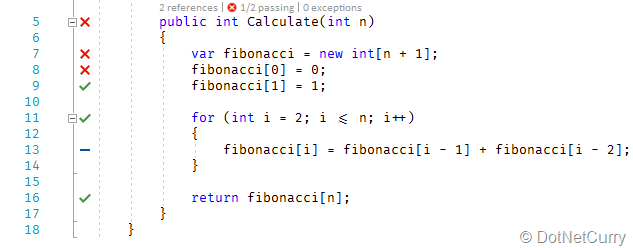
Image 5: Different Live Unit Testing glyphs
It’s time to make the test pass by implementing the Calculate function:
public int Calculate(int n)
{
    var fibonacci = new int[n + 1];
    fibonacci[0] = 0;
    fibonacci[1] = 1;

    for (int i = 2; i <= n; i++)
    {
        fibonacci[i] = fibonacci[i - 1] + fibonacci[i - 2];
    }

    return fibonacci[n];
}
Not only does the test pass now, but the coverage information is also shown in the code window.
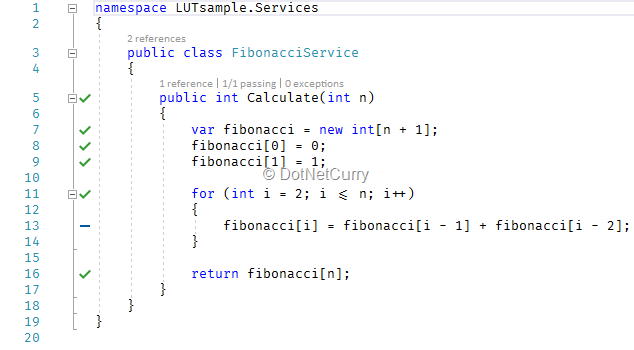
Image 6: Coverage information in code editor window
With one line of code not being executed by our test, we really need to add more tests:
public void CalculateOutOfRange()
{
    var fibonacci = new FibonacciService();
    Assert.ThrowsException<ArgumentOutOfRangeException>(
        () => fibonacci.Calculate(-1));
}

[TestMethod]
public void Calculate1()
{
    var fibonacci = new FibonacciService();
    Assert.AreEqual(1, fibonacci.Calculate(1));
}

[TestMethod]
public void Calculate8()
{
    var fibonacci = new FibonacciService();
    Assert.AreEqual(21, fibonacci.Calculate(8));
}
All lines of code are now covered by tests. However, one of the tests fails:
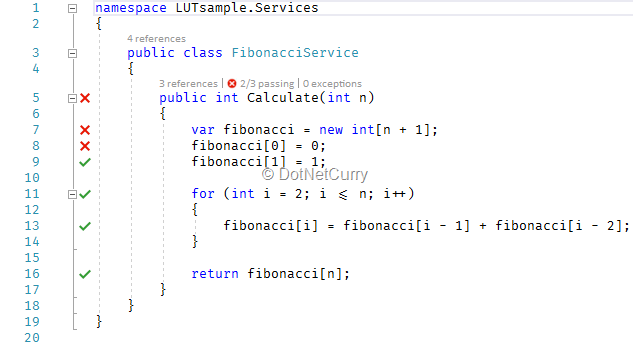
Image 7: Coverage information with failing tests
If we click on any glyph, a pop-up window will list all of the covering tests for that line. If we hover over a failing test in this list, more information about the failure will be shown in the tooltip.
Double-clicking a test in the list will navigate us to the test.
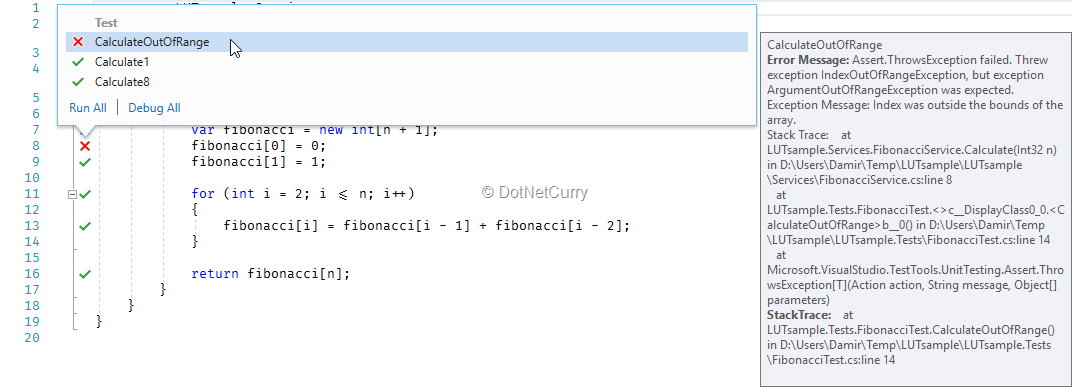
Image 8: Tooltip with information about a failing test
The next logical step would be fixing the function code so that all the tests will pass, but I’m leaving that to you as an exercise.
By now you should already have a pretty good idea of how the development cycle looks when practicing Test Driven Development with continuous testing. Once you get used to it, this approach should improve your code quality and make you more productive.
.NET Core Command Line Tools
.NET Core SDK includes a set of command line tools, which can be used as an alternative to the Visual Studio graphical user interface. We will use them to prepare a similar working environment with continuous testing.
Setting Up the Project
Let’s start by creating a new solution with a default ASP.NET Core MVC web application project inside it:
md LUTsample
cd .\LUTsample\
dotnet new sln -n LUTsample
dotnet new mvc -n LUTsample -o LUTsample
dotnet sln add .\LUTsample\LUTsample.csproj
Just like the project template in Visual Studio, the mvc template creates a working web application. Unfortunately, there’s no template available yet to setup deployment to a Docker container from command line, therefore this application will run locally. We only need to restore the NuGet packages and we’re ready to go:
dotnet restore
cd .\LUTsample\
dotnet run
We can open the web page at http://localhost:5000 in our favorite browser, as explained in the output of the last command:
Hosting environment: Production
Content root path: D:\Users\Damir\Documents\LUTsample\LUTsample
Now listening on: http://localhost:5000
Application started. Press Ctrl+C to shut down.
It’s time to create an accompanying test project and add it to the solution. Let’s stop the local web server with Ctrl+C and execute the following commands:
cd..
dotnet new mstest -n LUTsample.Tests -o LUTsample.Tests
cd .\LUTsample.Tests\
The mstest template will create a new test project based on the MSTest v2 testing framework with a sample empty test. The xunit template will use xUnit.net instead. After restoring the NuGet packages we can run the tests:
dotnet restore
dotnet test
Of course, the empty test passes:
Build started, please wait...
Build completed.

Test run for D:\Users\Damir\Documents\LUTsample\LUTsample.Tests\bin\Debug\netcoreapp1.1\LUTsample.Tests.dll(.NETCoreApp,Version=v1.1)
Microsoft (R) Test Execution Command Line Tool Version 15.0.0.0
Copyright (c) Microsoft Corporation.  All rights reserved.

Starting test execution, please wait...

Total tests: 1. Passed: 1. Failed: 0. Skipped: 0.
Test Run Successful.
Test execution time: 0.9738 Seconds
Running the Tests Continuously
We need to start modifying the code now.
Since command line tools take care of all .NET Core specific operations, we could use any code editor. I chose Visual Studio Code for this article, which is available for Windows, Linux and macOS just like ASP.NET Core itself.
Editorial Note: For a quick primer on VS Code, check https://www.dotnetcurry.com/visualstudio/1340/visual-studio-code-tutorial
With the C# extension installed, as soon as we open the solution folder in the editor, Visual Studio Code will offer to automatically generate the build and launch definitions for our solution.

Image 9: Automatically create build and debug assets
This will create launch.json and tasks.json files in the .vscode subfolder, allowing us to quickly build the project with Ctrl+Shift+B and debug it with F5.
We’re going to follow the same process as with Visual Studio 2017.
First we’ll add the FibonacciService with the not yet implemented Calculate function to a new Services folder inside the LUTsample project folder. Next, we’ll replace the empty test in the LUTsample test project with a real one.
For the test project to still build successfully, we need to add a reference to the web application:
dotnet add reference ..\LUTsample\LUTsample.csproj
We could now run this new failing test with dotnet test, but since we want to run the tests continuously, we need to add the dotnet-watch tool to the test project, following the instructions in its GitHub repository.
Open the LUTsample.Tests.csproj file in the editor and add the following inside its Project element:
This will work with .NET Core 1.0 and .NET Core 1.1. For .NET Core 2.0 projects we need to use version 2.0.0 of Microsoft.Dotnet.Watcher.Tools instead.
After restoring the new NuGet package, we can instruct the watch tool to run the test:
dotnet restore
dotnet watch test
It will output details about the failing test, but unlike dotnet test, it will keep running and watch for any changes in either the application or the test project:
watch : Started
Build started, please wait...
Build completed.

Test run for D:\Users\Damir\Temp\LUTsample\LUTsample.Tests\bin\Debug\netcoreapp1.1\LUTsample.Tests.dll(.NETCoreApp,Version=v1.1)
Microsoft (R) Test Execution Command Line Tool Version 15.0.0.0
Copyright (c) Microsoft Corporation.  All rights reserved.

Starting test execution, please wait...
Failed   LUTsample.Tests.FibonacciTest.Calculate1
Error Message:
 Test method LUTsample.Tests.FibonacciTest.Calculate1 threw exception:
System.NotImplementedException: The method or operation is not implemented.
Stack Trace:
    at LUTsample.Services.FibonacciService.Calculate(Int32 n) in D:\Users\Damir\Temp\LUTsample\LUTsample\Services\FibonacciService.cs:line 9
   at LUTsample.Tests.FibonacciTest.Calculate1() in D:\Users\Damir\Temp\LUTsample\LUTsample.Tests\FibonacciTest.cs:line 13


Total tests: 1. Passed: 0. Failed: 1. Skipped: 0.
Test Run Failed.
Test execution time: 0.8896 Seconds


watch : Exited with error code 1
watch : Waiting for a file to change before restarting dotnet...
As soon as we add the implementation for the FibonacciService.Calculate method and save the changes, the watch tool will rebuild the projects and rerun the tests:
watch : Started
Build started, please wait...
Build completed.

Test run for D:\Users\Damir\Temp\LUTsample\LUTsample.Tests\bin\Debug\netcoreapp1.1\LUTsample.Tests.dll(.NETCoreApp,Version=v1.1)
Microsoft (R) Test Execution Command Line Tool Version 15.0.0.0
Copyright (c) Microsoft Corporation.  All rights reserved.

Starting test execution, please wait...

Total tests: 1. Passed: 1. Failed: 0. Skipped: 0.
Test Run Successful.
Test execution time: 0.8763 Seconds


watch : Exited
watch : Waiting for a file to change before restarting dotnet...
Unlike Live Unit Testing, the results and the coverage are not shown directly in the code editor, but we still get immediate feedback with every change. If we now add the additional tests, they will again be immediately run, indicating that one of them fails.
For additional convenience you could even run dotnet-watch directly in the terminal that’s built into Visual Studio Code. This way you don’t need to have an extra terminal window open all the time.
Conclusion:
We have explored how continuous testing tools can make testing a more integral part of your development process, whether you’re following TDD or not.
Support for continuous testing is becoming more common in the .NET ecosystem and will only improve in the future. The .NET Core command line tools can be used with any editor and on any platform. Visual Studio 2017 introduces the Live Unit Testing feature, which is only included in the Enterprise edition. For other editions there are alternative third-party commercial extensions available.
This article was technically reviewed by Yacoub Massad.
This article has been editorially reviewed by Suprotim Agarwal.
C# and .NET have been around for a very long time, but their constant growth means there’s always more to learn.
We at DotNetCurry are very excited to announce The Absolutely Awesome Book on C# and .NET. This is a 500 pages concise technical eBook available in PDF, ePub (iPad), and Mobi (Kindle).
Organized around concepts, this Book aims to provide a concise, yet solid foundation in C# and .NET, covering C# 6.0, C# 7.0 and .NET Core, with chapters on the latest .NET Core 3.0, .NET Standard and C# 8.0 (final release) too. Use these concepts to deepen your existing knowledge of C# and .NET, to have a solid grasp of the latest in C# and .NET OR to crack your next .NET Interview.
Click here to Explore the Table of Contents or Download Sample Chapters!
Was this article worth reading? Share it with fellow developers too. Thanks!
Damir Arh has many years of experience with software development and maintenance; from complex enterprise software projects to modern consumer-oriented mobile applications. Although he has worked with a wide spectrum of different languages, his favorite language remains C#. In his drive towards better development processes, he is a proponent of Test-driven development, Continuous Integration, and Continuous Deployment. He shares his knowledge by speaking at local user groups and conferences, blogging, and writing articles. He is an awarded Microsoft MVP for .NET since 2012.