The ASP.NET FormView Web Server Control can be used as a code generator for your ASP.NET forms production and can cut development time in half for most forms. The secret is the FormView Generator - which many of you have used before but may not have thought about it in this way.
Here is Microsoft’s description for the FormView Control: The FormView control is used to display a single record from a data source in a table. When using the FormView control, you specify templates to display and edit bound values. The templates contain formatting, controls, and binding expressions to create the form. The FormView control is often used in combination with a GridView control for master/detail scenarios. This section contains the following topics about the FormView control.
I have built so MANY forms in .NET that it makes my head spin, but I am always looking for easier ways to cut down on the time it takes to produce even the simplest form. Well I think I have found the best and easiest method of getting my form development started- and I didn’t have to write any code!
Think about it, most forms start off by placing controls on the design surface and laying them out in tables, and naming the controls, and remembering what fields are in the database, and, and, and. Yuck. I am tired of this and have found a better way. In a small form, this can mean more than a thousand lines of markup of HTML and the like.
But by using the FormView control, you can have Microsoft auto-generate most of these lines by reading the database table and creating the start of the form. It is already using Templates (which are the absolute secret of good forms) and then you can modify the auto-generated code to your liking.
Edit and Insert Templates
You can use the EditItemTemplate template to allow users to modify an existing record, and the InsertItemTemplate template to gather values for a new record to be inserted into the data source. In the EditItemTemplate and InsertItemTemplate templates, you typically include controls that take user input, such as TextBox, CheckBox, or DropDownList controls. You might also add controls to display read-only data, and command buttons to allow users to edit the current record, insert a new record, or cancel current action. You bind controls in the EditItemTemplate and InsertItemTemplate templates to data using a data-binding expression that includes the Bind method for two-way data binding, as shown in the following example.
Example code that is generated:
<asp:FormView ID="FormView1" DataSourceID="SqlDataSource1"
DataKeyNames="ProductID" RunAt="server">
<ItemTemplate>
<table>
<tr><td align="right"><b>Product ID:</b></td>
<td><%# Eval("ProductID") %></td></tr>
<tr><td align="right"><b>Product Name:</b></td>
<td><%# Eval("ProductName") %></td></tr>
<tr><td align="right"><b>Category ID:</b></td>
<td><%# Eval("CategoryID") %></td></tr>
<tr><td align="right"><b>Quantity Per Unit:</b></td>
<td><%# Eval("QuantityPerUnit") %></td></tr>
<tr><td align="right"><b>Unit Price:</b></td>
<td><%# Eval("UnitPrice") %></td></tr>
</table>
</ItemTemplate>
</asp:FormView>
The Code Generation process
Ok here is the process for the Form Generation of any table configured with data source control.
When you bind a data source control to a FormView control, an ItemTemplate is auto-generated containing HTML markup for each field and a Label control with the Text property bound to the field's value. Also created are an InsertItemTemplate and EditItemTemplate, populated with input controls for each of the data fields returned by the data source control.
The markup will look something like this:
<asp:FormView ID="FormView1" runat="server" CellPadding="4"
DataKeyNames="MeterID" DataSourceID="SqlDataSource2" ForeColor="#333333">
<EditItemTemplate>
MeterID:
<asp:Label ID="MeterIDLabel1" runat="server" Text='<%# Eval("MeterID") %>' />
<br />
Manufacturer:
<asp:TextBox ID="ManufacturerTextBox" runat="server"
Text='<%# Bind("Manufacturer") %>' />
<br />
ModelID:
<asp:TextBox ID="ModelIDTextBox" runat="server"
Text='<%# Bind("ModelID") %>' />
<br />
RTUSN:
<asp:TextBox ID="RTUSNTextBox" runat="server"
Text='<%# Bind("RTUSN") %>' />
<br />
SecurityCode:
<asp:TextBox ID="SecurityCodeTextBox" runat="server"
Text='<%# Bind("SecurityCode") %>' />
<br />
MeterComIDAddress:
<asp:TextBox ID="MeterComIDAddressTextBox" runat="server"
Text='<%# Bind("MeterComIDAddress") %>' />
So instead placing each control on the form and laying out each form from the database, you can use this approach and get all this work done with just a few keystrokes. Then you can use the time saved to modify and tweak the layout to meet your requirements.
Step 1: To connect to a SQL Server database using the SqlDataSource control
- In Microsoft Visual Studio, open a Web site, add an ASP.NET page (Web Form), and switch to Design view.
- From the Data group in the Toolbox, drag a SqlDataSource control onto the page.
- On the SqlDataSource Tasks shortcut menu, click Configure Data Source.
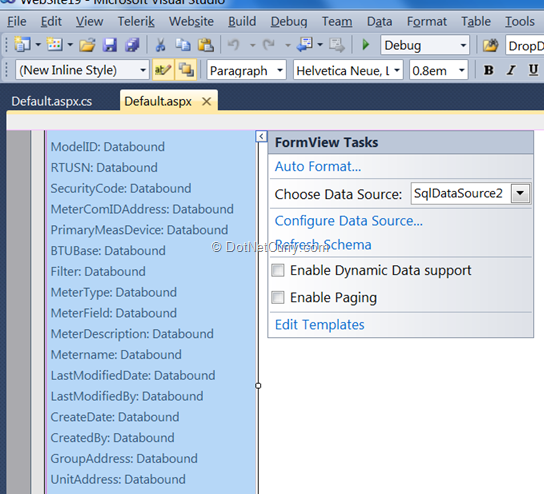
Step 2: Binding the Data to the FormView: drag a FormView from the Toolbox onto the Designer of a new aspx page and right-mouse click and choose show smart tag:

Auto-Create the Form View Summary
- Visual Studio will create your form with data from your SQLDataSource.
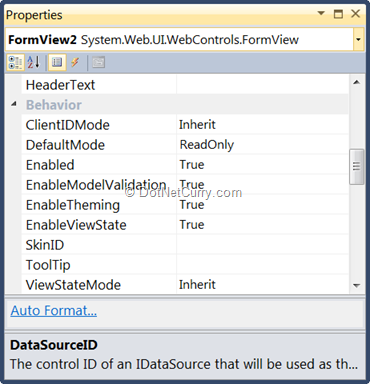
- We will set the Default view for the form. There are three options that the FormView can be set to: Edit, Insert, and Read-Only. Visual Studio will populate all three options with read-only label controls. In this example; it is set to read-only.
- In the right hand properties pane you will see the DefaultMode option under the Behavior heading.
- Select the ReadOnly option to set the read-only view of your FormView control as the default:

5. Now Visual Studio will populate our new form. These will be created: InsertItemTemplate, EditItemTemplate, & ItemTemplate.
6. Click on your FormView Control, and then Click on the FormView Tasks tab that appears at the top right of your control.
7. Your SQLDataSource is bound to your FormView and a new option appears to: Refresh Schema
8. Click the Refresh Schema option and in the wizard that pops up, enter default input parameter values for Visual Studio to use to run the Stored Procedure.
9. Once you have finished with the Refresh Schema wizard, Visual Studio will populate your form for you.
Additional Templates
The FormView supports the following templates:
ItemTemplate—Used to render the particular record displayed in the FormView
HeaderTemplate—Used to specify an optional header row
FooterTemplate—Used to specify an optional footer row
EmptyDataTemplate—When the FormView's DataSource lacks any records, the EmptyDataTemplate is used in place of the ItemTemplate for rendering the control's markup
PagerTemplate—Can be used to customize the paging interface for FormViews that have paging enabled
EditItemTemplate/InsertItemTemplate—Used to customize the editing interface or inserting interface for FormViews that support such functionality
The Code Behind
The code-behind for the most part handles data binding when you allow search and paging. I use LINQ to handle most of this, but this is not a requirement for all forms- and won’t be covered here. But here is a code snippet from the attached source so you can get the idea:
Note: The WellProfileDataContext in code below was also auto-generated:
LINQ to SQL O/R Designer provides the functionality to drag and drop the tables or views onto the designer surface that generates classes mapped to the database objects. These classes are called entity classes.
protected static List<Well> BindWellList()
{
List<Well> wells = new List<Well>();
WellProfileDataContext dc = new WellProfileDataContext();
wells = dc.Wells.ToList();
//foreach (Well wl in wells)
//{
// wells.Add(new Well
// {
// WellName = wl.WellName,
// WellID = wl.WellID
// });
//}
return wells;
}
====================================================================================
private void bindGridView()
{
WellProfileDataContext dc = new WellProfileDataContext();
if (drpMeters.SelectedValue.Length > 0)
{
var NewDataSource = from data in dc.Meters.Where(x => x.MeterDescription == drpMeters.SelectedValue)
select data;
GridView1.DataSource = NewDataSource.ToList();
GridView1.DataBind();
}
else
{
GridView1.DataSource = dc.Meters.ToList();
GridView1.DataBind();
}
}
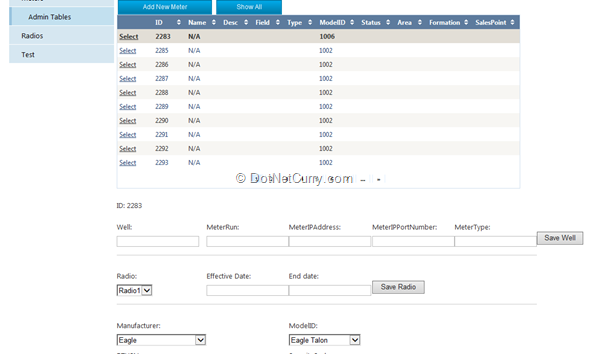
Get the idea? You can build this form in 3 hours from scratch!! You can if you use the suggestions from this article. If you don’t want to start from a blank screen, use the attached source code as a start.

I built this form in 3 hours- YES 3 hours and had it in production the next day; it has over 1000 lines of markup and 500 lines of code-behind- but using the methods in this article. Some features of this form is listed here:
- Dropdowns for lookup values to the database
- All crud operations (Insert, Update, Delete)
- Ajax Control Kit
- Ajax Update Panels
- System.Web.Services
- AutoCompleteExtender1
- And More!
I have included the source code- take a look most of the markup was auto-generated and all I did was tweak it and add the new controls for my specific business rules. And of course I wrote the code-behind- but that was the fun part!
Conclusion
The ASP.NET FormView control's primary feature is that it lets you create the record layout yourself by defining templates. By working with templates, you can have complete control over the layout and appearance of the data in the control. The FormView control also supports updates such as editing, inserting, and deleting data records. If the data source provides more than one record to the FormView control, the control lets you page through the records individually.
And the best thing is that you are in complete control; use it as a code generator that works as an assistant so you can enjoy the best things in life, because you are not spending all your time building forms!!
References:
Here are some resources to further training on the FormView Control: http://msdn.microsoft.com/en-us/library/ms227992(v=vs.100).aspx
There are a lot of step by step YouTube videos to get you started in seconds! http://www.youtube.com/watch?v=1vgeKexLvEU
Download the entire source code of this article from our Github Repository
This article has been editorially reviewed by Suprotim Agarwal.
C# and .NET have been around for a very long time, but their constant growth means there’s always more to learn.
We at DotNetCurry are very excited to announce The Absolutely Awesome Book on C# and .NET. This is a 500 pages concise technical eBook available in PDF, ePub (iPad), and Mobi (Kindle).
Organized around concepts, this Book aims to provide a concise, yet solid foundation in C# and .NET, covering C# 6.0, C# 7.0 and .NET Core, with chapters on the latest .NET Core 3.0, .NET Standard and C# 8.0 (final release) too. Use these concepts to deepen your existing knowledge of C# and .NET, to have a solid grasp of the latest in C# and .NET OR to crack your next .NET Interview.
Click here to Explore the Table of Contents or Download Sample Chapters!
Was this article worth reading? Share it with fellow developers too. Thanks!
Mark Kendall is a Software Engineer working in the Oil Industry in Dallas,Texas. He has been a programmer/developer for past 15 years specializing in .NET/C# development. Currently, he is a Sharepoint/Silverlight developer specializing in BCS Services. He has published a book on Dotnetnuke, and written several articles on many .net subjects. Apart from his passion for making money writing software to improve business, Mark enjoys ranting-and-raving about current events and taking long runs on the beach. He blogs at
kendallsoft and can be reached at Kendallsoft[attherate]hotmail[dot]com