What is Jenkins, and how to use it for DevOps
Jenkins is an Open Source software written in Java.
It provides services like Build Management, and can be used for running tests (functional or UI). It is also used for CI (Continuous Integration) as well as CD (Continuous Delivery).
Jenkins is a free tool, easy to install and configure. We can add various plugins which can help in integrating different tools like Azure DevOps, GitHub (for source control), Maven, Ant, MS Build (for build as well as testing), Selenium (UI automation), Ansible (for deployment) and many more. Using Jenkins, it becomes easy to integrate all kinds of tools for build, testing, packaging, analyzing, deploying etc.
In this two-part tutorial series, I will discuss integration of Jenkins with various tools such as:
- Azure DevOps and GitHub: for Source Control
- Java with Eclipse and C# with Visual Studio 2017: for code writing
- Apache Ant, Apache Maven and MS Build: for Build Management
- Junit 4.12 with Eclipse and MS Test with Visual Studio 2017: Functional testing
- Selenium with Eclipse and Selenium with Visual Studio 2017 C#: UI Testing
- GitHub (webhooks) and Azure DevOps (service hooks): Continuous Integration
Before we delve into Jenkins, I want to provide some information about Azure DevOps.
Overview of Azure DevOps
Azure DevOps (formerly called Visual Studio Team Services – VSTS) is a set of services for developing, testing and delivering products. Using Azure DevOps, creating and deploying applications become quite efficient. It is not only a set of tools for automation of CI CD using Microsoft stack, but a lot of other third-party tools can very easily integrate with it.
In fact, if our build pipeline is on Azure DevOps, we can integrate it with Jenkins to perform some job. A few years back, it started as Team Foundation Server (TFS) on the cloud, but over the years, it has evolved and with the name Azure DevOps, it is VSTS, TFS and Azure all jelled together to form a set of tools.
Editorial Note: To learn more about Azure DevOps, check out our tutorial at https://www.dotnetcurry.com/devops/1473/vsts-azure-devops-change.
In the first part of this series, I will discuss
- Writing code with Java
- Using Git Hub for Source Management
- Using Ant and Maven for Build
- Using JUnit and Selenium tests for functional and UI testing and
- How to configure Continuous Integration between Git Hub and Jenkins.
In the next upcoming article, I will discuss similar features with :
- Code in Visual Studio 2017 C#
- Source Control in Azure DevOps
- MS Build for Build Management and MS Test for testing
- How to do CI between Azure DevOps and Jenkins
- How we can use Eclipse IDE to write code and use Azure DevOps for Source Control and
- How to do Continuous Deployment (CD) to Azure Web App Service
I am assuming that JDK and Eclipse IDE are already installed on the machine. I am using Eclipse (Oxygen) IDE for writing code.
Installation and Configuration of Jenkins
Let us start with installation and configuration of Jenkins. Download the zip file and extract it. Provide a folder for installation of Jenkins.
After installing Jenkins, the browser automatically opens (the port number is 8080) and asks for a secret password. This is kept at : \Program Files (x86)\Jenkins\secrets location in file initialinitialAdminPassword which is required to unlock Jenkins.
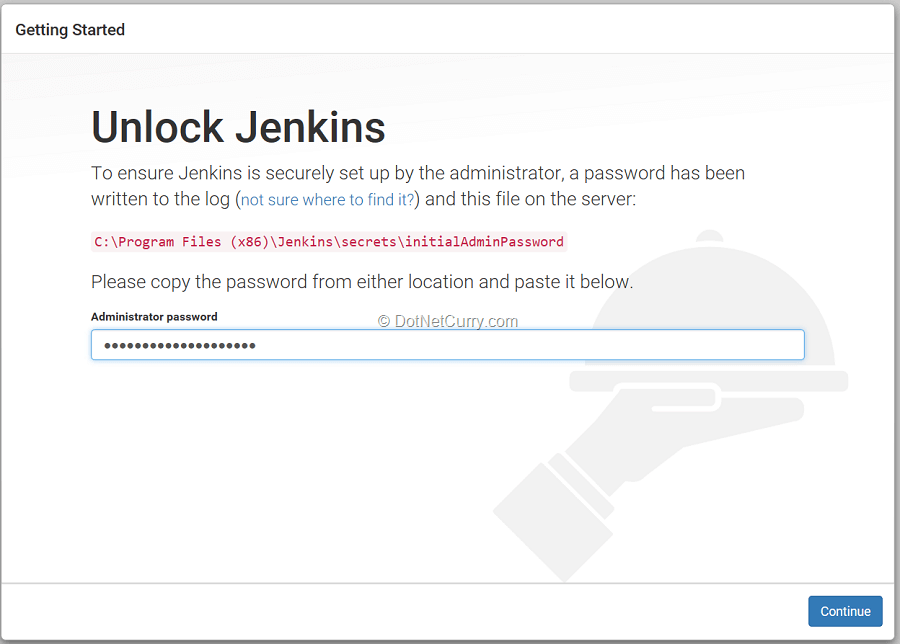
We can either select suggested plugins, or select the option for selecting plugins.
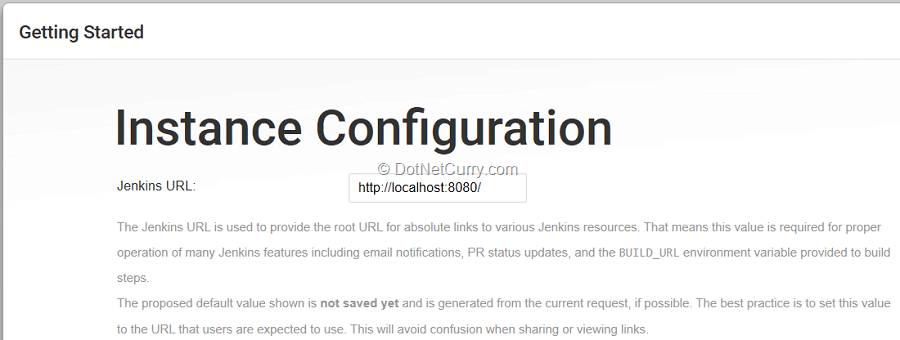
After installation, provide the admin user name and other details, and click on Save and finish. At this stage, we can change the port number to some other, if required.
Source Control in GitHub, Code Writing in Java, Build with Ant and JUnit and Selenium Tests
Write Code in Eclipse with Java
Let us create a hello world project in Java and use Git Hub as the Source Control. We will later add Ant build.xml and use the same in Jenkins.
We will add Junit and Selenium tests to the project and provide a way to execute tests and publish the results.
We need Apache Ant to build the Java project and then configure Ant for Jenkins.
Select Manage Jenkins > Global Tool Configuration and scroll down till you see the branch for Ant. Expand and add the path to the Ant folder you have created.

Run the Java Application through Eclipse to ensure that there are no compilation errors.
Using GitHub as Source Control
To use GitHub as the Source Control, you will need to sign in to GitHub and create a repository. Use the url for the repository to push to the remote repository from Eclipse
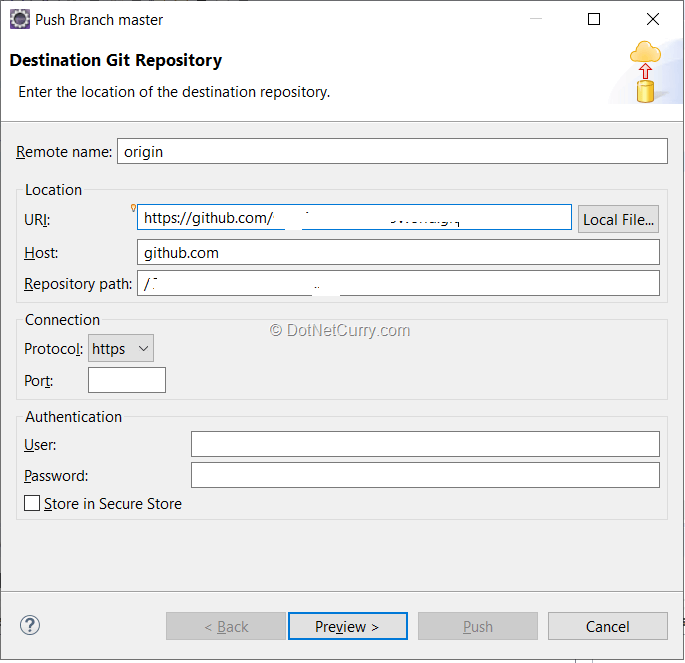
You can provide the user name and password and Store it in Secure Store if you need. After a successful Push, you should be able to see your code on GitHub .
Use Apache Ant for Build
Let us add build.xml from the Ant build, to this project. Right click on the project and select Export > Ant Build File > Select JUnit and click on Finish.
Do not forget to add build.xml to the code repository.
The file build.xml contains all Ant targets. Ant target is a sequence of various tasks which need to be executed in the build process. A task is a way to actually do some activity. There are lot of built in tasks like creating directories, copying files, compiling code create .jar or .war files etc. We can specify the sequence of these targets by providing the target on which the current target depends on. The targets can be for compiling java code, executing JUnit tests or even publishing reports. You can specify the default target.
Create a Job in Jenkins
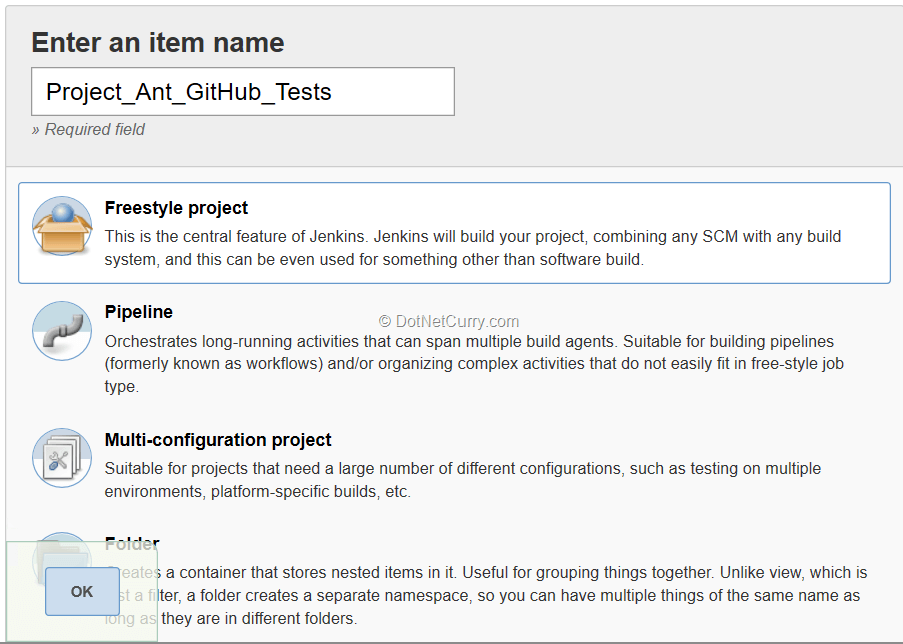
Let us create a new job for source control from GitHub, build using Ant and to which we will later add Junit and Selenium tests.
Select the option of Freestyle project.
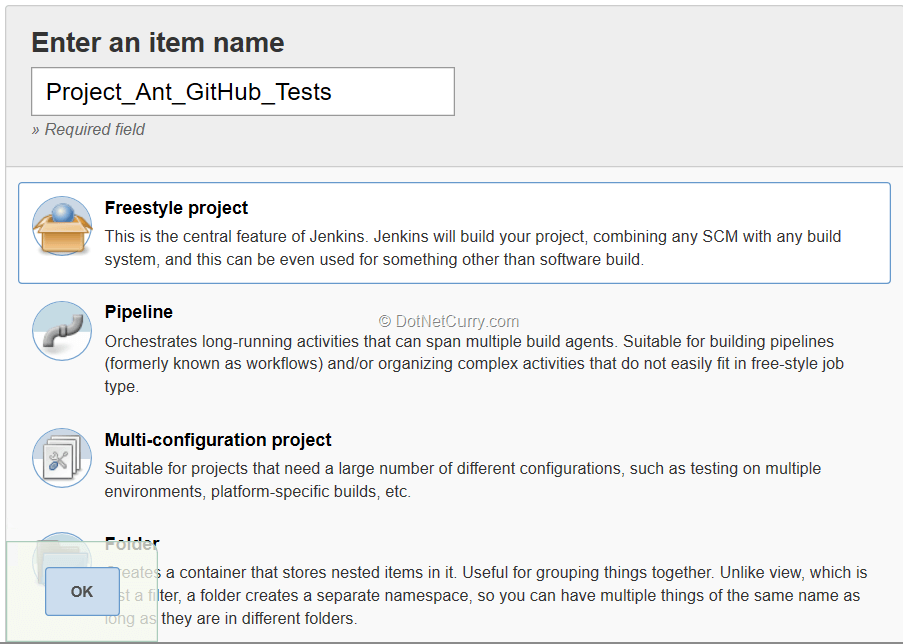
Before we fetch the code from GitHub, we have to provide credentials to do the same. Select Credentials as shown in the following figure:
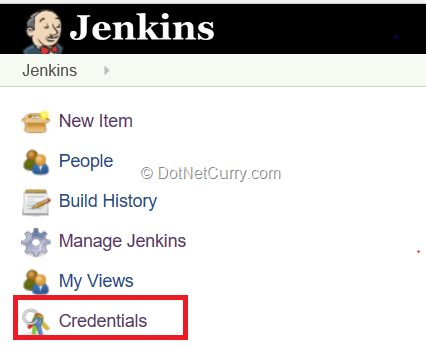
Create a new set of credentials to access GitHub from Jenkins
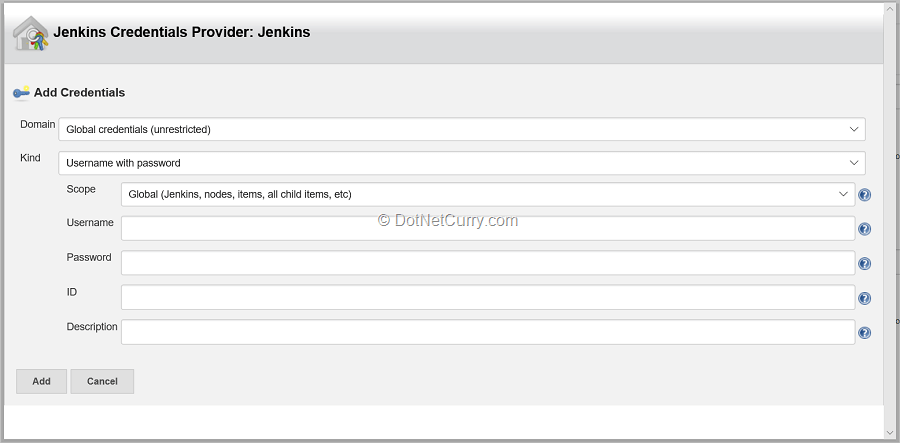
We can provide these credentials when we select Git as Source Control for the job.
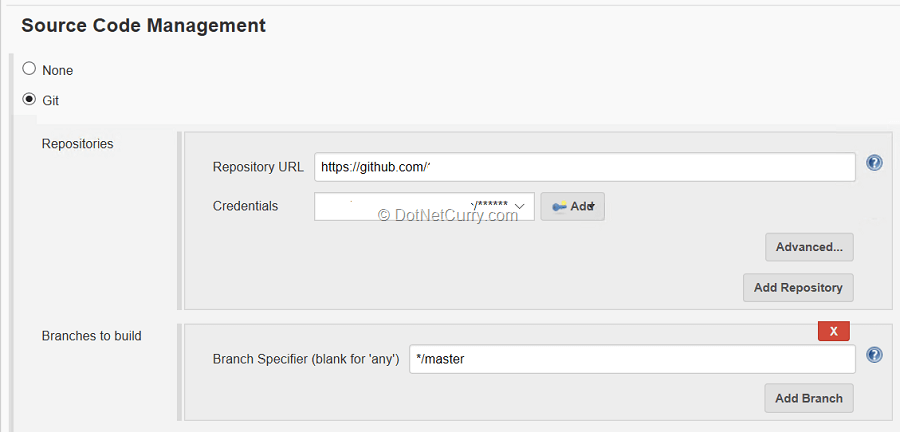
Also select a build step for Ant.

Build the project. As I have added bin folder as build output, I get the .class file added to it. The build step for ant picks up build.xml file and executes it.
Add JUnit and Selenium Tests
Let us add Junit test to the Eclipse project. I added a class in tests package with a few methods in it. I also added class for Junit tests by adding Junit 4.12 as the library. You can add Junit v5 it you want.
I have added target for Junit as follows:
<!-- Run the JUnit Tests -->
<!-- Output is XML, could also be plain-->
<target name="junit" depends="compile">
    <junit printsummary="on">
        <classpath refid="junit.class.path" />
        <formatter type="xml" />
        <batchtest todir="${test.report.dir}">
            <fileset dir="${src.dir}">
                <include name="**/*Test*.java"/>
            </fileset>
        </batchtest>
    </junit>
</target>
I have also declared the class path id for where the JUnit jar files will be available. Similarly, you can add the target for creating Junit report in build.xml.
Now the only test that remains to be added are the UI tests which I have added as a Selenium test for an already existing website. We need selenium related .jar files along with chrome driver or any other driver which we will use for testing the site. Note here that Selenium testing is only for Web Applications.
After writing the test method for web site testing, we can commit and push all this code to a remote repository on GitHub and try the build from Jenkins once again to ensure that the unit tests and Selenium tests are executed. Do not forget to specify the .jar files for Selenium in build.xml.
Build in Jenkins
After a successful build the Latest Test Result is added to the page. We can drill further to find how many tests executed and how many passed.
I purposely added test which fails.
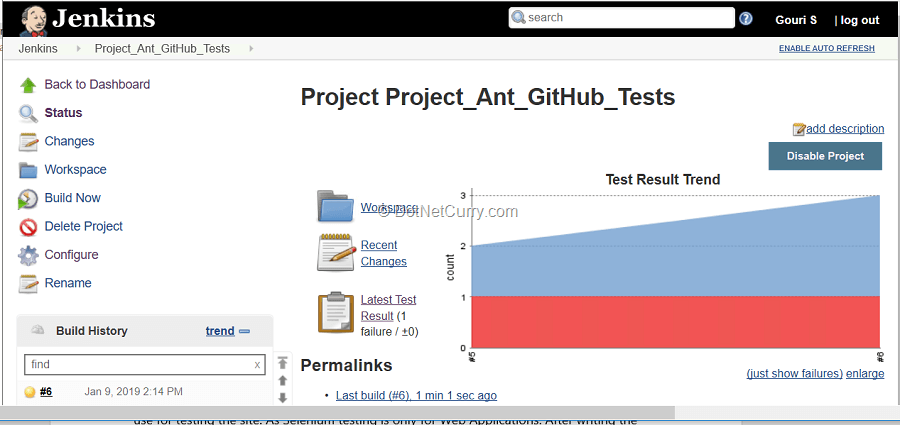
Continuous Integration (CI) with Git Hub
The only remaining feature is to provide a way with which a push to the master branch is done to GitHub and the build from Jenkins will be automatically triggered as CI. This is a 2-step process, in the first step we create a Webhook in GitHub, and in second step we add Build Trigger for ‘GitHub hook trigger for GITScm polling’.
- As the Jenkins server I had installed does not have a public URL, I used ngrok utility to provide this in order to create webhook. Once this is done, the build will get automatically triggered the moment there is any change in code .
- There is another way to achieve this. I created a virtual machine with Azure, installed Jenkins on it, provided static IP address to it (also ensure that port 8080 is open as that is the port for Jenkins). Once this is done, I configured Jenkins and instead of localhost for Jenkins, I gave the static IP with the port. I used this address while creating webhook from GitHub and the CI worked fine.
Build with Apache Maven
Coding in Eclipse with Source Control GitHub
I am going to select a Maven Project with Eclipse.
I also selected Web Application so that a .jsp file got automatically added. Automatically pom.xml is added which takes care of the runtime target since we have selected a Web Application.
I also added dependency of JUnit to the pom.xml file along with adding actual test methods. GitHub was used as Source Control for this project too. I tried running maven build from eclipse by providing goals like clean verify test etc.
Maven provides a build framework. As I had used the Maven Project to create it, it automatically adds the required project structure. For example, the source code will be under
/src/main/java and tests will be
/src/test. The project can be built by providing goals and dependencies. There are some requirements for pom.xml like root for the project (basic schema), model version followed by group id, artifact id and version. Actually, we do not have to write this manually as while creating the maven project, a lot of archtypes plugins are available based on which it can be created automatically. Maven provides phases like validate, clean, compile, test, package, install, deploy etc. Each phase is a sequence of goals and clean goal is associated with clean phase.
Add Maven plugin to Jenkins and create a new Project
Once the plugin for Maven is added to Jenkins, a project of type Maven can be seen while creating a new project.
Provide the goals to the pom.xml in the project. Build the project and ensure that the test methods are executed. If we want to add the step for Publish JUnit reports, we have to take a freestyle project and add a step for Maven build separately, and later add the step to publish reports. The publish reports step is not available if we select Maven Project.
Now that the job is ready, we can build the project and see the output generated. Similar, functionality for CI can be added so that the moment there is a code push, the build will be triggered.
Conclusion
As we have seen, it is quote easy to integrate tools like git, ant or maven in Jenkins to be used in a project.
In this tutorial, I discussed how Jenkins can be integrated with various tools for Source Control, Build Management and Test Management. Jenkins provides hundreds of plugins with which integration with tools like GitHub, Azure DevOps, JUnit Tests, Selenium Tests is possible. I also discussed how continuous integration is possible with integration between Jenkins and GitHub.
This article has been editorially reviewed by Suprotim Agarwal.
C# and .NET have been around for a very long time, but their constant growth means there’s always more to learn.
We at DotNetCurry are very excited to announce The Absolutely Awesome Book on C# and .NET. This is a 500 pages concise technical eBook available in PDF, ePub (iPad), and Mobi (Kindle).
Organized around concepts, this Book aims to provide a concise, yet solid foundation in C# and .NET, covering C# 6.0, C# 7.0 and .NET Core, with chapters on the latest .NET Core 3.0, .NET Standard and C# 8.0 (final release) too. Use these concepts to deepen your existing knowledge of C# and .NET, to have a solid grasp of the latest in C# and .NET OR to crack your next .NET Interview.
Click here to Explore the Table of Contents or Download Sample Chapters!
Was this article worth reading? Share it with fellow developers too. Thanks!
Gouri is a Trainer and Consultant on Azure DevOps and Azure Development. She has an experience of three decades in software training and consulting. She is a graduate from Pune University and PGDCA from Pune University. Gouri is a Microsoft Most Valuable Professional (MVP) - Developer Technologies (Azure DevOps), Microsoft Certified Trainer (MCT) and a Microsoft Certified Azure DevOps Engineer Expert. She has conducted over 150 corporate trainings on various Microsoft technologies. She is a speaker with Pune User Group and has conducted sessions on Azure DevOps, SQL Server Business Intelligence and Mobile Application Development. Gouri has written more than 75 articles on Azure DevOps, TFS, SQL Server Business Intelligence and SQL Azure which are published on
www.sqlservercurry.com and
www.dotnetcurry.com. You can connect with her on
LinkedIn.