In a previous article, I showed you how to setup Build and Release for a React.JS app using Azure DevOps.
We also discussed a test using a combination of Jest, Mocha and Selenium that was executed as part of the release after deploying the app on Azure App Service.
In this tutorial, I will extend the concept by creating a React.JS app using TypeScript, and transpiling it as a regular React.JS app before deploying it.
TypeScript is a way to write typed JavaScript. You can create React.JS compliant JavaScript code using TypeScript. When it is transpiled, pure JavaScript is generated which can then be deployed.
Before we start, I want to emphasize that this is not a tutorial on TypeScript, but it is an overview of how to build and deploy a React.JS app that is written using TypeScript.
Editorial Note: This article assumes familiarity with TypeScript. If you are new to TypeScript, check our TypeScript tutorials.
Create a TypeScript React.js App
To create such TypeScript code that can get transpiled, create-react-app utility can be used. The command to create such an app is “npx-create-react-app typescript” where “x” is the name of the application.
This command will create a React.JS app with a source structure in line with TypeScript requirements. It will have an “index.tsx” file instead of index.js file and in addition to “package.json” file, it will have “tsconfig.json” file.There will also be a few more .ts files and App.test.tsx file for testing the app.
First move the entire code under a folder called ssgsems. This step is necessary because some tasks in the build cannot use the root of the repository. Now, under the src folder, which is created by default, let’s add a new folder named components and a file named “hellouser.tsx”. This is going to be the React.JS component that will be used for interactions with the user.
Add the following code to that file:
import * as React from 'react';
interface IState {
  user: string;
  userbuffer: string;
}
class Description extends React.Component<IState> {
  public state: IState = {
    user: "",
    userbuffer: "",
  };
  public greet = () => {
    var user = "";
    if (this.state.user != "") {user = this.state.user + ", " + this.state.userbuffer;}
    else {user = this.state.userbuffer;}
    this.setState({ user });
  };
  public stateChange = (event: any) => {
    this.state.userbuffer = event.target.value;
  }
  public render() {
    return (
      <div>
        <p>Enter your name:
            <input type="text" onChange={this.stateChange} />
        </p>
        <button onClick={this.greet}>Greet User</button>
        <p>Hello {this.state.user}</p>
      </div>
    );
  }
}
export default Description;
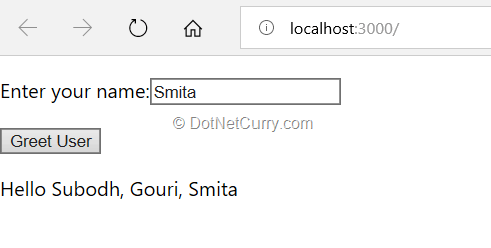
This component will render a textbox and a button.
For this app to get working, you will also need to make a change in index.tsx as follows:
import React from 'react';
import ReactDOM from 'react-dom';
import './index.css';
import Hello from "./components/hellouser";
import * as serviceWorker from './serviceWorker';

ReactDOM.render(
    <Hello
        user={"World"}
        userbuffer={"World"}
        />
,
    document.getElementById('root') as HTMLElement
    );

// If you want your app to work offline and load faster, you can change
// unregister() to register() below. Note this comes with some pitfalls.
// Learn more about service workers: http://bit.ly/CRA-PWA
serviceWorker.unregister();
Notice the import statement for the component that you had created earlier and its invocation in the render method.
When the user enters her / his name in the textbox and clicks the button, the app will send a greeting. The app will then display all the users it has greeted in the current session.

Let’s create a team project named ReactAppTs with a git repository:
git remote add origin https://<<yourazuredevopsaccount>>.visualstudio.com/DefaultCollection/ReactAppTs/_git/ReactAppTs
Commit and Push the code to the remote repository. Detailed steps for these are available in the earlier article that I had written www.dotnetcurry.com/devops/1488/azure-devops-build-deploy-reactjs
Creating a Build Pipeline Definition
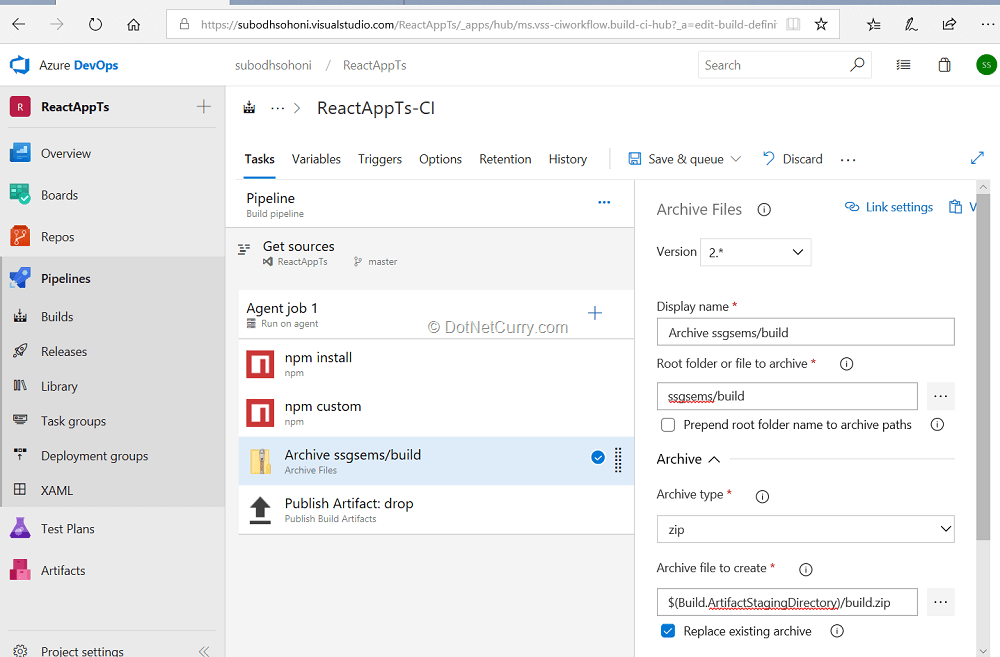
Now that the code is in the repository, you can create a build pipeline definition. This pipeline definition will have only four tasks:
1. npm install: This will install all the necessary node modules on the agent. It will require the path of folder that contains package.json file.
2. npm custom: This task is to create an optimized version of JavaScript code using the built-in react script to convert TypeScript to JavaScript. You have to also provide the value “run-script build” to the parameter Commands and Arguments. When executed, this task will create a folder named “build” under the ssgsems folder on the agent.
3. Archive Files: This task will create a .ZIP package of the created “build” folder. Set “ssgsems/build” as the folder to archive and “$(Build.ArtifactStagingDirectory)/build.zip” as the archive file to be created.
4. Publish Artifact: This task will publish the “build.zip” archive as a drop artifact. You have to provide path of the created “build.zip” archive, ““$(Build.ArtifactStagingDirectory)/build.zip” as path to publish.

When you queue and run this build pipeline, it will create an artifact named “drop” which will contain a build.zip file that is used to deploy the app.
Creating a Release Pipeline
Your next step is to create a release pipeline that will deploy the app to Azure App Service – Web App. Create a new Web App as a placeholder for the app that you are going to deploy. An earlier article in this series on Building and Deploying ReactJs apps gave detailed steps to do do. You can read it here > www.dotnetcurry.com/devops/1488/azure-devops-build-deploy-reactjs
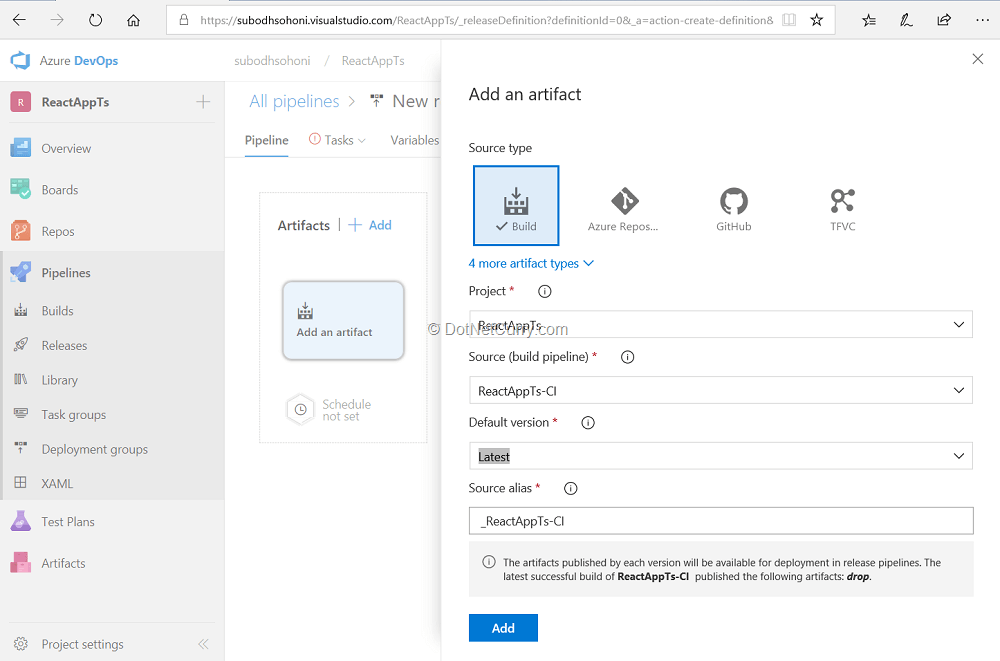
While creating the release pipeline, select the template of “Deploy Node.js app to Azure App Service”. Give the name Dev to the first stage. Add the artifact that is created by the build pipeline that you have created earlier. Select Latest as the default version to be deployed.

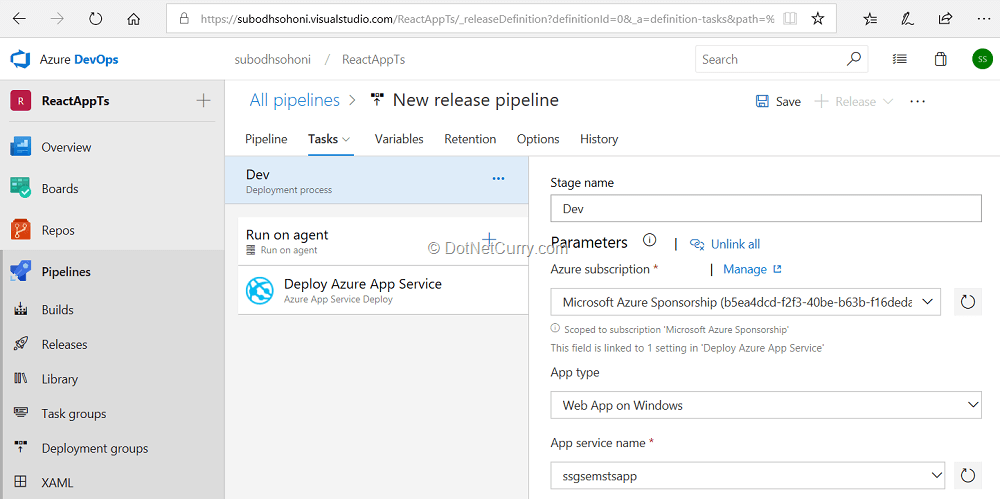
In the tasks section, Select and Authorize your Azure subscription. Select the Azure Web App that you have created earlier in the App Service name parameter. In the Deploy Azure App Service task, ensure that the text box for “Generate web.config parameters …..” is blank, remove text if any in it. Also ensure that in the “Application and Configuration Settings” section “App Settings” text box is also blank.

After you create a new release in this pipeline, you will get the deployed application. It now shows a custom UI instead of the placeholder that was added when the app was created.
You can create similar stages in the release pipeline for Test, UAT, Prod etc. and set the tasks as appropriate. If you want to test the app, check the steps in an earlier article in the series.
Conclusion
In this article, we stepped you through the creation of a React.JS app using TypeScript and then to do the build and deployment to an Azure App Service as a web app.
Thanks to Tim Sommer for his suggestions and for technically reviewing this article.
This article has been editorially reviewed by Suprotim Agarwal.
C# and .NET have been around for a very long time, but their constant growth means there’s always more to learn.
We at DotNetCurry are very excited to announce The Absolutely Awesome Book on C# and .NET. This is a 500 pages concise technical eBook available in PDF, ePub (iPad), and Mobi (Kindle).
Organized around concepts, this Book aims to provide a concise, yet solid foundation in C# and .NET, covering C# 6.0, C# 7.0 and .NET Core, with chapters on the latest .NET Core 3.0, .NET Standard and C# 8.0 (final release) too. Use these concepts to deepen your existing knowledge of C# and .NET, to have a solid grasp of the latest in C# and .NET OR to crack your next .NET Interview.
Click here to Explore the Table of Contents or Download Sample Chapters!
Was this article worth reading? Share it with fellow developers too. Thanks!

Subodh is a Trainer and consultant on Azure DevOps and Scrum. He has an experience of over 33 years in team management, training, consulting, sales, production, software development and deployment. He is an engineer from Pune University and has done his post-graduation from IIT, Madras. He is a Microsoft Most Valuable Professional (MVP) - Developer Technologies (Azure DevOps), Microsoft Certified Trainer (MCT), Microsoft Certified Azure DevOps Engineer Expert, Professional Scrum Developer and Professional Scrum Master (II). He has conducted more than 300 corporate trainings on Microsoft technologies in India, USA, Malaysia, Australia, New Zealand, Singapore, UAE, Philippines and Sri Lanka. He has also completed over 50 consulting assignments - some of which included entire Azure DevOps implementation for the organizations.
He has authored more than 85 tutorials on Azure DevOps, Scrum, TFS and VS ALM which are published on
www.dotnetcurry.com.Subodh is a regular speaker at Microsoft events including Partner Leadership Conclave.You can connect with him on
LinkedIn .