In this tutorial, I am going to do a walkthrough of the process to continuously integrate and deploy an ASP.NET Core application (Docker support enabled), to Azure Kubernetes Service (AKS) using Azure DevOps.
As a professional software development process, one would like to completely automate the process to create and deploy even containerized applications.
Azure DevOps provides the tools and services to do so.
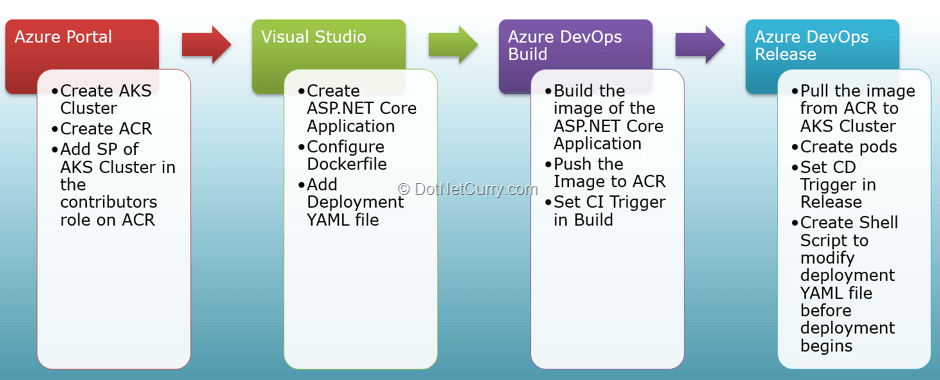
The flow of what we are going to do in this walkthrough is as follows:
Concepts related to Containers and Kubernetes
Let us start with some concepts related to containerized applications:
1. A Container is a standard unit of software that packages up code and all its dependencies so the application runs quickly and reliably from one computing environment, to another. They are light weight virtualization units which run only one process.
2. Docker are the type of containers which are standalone, executable package of software that includes everything needed to run an application: code, runtime, system tools, system libraries and settings. Although technically possible, Docker containers are discouraged to run multiple processes, to keep separate areas of concern. They are encouraged to use services provided by the Host Operating System, which can be Linux and Windows, through the Docker engine.
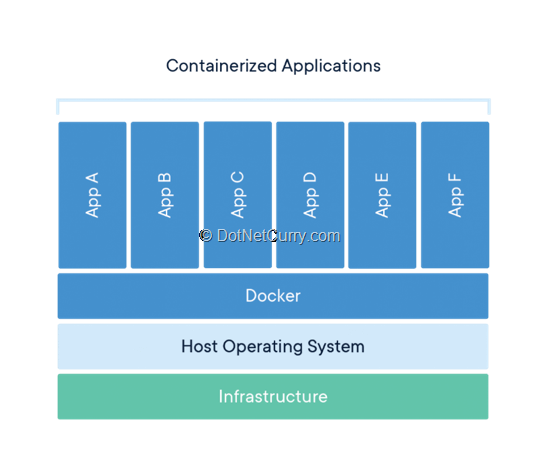
Image Ref: https://www.docker.com/resources/what-container
3. Docker hosts are machines / VMs that run Docker engine and support Docker containers.
4. Container images are the basis of containers. An Image is an ordered collection of root filesystem changes and the corresponding execution parameters for use within a container runtime. An image typically contains a union of layered filesystems stacked on top of each other. It is like a template of a container.
5. Kubernetes (K8s) is an open-source system for automating deployment, scaling, and management of containerized applications. Kubernetes puts containers into groups that make up an application into logical units called pods for easy management and discovery. Pods are hosted on the VMs called as nodes. Kubernetes manages nodes and pods. Ref: https://kubernetes.io/ and https://www.dotnetcurry.com/microsoft-azure/1434/kubernetes
6. Azure Kubernetes Service (AKS) provides the support in Azure for implementation of Kubernetes. I will be providing more details about this later.
7. Azure Container Registry (ACR) is an Azure service which maintains the repository of container images in Azure.
Creation of Azure resources
Let us now start our walkthrough by creating the resources in Azure.
If you do not have an Azure Account, you can create a trial account from https://portal.azure.com. With this 30-day free trial account, you will get a credit of USD 200 (or equivalent in your local currency for supported countries) that you can use to create resources in Azure for trial purposes, similar to this walkthrough. After the credit and trial period, you can take a decision to continue by converting the trial into a paid account.
We will first create an Azure Kubernetes Cluster (AKS Cluster).
This is a cluster of nodes, which are virtual machines that will be hosting the containers. When we create AKS cluster, along with the nodes, another VM is created in the cluster. That VM is a Cluster Master which manages the nodes in the cluster.
To create the AKS Cluster, open the Azure Portal and login to the Azure Account. Then create a new resource of the type Kubernetes Service which opens the wizard to create Kubernetes Cluster.
Provide the name of the cluster, resource group in which this cluster is to be created, the size of the nodes and the number of nodes in the cluster.
The size of the node that is automatically chosen is Standard DS2 v2. This size in my opinion is ideal for running the containers in a professional environment. Default number of nodes that are selected for the cluster are three. Since this is just for example and not for professional use, I changed that to one node.
Note: Number of nodes to be created depend upon the load that is expected and the containers that will need to be created.
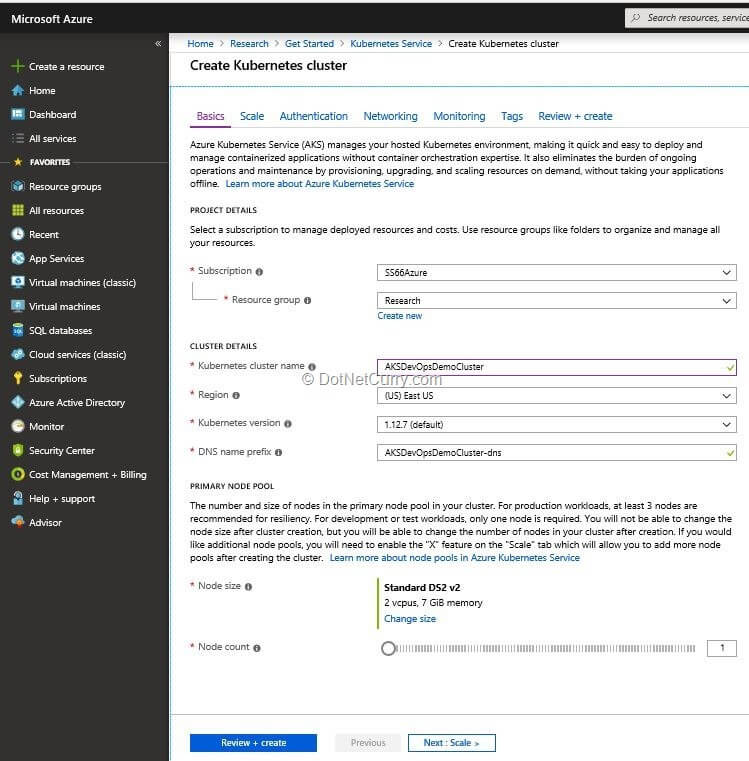
Figure 1: Create Kubernetes cluster
In this wizard, we will also ensure that a Service Principal is created for the AKS Cluster.
A Service Principal is like a service account that gets created for a service in Azure Active Directory. The purpose of creating a Service Principal is to grant permissions to the service to access some resources. Whatever permissions are granted to a Service Principal, are automatically transferred to the service it represents.
In this case, a Service Principal will be created for the AKS Cluster and we will give it permission to pull images from the Azure Container Registry that we will create later in the walkthrough.
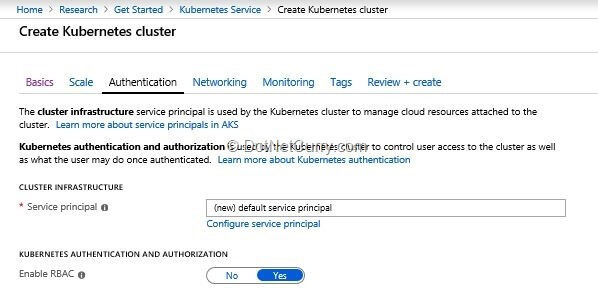
Figure 2: Service principal creation
This Service Principal will be given a default name that we can check from Azure Active Directory of our account – Registered Applications. It is also possible to create a Service Principal in advance and assign it to the AKS Cluster at the time of creation, but we are not using that route as it is easier to create Service Principal and link it with AKS Cluster at the time of creating the AKS Cluster.
The name of the cluster that I created is AKSDevOpsDemoCluster and the Service Principal for that is AKSDevOpsDemoClusterSP-xxxxxxxxxx.
The next resource that we will create in Azure is the Azure Container Registry (ACR). This is sort of a container which will store the images of Docker containers that we will create. This resource in Azure is also created from the Azure Portal.
I have given the name of aksdevopsdemo.azurecr.io to the ACR while creating it. It is in the same resource group where the AKS Cluster is created, so they are in the same logical subnet.
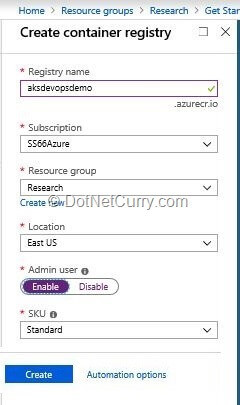
Once the ACR is ready, we now edit the Access Control of that ACR to add Service Principal of the AKS Cluster to the role of Contributors. This role has a permission to push and pull images from this ACR.
Figure 3: ACR Creation and RBAC
Creation of Team Project and git repository
Now that the resources in Azure are ready, we will create a Team Project in Azure DevOps Account.
If you do not have an account in Azure DevOps, you can create a free account from https://dev.azure.com. To use or create Azure DevOps account, I strongly suggest using the same email address that was used to create an Azure Account. This will make the authentication process seamless to access Azure resources from Azure DevOps.
If you have to use different email accounts for Azure and Azure DevOps then you can follow the guidelines provided at https://docs.microsoft.com/en-us/azure/devops/pipelines/library/connect-to-azure?view=azure-devops to create a connection to Azure.
The name of the team project that I have created is AKSDevOps. For the sake of consistency, I suggest that you also do so while following this walkthrough.
When the team project is created, I selected git as the version control which created a git repository on Azure DevOps. This git repository is going to work as a remote repository for all team members who are developing the application. We can now clone this repository to create a local repository.
Clone operation can be executed in Team Explorer which is part of Visual Studio. To start with, in the Team Explorer, connect to the newly created team project and click the Clone button once the connection is established.
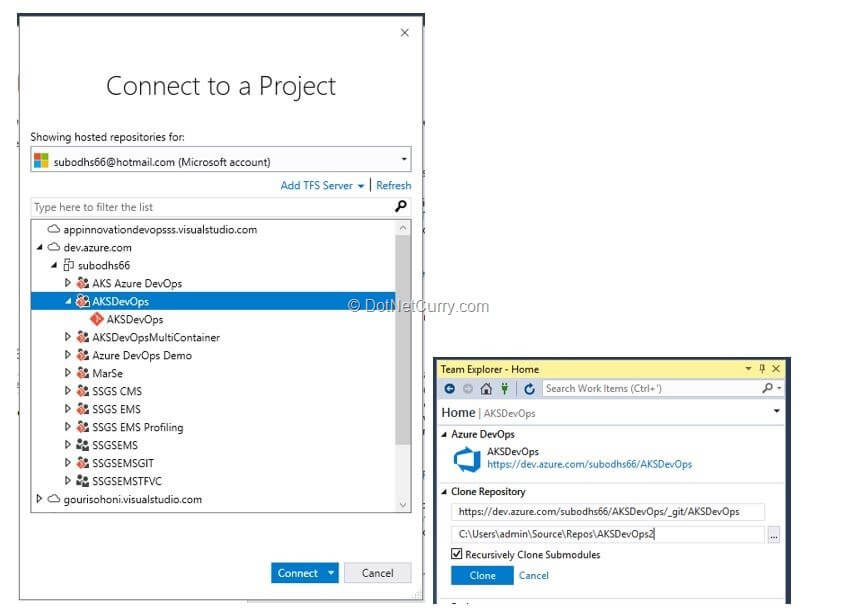
Figure 4: Connect to team project and clone repository
Creation of Application with Docker Support and changes in code
Once the remote repository is cloned to create a local repository, let us create an ASP.NET Core Application in that local repository. We are creating an ASP.NET Core Application as we are going to use Docker support to containerize the application.
Docker containers are predominantly based upon Linux, and only .NET Core applications work on Linux because it is cross-platform. At the time of creating the project, we will add it to the local git repository created in the previous step. To ensure that it is added to the same repository, click the “New” link under Solutions section of Team Explorer.
Provide a name to the project, AKSDevOpsApp and select the template of “ASP.NET Core Web Application” from the sub-section of “.NET Core” under the section of “Visual C#”.

Figure 5: Create new ASP.NET Core Project
While creating that project, we will select “Enable Docker Support” so that the created application will contain the Dockerfile.
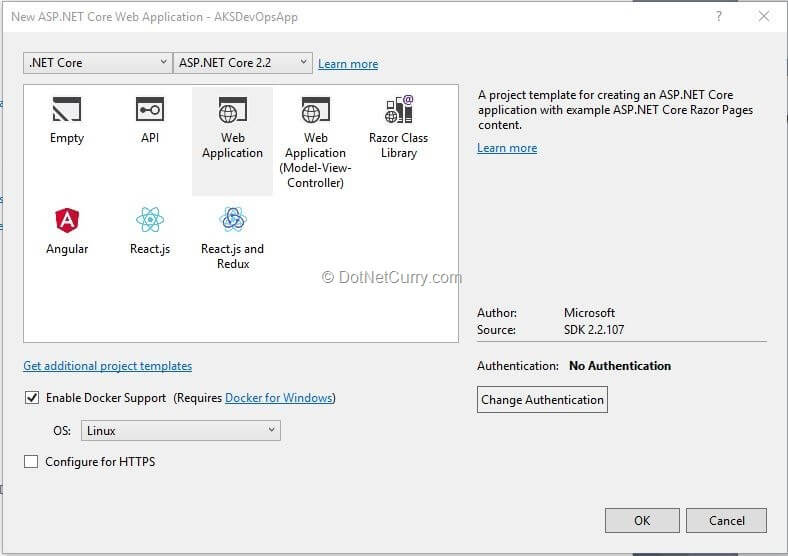
Figure 6: Add Docker support to the application
Once the project is created, we will open the Dockerfile and make the following changes:
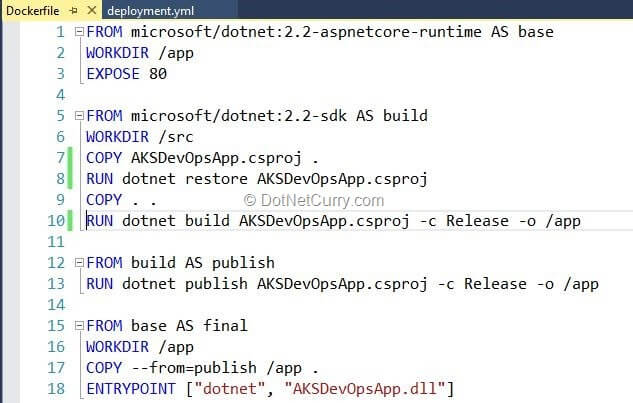
Figure 7: Dockerfile code
My observation is that the Dockerfile as created by the project creation wizard does not work as it is. It can be taken as a starting point and modified. I have experimented with various options and finally came to the conclusion that the code shown in Figure 7 always works.
We will also make some more changes to the code of the application. Open the index.cshtml from the solution explorer and change the code of the “Welcome” message.

Figure 8: Code change in index.cshtml
We will also add a YAML file named deployment.yml. This file will be used to deploy the image from ACR to AKS Cluster. It will be created in a folder named “Manifest” (this is only for the convenience and segregation of code of application with that of deployment file, it is not a technical necessity). This file will be passed by the build to the release management as part of the artifact, so that it can be used at the time of deployment. Code of that file will be somewhat like this:
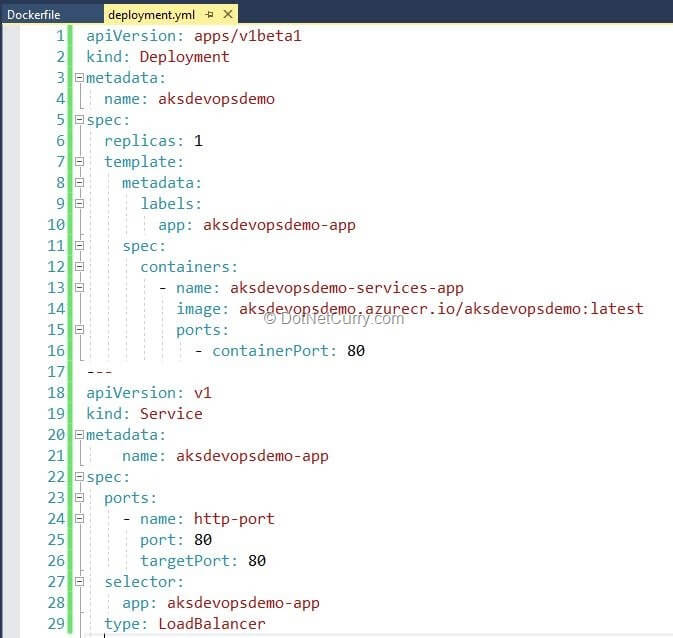
Figure 9: Deployment.yml code
This YAML file specifies the image to be used, replicas of the pods to be created, ports to be opened on the container and LoadBalancer service to expose the containers to the outside world.
If necessary, open the Settings tab in Team Explorer and click the link to Add a “.gitignore” file so that binary files and their folders like bin and obj will be omitted from changes that are ready for commit. Now we can Commit code to the local repository and Push that to the remote repository on Azure DevOps.
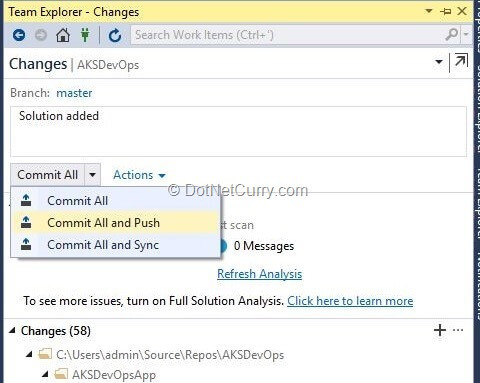
Figure 10: Commit and push code to the remote repository
Create a build pipeline
In the next step, we will create a new Build pipeline in which we will create an image based upon the Dockerfile and then Push it to the ACR that we have created earlier.
To create the new Build pipeline, open the page of your organization in Azure DevOps https://dev.azure.com//AKSDevOps and then select Builds from the Pipelines section in the left pane.
Select the link “Use the classic editor” to create the pipeline without YAML.
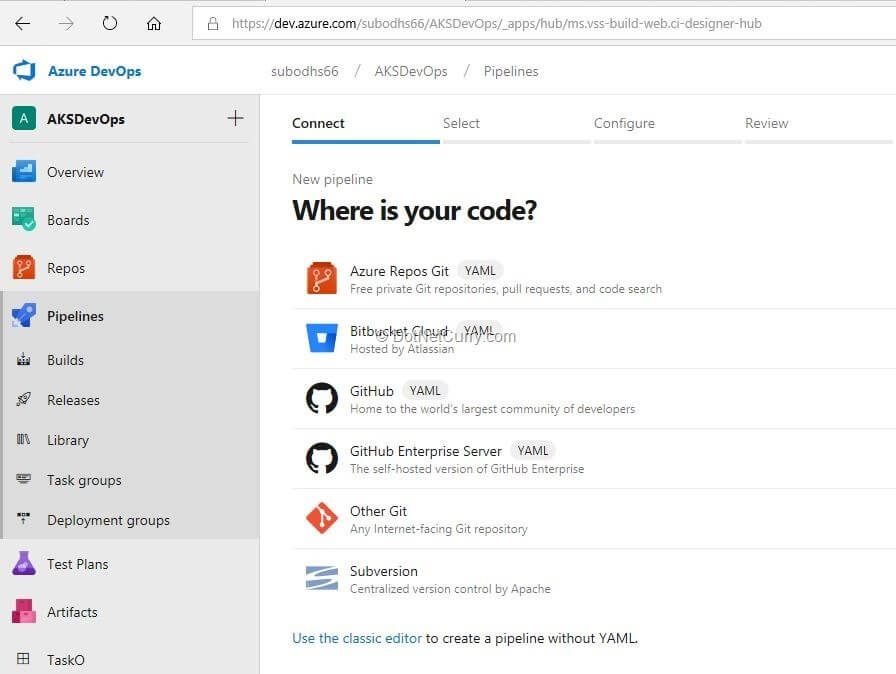
Figure 11: Create new build pipeline
On the subsequent page, select the “Docker container” template.
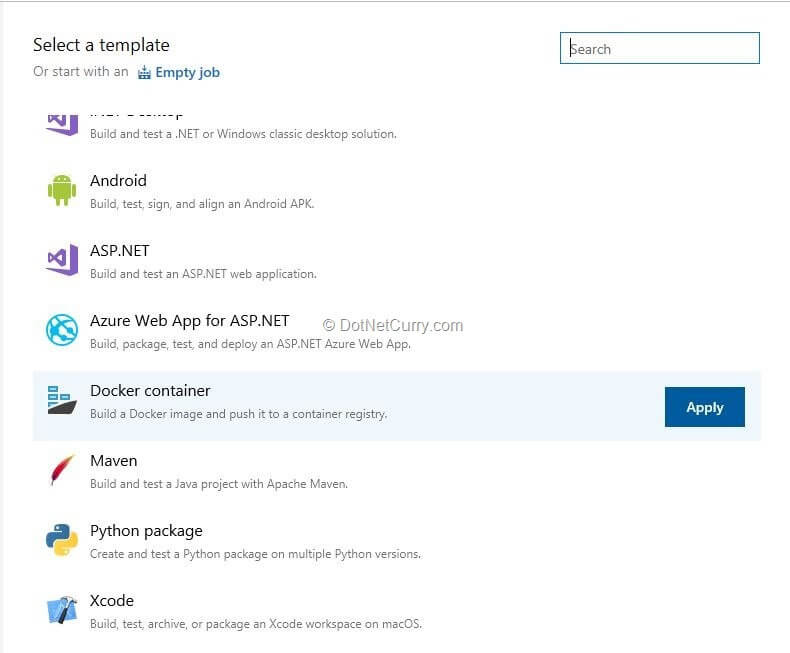
Figure 12: Select Docker container template for build pipeline
This template will provide tasks to create the container image and to push it to the ACR.
Before making changes in the parameters of the tasks, open the Pipeline node. On this node, change the name of the pipeline as AKSDevOpsDemoBuild and the select the Hosted Ubuntu 1604 agent pool. Since we are creating Docker images, agents under this pool support the actions to create and push those images.
Let’s now set the values for parameters of the “Build an image” task. Use the following guidelines to set those values:
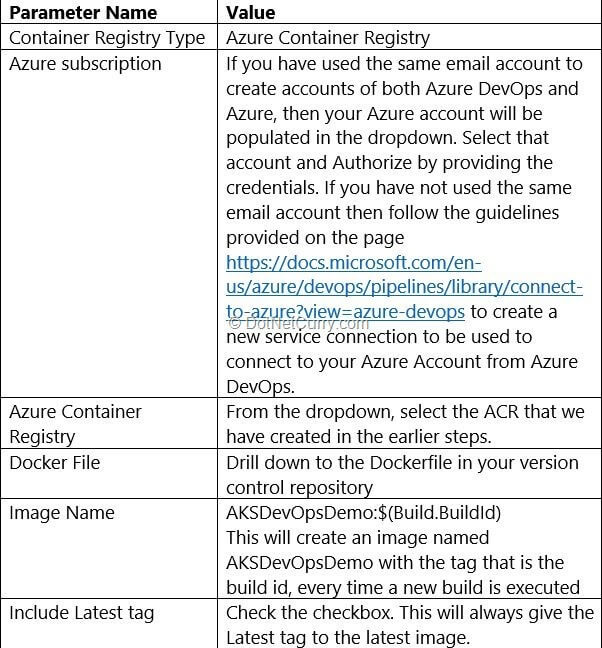
Enter similar values in the Push an image task.
We need to create an artifact and put the Deployment.yml file in that artifact. To add this file in the artifact, begin by copying that file into the folder on the agent which maps to the artifact.
This folder is represented by a built-in build variable called “Build.ArtifactStagingDirectory”. Let’s add a “Copy File” task where
- the source folder is the Manifest folder, selected by drill down in the version control repository,
- contents are the file named deployment.yml and
- destination is folder represented by the variable “Build.ArtifactStagingDirectory”.
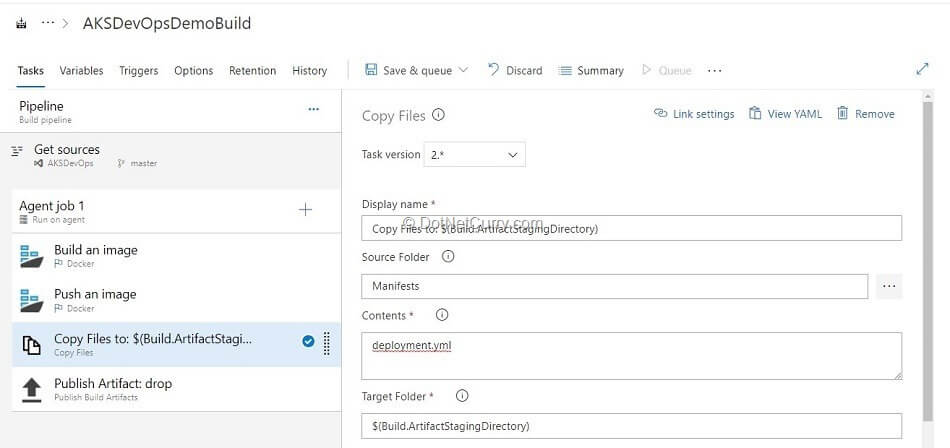
Figure 13: Copy files task details
The last task that we will add is “Publish Artifact” where we need not make changes in the parameters. It will publish the artifact named “drop” in which the deployment.yml file is present.
After configuring these tasks, we will “Save and Queue” this build. At the success of the build, the image is created as configured in the Dockerfile, pushed to ACR and the artifact as mentioned earlier, is created and published.
Create a release pipeline
We now have to deploy the created image on AKS Cluster. We will do that using the Release Management service.
Let’s create a new release pipeline from Pipelines – Releases section in the left-hand pane of the Azure DevOps page. In this release pipeline we will add only one stage (for the sake of this example), but normally there may be multiple stages in a release pipeline.
For this release pipeline, we will select the “Deploy to Kubernetes cluster” template.
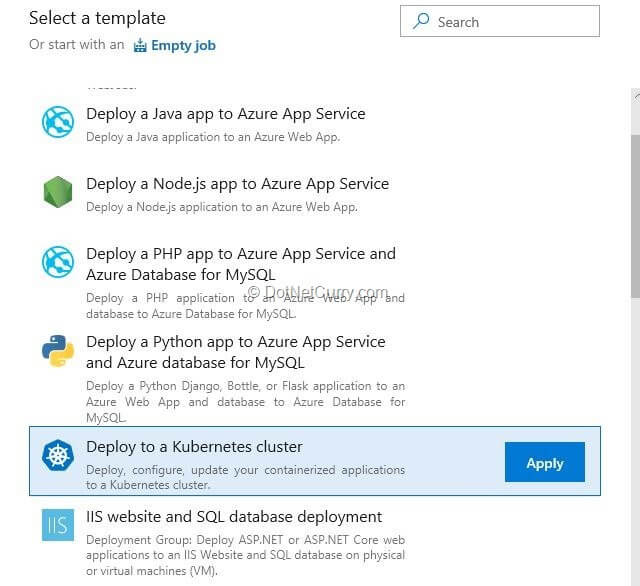
Figure 14: Select Deploy to Kubernetes cluster template for release pipeline
This template by default adds one stage, let’s call it “QA”. We will add the build pipeline definition that we have created earlier, as the artifact source.
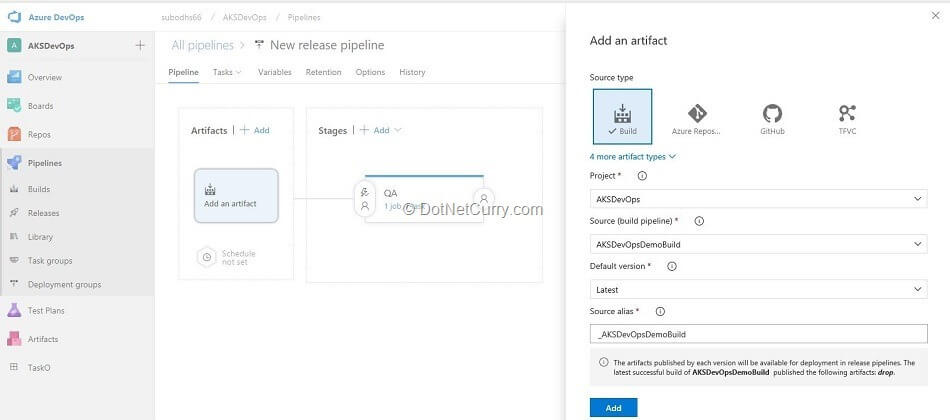
Figure 15: Select artifact source and note artifact alias
Let’s now set the parameters for the task that is added by the template.
That task is of “kubectl”. Before we set other parameters, let’s setup a connection to the AKS Cluster. This is done through the wizard that is started by clicking the New button for the parameter of Kubernetes Service Connection.
We will base our connection on the Azure Subscription which is common between Azure and Azure DevOps. Once we select the Azure subscription in this wizard, we can select the AKS Cluster that we had created earlier. We will use the “default” namespace. Click OK to create a new connection.
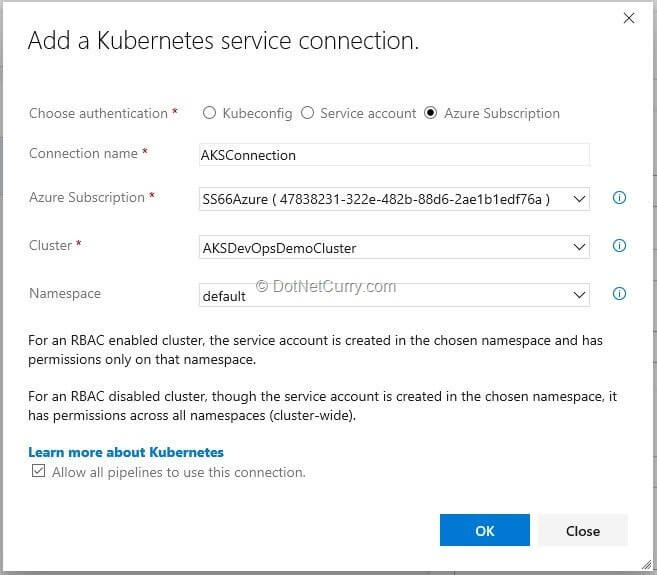
Figure 16: Create connection to AKS Cluster
We will set the parameters for this task as shown below:
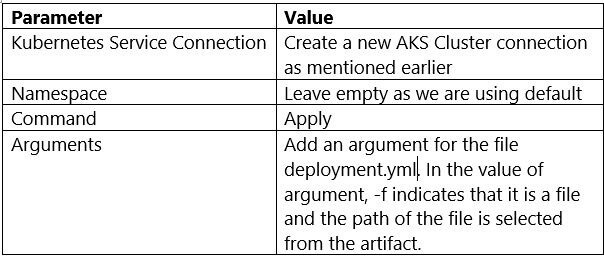
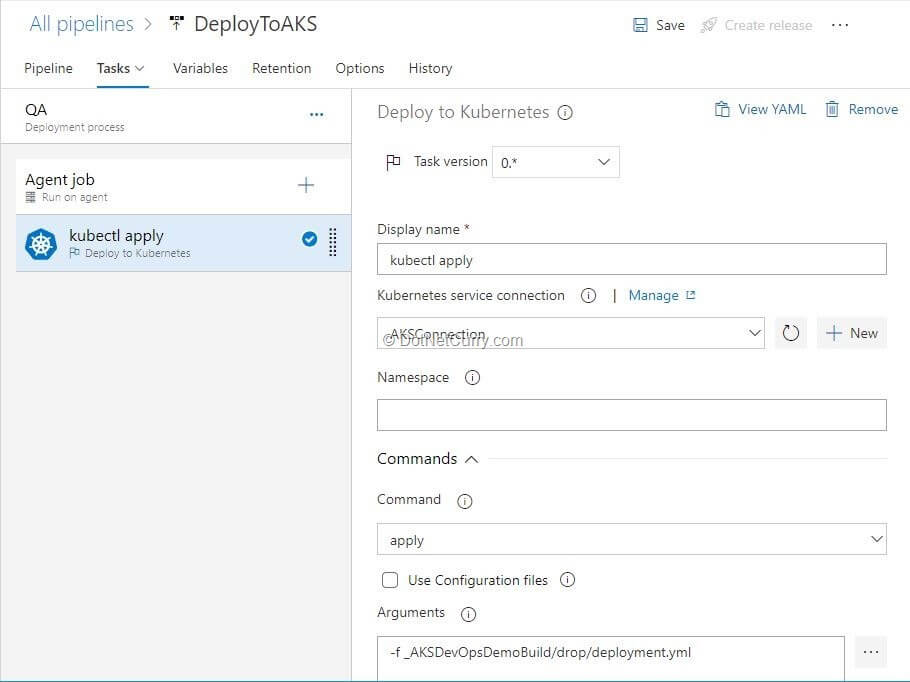
Figure 17: Kubectl task in release pipeline
Now create a release which will pull the image that we had built and deploy the containers in the pods on a node in AKS Cluster. Let’s view those pods.
View pods and services
One excellent tool within the Azure Portal is called CloudShell.
It is a shell that can be accessed without going out of the portal (in the browser). Once we open it, we can execute either PowerShell or Bash commands on the command prompt. In this example, let’s select to open the CloudShell in Bash mode. We will now connect to our AKS Cluster by using the command:
$ az aks get-credentials --resource-group research --name AKSDevOpsDemoCluster
In the above-mentioned command, “research” and “AKSDevOpsDemoCluster” are names and may be different in your case.
The next command is to get a list of pods:
$ kubectl get pods
This command will list the pods that are created by Azure DevOps Release.
Another command is to view the services created:
$ kubectl get services
This command will list the services including the LoadBalancer service and the service that manages the cluster.
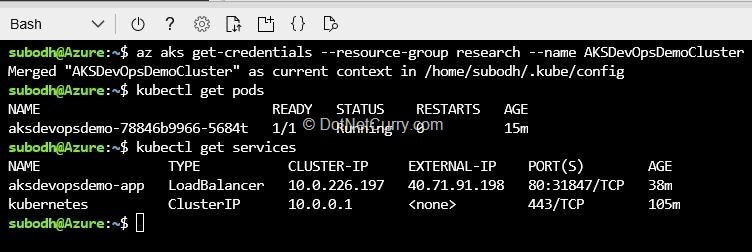
Figure 18: Pods and services created by release
Once we get the External IP address of LoadBalancer service, we can browse to it to view the application.
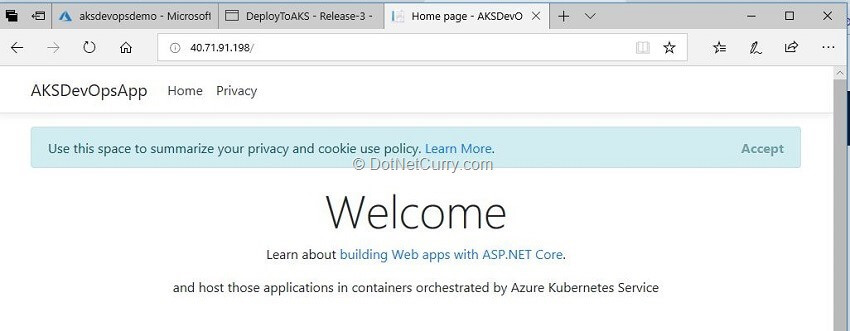
Figure 19: Application running in the container
Issue related to CI/CD of image with “latest” tag
In this exercise, we have deployed an image that has a name of aksdevopsdemo and a label of Latest. What we realize is that if we try to update the image by changing some code and build it again, the newly created image will have a tag with the build number and another tag that is “latest”.
If we try to redeploy the image with the tag “latest”, it will not replace the image in the running containers. It becomes obvious that deploying image with “latest” tag is not a useful strategy if we want containers to re-pull image without a break.
Update running containers with new image without service break
Let’s consider the option of deploying the image that has the tag of build id.
Every time the build executes to create the image, build id will be different and so will be the tag given to that image. In fact, this is a standard behavior of the Docker image creation task in Azure DevOps Build pipeline.
When redeployed, the image with the same name but a different tag will be used and the running containers will have no problem in pulling that image. We have to now ensure that image that is pulled at the deployment, is the one with latest build id.
Release management gets the image name and tag of the image to deploy from Deployment.yml file. In this file, we will need to replace the tag “latest” with the ID of the build. This needs to be done every time a new build artifact is passed to the release management service. We will need to update the Deployment.yml file before the actual deployment takes place.
As part of the release, we will use the “sed” command to make an inline change in that file to replace “latest” word with the value of the build id. This will have to be done in the first step of release, where we can access the build id and pass it on to the shell script which also needs to be part of the artifact.
Let’s write a shell script as follows:

Figure 20: Code of run.sh Bash script
This shell script accepts an argument. That argument is the Build Id passed from the release task. It replaces the first instance of the word “latest”.
Path of the file is the path of the artifact that is passed to that release so that the replacement takes place in the artifact itself. We will save this Bash script in the Manifest folder, as “run.sh” file (name can be different but ensure to replace it wherever we have used it) to the version control.
After pushing that to the remote repository, make a change in the build pipeline definition that we had created earlier to also copy this file in “Build.ArtifactStagingDirectory”. This way, it gets added to the artifact that is passed to the release.
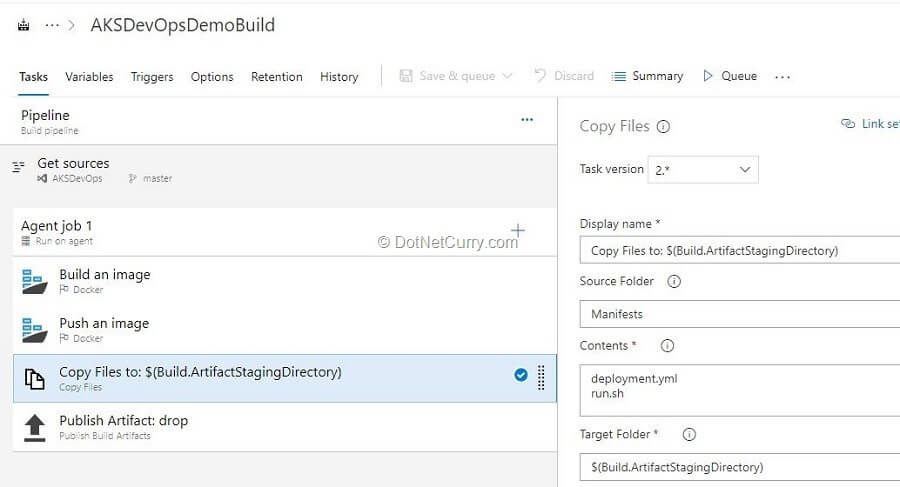
Figure 21: Changes in the Copy files task in build pipeline
We will now add a task of “Bash” script execution to the release pipeline definition. Set the following parameter values:

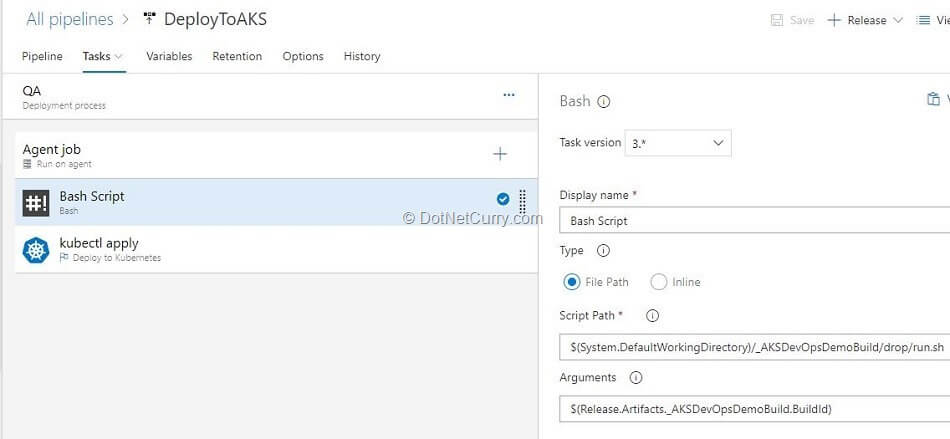
Figure 22: Task to execute created Bash script
Release can access Build Id from the artifact that is passed to it. In this case, the variable Release.Artifacts._AKSDevOpsDemoBuild.BuildId takes the alias of the artifact provider which is _AKSDevOpsDemoBuild and gets the BuildID from it.
When we create a release, it will first run that Bash script on the agent. That Bash script will take the deployment.yml file from the same artifact where the Bash script is, and replace the word “latest” with the build id.
The deployment.yml is saved back in that artifact. It is used in the next step to do the deployment. As the deployment proceeds, the image with the tag of the latest build id will be pulled by the running containers and the application is updated.
Summary:
In this article, we have learnt many concepts and practices.
1. Create an Azure Kubernetes Service (AKS) Cluster with a Service Principal.
2. Create an Azure Container Registry (ACR) and add the AKS Cluster created in the earlier step to the contributors role in the Access Control of ACR so that it can pull images from that ACR.
3. Create an application using ASP.NET Core technology that has Docker support.
4. Configure Docker containers creation using Dockekerfile.
5. Configure deployment of containers to AKS Cluster using a YAML file.
6. Create a build pipeline definition to create an image based upon the configuration provided in Dockerfile and push that to ACR that was created earlier.
7. Use Release Management service to do deployment to AKS Cluster using the YAML file.
8. Modify YAML file in artifact to reflect Build Id so that every time a new build is deployed, it will update the running containers also.
This article was technically reviewed by Gouri Sohoni.
This article has been editorially reviewed by Suprotim Agarwal.
C# and .NET have been around for a very long time, but their constant growth means there’s always more to learn.
We at DotNetCurry are very excited to announce The Absolutely Awesome Book on C# and .NET. This is a 500 pages concise technical eBook available in PDF, ePub (iPad), and Mobi (Kindle).
Organized around concepts, this Book aims to provide a concise, yet solid foundation in C# and .NET, covering C# 6.0, C# 7.0 and .NET Core, with chapters on the latest .NET Core 3.0, .NET Standard and C# 8.0 (final release) too. Use these concepts to deepen your existing knowledge of C# and .NET, to have a solid grasp of the latest in C# and .NET OR to crack your next .NET Interview.
Click here to Explore the Table of Contents or Download Sample Chapters!
Was this article worth reading? Share it with fellow developers too. Thanks!

Subodh is a Trainer and consultant on Azure DevOps and Scrum. He has an experience of over 33 years in team management, training, consulting, sales, production, software development and deployment. He is an engineer from Pune University and has done his post-graduation from IIT, Madras. He is a Microsoft Most Valuable Professional (MVP) - Developer Technologies (Azure DevOps), Microsoft Certified Trainer (MCT), Microsoft Certified Azure DevOps Engineer Expert, Professional Scrum Developer and Professional Scrum Master (II). He has conducted more than 300 corporate trainings on Microsoft technologies in India, USA, Malaysia, Australia, New Zealand, Singapore, UAE, Philippines and Sri Lanka. He has also completed over 50 consulting assignments - some of which included entire Azure DevOps implementation for the organizations.
He has authored more than 85 tutorials on Azure DevOps, Scrum, TFS and VS ALM which are published on
www.dotnetcurry.com.Subodh is a regular speaker at Microsoft events including Partner Leadership Conclave.You can connect with him on
LinkedIn .