Automated CI/CD with Terraform and Azure DevOps
Terraform is an open-source tool for provisioning and managing cloud infra. It organizes infra in configuration files that describe the topology of cloud resources. These resources include virtual machines, storage accounts, networking interfaces, SQL servers, databases etc. Terraform CLI provides a simple mechanism to deploy and version the configuration files to Azure.
Benefits of using Terraform
Automate Infra management
Terraform’s template-based configuration files enable us to define, provision, and configure Azure resources in a repeatable and foreseeable manner. Automating infra has several benefits:
(1) Lowers human errors while deploying and managing infra.
(2) Deploys similar templates multiple times to create identical multiple environments like development, test and production. This is a desirable property of infrastructure configuration called Idempotency.
(3) Reduces the cost of different environments like development, test and productions by creating them on-demand and destroying them when the need is over.
Understand infra changes before being applied to Azure (or any other cloud providers)
As a resource topology becomes complex, understanding the meaning and impact of infra changes can be difficult. Terraform CLI enables users to validate and preview infra changes before applying. Previewing infra changes has several benefits:
(1) Team members can understand proposed changes and their impact easily.
(2) Unintended changes can be captured early in the development process itself
Deploy infrastructure to multiple clouds
Terraform is proficient at deploying an infra across multiple cloud providers. It enables developers to use compatible tool for multiple cloud to manage.
Terraform uses a custom language
HCL (HashiCorp Configuration Language) is designed to be a compromise between being human readable and machine friendly, and it is generally easier to read than ARM template JSON.
Use Azure Cloud Shell
Azure Cloud Shell, an interactive shell environment can be used via a browser. Use either Bash or PowerShell with Cloud Shell to work with Azure services. We can use the Cloud Shell preinstalled commands to run the code in this article without having to install anything on our local environment.
To start Azure Cloud Shell:
(1) Go to https://shell.azure.com or select the Launch Cloud Shell button to open Cloud Shell in your browser.

(2) Select the Cloud Shell button on the menu bar at the upper right in the Azure portal.

Install Terraform
If we are using Azure cloud shell, we don’t need to install terraform manually as it’s already available.
To access Azure cloud shell, refer the steps above. Incase you want to install Terraform manually, download the appropriate package for your operating system into a separate install directory. The download contains a single executable file, for which you should also define a global path. For instructions on how to set the path on Linux and Mac, go to this webpage. For instructions on how to set the path on Windows, go to this webpage.
Verify your path configuration with the terraform command. A list of available Terraform options is shown, as in the following example output:
saumilkumar@Azure:~$ terraform
Usage: terraform [-version] [-help] <command> [args]
The available commands for execution are listed below.
The most common, useful commands are shown first, followed by
less common or more advanced commands. If you're just getting
started with Terraform, stick with the common commands. For the
other commands, please read the help and docs before usage.
Common commands:
    apply              Builds or changes infrastructure
    console            Interactive console for Terraform interpolations
    destroy            Destroy Terraform-managed infrastructure
    env                Workspace management
    fmt                Rewrites config files to canonical format
    get                Download and install modules for the configuration
    graph              Create a visual graph of Terraform resources
    import             Import existing infrastructure into Terraform
    init               Initialize a Terraform working directory
    login              Obtain and save credentials for a remote host
    logout             Remove locally-stored credentials for a remote host
    output             Read an output from a state file
    plan               Generate and show an execution plan
    providers          Prints a tree of the providers used in the configuration
    refresh            Update local state file against real resources
    show               Inspect Terraform state or plan
    taint              Manually mark a resource for recreation
    untaint            Manually unmark a resource as tainted
    validate           Validates the Terraform files
    version            Prints the Terraform version
    workspace          Workspace management
All other commands:
    0.12upgrade        Rewrites pre-0.12 module source code for v0.12
    debug              Debug output management (experimental)
    force-unlock       Manually unlock the terraform state
    push               Obsolete command for Terraform Enterprise legacy (v1)
    state              Advanced state management
Run a sample Terraform script
1. Create an empty file testrg.tf in a directory.
saumilkumar@Azure:~/saumil$ cat > testrg.tf
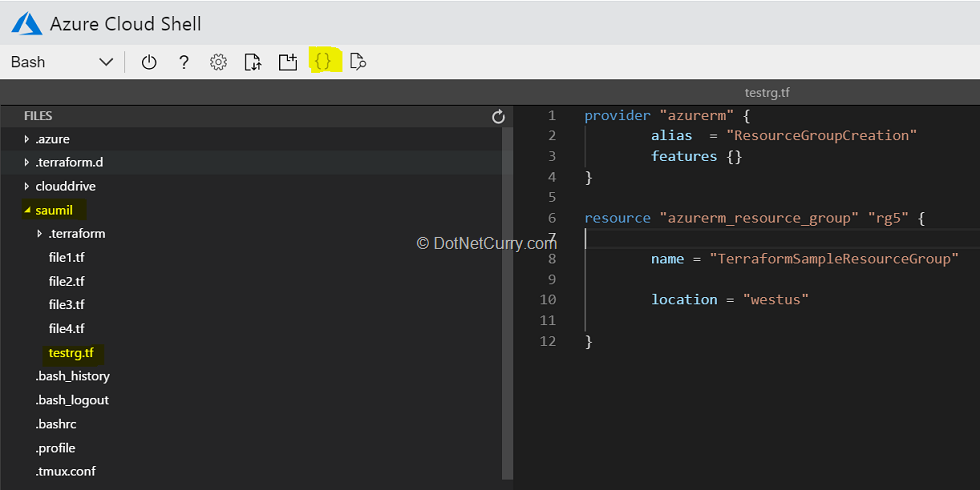
2. Once the file is created, paste the following script:
provider "azurerm" {
alias = "west"features {}
}
resource "azurerm_resource_group" "rg" {
        name = "TerraformSampleResourceGroup"
        location = "westus"
}
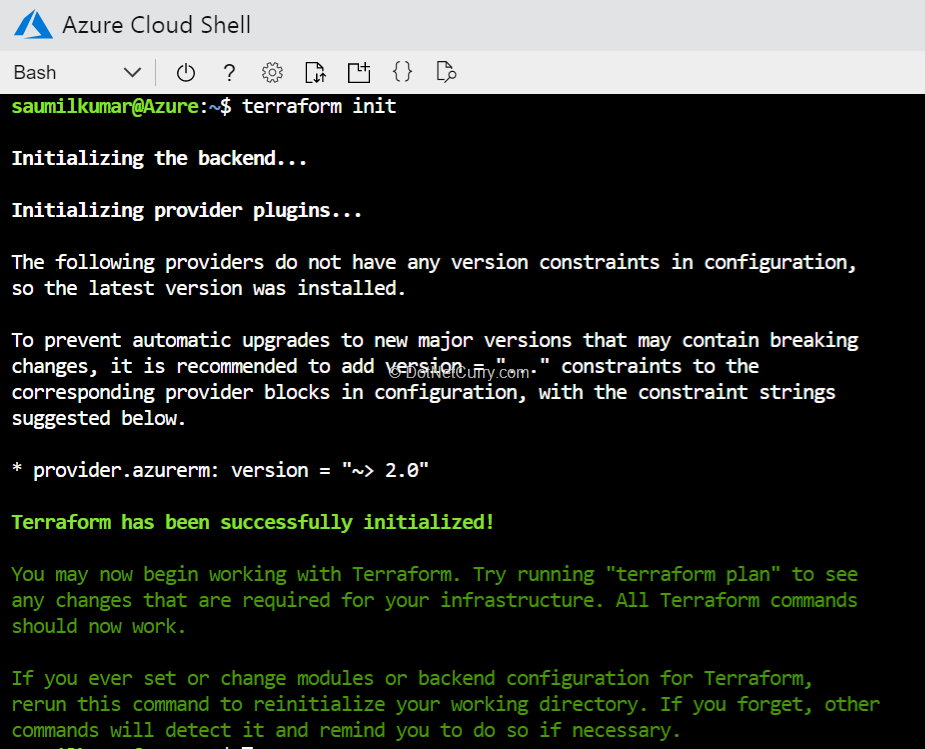
3. Save the file and then initialize the Terraform deployment. This step downloads the Azure modules required to create an Azure resource group.
terraform init
The output is similar to the following:
Terraform plan can be used to preview the actions to be completed by the Terraform script:
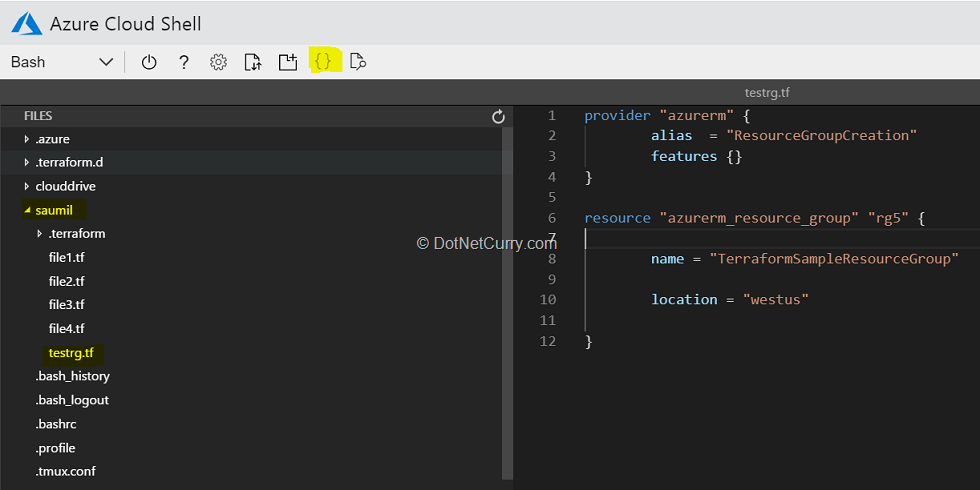
In current directory we have multiple terraform files. So, when we run terraform plan it will scan all *.tf files and execute the plan. Here’s the expected output for the above example.
Output: –
saumilkumar@Azure:~/saumil$ terraform plan
Refreshing Terraform state in-memory prior to plan...
The refreshed state will be used to calculate this plan, but will not be
persisted to local or remote state storage.
------------------------------------------------------------------------
An execution plan has been generated and is shown below.
Resource actions are indicated with the following symbols:
  + create
Terraform will perform the following actions:
  # azurerm_resource_group.rg will be created
  + resource "azurerm_resource_group" "rg" {
      + id       = (known after apply)
      + location = "westus"
      + name     = "TerraformSampleResourceGroup"
    }
  # azurerm_resource_group.rg1 will be created
  + resource "azurerm_resource_group" "rg1" {
      + id       = (known after apply)
      + location = "westus"
      + name     = "File1"
    }
  # azurerm_resource_group.rg2 will be created
  + resource "azurerm_resource_group" "rg2" {
      + id       = (known after apply)
      + location = "eastus"
      + name     = "File2"
    }
  # azurerm_resource_group.rg3 will be created
  + resource "azurerm_resource_group" "rg3" {
      + id       = (known after apply)
      + location = "eastus"
      + name     = "File3"
    }

  # azurerm_resource_group.rg4 will be created
  + resource "azurerm_resource_group" "rg4" {
      + id       = (known after apply)
      + location = "eastus"
      + name     = "File4"
    }
Plan: 5 to add, 0 to change, 0 to destroy.
------------------------------------------------------------------------
Note: You didn't specify an "-out" parameter to save this plan, so Terraform
can't guarantee that exactly these actions will be performed if
"terraform apply" is subsequently run.
4. When ready to create the resource groups, apply Terraform plan as follows:
terraform apply
The output is similar to the following:
saumilkumar@Azure:~/saumil$ terraform apply
An execution plan has been generated and is shown below.
Resource actions are indicated with the following symbols:
  + create
Terraform will perform the following actions:
  # azurerm_resource_group.rg will be created
  + resource "azurerm_resource_group" "rg" {
      + id       = (known after apply)
      + location = "westus"
      + name     = "TerraformSampleResourceGroup"
    }
  # azurerm_resource_group.rg1 will be created
  + resource "azurerm_resource_group" "rg1" {
      + id       = (known after apply)
      + location = "westus"
      + name     = "File1"
    }
  # azurerm_resource_group.rg2 will be created
  + resource "azurerm_resource_group" "rg2" {
      + id       = (known after apply)
      + location = "eastus"
      + name     = "File2"
    }
  # azurerm_resource_group.rg3 will be created
  + resource "azurerm_resource_group" "rg3" {
      + id       = (known after apply)
      + location = "eastus"
      + name     = "File3"
    }
  # azurerm_resource_group.rg4 will be created
  + resource "azurerm_resource_group" "rg4" {
      + id       = (known after apply)
      + location = "eastus"
      + name     = "File4"
    }
Plan: 5 to add, 0 to change, 0 to destroy.
Do you want to perform these actions?
  Terraform will perform the actions described above.
  Only 'yes' will be accepted to approve.
  Enter a value: yes
azurerm_resource_group.rg1: Creating...
azurerm_resource_group.rg4: Creating...
azurerm_resource_group.rg: Creating...
azurerm_resource_group.rg2: Creating...
azurerm_resource_group.rg3: Creating...
azurerm_resource_group.rg2: Creation complete after 4s [id=/subscriptions/SubscriptionID/resourceGroups/File2]
azurerm_resource_group.rg3: Creation complete after 5s [id=/subscriptions/SubscriptionID/resourceGroups/File3]
azurerm_resource_group.rg1: Creation complete after 5s [id=/subscriptions/SubscriptionID/resourceGroups/File1]
azurerm_resource_group.rg4: Creation complete after 5s [id=/subscriptions/SubscriptionID/resourceGroups/File4]
azurerm_resource_group.rg: Creation complete after 5s [id=/subscriptions/SubscriptionID/resourceGroups/TerraformSampleResourceGroup]
Now, Let’s create one CI-CD pipeline for ASP.NET Application where we will create an ASP.net sample project and using terraform we will do Infra and Binaries deployment as a part of release process.
Creating Automated CI-CD Pipeline for an ASP.NET Application
Follow these steps to create an automated pipeline for the demo project:
(1) Clone the following URL which has sample application code base as well as terraform code:
https://sausha@dev.azure.com/sausha/PublicData/_git/Terraform-CICD
(2) Once we have clone repo, go to master branch and Terraform folder.

(3) Select the webapp.tf file under the Terraform folder. Go through the code.
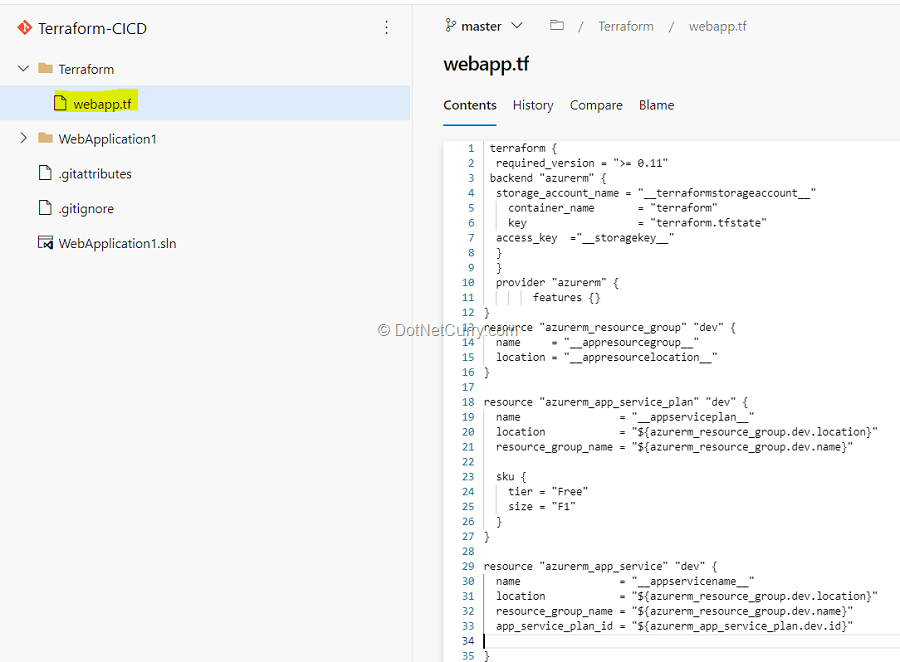
webapp.tf is a terraform configuration file.
In this example, we want to deploy an Azure Resource group, App service plan and App service required to deploy the website. And we have added Terraform file (Infrastructure as Code) to source control repository in the Azure DevOps project which can deploy the required Azure resources.
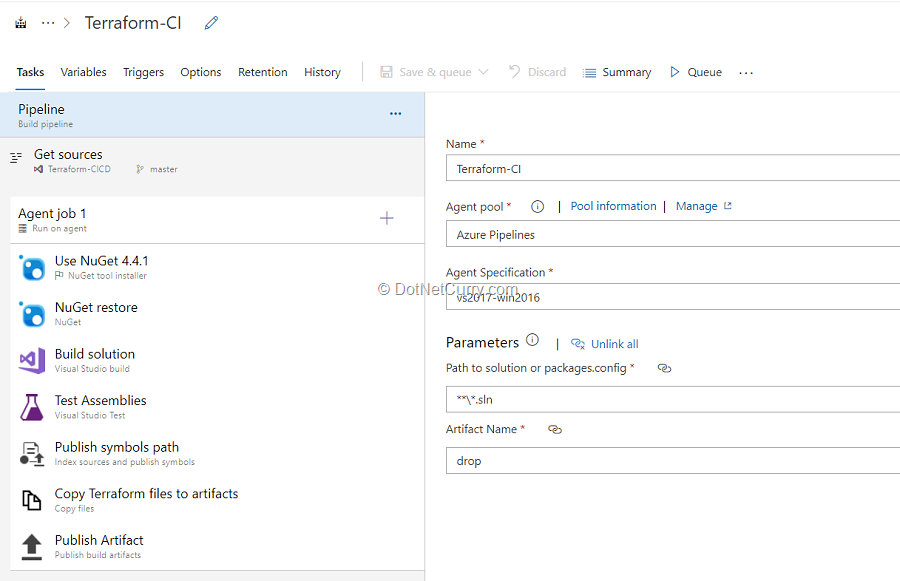
(4) The Build pipeline will look like the one shown below. This CI pipeline has tasks to compile ASP.NET project. The NuGet tasks in the pipeline will restore dependencies, build, test and publish the build output into a zip file (package) which can be deployed to a web application.
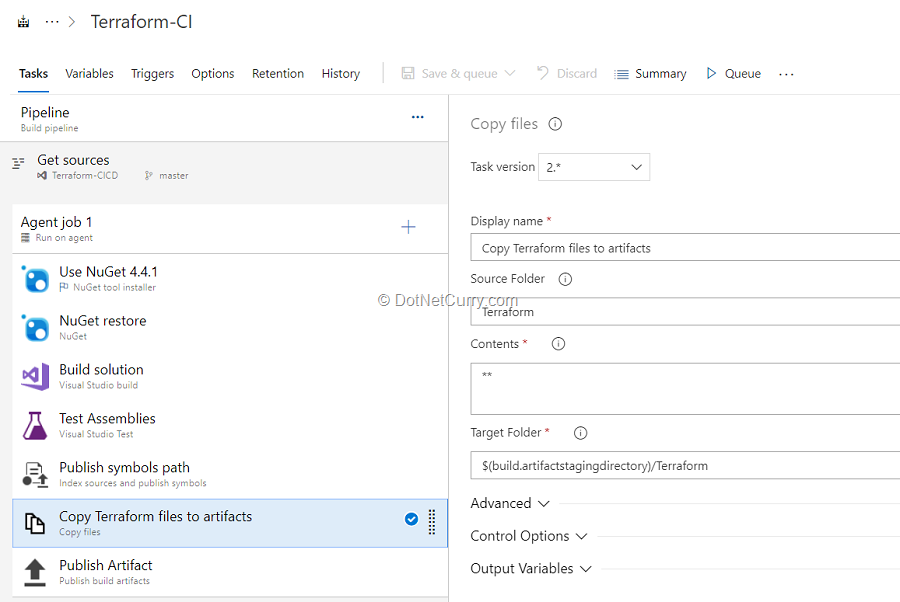
(5) In addition to the application build, we need to publish terraform files to build artifacts so that it will be available in the Release pipeline. To do so, we have added Copy files task to copy Terraform file to Artifacts directory.
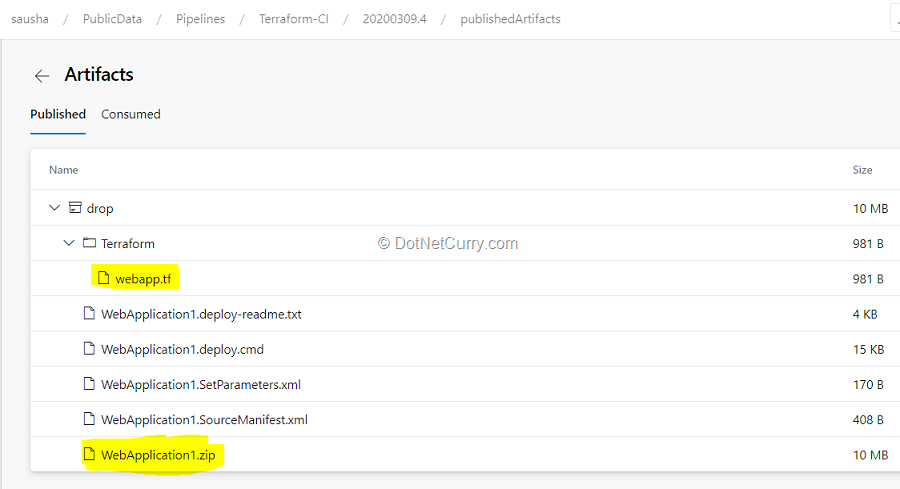
(6) Once the CI pipeline is successfully completed, it will publish the following format Artifacts to the Release pipeline.
(7) Select the Azure CLI task. By default, terraform stores state locally in a file named terraform.tfstate. When working with Terraform in a team, use of a local file makes Terraform usage complicated. With remote state, terraform writes the state data to a remote data store. Here we are using Azure CLI task to create Azure storage account and storage container to store Terraform state file.
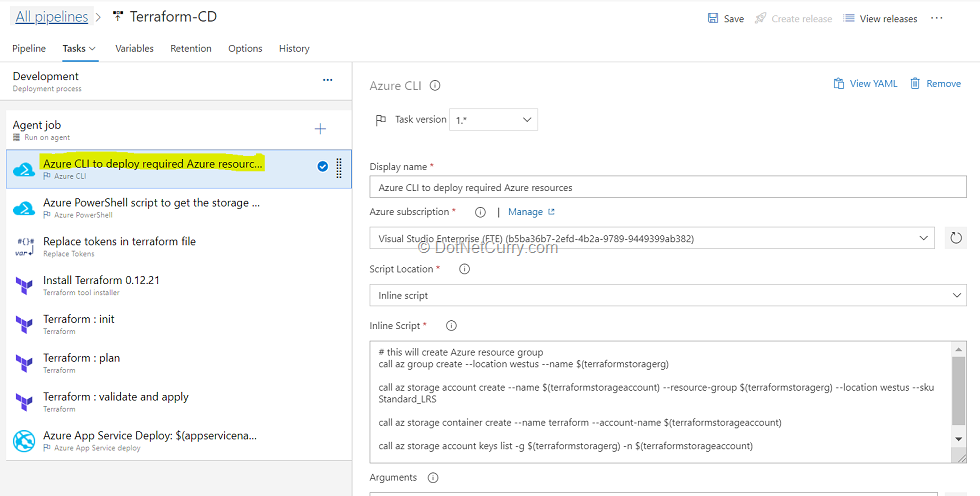
Here’s the Inline Script used in task:
# this will create Azure resource group
call az group create --location westus --name $(terraformstoragerg)
call az storage account create --name $(terraformstorageaccount) --resource-group $(terraformstoragerg) --location westus --sku Standard_LRS
call az storage container create --name terraform --account-name $(terraformstorageaccount)
call az storage account keys list -g $(terraformstoragerg) -n $(terraformstorageaccount)
(8) Select the Azure PowerShell task. To configure the Terraform backend, we need a Storage account access key. Here we are using Azure PowerShell task to get the Access key of the storage account provisioned in the previous step.
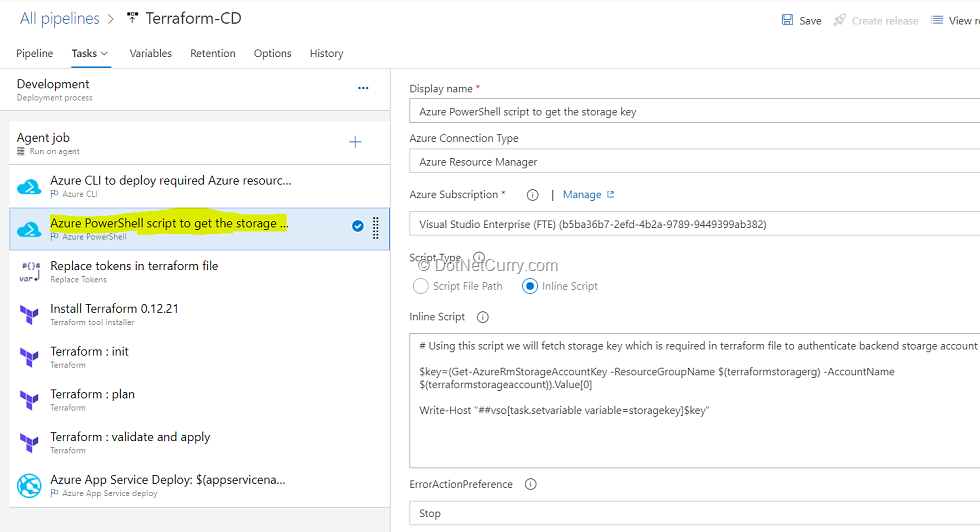
Here’s the Inline Script used in task:
# Using this script, we will fetch storage key which is required in terraform file to authenticate backend storage account
$key=(Get-AzureRmStorageAccountKey -ResourceGroupName $(terraformstoragerg) -AccountName $(terraformstorageaccount)).Value[0]
Write-Host "##vso[task.setvariable variable=storagekey]$key"
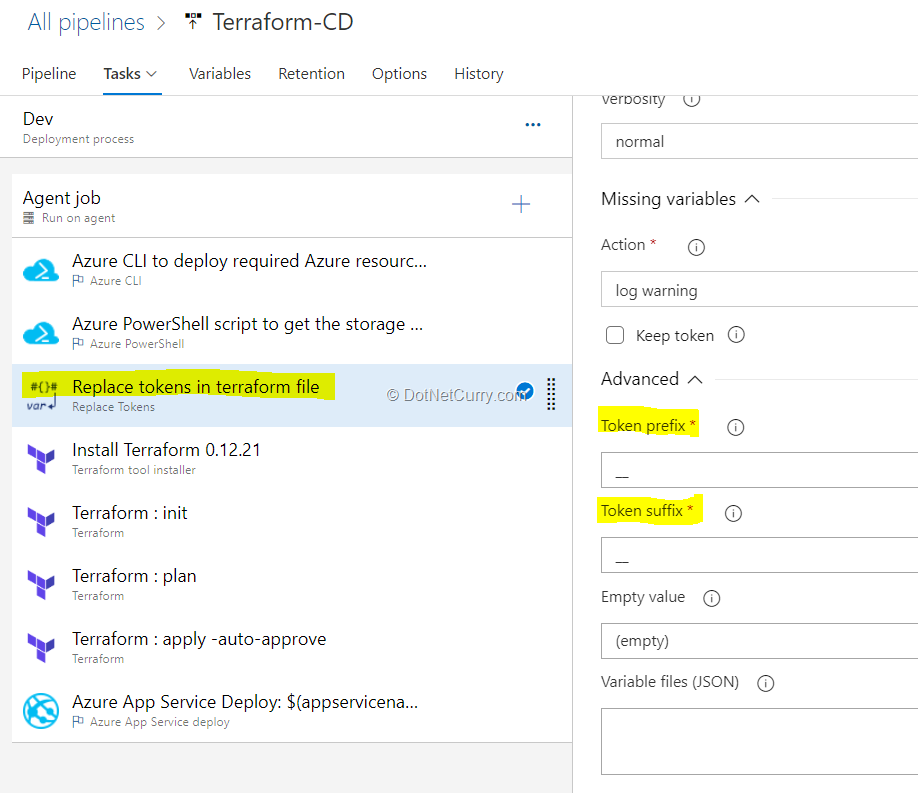
(9) Select the Replace tokens task. If we observe the webapp.tf file, we will see there are few values are suffixed and prefixed with __. For example, terraformstorageaccount.

Using the Replace tokens task, we will replace those values with the variable values defined in the release pipeline.
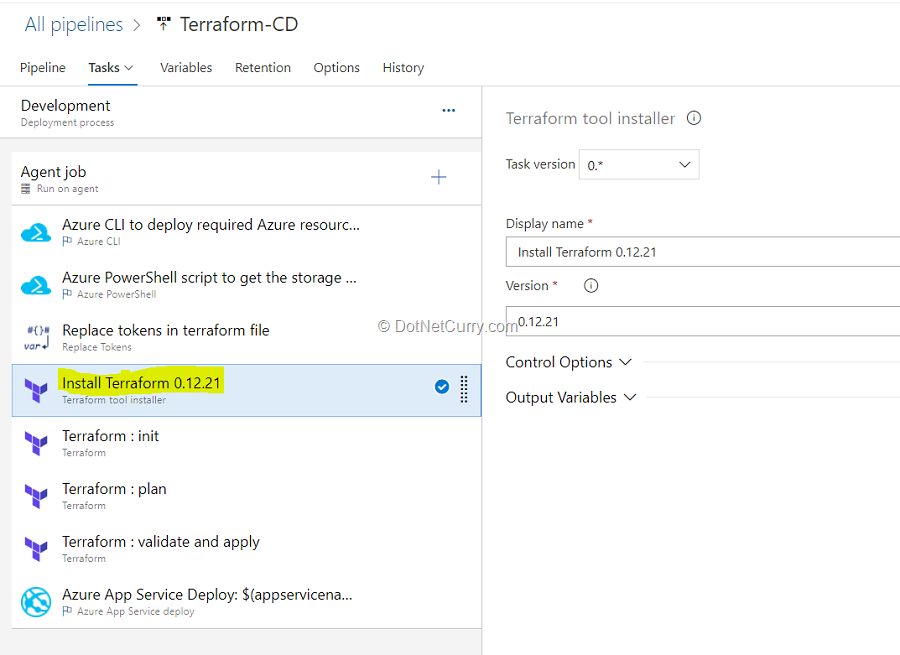
(10) Terraform tool installer task is used to install a specified version of Terraform from the Internet or the tools cache, which prepends it to the PATH of the Azure Pipelines Agent (hosted or private).
When we are running Terraform in automation, the main Terraform workflow is shown below:
a) Initialize the Terraform working directory.
b) Produce a plan for changing resources to match the current configuration.
c) Apply the changes according to the plan.
The next Terraform tasks in release pipeline help us to implement this workflow.
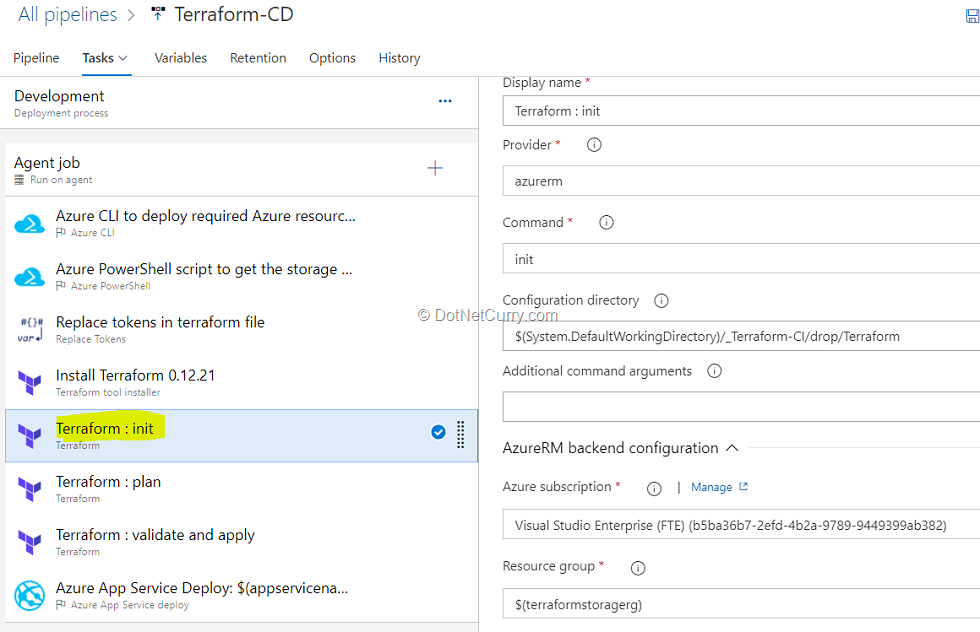
(11) Select the Terraform init task. make sure the container name is selected as terraform. This task runs terraform init command. The terraform init command looks through all the *.tf files in the current working directory and automatically downloads any of the providers required for them. In this example, it will download Azure provider as we are going to deploy Azure resources.
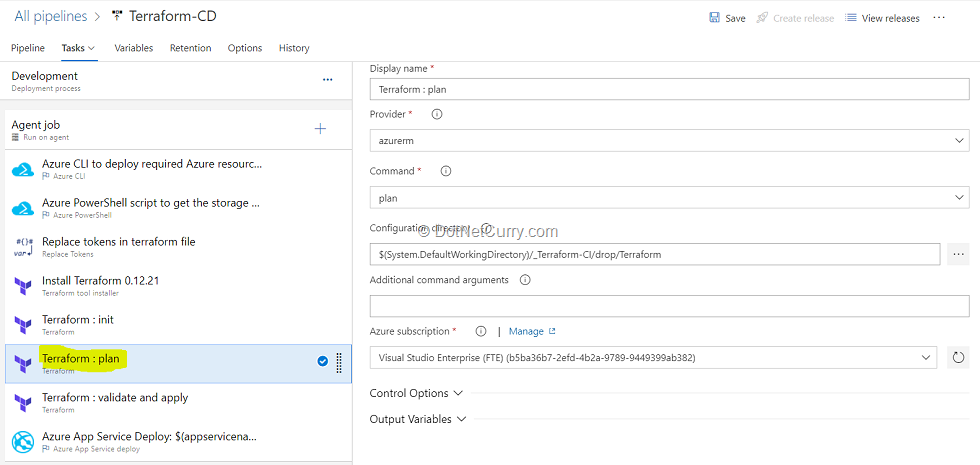
(12) Select the Terraform plan task. The terraform plan command is used to create an execution plan. Terraform determines what actions are necessary to achieve the desired state specified in the configuration files. For example, terraform plan might be run before committing a change to version control, to create confidence that it will behave as expected.
In this pipeline, we are initializing webapp.tf file so when initialization happens, terraform will create a state file to check the resources we are trying to create in Azure resource group, app service plan, app service.
It will check to see if it’s first time you are running the pipeline. If so, it will prompt that three resources needs to be added and incase you are running the same release pipeline later, it will refer the state file and check if the resources already exist, in which case, it will show no new changes will be required.
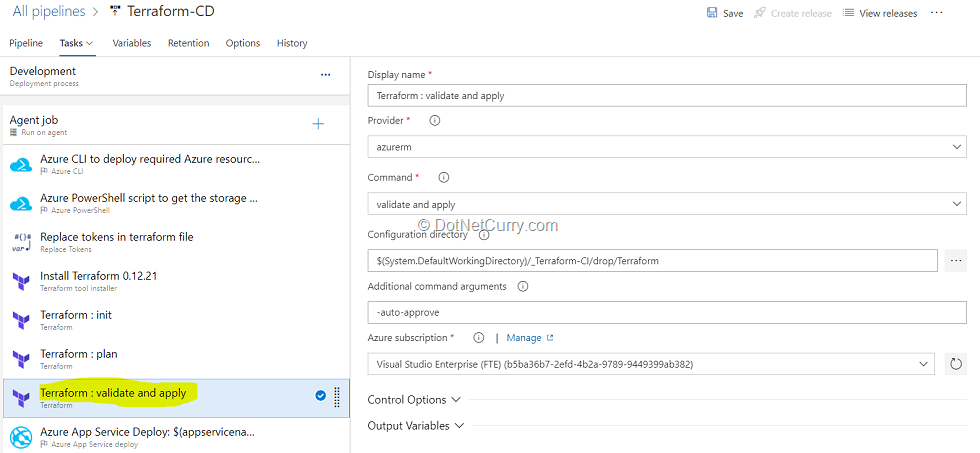
13. Select the Terraform Apply task. This task will run the terraform apply command to deploy the resources. By default, it will also prompt for a confirmation that you want to apply the changes. Since we are automating the deployment, we are adding auto-approve argument to not prompt for confirmation.
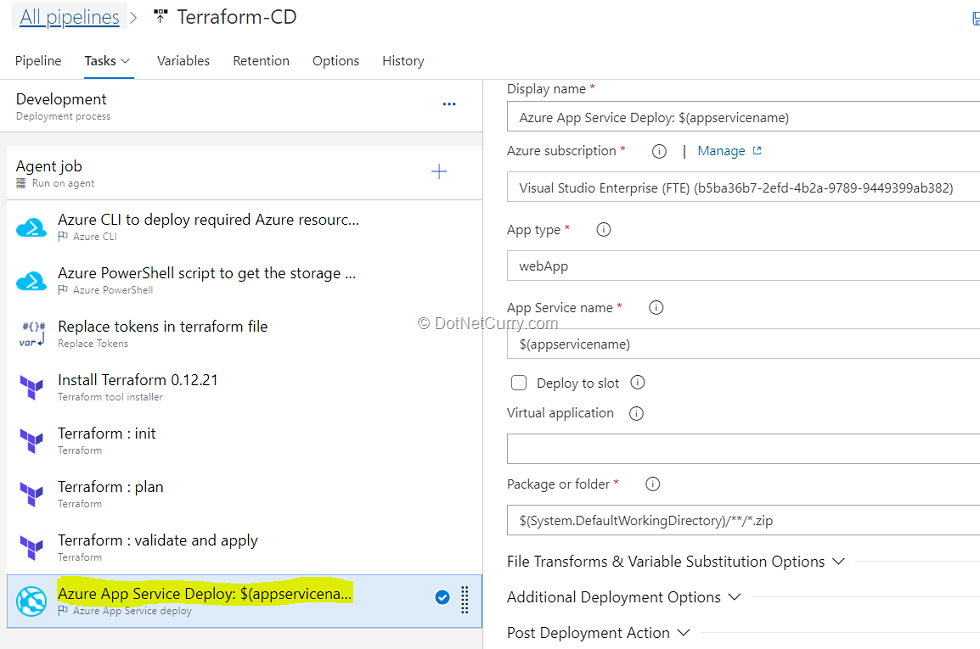
14. Select Azure App Service Deploy task. This task will deploy the .zip file to Azure app service which is provisioned by Terraform tasks in previous steps.
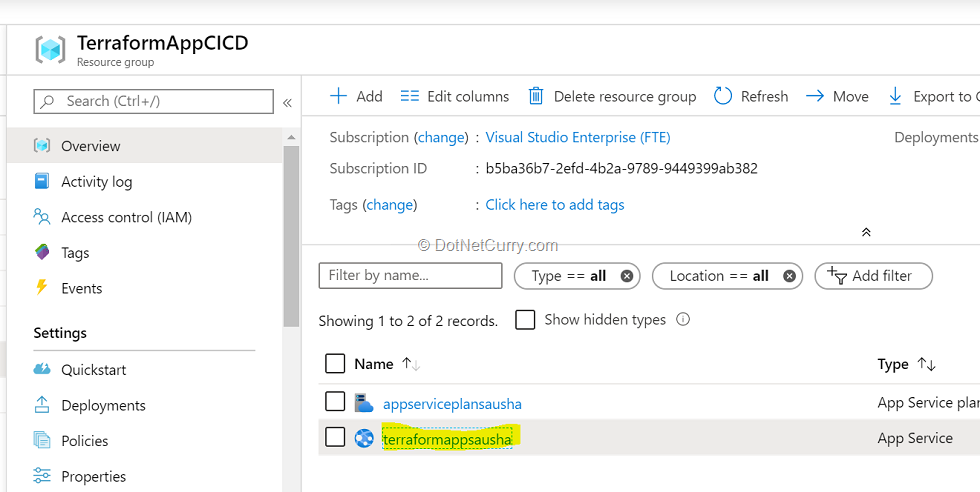
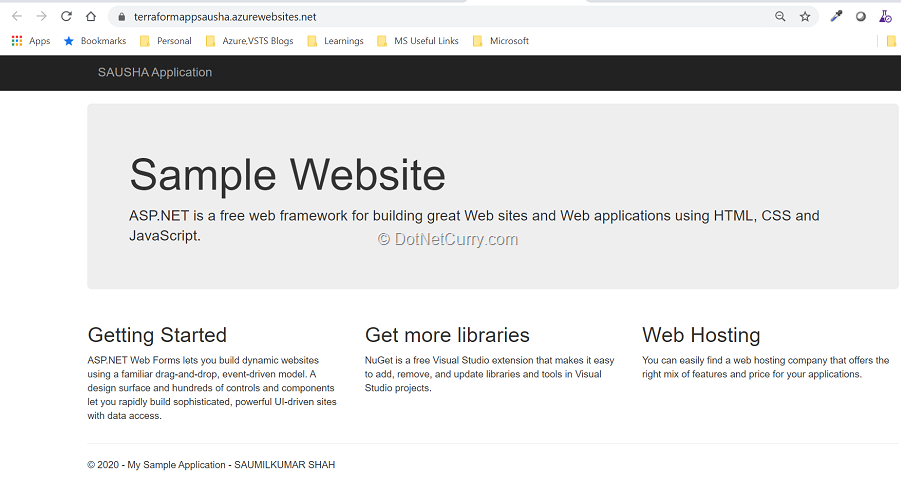
15. Once the release is successful, navigate to your Azure portal. Search for terraformappsausha in App services.
16. Browse to view the application deployed.
Conclusion:
In this tutorial, we have seen the benefits of Terraform. We installed Terraform or Azure Cloud Shell and started creating Azure resources in Azure subscription using CLI.
Additionally, we have seen how to automate repeatable deployments with Terraform on Azure using ADO (Azure DevOps) Pipelines.
Download the source code of this article from Github.
Resources:
Github resources for Azure Provider templates: https://github.com/terraform-providers/terraform-provider-azurerm/tree/master/examples
Terraform provider documentation: https://www.terraform.io/docs/providers/azurerm/index.html
Deploying Terraform with Bash: https://docs.microsoft.com/en-us/azure/cloud-shell/example-terraform-bash
This article was technically reviewed by Subodh Sohoni.
This article has been editorially reviewed by Suprotim Agarwal.
C# and .NET have been around for a very long time, but their constant growth means there’s always more to learn.
We at DotNetCurry are very excited to announce The Absolutely Awesome Book on C# and .NET. This is a 500 pages concise technical eBook available in PDF, ePub (iPad), and Mobi (Kindle).
Organized around concepts, this Book aims to provide a concise, yet solid foundation in C# and .NET, covering C# 6.0, C# 7.0 and .NET Core, with chapters on the latest .NET Core 3.0, .NET Standard and C# 8.0 (final release) too. Use these concepts to deepen your existing knowledge of C# and .NET, to have a solid grasp of the latest in C# and .NET OR to crack your next .NET Interview.
Click here to Explore the Table of Contents or Download Sample Chapters!
Was this article worth reading? Share it with fellow developers too. Thanks!
Saumil works with Microsoft as a Cloud Consultant. He comes with experience into Azure Services, DevOps, Solution Design, Release Management. He is passionate about cloud technologies. Follow him on twitter @
SaumilkumarShah and connect on
Linkedin.