In this article, I am going to drill deep into Azure Boards service. This is an Azure DevOps service to unearth features for portfolio management.
A portfolio we are considering here, is development of a product that is so large that it cannot be done by a single team in a viable length of time. It has to be done by multiple teams as a joint effort.
Azure Boards provides Teams, Areas, Shared backlogs and Team backlogs features for doing portfolio management. In this article, we will explore why these tools are necessary and how to use them.
Azure DevOps – Portfolio Management
Defining the context of portfolio
Scrum sets a limit on the size of the team to a maximum of 9 team members.
For a large product, it will take inordinate length of time for a team of up to 9 team members to develop it. Such a timeframe for delivery is not acceptable to the customers and the management. It is but natural to give the task of the product development to two or more teams.
When these multiple teams are working to develop the same product, there are some rules that those teams will have to follow to remain Scrum teams. Each team has to work within the framework of Scrum.
Keeping that in mind, let’s list the rules, constraints and artifacts that are to be created.
1. Product Backlog – Multiple teams are going to develop a Single product. Hence all product requirements, regardless of which team will fulfill those, will be put into one product backlog. That product backlog will be shared by all teams.
When we want to view the product backlog, the entire list of ordered set of Product Backlog Items (PBIs) should be visible.
2. Delivery Cadence – Usually customers are not interested in the delivery of a feature that depends upon another feature that may not be available, yet.
Since the customers are interested in the delivery of an entire Product Increment, the delivery cadence of all the teams should be same. That can be at the end of each sprint, but is not always so. The delivery of increment of product should be planned at a time that is convenient to all the teams and the customers. We will call it as a Release.
All the teams should have a plan to release an increment that is synchronized with each other. Within a release of multiple sprints, it is possible that each team may have different duration, start dates and end dates of the sprints, as long as they follow the limits set by the release. See Figure 1.

Figure 1: Unsynchronized sprints of multiple sprints in a release
3. Synchronized sprints – As mentioned earlier, the delivery cadence of all teams should be the same with a freedom to schedule the sprints at the team level. After accepting that fact, we should also consider the needs of the organization to have a comparison of status of development teams, and deliveries of dependencies at an appropriate time.
From this point of view, it is suggested to have synchronized sprints for all the teams as shown in Figure 2.

Figure 2: Synchronized sprints of multiple sprints in a release
4. Sprint Backlog – Each team will have its own sprint backlog. As a default, the team should be able to view and focus on their own sprint backlog.
5. Transparency about Dependencies – It is natural that if multiple teams are developing a feature, there will be dependencies within the (Product Backlog Items) PBIs that are taken up by different teams in their respective sprint backlogs. It should be possible to always view the status of dependencies across the teams, in one view.
Demystifying Terms associated with Product Development
Having defined these shared rules and constraints, we will now disambiguate some of the terms related to portfolio.
Product Backlog Item (PBI) – PBI is any abstract entity in the context of the product, on which the team will take efforts. It may be a User Story or a Non-Functional Requirement which needs to be fulfilled. It may be a Bug that needs to be fixed. It is expected that every PBI is scoped maximum to a sprint and to a single team. If it is started for implementation in a sprint, it should be completed in that same sprint.
Feature – Features are set of User Stories or PBIs which go together. They are required to be implemented as a unit to give a coherent experience to the user. Features are created from top-down and then refined in the bottom-up approach.
Let me explain this statement.
Once the overall direction of Product development is finalized, the product is split into user experiences that are required for the product to work. These user experiences, which we call features, are large enough to be implemented over multiple sprints.
Each feature is then split into multiple PBIs to be implemented. It is added to the product backlog so that it becomes one of the PBIs. This is the top-down part of the approach.
If a PBI is so large that it can take efforts of all the team members in a sprint and still cannot be implemented in a sprint, then it is elevated to the level of feature. It then is split into multiple PBIs, each of which is possible to be implemented in a sprint. This part is the bottom-up approach. Each feature should be implemented during a release. A feature can be scoped to multiple teams.
Epic – These entities define the general direction of product development and initiatives that organization adapts. It is split into multiple features which are implemented over number of releases.
Area – This term is not a generic term but is specific to Azure DevOps and some other DevOps toolsets like IBM Rational Team Concert.
Conceptually, it is a way to classify our PBIs on a criteria other than time.
As we all know, one of the Agile practices is to do incremental development using iterative development model. Iteration is a timebox in which the entire development process is carried out for a defined increment to product. PBIs and their derivatives like tasks are classified into iterations to define, what is being developed in each iteration.
We may want to classify PBIs on criterion other than time. This is what Areas helps us do. For example, if a team is developing a feature called “Employee UI” then all the PBIs that are part of mentioned feature can be added to the area named “Employee UI”. There can be one-to-one relationship between the team and its area.
Now that we have got a clarity about the terms that we are going to use, we can check how those are implemented using a case study.
Case Study: SSGS Employee Management System (EMS)
SSGS IT EDUCON Services Pvt. Ltd. is a consulting firm that provides consulting related to DevOps.
SSGS Consultants go on-site for providing support related to various DevOps tools and processes. When an enquiry comes for support related to DevOps, the profiles of the consultants are sent to the customer over emails. Customer selects the consultant of their choice and the contract is drawn between the customer and SSGS.
When consultants upgrade to new technologies and / or have gained new experience, updated profiles of the consultants are sent. When there are a number of repeat enquiries, it is observed that some customers do not request new profiles, but check the old profiles of these consultants to find if they fit their requirement.
To eliminate this issue, SSGS needs a software application to be created which will allow customers to search and view the latest profiles of consultants. Profiles are initially created by the HR Person in the organization when the consultant joins the organization. Those profiles cannot be downloaded for offline use. The Customer can view skill set, certifications and experience of the consultants, as well as their rates and availability. The customer then can select one or multiple consultants with whom the contract is drawn.
Once the consulting project is over, the consultants update their profile in the same software that was used by the customer and submit it for approval to the manager. The Manager may accept the updates or may suggest some more changes. Once the manager approves the updates in a profile, that profile becomes available to the next customer if the search criterion matches. If the consultant leaves the organization, the HR Person archives the profile and may also delete it, if needed.
Analysis of the case study
Since the application is to be accessed by external as well as users internal to the organization, it needs to be a browser-based web application. It should have separate interfaces for HR, Consultant (Employee), Manager and Customers. We can call each of them as features.
Each of these interfaces will allow many interactions between the user and the application. These interactions are gathered as PBIs. The Application needs to be created in the shortest possible time
Approach to address the issues in the case
1. Since there are multiple interfaces which make a product, we will create multiple teams to handle each of those. Each interface will be treated as a feature and an area will be created for it. The created area will be assigned to the respective team.
2. PBIs created as children of each feature, will also be added to the same area.
3. Each team will have the iterations that have same start dates and end dates.
4. There will be only one product backlog, common to all feature teams. This backlog will consist of features and children PBIs.
5. Each team will have separate sprint backlog in which PBIs of that sprint will be added.
6. It should be possible to view entire product backlog distribution to teams with sprints and release on a scale in a single screen.
Implementation
Create Team Project and Teams
We start the implementation by creating a new team project on Azure DevOps. When a team project is created, it automatically adds a team with same name as the team project name.
When we add a team project named “SSGS EMS”, a team named “SSGS EMS Team” is automatically added to that team project. This team will have all the members working on the product. We will now create the teams and their respective areas for different interfaces. We will create the following teams:
1. Employee Interface
2. HR Person Interface
3. Manager Interface
4. Customer Interface
We can create new teams by clicking the “New Team” button on the page of Project Settings – Teams. Figure 3 shows a form for creating the new team named “Employee Interface”.
Observe that:
1. I have selected team members for the team
2. I am the administrator of the team and am also a part of the team.
3. All the other members are assigned the role of “Contributor” so that they can add and edit any entity in the project.
4. The check-box to create an area path with the name of the team is checked.
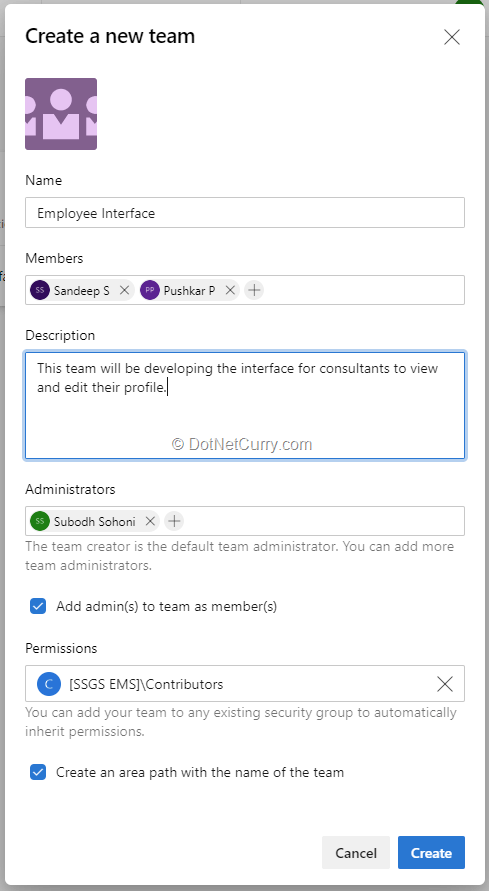
Figure 3: Create a new team
On that page itself we can view all the created teams as seen in Figure 4. Each team is going to be a Scrum Team.

Figure 4: Created Teams
From Project Settings – Boards – Project Configuration – Areas we can view the created areas.
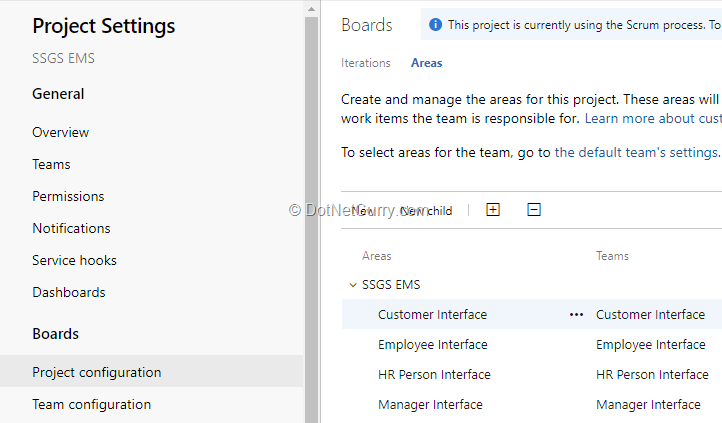
Figure 5: Areas Created with Teams
To set the properties for each team, let us select the teams one by one from the top (dropdown) – see Figure 6.
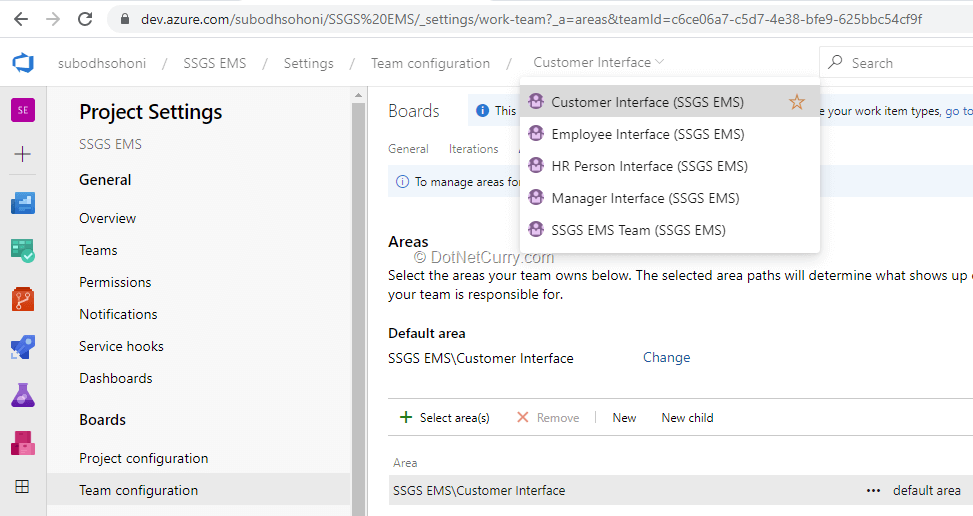
Figure 6: Default Area for the Team
When a team, for example “Customer Interface” is selected, we can see that “Default Area” property of the team is selected to the area with a name that is same as the team name.
Configure Sprints in Project Settings
For each team, we can set the sprint (Iteration) that will appear in the Sprint hub of that team. As a preparation for the same, we should have as many minimum sprints with same dates defined in the project, as the feature teams.
Since we have 4 feature teams, we can set a minimum of 4 sprints having the same dates. Set the dates of the sprint from Project Configuration – Iterations page.
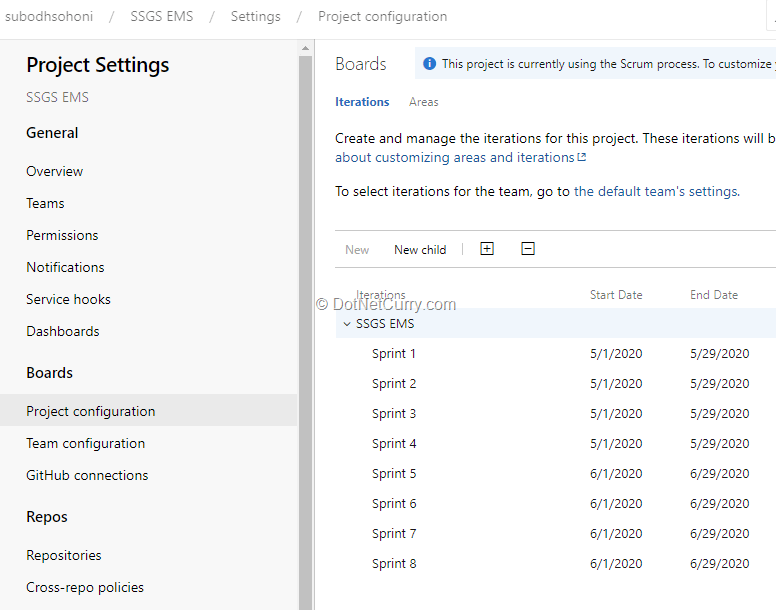
Figure 7: Sprint dates
Set Sprints for Teams
Let’s now set sprints for the teams. Open the page Team Configuration from Project Settings – Boards. Select the team “Employee Interface” from the top-level dropdown on that page. Click the Iterations tab on the team properties page that is shown. Add the iteration “SSGS EMS\Sprint 1” to the list of iterations of this team by selecting that iteration.
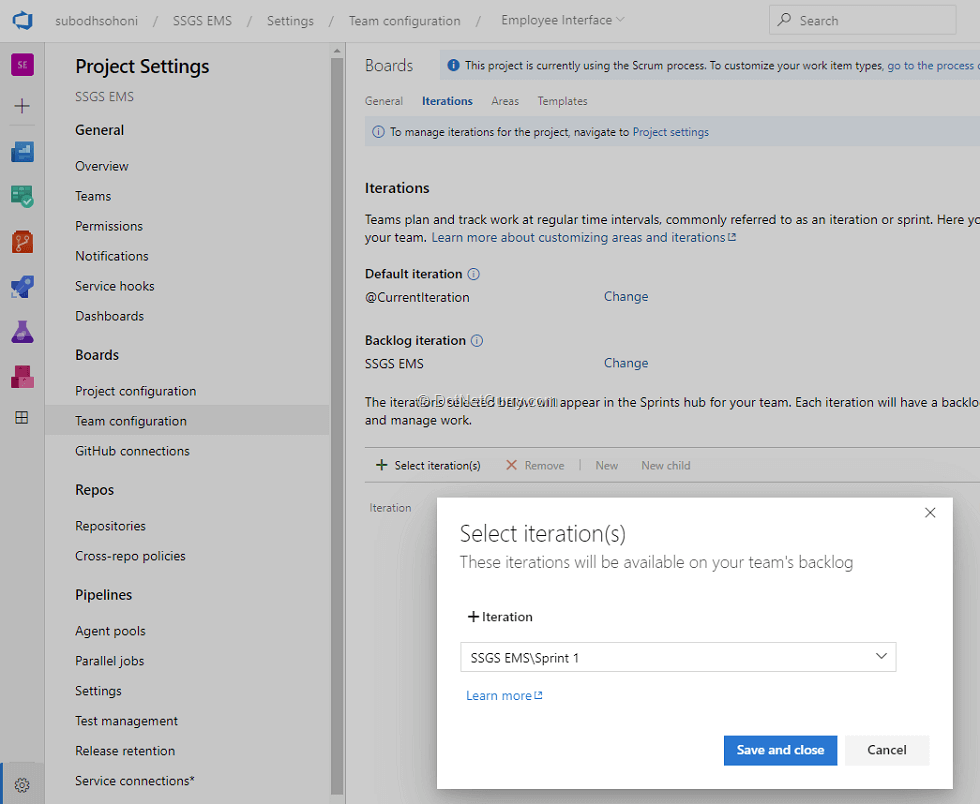
Figure 8: Set Sprints for the Team
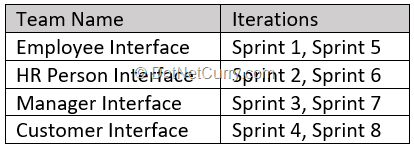
Add iterations to various teams as shown in the following table:
Create Product Backlog
We will now create Product Backlog. Open the page Boards – Backlog and ensure that the team that is selected by default is “SSGS EMS” (the default team of the project). Select the Feature from the dropdown that appears on the top-right corner of the page (Figure 9).
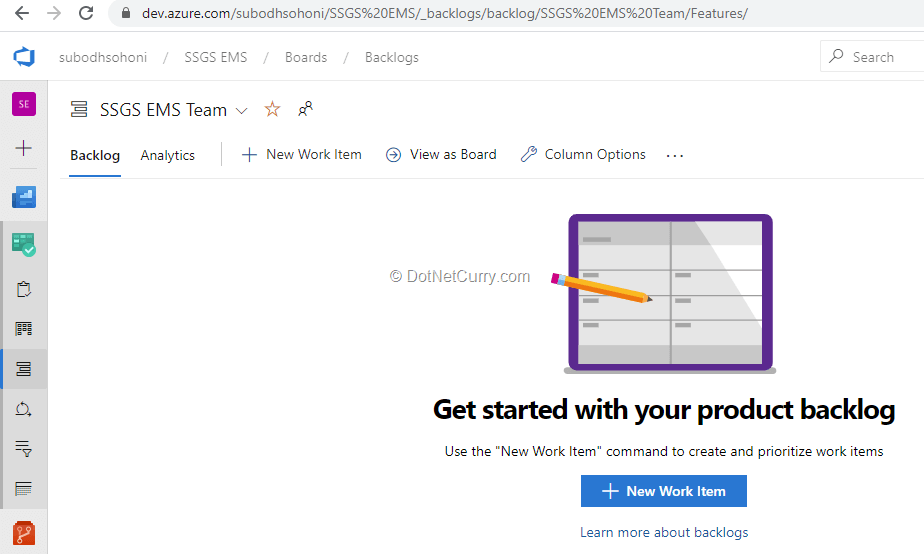
Figure 9: Product Backlog Creation
Let’s add features to the product backlog. Features are parent of PBIs. We will not assign features to any specific team although we will keep their names same as the team names.
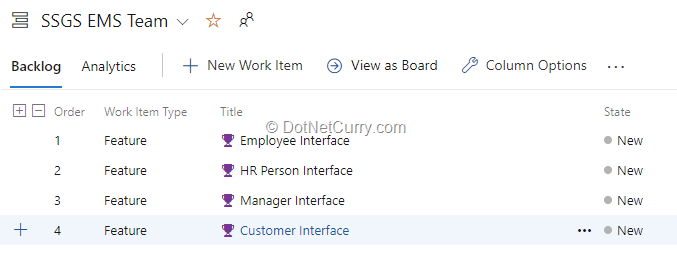
Figure 10: Created Features
In the next step, we will change the view to Backlog Items and add the setting to view Parents.
Once the Features are visible in the product backlog, we will add the PBIs. Each PBI is added as a child to the respective feature. A sample set of PBIs which is a complete product backlog at this moment can be seen in Figure 11:

Figure 11: Snapshot of Product Backlog
Set Area Path and Iteration Path to PBIs as per team
Now we will add PBIs to area path of the respective team.
For example, let’s first add the first PBI that is under the feature “HR Person Interface” to area path with the name “HR Person Interface”. As soon as we do that, it appears in the backlog of “HR Person Interface” as seen in Figure 12.
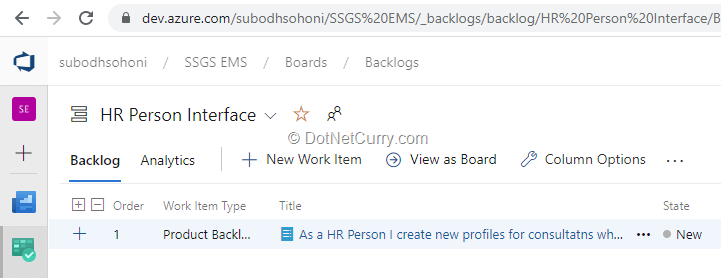
Figure 12: Team Backlog
A side effect of this step is it disappears from the Product Backlog of the Default Team. In most of the cases, we want that to appear in the Product Backlog.
For that we have to change a setting.
We will open the page Project Settings – Team Configuration – Areas – SSGS EMS (Default area of the project) and then click the Context Menu Button (…) as shown in Figure 13.
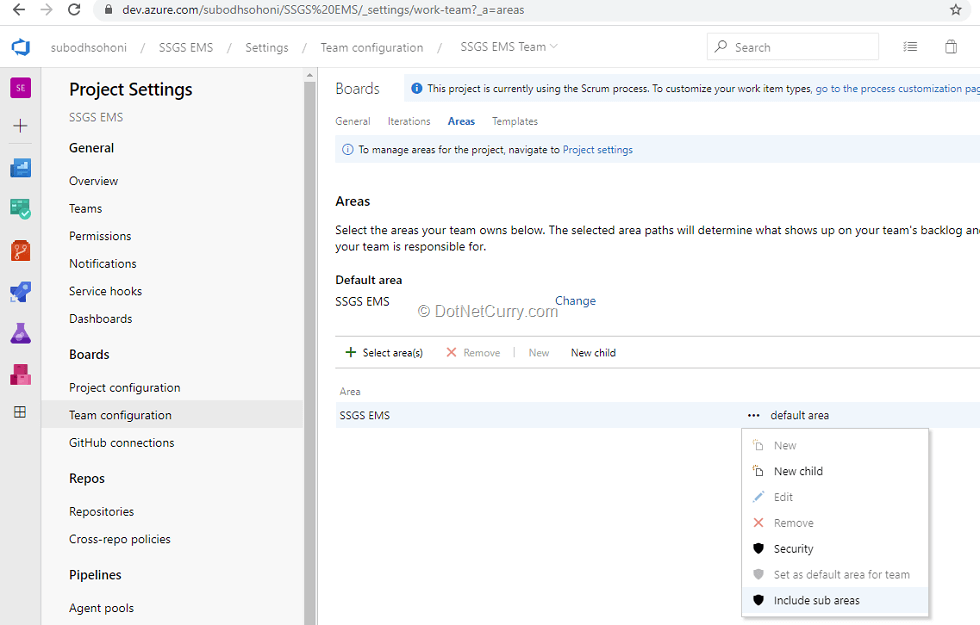
Figure 13: Include Sub Areas for Default Team
After accepting the Warning that appears, we will be able to see the PBIs that are under a different team backlog, under the product backlog too.
Now we can drag and drop the PBI under Sprint 2 which is the Current Sprint of the team “HR Person Interface”.
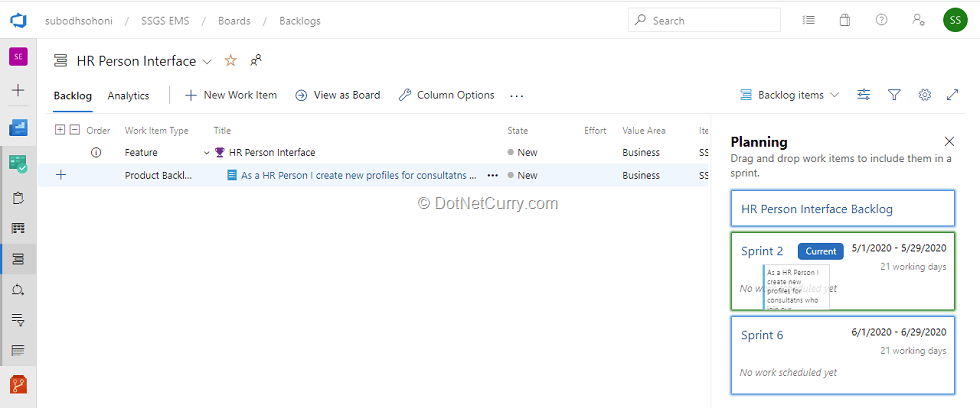
Figure 14: Creating the Sprint Backlog
PBIs that are put under Sprint 2 can be seen under the Task Board of Sprint 2.
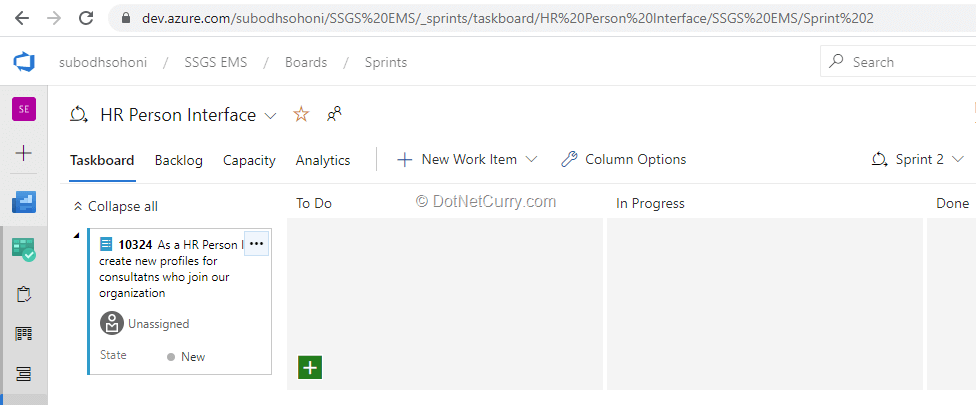
Figure 15: Task Board
Figure 16 shows the product backlog at default team level after distributing the various PBIs to team sprints.
As a pure agile practice, we should not put any PBIs in sprints that are not current sprint of the team. But I have gone against that practice for showing the feature of Release Plan View that is part of the Delivery Plan extension.
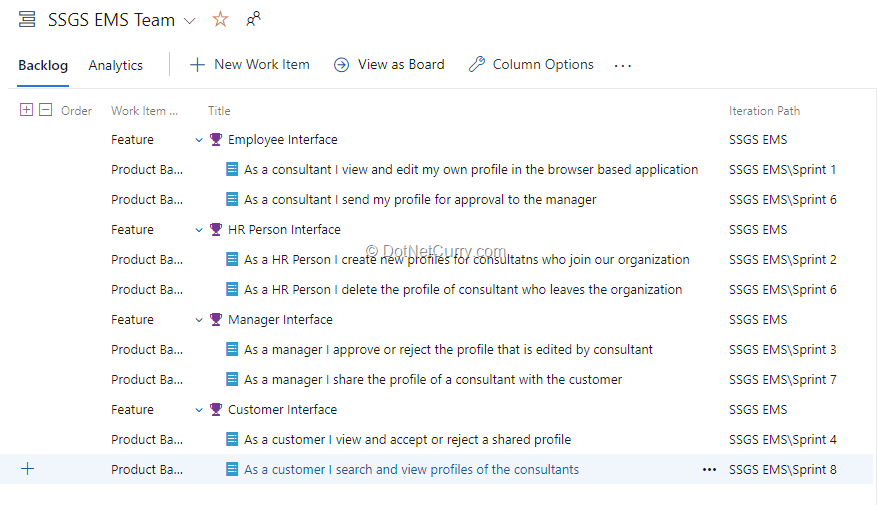
Figure 16: Product Backlog after Distribution
You may observe in Figure 16 that I have deliberately added one of the PBI that is a child of “Employee Interface” to Sprint 6 that is not a sprint of “Employee Interface”. It goes to show that it is possible to work across different teams in the same feature.
Working with Delivery Plan Extension
We can install the Delivery Plan extension from Visual Studio Marketplace. It is directly installed on our Azure DevOps account from the page https://marketplace.visualstudio.com/items?itemName=ms.vss-plans. This extension is created by Microsoft and is free of cost.
Once it is installed, we can view it under the Boards section of the team project as a node named “Plan”. On that page, we will create a new plan and call it as Release Plan.

Figure 17: Creating new Delivery Plan
We can add all our feature teams under this plan and set the backlog level to “Product Backlog Item”.
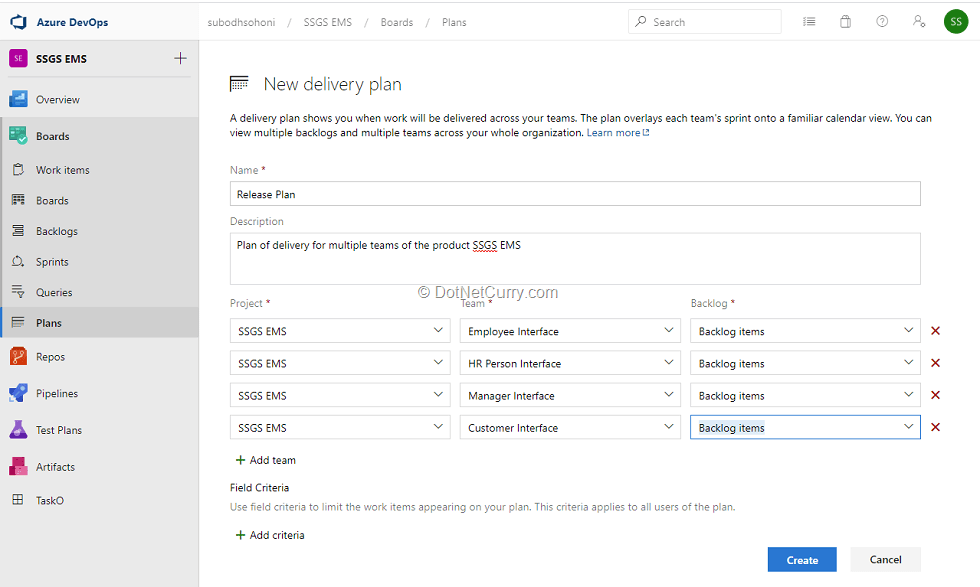
Figure 18: Add the Teams and Backlogs to the Delivery Plan
The plan is created when we click the Create button. In Figure 18, you may be able to see the plan that has some additional PBIs. We can add such PBIs directly from the plan if we find any important PBIs missing.
On the plan, we can set markers as milestones as seen in Figure 19. You may be able to see the marker for Release 1 which is when the first increment of the product is to be released.
We can also set the fields that appear on the cards of the PBIs. I have added the Parent ID of the PBI so that we may be able to trace the feature that the PBI is a child of.
Use of Delivery Plan extension can be made in the following ways:
1. View the planned iterations and PBIs under them for all teams on a single screen.
2. Check the status of dependencies that are being created by other teams.
3. Use it as a basis for periodic communication between teams.
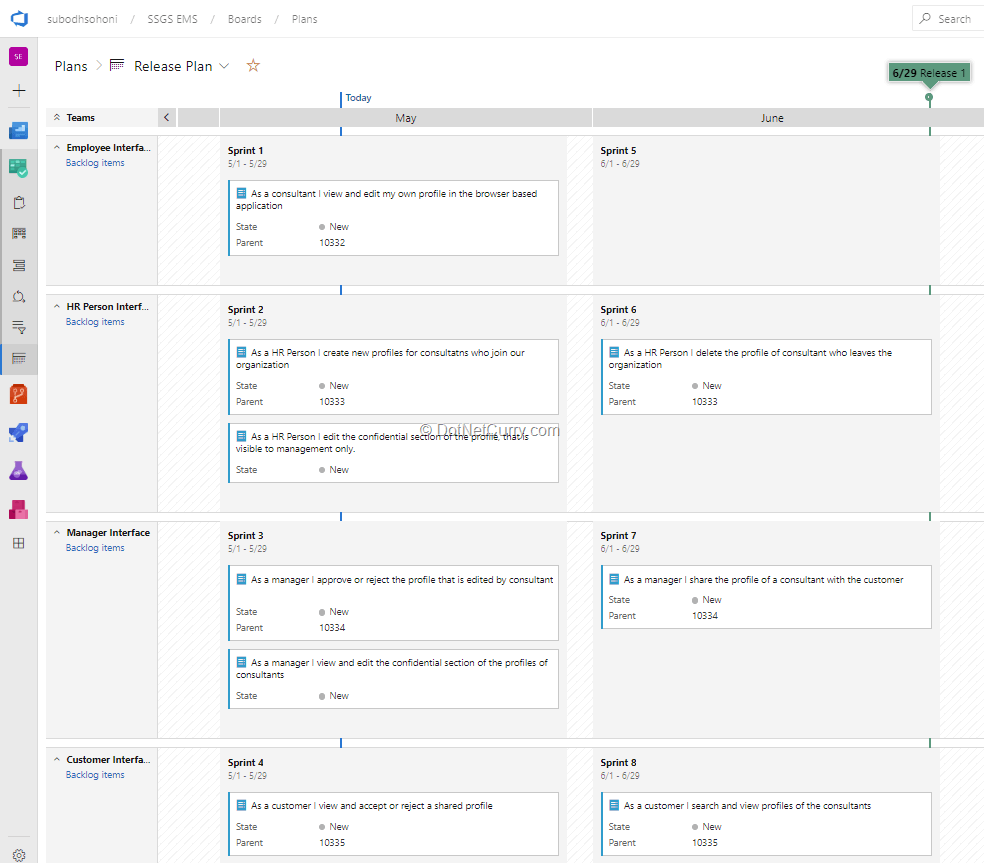
Figure 19: Viewing the Delivery Plan for the Entire Release
Conclusion
In Azure DevOps, it is possible to use the same tools provided for managing agile development of one team, to manage parts of a single product being developed by multiple teams.
In this article, we have seen how we can keep a common product backlog for all teams working on a single product but maintain a separate sprint backlog for each of them.
We also saw how to use the Delivery Plan extension for viewing the entire release consisting of multiple iterations and multiple teams.
This article was technically reviewed by Gouri Sohoni.
This article has been editorially reviewed by Suprotim Agarwal.
C# and .NET have been around for a very long time, but their constant growth means there’s always more to learn.
We at DotNetCurry are very excited to announce The Absolutely Awesome Book on C# and .NET. This is a 500 pages concise technical eBook available in PDF, ePub (iPad), and Mobi (Kindle).
Organized around concepts, this Book aims to provide a concise, yet solid foundation in C# and .NET, covering C# 6.0, C# 7.0 and .NET Core, with chapters on the latest .NET Core 3.0, .NET Standard and C# 8.0 (final release) too. Use these concepts to deepen your existing knowledge of C# and .NET, to have a solid grasp of the latest in C# and .NET OR to crack your next .NET Interview.
Click here to Explore the Table of Contents or Download Sample Chapters!
Was this article worth reading? Share it with fellow developers too. Thanks!

Subodh is a Trainer and consultant on Azure DevOps and Scrum. He has an experience of over 33 years in team management, training, consulting, sales, production, software development and deployment. He is an engineer from Pune University and has done his post-graduation from IIT, Madras. He is a Microsoft Most Valuable Professional (MVP) - Developer Technologies (Azure DevOps), Microsoft Certified Trainer (MCT), Microsoft Certified Azure DevOps Engineer Expert, Professional Scrum Developer and Professional Scrum Master (II). He has conducted more than 300 corporate trainings on Microsoft technologies in India, USA, Malaysia, Australia, New Zealand, Singapore, UAE, Philippines and Sri Lanka. He has also completed over 50 consulting assignments - some of which included entire Azure DevOps implementation for the organizations.
He has authored more than 85 tutorials on Azure DevOps, Scrum, TFS and VS ALM which are published on
www.dotnetcurry.com.Subodh is a regular speaker at Microsoft events including Partner Leadership Conclave.You can connect with him on
LinkedIn .