JavaScript took over web development and became the de-facto standard language of the web. Technologies like Flash or Silverlight succumbed to the unstoppable rise of JavaScript.
Since then, JavaScript has expanded into even further areas like mobile applications, servers and desktop applications.
This doesn’t mean JavaScript will stay unchallenged forever.
First announced in 2015, WebAssembly (aka WASM) is a new portable binary format designed to be efficient in size, as well as in parsing and execution time. It finally got its Minimum Viable Product (MVP) released and supported by all major modern browsers during 2017, with older browsers relegating to polyfills.
Since the WebAssembly standards are being developed by a W3C group with engineers from Google, Mozilla, Microsoft and Apple, it should come as no surprise that Microsoft saw it as an opportunity to explore running .NET in the browser.
This is where Blazor comes into play, the current Microsoft experiment that allows .NET Core to be run in the browser.
In the rest of the article, we will explore how Blazor brings these technologies together and the new possibilities it brings to the table.

Blazor - Introduction
A 5 minutes introduction to WebAssembly
WebAssembly is a portable binary format that has been designed to be:
- Compact and fast to parse/load so it can be efficiently transferred over the wire, loaded and executed by the browser
- Compatible with the existing web platform. Can run alongside JavaScript, allows calls to/from it, can get access to the Browser APIs and runs in the same secure sandbox as JavaScript code
- A compiler target for multiple languages with C/C++ as the initial focus, but more to follow
It is important to highlight that WebAssembly does not attempt to replace JavaScript. It has been designed to complement and integrate with JavaScript, as well as with other existing web technologies like HTML and CSS.
Higher level languages can be compiled to WebAssembly, which is then run by the browser in the same sandboxed environment as JavaScript code.
Let’s briefly see how WebAssembly execution compares to JavaScript, as the efficiency and performance gains are one of its more promising features.
- At a high level, JavaScript code gets executed by a runtime or VM where it goes through a process of parsing, compilation/optimization and finally the JIT (Just in time compiler) monitors and performs speculative optimizations of the binary code being executed.
- WebAssembly modules are compiled from higher level languages and have been already parsed and compiled/optimized so they need to go through a fast decoding phase (as the module is already in bytecode format close to machine code) before being injected into the final JIT stage of this pipeline.
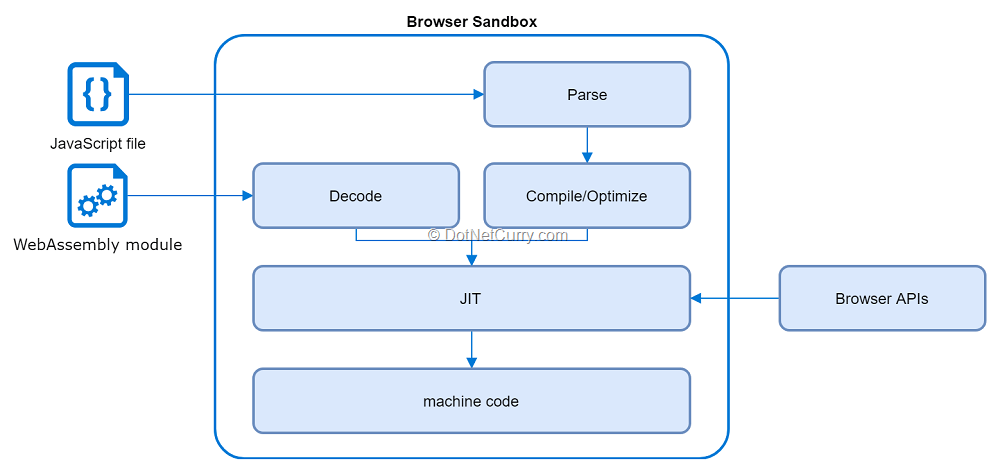
Figure 1, executing JavaScript code and WebAssembly modules in the browser
This is admittedly a very brief overview of WebAssembly since we still have lots more ground to cover in the article. For a more detailed discussion, apart from the official website you can check this article from Dave Glick, this series of articles from Lin Clark and this article from William Martin.
In a nutshell, WebAssembly promises a more efficient/faster way of running code in the browser, using any higher-level language that can target it for development, while being compatible with the existing web technologies.
As you can imagine, it is still early days for WebAssembly.
The documentation and tooling available are pretty rough, including areas as crucial as browser and development tools.
In terms of the features supported today, one of its main current limitations is the lack of support for direct access of the DOM and browser APIs, for which JavaScript interop is the only approach. It is early days and proposals to extend the current MVP are being studied.
Are you a .NET/C# developer looking for a resource covering New Technologies, in-depth Tutorials and Best Practices?
Well, you are in luck!
We at DotNetCurry release a digital magazine once every two months aimed at Developers, Architects and Technical Managers and cover ASP.NET Core, C#, Patterns, .NET Core, ASP.NET MVC, Azure, DevOps, ALM, TypeScript, Angular, React, and much more. Subscribe to this magazine for FREE and receive all previous, current and upcoming editions, right in your Inbox. No Gimmicks. No Spam Policy.
Executing .NET code in the browser with Mono
Once a new bytecode format for running code in the browser is available, one simple step to run .NET code in the browser would be using a runtime compiled to WebAssembly.
This is where Mono fits in the puzzle.
Mono is an open source implementation of the .NET Framework that provides .NET Standard 2.0 support and has recently been compiled to WebAssembly.
The way .NET in the browser currently works is by compiling the Mono runtime to WebAssembly which can then use Mono’s own IL interpreter to load and execute .NET assemblies. A JavaScript file bootstraps this runtime and downloads the dlls which are then provided to the runtime. This JavaScript file also provides access to any browser APIs required.
Overall this means your code gets compiled to .NET Standard dlls which are downloaded by the browser and interpreted by Mono’s runtime compiled to WebAssembly, which is the only part actually compiled to WebAssembly. This process is known as Interpreted Mode and it can be roughly depicted by the following diagram:
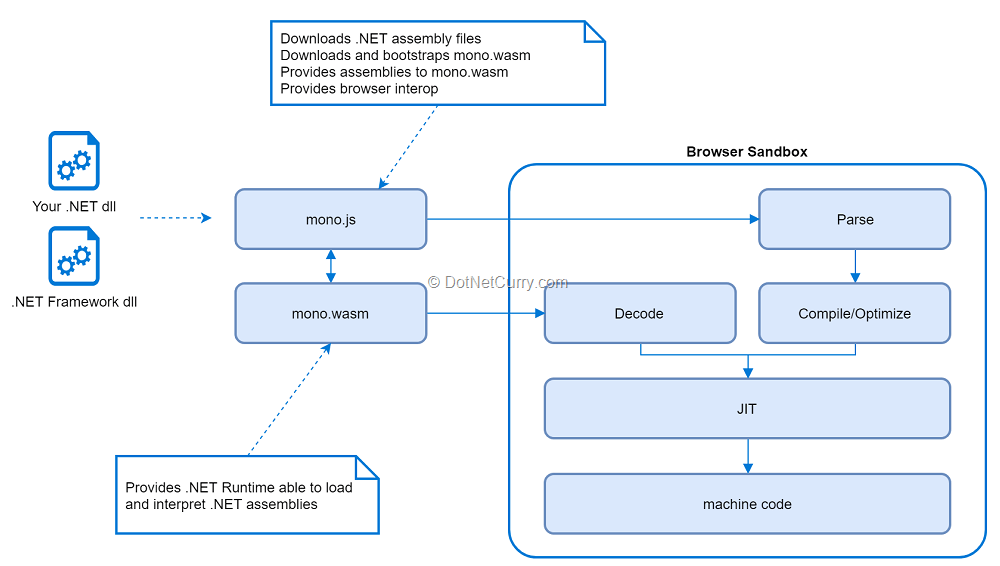
Figure 2, The WebAssembly Mono runtime in interpreted mode
As you can imagine the only bit optimized for WebAssembly is the runtime, which then needs to use its own IL interpreter to run the actual application assemblies. This is not very optimal, losing some of the benefits WebAssembly provides in terms of efficiency and performance.
However, the Mono team has been exploring an alternative Ahead of Time (AoT) mode where all of your .NET application code would get compiled to WebAssembly and executed with no previous interpretation of .NET assemblies needed.
You can find an interesting discussion of both modes in Steve Sanderson introduction to Blazor.
Blazor
The last piece of the puzzle is Blazor (Browser + Razor), which is a framework for building Single Page Applications (SPA) in .NET Core which uses the Mono WebAssembly runtime.
Blazor aims to provide typical SPA features like components, routing and data binding while leveraging the .NET Framework and its tooling.
It provides a familiar development experience for .NET developers who can now use the same language across the entire stack. At the same time, it is a true client framework which imposes no restrictions on server-side technologies and can be deployed from any server capable of serving static files.
The framework is based around Razor pages which are used to create Pages and Components. These support dynamic HTML, one-way and two-way data binding and DOM event handling.
It also provides a JavaScript interop service that can be used to either call JavaScript functions or receive a call from them.
The following diagram shows how these pieces fit together in the context of a Blazor project:
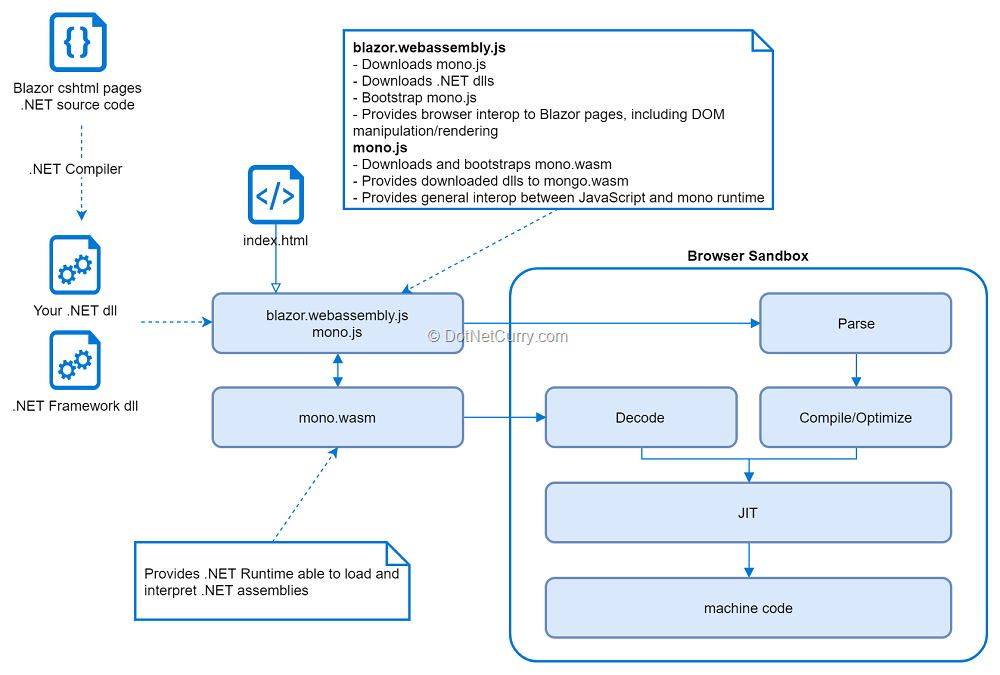
Figure 3, Blazor, Mono and WebAssembly
It is still very early days in the Blazor project, which is still officially considered an experiment by Microsoft. Whether it will become a supported product with enough adoption by the developers is yet to be seen.
However, it is certainly promising and while the setup seems complicated, the development experience is surprisingly smooth where all the pieces needed for running .NET code in the browser work out of the box.
It also presents a different philosophy from past failed attempts like Silverlight, in the sense it doesn’t need any specific plugins to be installed in the browsers. It is fully based on technologies provided by (modern) browsers.
Older browsers like IE can be supported using WebAssembly polyfills, although they are not a priority for the team and support is partial since Blazor itself has dependencies like Promise which are not polyfilled yet by the project templates.
If you want to read more, the official docs should be the first stop to read about Blazor. Then make sure you check out the Awesome Blazor site which contains a curated list of videos, articles, examples and much more.
Getting started with Blazor
In order to get started with Blazor you need to install a few prerequisites:
- Install Visual Studio 2017, version 15.7 or later.
- Install the .NET Core 2.1 SDK, version 2.1.300 or later
- Install the Blazor Language Services extension for VS
- Optionally install the templates for the dotnet new command by running dotnet new -i Microsoft.AspNetCore.Blazor.Templates::* in the console.
Pay close attention to the versions of Visual Studio and the .NET Core SDK since earlier versions won’t work!
You can find the version of the .NET Core SDK by running dotnet --version in the console (mine is 2.1.302 at the time of writing). The version of Visual Studio can be found in the Help > About Microsoft Visual Studio window.
Everything related to Blazor is still in flux, so I would also recommend you to check out the official docs in case things changed since I wrote the article.
You will also need a modern browser like Chrome, Firefox, Safari or Edge.
While support for older browsers is possible through polyfills, browsers like IE11 are not a priority for the team (and might never be) and don’t currently work. You can see some community-driven polyfills to address the issue but there is no guarantee these will keep working with newer versions.
Now that you have everything in place, open Visual Studio and create a new project selecting ASP.NET Core Web Application. A new window will open where you should see three different Blazor projects:
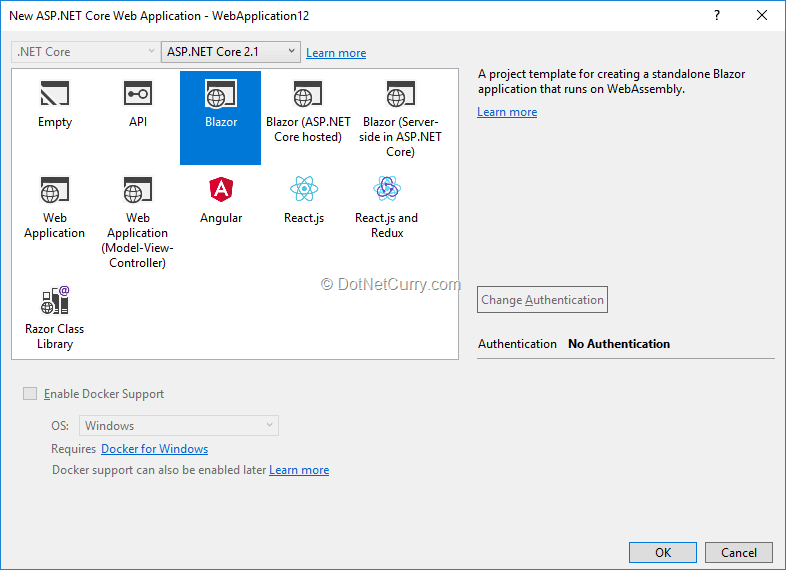
Figure 4, Blazor project templates
We will discuss these in more detail later, select the Blazor one and create the new project. Once the project is generated, you should see the following folder structure:
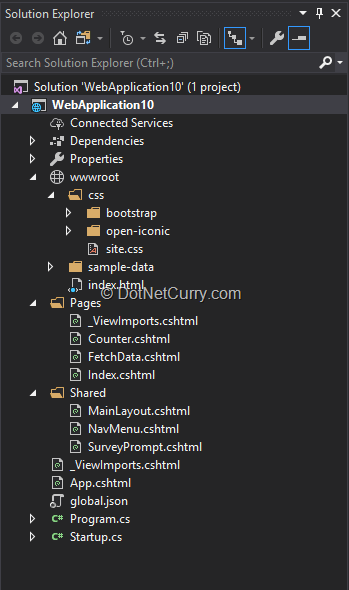
Figure 5, new Blazor project structure
You can now go ahead and run the project in the Debug mode. A browser window should appear, display a Loading message for about a second and then your first Blazor app should appear:

Figure 6, your first Blazor application
Let’s see if we can understand how Blazor is using Mono and WebAssembly to run this project.
Open the index.html file of your project and you will see it is surprisingly simple.
The header loads the styles while the body contains an <app> element where the application will later be mounted, plus a script reference for blazor.webassembly.js which is the one starting the bootstrap process of the app in the browser.
<!DOCTYPE html>
<html>
<head>
    <meta charset="utf-8" />
    <meta name="viewport" content="width=device-width">
    <title>WebApplication10</title>
    <base href="/" />
    <link href="css/bootstrap/bootstrap.min.css" rel="stylesheet" />
    <link href="css/site.css" rel="stylesheet" />
</head>
<body>
    <app>Loading...</app>

    <script src="_framework/blazor.webassembly.js"></script>
</body>
</html>
The script blazor.webassembly.js is quite important as it is the one in charge of starting the application, including downloading and starting the Mono WebAssembly runtime. If you open the network tab of your browser, you will see the following sequence:
- The blazor.webassembly.js is downloaded
- The blazor.boot.json is downloaded by blazor.webassembly.js
- The mono.js script is downloaded by blazor.webassembly.js
- The mono.wasm WebAssembly module is downloaded by mono.js
- All the dlls needed for the project are downloaded by blazor.webassembly.js
The information contained in blazor.boot.json is generated at compile time and basically describes the assemblies needed by your application, your main assembly and the entrypoint function:
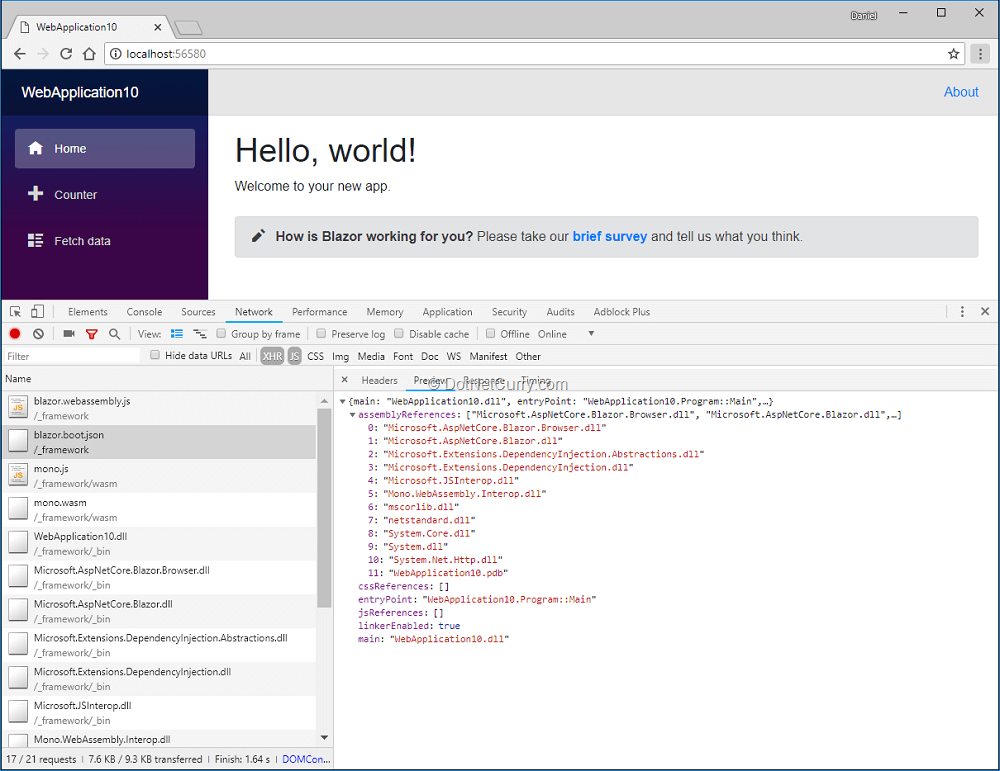
Figure 7, Bootstrap process of the application
Once everything is downloaded, the Mono runtime is started with the given assemblies and the entrypoint function is invoked:
- The entrypoint is the Main function of the Program class, which simply starts executing the Blazor framework.
- The Blazor framework, which is now being executed in the browser by the Mono runtime, will take over. Blazor will then render the root component inside the <app> element. The root component is configured in the Startup class and by default will be the App.cshml component.
- The root component simply includes a <Router> Blazor component which starts the client-side routing. The Blazor page matching the current route will be rendered, which will be the Index.cshtml page for the root URL.
This whole process comes at a cost and it currently takes about 1.4 seconds before you see the application rendered.
If you profile the app, you will notice that about 300ms from the start the mono.wasm is downloaded (which is about 700Kb gzipped). It then takes another 700ms for it to be processed before the download process of all the required assemblies begins, followed by the Mono runtime starting the application. In about 1.4 seconds, you will see the first paint of the application:
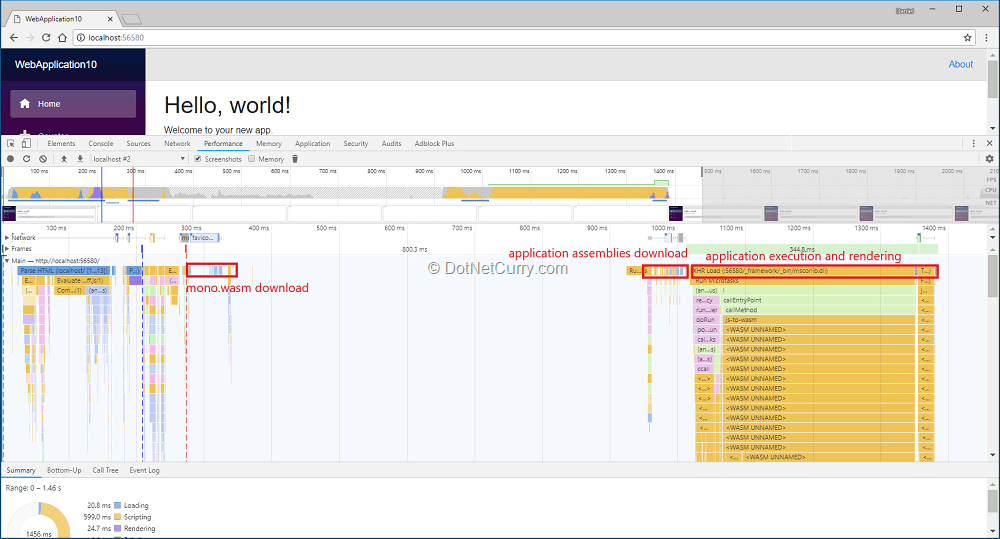
Figure 8, Monitoring application start
We also need to reinforce the idea that currently the only WebAssembly module is the Mono runtime.
- Every other assembly needed by your application is compiled as a regular .NET Standard 2.0 dll, downloaded by the browser and interpreted by the Mono runtime’s own IL interpreter.
- This means your assemblies won’t be compiled to WebAssembly and it is up to the runtime’s IL interpreter to do a good job at executing assemblies in WebAssembly (it currently doesn’t).
Remember this is the current mode of how things work, but an alternate Ahead of Time mode is being explored where the assemblies would also be compiled to WebAssembly and promises much better performance.
There is another performance problem when it comes to updating the DOM so Blazor can render your app and any updates that come after:
- Since WebAssembly code cannot directly access the DOM, for Blazor to render anything and update the current DOM, it needs to go through the interop bridge provided by blazor.webassembly.js.
- Blazor .NET code will try to figure out the DOM elements that need to be updated which are then passed to blazor.webassembly.js for them to be rendered.
This process is better explained in the Learning Blazor website, but together with the issue described above, remains one of the current major performance bottlenecks as you end up relying on JavaScript code for any rendering.
There are proposals for WebAssembly to gain better access to the DOM but it will take some time before they realize.
A tour of Blazor functionality
In this section, we will take a brief look at some of the functionality you can find today in Blazor, much of which will appear familiar if you ever worked with Razor in ASP.NET.
You can read through the official docs for a more detailed (and possibly up to date given the experimental and fast paced nature of Blazor) overview of the features. The Learn Blazor website is also worth a visit, as well as the Awesome Blazor curated listing.
Pages and components
Blazor leverages the Razor templating engine extensively, which means if you are already familiar with it from writing ASP.NET applications, you will have an easier time writing Blazor pages and components.
- Note that the directives available vary with respect to the ones in an ASP.NET Core application (for example the @model directive doesn’t make sense here and there is no concept of “Razor pages”).
- For a full list of the Razor directives and features supported, check out the official docs.
Razor syntax
Let’s start by taking a look at the simplest of the examples, the Index.cshtml page located inside the Pages folder:
@page "/"
<h1>Hello, world!</h1>
Welcome to your new app.
<SurveyPrompt Title="How is Blazor working for you?" />
The Razor syntax should be familiar, with its mixture of HTML, directives like @page and custom components like SurveyPrompt.
- The @page enables client-side routing for the page, associating the route “/” with this page.
- The SurveyPrompt component is another Blazor component defined inside the Shared folder. From the Index page we are providing a value for its Title property
So, what does the SurveyPrompt component looks like? If you open the SurveyPrompt.cshtml file you will see:
<div class="alert alert-secondary mt-4" role="alert">
    <span class="oi oi-pencil mr-2" aria-hidden="true" />
    <strong>@Title</strong>
    …
</div>
@functions {
    [Parameter]
    string Title { get; set; }
}
It is similar to the Index page except that it contains the simplest of examples on how the pages/components can include logic written C#.
- The @functions directive allows you to define the logic of the component, where in this case we are just declaring a parameter named Title by just adding a property of type String with that name. This is the parameter provided from the Index page.
- The template section shows how the parameter can be used as part of the HTML that will be rendered for the component, using @Title. This is nothing but standard Razor syntax, where @ symbol transitions from HTML into C# code and implies the expression that follows should be evaluated at runtime, converted to a string and inserted into the resulting HTML.
Reactivity
One of the main differences when working with Blazor is that you are now writing a client-side SPA application, which runs in the browser and should react and re-render its components whenever the user interacts with it.
This is different from server-side Razor, which renders an HTML page for a given request, and is done as soon as the HTML page is ready and sent to the browser.
What this means is that your pages and components are now reactive.
This is a concept familiar to anyone working with client-side frameworks like Angular, React or Vue and can be easily illustrated with an example.
Let’s update the Index page so it includes an input for the user to enter his/her name, which will then be used to update the Title property provided to the SurveyPrompt component:
@page "/"
<h1>Hello, world!</h1>
<p>Welcome to your new app @Name.</p>
<input bind="@Name" type="text" class="form-control" placeholder="Name" />
<SurveyPrompt Title="@Title" />
@functions{
    public String Name { get; set; }
    public String Title => $"How is Blazor working for you, {Name}?";
}
When you run the updated project (you will need to restart it since it does not automatically do so when the code changes), you should see the following updated Index page. Notice how the name you enter is used both for the welcome message in the Index page and the Title of the SurveyPrompt component:
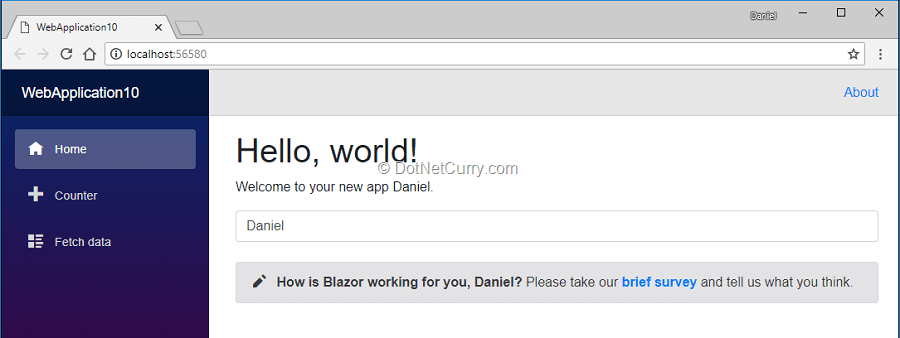
Figure 9, reactivity and data binding
If you update the value of the input, both the Index page and the SurveyPrompt will be re-rendered, updating the DOM to reflect the changes.
And not only that, it will update only the DOM elements that have been affected, since it knows that only the <p> of the Index page and the <strong> element of the SurveyPrompt component were affected by the change to the Name value.
As you can see, the reactivity means your components are instantiated and alive while they are part of the current page, and they will react to DOM events and data changes accordingly.
You can tap into this lifecycle of a component by implementing any of the lifecycle methods. This will be called by Blazor at specific points in the life of a component, for example let’s update the SurveyPrompt component so it renders a list with an entry for each event:
<div class="alert alert-secondary mt-4" role="alert">
    …
</div>
<ul>
@foreach (var evt in LifecycleEvents) {
    <li>@evt</li>
}
</ul>
@functions {
    [Parameter]
    string Title { get; set; }
    List<string> LifecycleEvents { get; set; } = new List<string>();
    protected override void OnInit() =>
        LifecycleEvents.Add("OnInit");
    protected override void OnAfterRender() =>
        LifecycleEvents.Add("OnAfterRender");
}
Now run the application and change the Name using the input. Notice how the SurveyPrompt component was initialized once but rendered every time the Name changed:
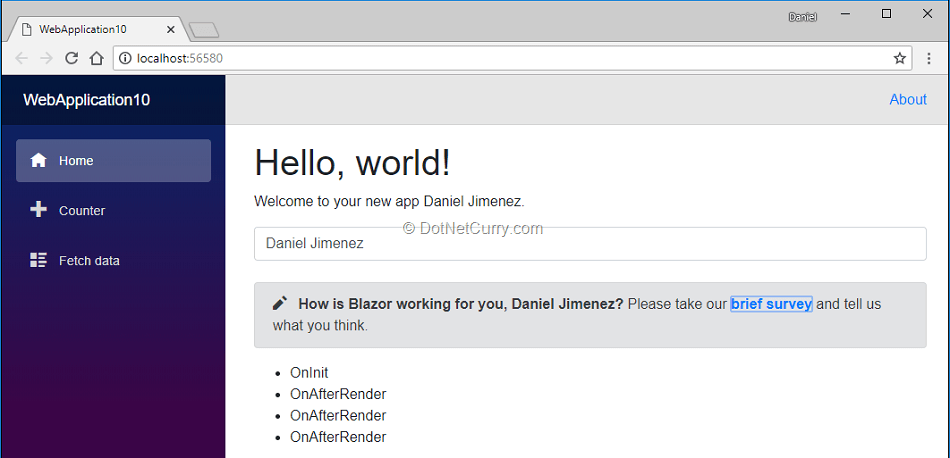
Figure 10, Some of the lifecycle events of a component
For a more detailed discussion of the lifecycle methods available see the official docs.
Data binding and event handling
We have already seen an example of how to bind a C# property to an attribute of a DOM element, however it might have gone unnoticed. When we added the input to the Index page using the bind attribute we were in fact adding 2-way data binding between our Name property and the value property of the input DOM element.
Under the hood the bind attribute is setting one-way binding between the C# property and the DOM property, plus an event handler for the DOM event so the C# property gets updated too.
Let’s start by seeing how you can bind to an event of any DOM element using the on{eventName} attribute. All you have to do is set the attribute to a method with the right parameters (or none if you don’t need to use them). Replace your previous changes to the Index.cshtml with:
<input value="@Name"
       onchange="@OnChange"
       oninput="@OnInput"
       onfocus="@OnFocus"
       onblur="@OnBlur"
       onclick="@(() => DOMEvents.Add("on click. Inline lambdas are possible too!"))"/>
<ul>
@foreach (var evt in DOMEvents)
{
    <li>@evt</li>
}
</ul>
@functions{
    public String Name { get; set; }
    List<string> DOMEvents { get; set; } = new List<string>();

    void OnChange(UIChangeEventArgs e) => DOMEvents.Add($"on change: {e.Value}");
    // Current Blazor issue prevents the updated input value
    // to be sent in the input event: https://github.com/aspnet/Blazor/issues/821
    void OnInput(UIEventArgs e) => DOMEvents.Add($"on input");
    void OnFocus() => DOMEvents.Add("on focus");
    void OnBlur() => DOMEvents.Add("on blur");
}
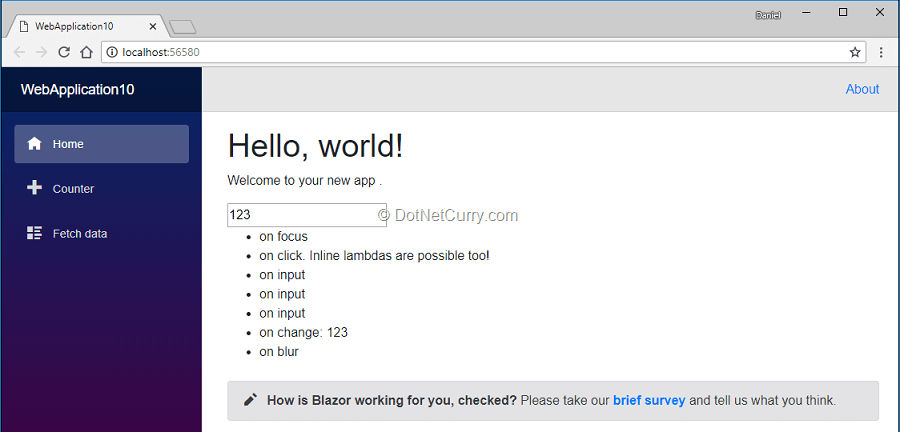
Figure 11, Data binding and event handling
As the example shows, you can listen to any DOM event using the on{eventname} attribute and assigning to it a component function with the required signature. Feel free to study the Counter.cshtml page in the project template which shows another event handling example.
Let’s move onto data binding next.
By now it should be clear that you can perform one-way data binding by simply setting any valid DOM property to a C# expression. For example:
- Set the value property of a text input element with <input type="text" value="@MyValue" /> where MyValue is a property of your page/component of type string.
- Set the checked property of a checkbox element with <input type="checkbox" checked="@MyValue" />, where MyValue is a property of your page/component of type bool.
However, this only gives us one-way data binding from C# to the DOM. If the value of the C# property changes, the property of the DOM element will be updated but not the other way around.
This might be fine for setting DOM properties like disabled, readonly or class, but in many cases and particularly with inputs, you will need two-way data binding with DOM properties like value or checked.
This is what the bind attribute achieves, by automatically setting one-way binding from C# to DOM plus an event handler to update from DOM to C#. So, the bind directive used here:
<input bind="Name" type="text" class="form-control" placeholder="Name" />
...is the same as manually setting the one-way binding with the input’s value property and listening to its change event to update:
@using Microsoft.AspNetCore.Blazor;
<input value="@Name"
       onchange="@((UIChangeEventArgs e) => Name = (string)e.Value)" />
In its more general form, you specify both the DOM property and event you want to use:
<input bind-value-onchange="@Name" type="text" />
<input bind-checked-onchange="@MyValue" type="checkbox" />
But you can simply bind to a C# property and let the attribute figure out both the DOM property and event:
<input bind="@Name" type="text" />
<input bind="@MyValue" type="checkbox" />
Before we move on, do you remember the JavaScript library blazor.webassembly.js? That library plays a crucial role in making event handling possible.
The DOM events need to be handled by JavaScript code part of that library (since WebAssembly doesn’t have direct access to the DOM) which will in turn call a method in the .NET code of Blazor that will finally dispatch the event to your component.
You can see this in the Blazor source code of its JavaScript library which invokes a .NET method using the interop method DotNet.invokeMethodAsync (more on this later):
return DotNet.invokeMethodAsync(
  'Microsoft.AspNetCore.Blazor.Browser',
  'DispatchEvent',
  eventDescriptor,
  JSON.stringify(eventArgs.data));
This means there is another penalty hit in handling events when compared to JavaScript frameworks which can directly interact with the DOM!
Structuring component’s code
So far, we have only seen components whose code is declared inline, with its code inside a @functions directive. This isn’t the only option and you can extract the code for a component to its own class using the @inherits attribute.
Let’s update the Counter.cshtml page so we move its code to a separate file.
Add a new class CounterBase into a file CounterBase.cs file next to the page. Update the new class so it from BlazorComponent (you will need to use the namespace Microsoft.AspNetCore.Blazor.Components)and then move the code from the @functions directive into the new class. You will need to make elements protected so they can be accessed from the page:
public class CounterBase: BlazorComponent
{
    protected int currentCount = 0;
    protected void IncrementCount()
    {
        currentCount++;
    }
}
Next remove the @functions directive from the page and include an @inherits CounterBase directive. The page should end up looking like:
@page "/counter"
@inherits CounterBase

<h1>Counter</h1>
<p>Current count: @currentCount</p>
<button class="btn btn-primary" onclick="@IncrementCount">Click me</button>
There are a couple of small caveats with this approach.
The first one is that we need to use a different class name than the page, since the page will always be compiled into its own class which will inherit the one we create with the logic. The second is that since we rely on inheritance, we need to make members public/protected or they won’t be accessible from the page.
However, it is possible to avoid having a cshtml file and rely on the POCO class which will then contain regular C# code to render the template. This could be an interesting approach, particularly when the HTML of the template will be simple or highly dynamic. You can even mix and match this approach with parts of the template generated in the C# code.
Read more about it in the Learn Blazor website.
Dependency injection
The logic of your components and pages will not always be so simple that it can be self-contained.
Often you will need to use other classes that provide access to functionality your components need. A very typical example is making HTTP requests, for which you need to use the HttpClient class.
Since Blazor is built on top of .NET Core, it comes with dependency injection support out-of-the-box. If you are familiar with dependency injection in ASP.NET Core, the support here is very similar to the default container of ASP.NET Core.
You register services in the ConfigureServices method of the Startup class, this will make them available within the framework and injected into any Blazor component using the @inject directive. The default project template shows an example of this approach in the FetchData.cshtml page which gets an instance of the HttpClient injected so it can send an HTTP request. (This is a framework service which is always available so you don’t need to register it)
@page "/fetchdata"
@inject HttpClient Http

<h1>Weather forecast</h1>
<p>This component demonstrates fetching data from the server.</p>
…

@functions {
    WeatherForecast[] forecasts;

    protected override async Task OnInitAsync()
    {
        forecasts = await Http.GetJsonAsync<WeatherForecast[]>("sample-data/weather.json");
    }

    class WeatherForecast
    {
        public DateTime Date { get; set; }
        public int TemperatureC { get; set; }
        public int TemperatureF { get; set; }
        public string Summary { get; set; }
    }
}
If you use the inheritance approach to move your logic into a class inheriting from BlazorComponent, you will need to use property injection (remember the class generated from the cshtml file actually inherits from it, so it won’t know how to pass any constructor properties!):
public class MyComponentBase: BlazorComponent
{
    [Inject]
    protected HttpClient client { get; set; }

    …
}
Component libraries
Blazor being a client-side framework for SPA applications, it is no wonder developers would like to create libraries of reusable components. While the templates available from Visual Studio don’t show this, there is a template for the dotnet new CLI that allows you to create component libraries which can then be referenced from other projects.
Simply run dotnet new -i Microsoft.AspNetCore.Blazor.Templates::* in the console and you should now see a new template dotnet new blazorlib which allows you to create a new project with a Blazor library of components.
There is a great introduction to creating component libraries in this article from Chris Sainty. And if you take a look at the Awesome Blazor curated list of components, you will see the community has started to provide both specific components and general libraries providing Bootstrap4 or Material Design components!
Client routing
Blazor provides simple client-side routing. Your root App.cshtml component will include a <Router> Blazor component which will be in charge of listening to URL changes and rendering the page that matches the new URL.
- Each page is associated with one (or multiple) URL(s) through the usage of the @page directive. For example, the Index page uses @page "/" while the Counter page uses @page "/counter".
- Behind the scenes, the generated classes for those cshtml files just include a [Route] attribute as in [Route("/counter")].
The route segment associated with each route can include route parameters, which you can later access in the component code.
It is worth mentioning that currently there is no support for optional route parameters, so you would need to either use two @page directives or two [Route] attributes, one with the parameter and the other one without:
@page "/counter"
@page "/counter/{Step:int}"

<h1>Counter</h1>
<p>Current count: @currentCount</p>

<button class="btn btn-primary" onclick="@IncrementCount">Click me</button>

@functions{
    int currentCount = 0;
    [Parameter]
    int Step { get; set; } = 1;
    void IncrementCount() => currentCount += Step;
}
One caveat with routing is that it uses normal URLs and there is no hashed mode.
That is, a @page "/counter" will be accessible at the /counter URL and there is no option to use #/counter.
While this is something desirable in most cases, it means that the server hosting the Blazor app should be configured to redirect all URLs that don’t match a static file to the index.html file, which will then bootstrap the application in the browser and will ultimately perform the navigation.
If you use the Blazor (ASP.NET Core Hosted) template, this is something taken care of by default, as the ASP.NET Core server includes middleware that handles this. The project also comes with a web.config to set things up in IIS which is how the non-hosted project template can be run in development with IIS Express.
However, if you plan on hosting the application yourself using a different server (which is totally possible since all the files are static files which will be downloaded by the browser), then you need to be aware of this caveat.
See the official docs for more information on hosting Blazor apps.
HTTP requests
The HttpClient class is available in the dependency injection container by default and is the recommended way of performing HTTP calls from Blazor components. You can see an example in the FetchData.cshtml page which we discussed briefly in the section about dependency injection.
@page "/fetchdata"
@inject HttpClient Http
<h1>Weather forecast</h1>
…
@functions {
    WeatherForecast[] forecasts;
    protected override async Task OnInitAsync()
    {
        forecasts = await Http.GetJsonAsync<WeatherForecast[]>("sample-data/weather.json");
    }
    class WeatherForecast { … }
}
You might be wondering about the JSON specific methods available in the HttpClient since those are not part of the standard HttpClient class.
- These are extension methods provided by Blazor, in order to make it easier dealing with requests sending/receiving JSON objects, which will happen very often when dealing with REST APIs from your client-side application.
- These extension methods use under the hood the SimpleJson library (which is embedded in the source code, rather than referenced as a Nuget package and had some changes applied) rather than JSON.Net which is the one used in ASP.NET Core applications.
You should also be aware of how HTTP requests are possible from Blazor.
- It is important to understand that even if we have .NET code running in the browser, not all the libraries will work since many will depend on APIs provided by the OS which won’t be available in the browser. An example would be using the PhysicalFileProvider class to try and access local files and folders.
- This also applies to the class available in .NET for networking. The reason why HttpClient works and is the recommended way of making HTTP requests from Blazor is that behind the scenes it has been configured so the actual request happens in JavaScript using the browser fetch API. Read more about this on the Learn Blazor website.
Both points might introduce further friction and gotchas compared to ASP.NET Core so you might want to stay wary.
JavaScript interop
When working on Blazor applications there will be times where you will need to integrate with existing browser APIs and/or JavaScript libraries, particularly in these early days while functionality still needs to be added to Blazor and WebAssembly.
Blazor provides Interop functionality to call JavaScript from C# and vice versa. Calling a JavaScript method from C# is simple, as long as the method is accessible from the window object (that is, it needs to be accessible as window.some.method)
- Add the JavaScript function into an existing JS file part of the project or a new <script> block in the index.html:
window.MyModule = window.MyModule || {};
window.MyModule.alert = (message) => {
    return alert(message);
};
- In the component, use the InvokeAsync method of the IJSRuntime interface, passing the name of the JavaScript function and any arguments:
@page "/interop"

<h1>Interop</h1>
<input bind="MessageToAlert" class="form-control" />
<button class="btn btn-primary mt-2" onclick="@ShowAlert">Show alert</button>

@functions{
    string MessageToAlert { get; set; }
    Task<object> ShowAlert()
    {
        return JSRuntime.Current.InvokeAsync<object>("MyModule.alert", this.MessageToAlert);

    }
}
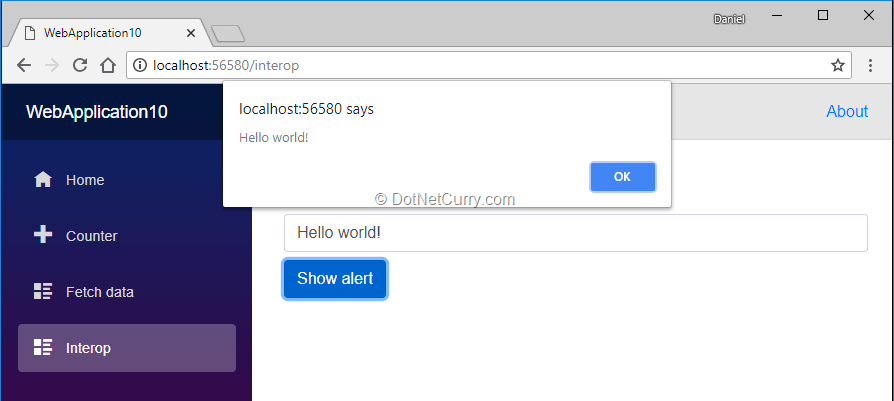
Figure 12, calling a Javascript method from .NET
Calling C# from JavaScript is equally simple. The only caveat to consider is whether you want to call a static method or an instance method, since in the latter case you will first need to pass the instance reference to JavaScript.
You can read more about it in the official docs. You can also browse the existing components in the Awesome Blazor listing, since many deal with JavaScript interop.
Blazor - Open questions and limitations
As impressive as the work put into Blazor and its current results are, this is still considered an experiment by Microsoft and it’s hard to know what its future will be.
In this section I will briefly discuss some of the limitations I have found which might or might not be addressed at some point (or might not be that important to you!).
Performance
The first one is the performance.
The promise of efficient code execution in the browser at close to native-code like speed is seriously affected by two issues:
- Only the Mono runtime is compiled to WebAssembly, with the rest of the .NET code relying on Mono’s own IL interpreter to be executed.
- Direct access to the DOM and browser API’s from WebAssembly is currently not possible which means the .NET code will find itself relying on JavaScript interop for rendering, event handling, HTTP requests and more.
You can read more about these issues and particularly the first one in several GitHub issues for the Blazor repo like this one and this one.
The first issue is expected to be improved once the AoT mode of the Mono runtime becomes a reality, but the second depends on the WebAssembly standard moving forward and being implemented by major browsers.
It is also not possible right now to compile your application into a combined bundle, instead the assemblies are downloaded individually and loaded into the Mono runtime. While the sizes of the assemblies seem small and they can be cached, the number of requests made on application startup is significant, which can be a problem with bad connections.
It seems to me that the WebAssembly promises are negated in part by these issues. And if the dependency on JavaScript interop for most of the tasks that need some sort of IO doesn’t change, you might as well use a JavaScript framework unless you have some CPU intensive code to run on the client.
At the same time, I understand that for many, avoiding JavaScript will be a reason enough to use Blazor, provided it gets on par with major JS frameworks in terms of performance and functionality.
Tooling
This one is obviously caused by being so early days for Blazor. For example, live reload doesn’t seem to work with the simplest of the templates, so you need to restart the project after making changes, unless I am missing something very obvious.
Debugging is also challenging, although a debugger extension for Chrome just got its first release with limited functionality. Since there are quite a few pieces involved between JavaScript libraries, .NET code and WebAssembly, and it is not always obvious how things work, good debugging support will make a huge difference.
Components and JavaScript tooling
Since WebAssembly and Blazor do not intend to replace existing web technologies but rather coexist with them, I would expect at some point better integration with existing tooling and libraries for web applications.
For example, there is no obvious way to create component style rules.
I have seen community attempts like Blazorous but I don’t see the framework itself providing a clear direction for you to use LESS/SASS/Stylus, CSS pre-processors, bundling, etc. It would be great if a component could declare a style block in a specific language and these were extracted and processed by a tool like webpack (or even integration with existing tooling like webpack) into a combined CSS bundle.
A similar point can be raised about JavaScript code for components with interop needs.
The one solution available right now would be a component library where your Blazor code, CSS and JS is encapsulated. However even in such a case, when you import several of those components from libraries, you might still want to process their CSS/JS files with modern tooling like webpack.
In general, there doesn’t seem to be a clean way to develop the JS/CSS part that will inevitably be needed for some of the components of your application. (at least for the foreseeable future until WASM gets better DOM support and libraries are ported to Blazor/WASM).
This can get even more annoying since it seems a non-trivial number of CSS/JavaScript libraries might be used by any given project (given the current WebAssembly and Blazor limitations), and with them comes all the modern JavaScript tooling.
You could always use tools like webpack to process all the assets in JS/CSS files outside Blazor components, but even that wouldn’t be such a trivial setup to achieve for production and development purposes, so examples and guidance would be much appreciated.
Server side Blazor
Just before we finish, let me briefly introduce an alternative way of running Blazor which was recently announced. It is now possible to run Blazor on the server and update the DOM and handle browser events via a thin JavaScript layer and a permanent SignalR connection.
This means you will be running your Blazor client code on the server together with the rest of your application code. Think about it, you can execute a framework in your server whose initial focus was to run .NET code in the client using WebAssembly!
This was made available with the release 0.5.0 of Blazor, and you should see an option Blazor (Server side in ASP.NET Core) when creating a new project:
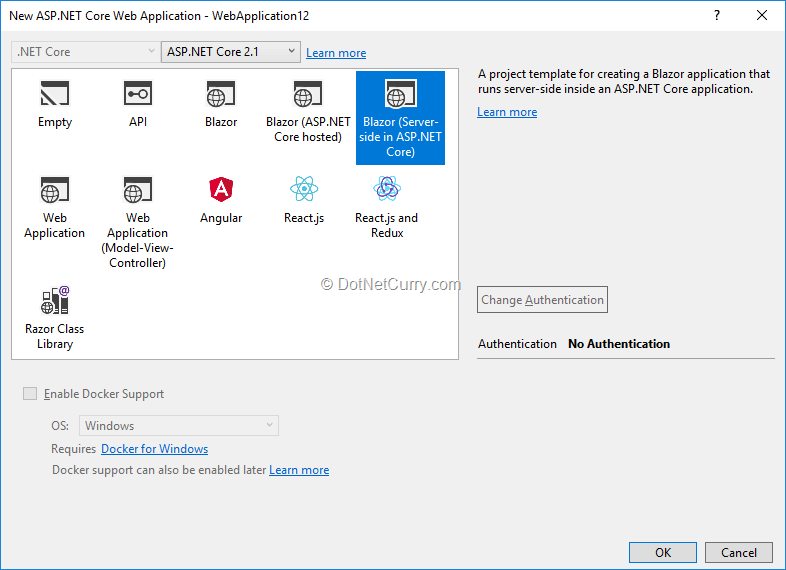
Figure 13, The server side Blazor template
If you create an application using this template, you will see that two different projects are added, a Blazor app and an ASP.NET Core server.
If you look at your index.html file you will see that blazor.server.js is included instead of blazor.webassembly.js. When your app starts, this file will establish a connection with the ASP.NET Core server, which will run the actual Blazor application (as well as the ASP.NET Core server) and any interaction with the browser and/or DOM will be propagated through a SignalR connection.
The same JavaScript functions that were used in the client side Blazor templates to update the DOM (since WebAssembly cannot access the DOM itself) are used here to render DOM changes which will be pushed through the SignalR connection.
When you inspect the network requests from the browser you will see it only needs to download the blazor.server.js script, the blazor.boot.json file and then establish a connection:
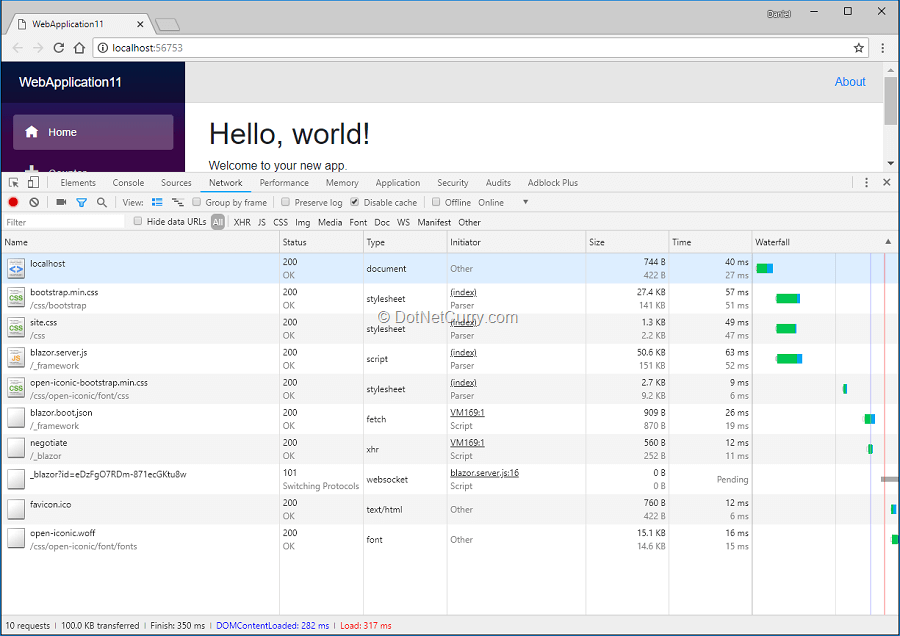
Figure 14, Faster bootstrap when using server side Blazor
This has some pros like the initial download and render of your app being really fast, immediate access to all the tooling for .NET like the debugger, or having no need for AJAX requests to fetch/update data.
Of course, it has downsides as well like every interaction with the browser requiring communication through the SignalR connection and concerns about how this model would scale with the number of concurrent users.
While the official docs contain a brief section describing the server side model , I have also found this article from Ankit Sharma quite interesting.
You can clearly see the experimental nature of the framework! I am sure we will keep seeing new ideas being implemented and some being dropped as the Blazor team gets feedback and WebAssembly/Mono keep evolving.
Conclusion
Blazor is impressive.
It leverages a number of technologies in smart ways in order to provide a SPA framework that can run .NET code in the browser.
Its design is also quite flexible, something that is shown by the fact that you can decide to run it on the server and simply keep a SignalR connection to a JavaScript layer that deals with the DOM.
However, the novelty of these technologies and its experimental nature also means it is very early days for it to be a serious option when starting your new application. Expect some serious limitations both in terms of functionality and the tooling available, but nonetheless what is available today is already impressive and works better than you might expect.
Whether Blazor and WebAssembly will be able to fulfill its promises is something we will find in time!
However, the pace at which the Blazor team and the community are pushing forward, is well worth staying tuned for.
This article was technically review by Damir Arh.
This article has been editorially reviewed by Suprotim Agarwal.
C# and .NET have been around for a very long time, but their constant growth means there’s always more to learn.
We at DotNetCurry are very excited to announce The Absolutely Awesome Book on C# and .NET. This is a 500 pages concise technical eBook available in PDF, ePub (iPad), and Mobi (Kindle).
Organized around concepts, this Book aims to provide a concise, yet solid foundation in C# and .NET, covering C# 6.0, C# 7.0 and .NET Core, with chapters on the latest .NET Core 3.0, .NET Standard and C# 8.0 (final release) too. Use these concepts to deepen your existing knowledge of C# and .NET, to have a solid grasp of the latest in C# and .NET OR to crack your next .NET Interview.
Click here to Explore the Table of Contents or Download Sample Chapters!
Was this article worth reading? Share it with fellow developers too. Thanks!
Daniel Jimenez Garciais a passionate software developer with 10+ years of experience who likes to share his knowledge and has been publishing articles since 2016. He started his career as a Microsoft developer focused mainly on .NET, C# and SQL Server. In the latter half of his career he worked on a broader set of technologies and platforms with a special interest for .NET Core, Node.js, Vue, Python, Docker and Kubernetes. You can
check out his repos.