The jQuery UI DatePicker is probably the most widely-used widgets, yet the most under utilized. It comes with a huge number of configurable options and a range of utility functions that you can use to customize the widget the way you want.
The DatePicker has an easy to use interface for selecting date. It is tied to a simple text field which when focused on by clicking or by using tab key, presents an interactive calendar like interface to the user, allowing a date to be selected. If a date is chosen, the date is then inserted into the text field.
Create a new file ‘datepicker.html’ in a folder. Here’s how to write the HTML code and call the datepicker() method in the <script> tag.
<html>
<head>
    <title>DatePicker Example</title>
    <link href="../css/jquery-ui.css" rel="stylesheet" />
    <script src="../scripts/jquery-1.11.1.min.js"></script>
    <script src="../scripts/jquery-ui.min.js"></script>
    <script>
        $(function () {
            $("#datep").datepicker();
        });
    </script>
</head>
<body>
    <h3>Click to select a date :</h3>
    <input type="text" id="datep" />
</body>
</html>
Here we are using an <input> element with id=date and binding the datepicker() widget to this input text field. The datepicker will automatically be positioned below the input field when a user clicks it. The calendar will be hidden when the user clicks outside. If the user chooses a date, the date will then be displayed in the input field:
Live Demo: http://www.jquerycookbook.com/demos/S9-General/67-datepicker.html
jQuery UI Datepicker offer a large set of options and methods. For a full list, see: http://api.jqueryui.com/datepicker/
Note: Do not use the HTML5 type="date" attribute in your <input> statements when using jQuery UI DatePicker as it causes conflicts
Let us see some practical examples of using the datepicker widget.
1 - Disable the Selection of some days
A typical requirement is to disable the selection of some days in the date picker. To accomplish this, we can use the beforeShowDay callback function which is called for each day in the date picker, before it is displayed. This function takes a date as a parameter, and returns values to indicate if the date is selectable; the class name to add to the date's cell, and an optional pop-up tooltip for this date.
Create a new file ’1-datepicker.html’. Let’s add some styling to the disabled day that sets the border to red
<style type="text/css">
    td.redday, table.ui-datepicker-calendar tbody td.redday a {
      background: none !important;
      background-color : red !important;
      background-image : none !important;
      color: White !important;
      font-weight: bold !important;
      font-size: 12pt;
    }
</style>
And the script where we will use the beforeShowDay callback to disable a day of our choice:
<script type="text/javascript">
    var disabledTool = new Date();
    disabledTool.setDate(disabledTool.getDate() - 2);
    disabledTool.setHours(0, 0, 0, 0);

    $(function () {
        $("#datepicker").datepicker({
            beforeShowDay: function (date) {
                var tooltipDate = "This date is DISABLED!!";
                if (date.getTime() == disabledTool.getTime()) {
                    return [false, 'redday', tooltipDate];
                } else {
                    return [true, '', ''];
                }
            }
        });
    });
</script>
Since the beforeShowDay function is called for every day in the date picker, we check to see if the date matches the date set in the disabledTool variable. If it does, we return three values: false to indicate date is not selectable, the css class name and the tooltip, as shown here:
return [false, 'redday', tooltipDate]
For all the dates that do not match, we are returning true which indicates the date is selectable, no css is to be applied and there are no tooltips.
return [true, '', '']
View the page in the browser and open the datepicker. This screenshot is taken on July 27th and in this example, we have set the day before yesterday as disabled, i.e. 25th of July, with a custom css class that sets the day border in red and with a tooltip that states “This date is DISABLED!!”
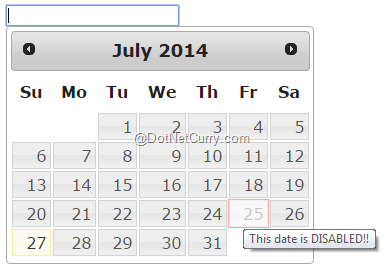
Live Demo: http://www.jquerycookbook.com/demos/S9-General/67.1-datepicker.html
2 - Disable the Selection of Weekends
Similar to the previous example, we can disable the weekend days using the beforeShowDay option by passing a shorthand function $.datepicker.noWeekends that automagically disables the week end days without any other code needed.
Create a new file ’2-datepicker.html’. Use the following code:
<script type="text/javascript">
    $(function () {
        $("#datepicker").datepicker({
            beforeShowDay: $.datepicker.noWeekends
        });
    });
</script>
View the page in the browser and you will observe that the weekends are disabled.
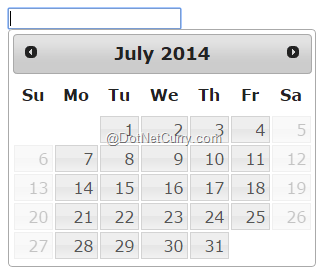
Live Demo: http://www.jquerycookbook.com/demos/S9-General/67.2-datepicker.html
3 - Display a Month-Year picker
If you want to display only the month/year selection, you can do so with a little hack:
Create a new file ’3-datepicker.html’. First use this CSS to hide the calendar display using display: none on .ui-datepicker-calendar element
<style type="text/css">
    .ui-datepicker-calendar {
        display: none;
    }
</style>
Now let’s see some code:
<script type="text/javascript">
    $(function() {
        $('#datepicker').datepicker( {
            changeMonth: true,
            changeYear: true,
            showButtonPanel: true,
            dateFormat: 'MM yy',
            onClose: function(dateText, inst) {
                var month = $("#ui-datepicker-div .ui-datepicker-month :selected").val();
                var year = $("#ui-datepicker-div .ui-datepicker-year :selected").val();
                $(this).datepicker('setDate', new Date(year, month, 1));
            }
        });
    });
</script>
We are setting the individual configurable options as follows:
- changeMonth: true to show the month change dropdown
- changeYear: true to show the year change dropdown
- showButtonPanel: true to shows a panel of buttons consisting of close and current links
- dateFormat: to parse and display date in the ‘MM yy’ format
In the onClose event, we get the current selected month and year and set the value in the input text field.
View the file in a browser and this is what you get:
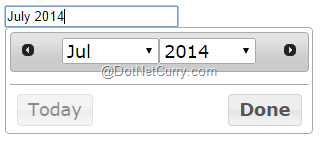
Live Demo: http://www.jquerycookbook.com/demos/S9-General/67.3-datepicker.html
4 - Display a Hidden DatePicker
A hidden datepicker can be useful in scenarios especially where the date picker on an HTML element can’t be bound. For example when we want to display a datepicker by clicking a radio button.
To achieve this requirement, we can setup a hidden date picker and then display it when the user clicks the radio button. In the onSelect event of the date picker, we can then set the date.
Create a new file ’4-datepicker.html’. Here’s some HTML that defines a bunch of radiobuttons and a datepicker
<body>
    <span>
        <input type="radio" id="radio1" name="radios" value="" />
        <label for="radio1">Today</label>
    </span>

    <span>
        <input type="radio" id="radio2" name="radios" value="" />
        <label for="radio2">1 Aug</label>
    </span>

    <span>
        <input type="text" id="customDatePicker" />
        <input type="radio" id="customStartDate" name="radios" value="" />
        <label for="customStartDate">Other</label>
    </span>
</body>
Use CSS to hide the datepicker when the page loads:
<style type="text/css">
    #customDatePicker {
        display: none;
    }
</style>
And finally the code that displays the datepicker:
$(function() {
    $("#customDatePicker").datepicker({
        onSelect: function () {
            $("label[for='customStartDate']").text($(this).val());
        }
    });

    $("#customStartDate").on('click', function () {
        $("#customDatePicker").datepicker("show");
    });
});
Observe that on the click event of the radiobutton customDatePicker, we display the datepicker and in its onSelect event, we set the chosen date from the datepicker in the label control.
When the page loads, you will see three radio buttons. Click on the ‘Other’ radiobutton.

A datepicker appears where you can select the date. I am selecting Aug 22nd.
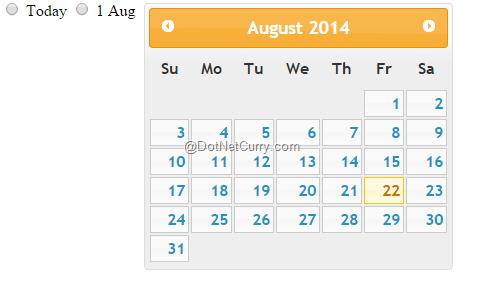
When you click on 22nd, the date is selected and appears in the label control placed next to the radiobutton

Live Demo: http://www.jquerycookbook.com/demos/S9-General/67.4-datepicker.html
5 - Navigate between Months using external buttons
Sometimes you may need to hide the default navigation buttons that come with the datepicker. Instead you want to use custom buttons that allow the users to navigate between the months. Lets see how to achieve this requirement.
Create a new file ’5-datepicker.html’. Declare a datepicker and two buttons as follows:
<body>
<div id="datepicker"></div>
<br />
<button id="prev">Previous Month</button>
<button id="next">Next month</button>
</body>
Add some css to hide the default navigation buttons of the datepicker control
<style type="text/css">
    .ui-datepicker-next, .ui-datepicker-prev {
        display: none;
    }
</style>
Add the code that handles the button click to navigate between the months of the datepicker
<script type="text/javascript">
    $(function() {
        $('#datepicker').datepicker();

        $('#next, #prev').on('click', function (e) {
            $('.ui-datepicker-' + e.target.id).trigger("click");
        });
    });
</script>
The solution is to trigger a click on the default navigation buttons when the custom buttons are clicked.
Live Demo: http://www.jquerycookbook.com/demos/S9-General/67.5-datepicker.html
6 - Programmatically Change the Selectable dates
In a previous example (1) , we saw how to disable certain dates. Let us assume at runtime, we want to programmatically change the dates that are selectable. In our example, we will start by disabling all Tuesdays. Then on a button click, we will change the Selectable dates by disabling all Wednesdays instead of Tuesdays.
Create a new file ’6-datepicker.html’. Let us start by defining our HTML which has a datepicker and a button control:
<body>
    <input type='text' id='datepicker' />
    <br />
    <br />
    <button id="changeDates">Change to Wednesday</button>
</body>
Code:
<script type="text/javascript">
    $(function () {
        var unavailableDay = 2; // disable tuesdays

        function disableDays(date) {
            var day = date.getDay();
            return [(day != unavailableDay), ""];
        }

        $('#datepicker').datepicker({
            beforeShowDay: disableDays
        });

        $("#changeDates").on('click', function () {
            unavailableDay = 3; // disable wednesdays
            $("#datepicker").datepicker("refresh");
        });
    });
</script>
We start by setting the disable dates to Tuesday. This is done by declaring a variable unavailableDay as 2 (representing Tuesday) and setting it in the beforeShowDay event, which is set to a function disableDays that takes a date as a parameter and returns an array equal to true/false indicating whether or not this date is selectable.
On the button click event, we set unavailableDay as 3 (representing Wednesday) and then use the date picker refresh() method that completely redraws the date picker. Calling the refresh method allows the datepicker to readjust itself, so that it can contain all of the newly added content; in our case, disabling all Wednesdays.
View the file in your browser. Click on the input box to display the datepicker:
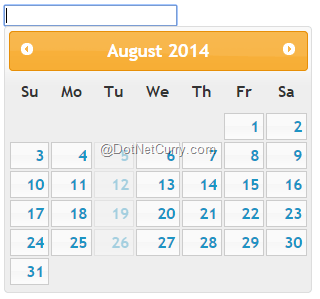
As you can observe, all the Tuesdays are disabled. Now click on the button below the datepicker (not shown in the screenshot) to change the disabled date to Wednesday. Click on the input box to display the datepicker again:
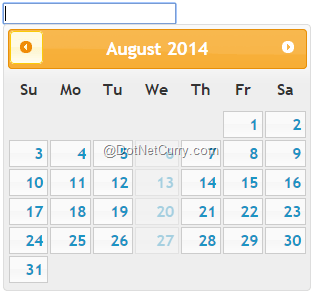
And you will find that the disabled dates have changed from Tuesday to Wednesday.
Live Demo: http://www.jquerycookbook.com/demos/S9-General/67.6-datepicker.html
7 - Custom date format
By default, the date format of the jQuery UI Datepicker is the US format mm/dd/yy, but we can set it to a custom display format, eg: for European dates dd-mm-yyyy and so on.
The solution is to use the date picker dateFormat option.
$.datepicker.formatDate( format, date, settings )
Create a new file ’7-datepicker.html’. Define a datepicker control:
<body>
    <input type='text' id='datepicker' />
</body>
..and use the following code to change the format with the dateFormat option. We have set it to ‘dd-mm-yy’.
<script type="text/javascript">
    $(function () {
        $('#datepicker').datepicker({ dateFormat: 'dd-mm-yy' });
    });
</script>
View the file in a browser and select a date. You will see that the date displays in dd-mm-yy format.
From the documentation, the format can be of the following combinations: http://api.jqueryui.com/datepicker/#utility-formatDate
Live Demo: http://www.jquerycookbook.com/demos/S9-General/67.7-datepicker.html
8 - Localizing the DatePicker
Building up on our previous example of displaying date in different formats, we can also fully customize and localize the jQuery UI datepicker control to cater for different languages and date formats.
There are two ways to do it:
- first by using the $.datepicker.regional attribute for custom localization and
- second by using a translation file kept in the i18n folder in the development-bundle/ui directory
Using $.datepicker.regional attribute
The $.datepicker.regional attribute holds an array of localizations, indexed by language code. In this example, we will display the datepicker control in Italian.
Create a new file ’8-datepicker.html’. Start by defining a datepicker control on your page:
<body>
    <input type='text' id='datepicker' />
</body>
Use the following code to specify the localization options in a standard configuration object:
<script type="text/javascript">
$(function () {
$.datepicker.regional['it'] = {
closeText: 'Chiudi',
prevText: '<Prec',
nextText: 'Succ>',
currentText: 'Oggi',
monthNames: ['Gennaio', 'Febbraio', 'Marzo', 'Aprile', 'Maggio', 'Giugno',
'Luglio', 'Agosto', 'Settembre', 'Ottobre', 'Novembre', 'Dicembre'],
monthNamesShort: ['Gen', 'Feb', 'Mar', 'Apr', 'Mag', 'Giu',
'Lug', 'Ago', 'Set', 'Ott', 'Nov', 'Dic'],
dayNames: ['Domenica', 'Lunedì', 'Martedì', 'Mercoledì',
'Giovedì', 'Venerdì', 'Sabato'],
dayNamesShort: ['Dom', 'Lun', 'Mar', 'Mer', 'Gio', 'Ven', 'Sab'],
dayNamesMin: ['Do', 'Lu', 'Ma', 'Me', 'Gi', 'Ve', 'Sa'],
weekHeader: 'Sm',
dateFormat: 'dd/mm/yy',
firstDay: 1,
isRTL: false,
showMonthAfterYear: false,
yearSuffix: ''
};
$.datepicker.setDefaults($.datepicker.regional['it']);
$('#datepicker').datepicker();
});
</script>
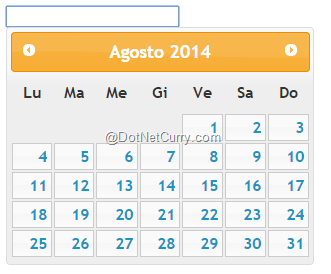
After specifying the options for the regional setting in the object, we use the $.datepicker.setDefaults function to set the datepicker to have Italian text.
View the file in the browser and you will see that the datepicker is displayed in the Italian language:
Live Demo: http://www.jquerycookbook.com/demos/S9-General/67.8-datepicker.html
Using Translation File
The jQuery UI i18 folder found at https://github.com/jquery/jquery-ui/tree/master/ui/i18n contains a wide range of different translations. The folder has different language translation files and to change the default language, all we have to do is include the source file of the alternative language. A full list of language option file is available here: http://jquery-ui.googlecode.com/svn/tags/latest/ui/i18n/
Create a new file ‘8.1-datepicker.html’. Add the following <script> reference directly after the link to jquery-ui.min.js:
<link href="../css/jquery-ui.css" rel="stylesheet" />
<script src="../scripts/jquery-1.11.1.min.js"></script>
<script src="../scripts/jquery-ui.min.js"></script>
<script src="scripts/jquery.ui.datepicker-fr.js"></script>
All you have to do now is the following:
<script type="text/javascript">
    $(function () {
        $('#datepicker').datepicker();
    });
</script>
As you can see without setting any configuration option, all we have done is link to the French translation file, which will change all of the visible text in the datepicker to the French language.
Save this file and and view the results in a browser.
Live Demo: http://www.jquerycookbook.com/demos/S9-General/67.8.1-datepicker.html
Character Set issues
In some browsers, August gets displayed as Août. If you open the jquery.ui.datepicker-fr.js file, you will find strange characters such as Août. To fix it, simple change it to Ao\u00fbt
These strange characters appear due to encoding issues. Check the encoding of the JavaScript file and save it to use UTF-8 NO BOM. Also specify a character encoding in your <head> as follows: <meta charset="UTF-8" />
Locating and fixing each strange character could be time consuming. The simplest fix is to lookup the online version http://ajax.googleapis.com/ajax/libs/jqueryui/1.10.4/i18n/jquery.ui.datepicker-fr.min.js and copy and replace the local versions script with it.
This code was authored by Irvin Dominin and explained by Irvin and Suprotim Agarwal
Did you like this article? This article was taken from a new jQuery book The Absolutely Awesome jQuery Cookbook which contains scores of similar practical jQuery/jQueryUI recipes you can use in your projects right away.
This article has been editorially reviewed by Suprotim Agarwal.
C# and .NET have been around for a very long time, but their constant growth means there’s always more to learn.
We at DotNetCurry are very excited to announce The Absolutely Awesome Book on C# and .NET. This is a 500 pages concise technical eBook available in PDF, ePub (iPad), and Mobi (Kindle).
Organized around concepts, this Book aims to provide a concise, yet solid foundation in C# and .NET, covering C# 6.0, C# 7.0 and .NET Core, with chapters on the latest .NET Core 3.0, .NET Standard and C# 8.0 (final release) too. Use these concepts to deepen your existing knowledge of C# and .NET, to have a solid grasp of the latest in C# and .NET OR to crack your next .NET Interview.
Click here to Explore the Table of Contents or Download Sample Chapters!
Was this article worth reading? Share it with fellow developers too. Thanks!
Irvin Dominin is currently working as lead of a technical team in SISTEMI S.p.A. (Turin, Italy) on .NET, jQuery and windows Projects. He is an
active member on StackOverflow. You can reach him at: irvin[dot]dominin[attherate]gmail[dot]com or on
LinkedIn