You probably have heard of the term Serverless. This new technology, which implies you don’t have servers, is hot and happening and taking over the world.
In this article I will tell you what serverless is, how it is implemented with Azure Functions and how to use it with apps.
Spoiler alert: there are still servers when using serverless.
This tutorial is from the DotNetCurry(DNC) Magazine with in-depth tutorials and best practices in .NET and JavaScript. This magazine is aimed at Developers, Architects and Technical Managers and covers Azure, C#, Patterns, .NET Core, MVC, DevOps, ALM, TypeScript, Angular, React, and more. Subscribe to this magazine for FREE and receive all previous, current and upcoming editions, right in your Inbox. No Spam Policy.
What is Serverless?
As the name implies, there should be no servers. However, that is not quite the case. There are still servers, you just have to think about the servers, less.
The term serverless has been around for a while and there are actually some different definitions floating online.
In the earlier days, serverless meant Backend-as-a-Service (BaaS) solutions.
Think of third-party, cloud hosted services like Firebase, Auth0 or Parse (discontinued). These services provide you with a lot of out-of-the-box functionality that you can leverage without having to implement too much code. More importantly, you are not burdened with any code on the server-side or the infrastructure that comes with it.
Another definition that seems to be a lot more popular now is the Function-as-a-Service. This is what we will be focusing on in this article.
With functions, you can write your own code and logic, and nothing more. You do not need to create a big REST API project, worry about where to host it, how secure it is, etc. You just write a simple piece of code that does what you want and let the service provider do the rest.
What this essential means is - you have to think about the server, less.
What basically happens is that your function is installed inside a runtime on a webserver, and whenever a request comes in, the function is very rapidly deployed and executed.
When the execution completes, there is a small interval that waits for any subsequent call. After that, the function is destroyed until a next request comes in. This way, you don’t have a long-running web application that is waiting for action, but instead is just idle most of the time.
There are several vendors that now provide this functionality: Amazon with Lambda, Google Cloud Functions and of course Microsoft Azure Functions.
Starting with Azure Functions
Making a start with Azure Functions is very easy. Just log into the Azure Portal, create a new resource and look for the Function App. Look under Compute, or just search for it with the search box. You can see it in Figure 1.
A Function App is a container for one or multiple Azure Functions. Think of it as a web application where you will define multiple endpoints, each endpoint being a separate function.
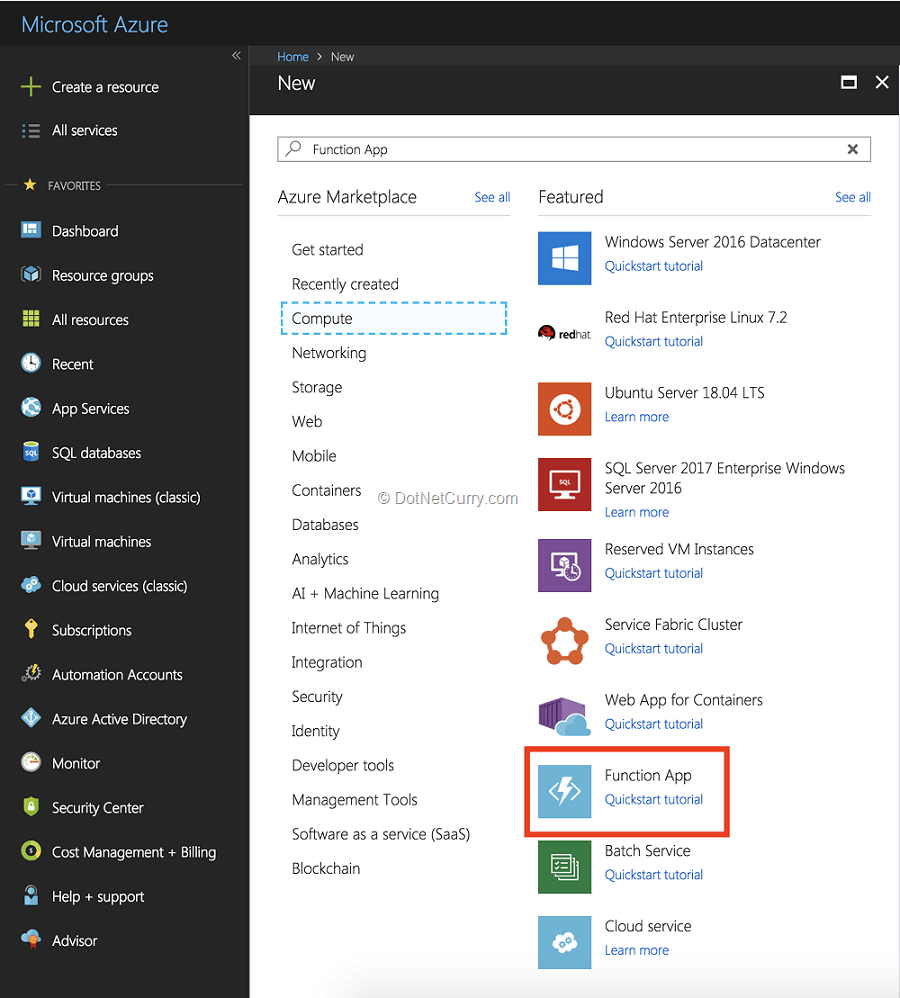
Figure 1: Creating our first Azure Function App in the Azure portal
Now, you will have to do some basic configuration of the Function App to be created. You will have to give it a (unique) name, which resource group to place it in, create an associated storage account, etc. It should all be self-explanatory.
The one option that is very interesting is the operating system option.
Here you can choose if your function should run on Windows, Linux or even Docker. Azure Functions are cross-platform and can be created with a variety of programming languages including JavaScript, PHP, Java and even Bash or PowerShell. For this example, we will just stick with Windows and C#, but it’s good to know that you can leverage all of this in any other language, on any other platform.
Also, in terms of cost you might want to look at the hosting plan. The default is Consumption Plan.
This means you will just pay for execution time. This is ideal, since you pay per second for the time the function is running. This is very precise and that makes it very cost effective in most cases.
However, you do have an overhead when your function is destroyed each time. You will have a cold start before each first request. Depending on how many external libraries you reference and how big your function is, this might take some time.
You can also choose the App Service Plan.
This plan basically reverts your function back to the waiting REST API application that is dedicated for you, waiting for requests. It comes at a higher price, but you do not have to deal with the cold starts.
For this sample, I will stick with the Consumption Plan.
Go ahead with the configuration and click the Create button. After a bit of processing, your new Function App will be ready to go. You can verify that your function is up and running by going to https://yourfunctionname.azurewebsites.net. You will see a page that says your function app is now running as it should! See Figure 2.
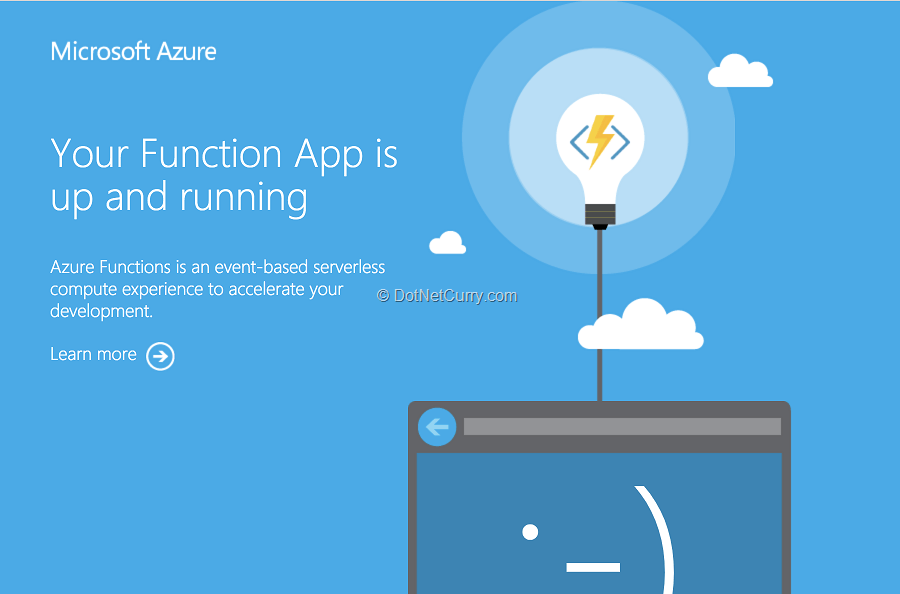
Figure 2: Status page that shows our AzureFunction App is running correctly
Implementing a Function
There are several ways to construct your function.
This of course depends on what programming language you choose. One option you always have is to implement your function through the Azure portal. Yes, you’ve read that right, there is a simple code editor in the Azure portal that allows you to write code and deploy it.
In our example we’ll be writing a C# function. For this we can leverage Visual Studio (VS), but you could also use VS for Mac or VS Code. They all have built-in support for Azure functions. Since I mostly develop cross-platform, I like to use my Mac with Visual Studio for Mac, but everything I will show here is also available in the other IDE’s.
Let’s start by creating a new Azure Functions project, no special SDK is needed as this is included in Visual Studio by default.
In Visual Studio (for Mac), create a new project and choose the Azure Functions template. You can find it under Cloud.
After selecting the Azure Functions template, you get to choose between a number of sub-templates. All these sub-templates provide you with different sample code to start from. This can help you get started with different kinds of triggers or implementations. You can see the selection screen in Visual Studio for Mac as shown in Figure 3.
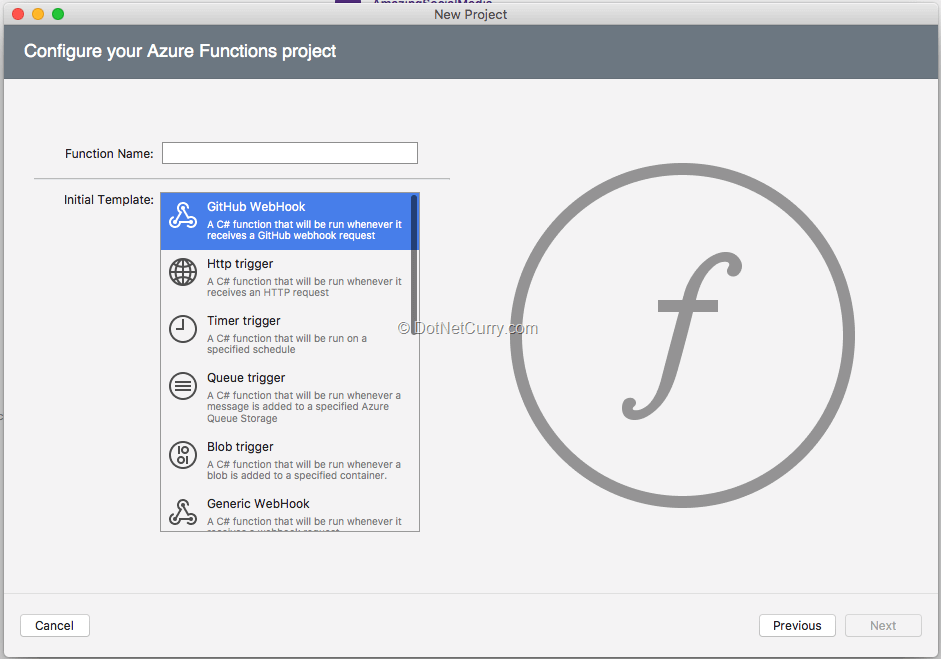
Figure 3: Selecting an Azure Functions template to get started
At the time of this writing, the Visual Studio for Windows templates aren’t as complete as the ones you can find on Mac.
For this sample, I will select the Http Trigger template. And after that select Function as a value for the Access Rights when you are prompted. When the template is generated, you will get a sample implementation for free. Let’s inspect what it does.
public static class HttpTrigger
{
    [FunctionName("HttpTrigger")]
    public static IActionResult Run([HttpTrigger(AuthorizationLevel.Function, "get", "post", Route = null)]HttpRequest req, TraceWriter log)
    {
        log.Info("C# HTTP trigger function processed a request.");

        string name = req.Query["name"];

        string requestBody = new StreamReader(req.Body).ReadToEnd();
        dynamic data = JsonConvert.DeserializeObject(requestBody);
        name = name ?? data?.name;

        return name != null
            ? (ActionResult)new OkObjectResult($"Hello, {name}")
            : new BadRequestObjectResult("Please pass a name on the query string or in the request body");
    }
}
Overall what this function does is read the value from “name” and print that as “Hello, Gerald”. The value for name can either come from the query string in your URL, or as a JSON value in the body.
There are a couple of interesting things in here.
You see references to a concept called triggers, a bit of authorization and a log. Let’s look at these in a bit more detail.
Triggers and Bindings
A trigger is the starting point of our Azure function.
Each function has exactly one trigger. That trigger has some data associated to it, depending on what kind of trigger it is. This usually is the payload.
In our example above, the payload is the HTTP request, thus we are using an HTTP trigger. Other triggers can be a TimerTrigger, QueueTrigger, BlobTrigger and many more.
With these triggers you can respectively respond to: a timed interval, listening to an Azure Storage Queue or respond to the event when a file is added to a specified container. Chances are that a trigger that you might need is already available, but if need be, you can of course create your own custom trigger. For our example we will stick to the HttpTrigger, which is basically the equivalent of calling a REST API endpoint.
Then there is a concept called bindings which are a bit more extensive. With bindings, you can specify input and/or output in a declarative way. I don’t know about you, but I don’t like to write code that deserializes or persists data. The code is always mostly the same and just lists the properties of our objects. To overcome this, the Functions team has invented bindings.
With bindings you have a declarative way of handling incoming and outgoing data.
There are a lot of prefabricated bindings for you. For instance, you can have a binding for Cosmos DB. Because the Cosmos DB bindings can be used as an input and output binding, this means you can get and write data without having to write actual code for it.
Another example is the notification hub. You can easily trigger a push notification and send it to the Azure Notification Hub for sending without having to write any code to connect to the hub and send the notifications. Again, if you’re missing a binding, you can implement it yourself.
For more information on triggers and bindings you can head over to the Microsoft Docs website: https://docs.microsoft.com/nl-nl/azure/azure-functions/functions-triggers-bindings. Here you will also find a great overview on which bindings are supported in which version of Azure Functions.
While bindings are a great concept, we won’t go into details in this article.
Authorization
You might not want your function to be called by everyone.
To accommodate this requirement, different authorization levels are available. At this time, you have the choice between anonymous, function, admin and system. With anonymous anyone can access the function. The other three need an API key to be able to access the function.
Then there is the matter of scope.
There are function keys and host keys. Function keys are valid for just that particular Azure Function and host keys are valid for the Function App. This means, all the functions within a Function App fall under the host key.
There is also a special _master key.
This one cannot be deleted, but it can be refreshed with a new value. This special key can be used across all functions in your function app for all access levels as it is a host key. To prevent you from locking yourself out, this _master key will always be present. Be careful with this and keep this a secret at all times!
On the Microsoft Docs pages, there is a good piece on authorization which you can read it here: https://docs.microsoft.com/en-us/azure/azure-functions/functions-bindings-http-webhook#authorization-keys.
Logging
Since you do not have to worry about the hosting of your application, this means that accessing logs like you traditionally would, is impossible. To provide you with an easy way to produce log output, the Azure Functions team has provided you with a built-in mechanism.
If you refer back to the code above, you can see that a TraceWriter is injected into the function. This object has different methods that correspond with different log levels like: info, trace or error. These logs are collected in your Function App and can easily be reviewed from within the Azure portal.
If there is a need for a custom logging mechanism, you are free to do so. This will not be handled in this article.
Customizing the Function
Let’s implement something of our own.
We will keep using the generated code that we saw in the previous steps and just remove the body of the function.
We are going to create a function that takes in an image and gives us back a description of what is in it. To achieve this, we will be using the Azure Cognitive Services. Underneath you can see the newly implemented function.
If you want to see the entire code, you can have a look at the repository I have set up for it here: https://github.com/jfversluis/ServerlessApps.
[FunctionName("HttpTrigger")]
public async static Task<IActionResult> Run([HttpTrigger(AuthorizationLevel.Function, "get", "post", Route = null)]HttpRequest req, TraceWriter log)
{
    log.Info("Function invoked");

    // We only support POST requests
    if (req.Method == "GET")
        return new BadRequestResult();

    // grab the key and URI from the portal config
    var visionKey = Environment.GetEnvironmentVariable("VisionKey");
    var visionEndpoint = Environment.GetEnvironmentVariable(“VisionEndpoint”);

    // create a client and request Tags for the image submitted
    var vsc = new ComputerVisionClient(new ApiKeyServiceClientCredentials(visionKey))
    {
        Endpoint = visionEndpoint
    };

    ImageDescription result = null;

    // We read the content as a byte array and assume it's an image
    if (req.Method == "POST")
    {
        try
        {
            result = await vsc.DescribeImageInStreamAsync(req.Body);
        }
        catch { }
    }

    // if we didn't get a result from the service, return a 400
    if (result == null)
        return new BadRequestResult();

    var bestResult = result.Captions.OrderByDescending(c => c.Confidence).FirstOrDefault()?.Text;
    return new OkObjectResult(bestResult
                ?? "I'm at a loss for words... I can't describe this image!");
}
I have added some comments which should clarify what happens. Overall, we start with determining if the request is a POST or a GET request.
If it’s a GET, we return a HTTP 400 Bad Request result. If it’s a POST, we continue, extract the image from the body and send it to the Azure Cognitive Services. If we get a result, we return that back to the caller.
The really cool thing here is, all that I had to do is install a Nuget package to communicate with the Cognitive Services.
You can use any NuGet package you like to help make your life easier. A word of warning: since your function is deployed often, this means the NuGet packages are reinstalled each time as well. The cold start-up time we have talked about earlier, comes into play here. The more packages you are using, the longer a cold start of your function will take.
You can test Azure Functions locally.
This is just as easy as debugging anything else. Just hit the run button and a command-line window will pop up, acting as a host for your Azure Function. Watch the output closely for any errors. If all goes well, you should be able to see the local URL of your function in the output as well. You can see the output on my Mac in Figure 4.
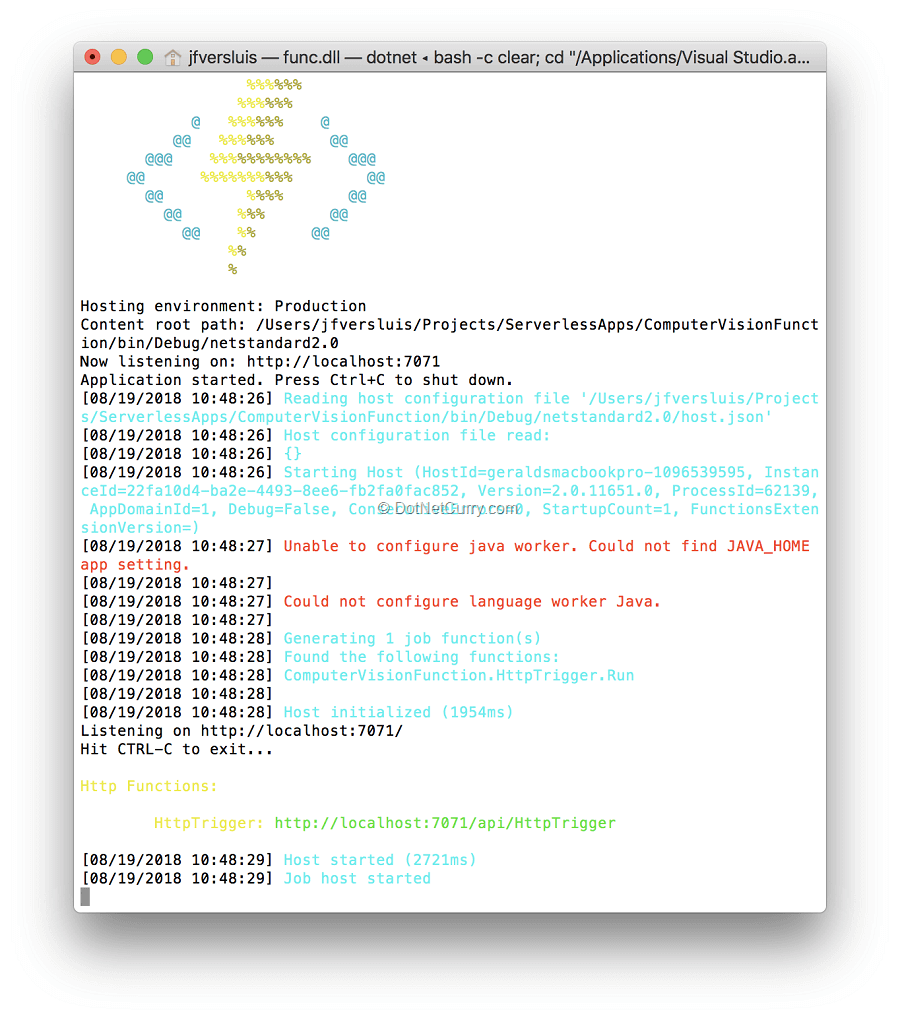
Figure 4: Debugging our Azure Function locally
When debugging locally, you can use a tool like Postman to fire HTTP requests at your local function to test the outcome. You can even setup breakpoints that will be hit.
Deployment of Azure Functions
Since we want to test it with a client, more specifically an app, we should deploy this to the Azure Function App we have set up earlier.
Depending on what IDE you’re using deployment is very easy. You can just do a right-click deploy from Visual Studio for Windows, hook up your Azure subscription and you’re good to go.
This functionality is not available in Visual Studio for Mac at the time of writing. Although it is available in the Beta and Alpha preview versions.
You can also setup deployment directly from your repository by going to the Azure portal. This is the route I took for now because I could not deploy from Visual Studio directly.
When you’re in your Function App, you can choose to start from all kinds of premade functions. But if you look closely, at the bottom, there is the option to deploy a function from source control. You can see it in Figure 5.
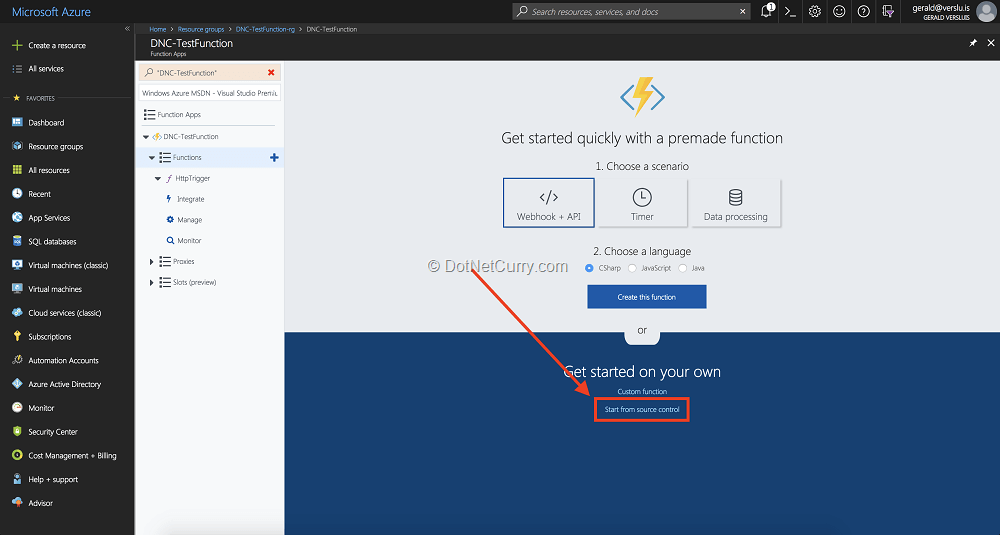
Figure 5: Setting up your Function straight from your repository
When choosing this option, you can integrate with your source control provider, GitHub in my case, and have the function be published directly from there. Doing so will setup an automated build and release for you under the hood.
This also means, when you push a new version to your repository, it gets published automatically.
When you set it up like this, your Function App turns into read-only mode, which means you can only make changes by pushing changes to your repository.
This is typically what you want. Normally, you would be able to change your function from the Azure portal. You can still do this by setting your function to read/write. When you do, remember that all changes you make will be overwritten on the next deployment from your repository.
Of course, you can also setup a CI/CD pipeline for your Azure Function from VSTS. This gives you full control over the process and how things are set up.
Consuming the Function
For the last part, we will see how we can consume our function. Actually, this is the least exciting part since it is identical to any other REST server you would communicate with.
I have created a simple Xamarin app that will communicate with our Azure Function. This app allows you to pick an image from your phone or take one with your camera and upload that to our function. As we already know, our function will pick up the image, send it to the Cognitive Services and return what can be seen on the picture.
For handling the image, I have used a plugin by James Montemagno, the Xam.Plugin.Media. You can read more about it here: https://github.com/jamesmontemagno/MediaPlugin.
The most relevant part can be seen in the code underneath. Using a regular HttpClient, we do a POST request to the Azure Function, wait for the result and show that to the user.
using (var httpClient = new HttpClient())
{
    var request = new StreamContent(file.GetStream());

    var httpResult = await httpClient.PostAsync("https://dnc-testfunction.azurewebsites.net/api/HttpTrigger", request);

    var descriptionResult = await httpResult.Content.ReadAsStringAsync();

    await DisplayAlert("Result", $"I see {descriptionResult}", "Thank you!");
}
A sample result can be seen in Figure 6.
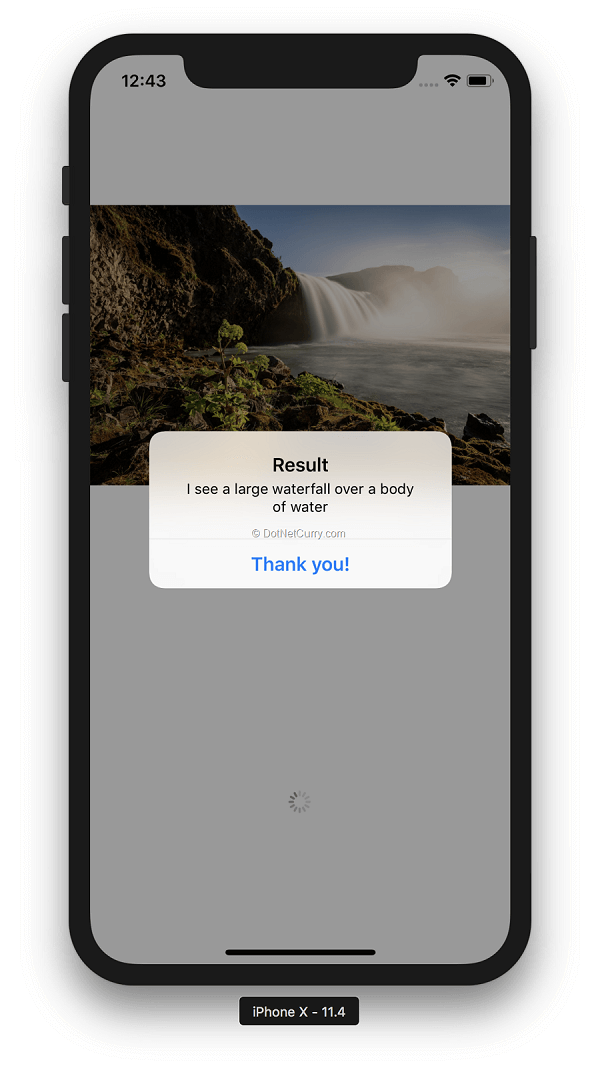
Figure 6: The result of our Xamarin app communication with the Azure Function
Wrapping up
The complete code for the example used in this article can be found in my GitHub account:https://github.com/jfversluis/ServerlessApps. There you will find the function as well as a Xamarin.Forms app with Android and iOS support.
To try things out, you can use the Function instance that I have hosted right now. Although if you really want to get the hang of it, I would encourage you to try and set things up yourself. It is very easy and you will have a lot of fun doing it.
In this article, we have learned what serverless is and how Microsoft has implemented this concept with Azure Functions. By using Functions, you can focus on what matters the most: your business logic. You do not need to worry about how to install it onto your IIS instance and all kinds of other boilerplate code to get your REST API up and running.
You could go with a full serverless architecture where basically each function could be a microservice or use the functions for simple, out-of-process tasks like resizing images or sending push notifications.
The possibilities are endless.
This article was technically reviewed by Tim Sommer
This article has been editorially reviewed by Suprotim Agarwal.
C# and .NET have been around for a very long time, but their constant growth means there’s always more to learn.
We at DotNetCurry are very excited to announce The Absolutely Awesome Book on C# and .NET. This is a 500 pages concise technical eBook available in PDF, ePub (iPad), and Mobi (Kindle).
Organized around concepts, this Book aims to provide a concise, yet solid foundation in C# and .NET, covering C# 6.0, C# 7.0 and .NET Core, with chapters on the latest .NET Core 3.0, .NET Standard and C# 8.0 (final release) too. Use these concepts to deepen your existing knowledge of C# and .NET, to have a solid grasp of the latest in C# and .NET OR to crack your next .NET Interview.
Click here to Explore the Table of Contents or Download Sample Chapters!
Was this article worth reading? Share it with fellow developers too. Thanks!
Gerald Versluis (@jfversluis) is a full-stack software developer and Microsoft MVP (Xamarin) from Holland. After years of experience working with Xamarin and .NET technologies, he has been involved ina number of different projects and has been building several apps. Not only does he like to code, but he is also passionate about spreading his knowledge - as well as gaining some in the bargain. Gerald involves himself in speaking, providing training sessions and writing blogs (https://blog.verslu.is) or articles in his free time. Twitter: @jfversluis Email: gerald[at]verslu[dott]is . Website:
https://gerald.verslu.is