Cloud applications have many commonalities with ordinary web applications. The main difference is in the way they are hosted. Instead of being deployed to our on-premise servers, they take advantage of services offered by cloud providers.
In this tutorial, I’m going to provide an overview of the cloud-based hosting options available for .NET applications, and how these options affect the application code.
To learn more about developing applications in .NET, you can read my previous article from this series:
Developing Web Applications in .NET
Developing Desktop applications in .NET
Developing Mobile Applications in .NET
Cloud Applications in .NET
Which hosting option should I choose?
This decision strongly depends on how adaptive the application is to the cloud environment:
- The least cloud specific hosting option is Infrastructure-as-a-Service (IaaS). This term is used for virtual machines hosted in the cloud which are completely under our own control as if they were located on our premises.
- The next step is Platform-as-a-Service (PaaS). In this model, the cloud provider keeps control of the operating system and only allows configuration of the web server software. For the application to work in such an environment, it must not depend on the local file system or any other software running or being installed locally.
- To avoid this restriction, applications can be deployed as Docker containers which declaratively specify all the local dependencies and configuration they require. At deployment time, the hosting environment will compose an isolated container instance based on these specifications. Such a hosting model is probably the most representative part of the so-called cloud-native applications.
- The latest hosting model introduced by cloud providers is serverless computing. Instead of hosting the web application as a single unit, this model requires it to be decomposed into separate independent functions. These are deployed, started and invoked as separate units. That’s the reason why this model is also named Function-as-a-Service (FaaS).
When deciding whether to move from on-premise hosting to the cloud, it’s important to keep in mind all the advantages of cloud services, especially if they seem to be a more expensive alternative at the first glance:
- Cloud allows us to dynamically scale resources to match current requirements. There’s no need to own or pay for more resources all the time if they are only needed for a specific period (e.g. during traffic spikes or additional periodic processing of data).
- Provisioning new resources in the cloud for new projects is much cheaper and faster than buying new hardware.
- The cloud providers employ dedicated staff focusing on all aspects of security: updating the software with latest securing patches, managing network configuration and ensuring physical security of servers. It’s very difficult to match the level of security they can provide.
You can read more about the things you need to consider before moving to the cloud in Vikram Pendse’s article Microsoft Azure Cloud Roadmap.
In the remainder of the article, I’m going to explain each of the hosting options in more detail from the perspective of a .NET developer. I’m going to be using the services available in Microsoft Azure. However, most other cloud providers also have their own offerings for each of the listed hosting options.
Infrastructure as a Service (IaaS)
The Infrastructure-as-a-Service approach to hosting in the cloud is based on regular virtual machines with unrestricted administrator access including remote desktop for Windows-based machines and SSH for Linux-based machines.
This full flexibility in the way the machine can be configured, comes at a cost. Not only are we responsible for applying security fixes and OS updates, but we must also install and configure all the prerequisites for our application to work. Let’s see what this encompasses when deploying an ASP.NET or ASP.NET Core web application to such a virtual machine.
The Infrastructure-as-a-Service offering in Microsoft Azure is called Azure Virtual Machines. Through a simple user interface, it allows us to quickly provision a new virtual machine by providing only the most basic information such as the hardware specification, the operating system, the network configuration and the login information. If necessary, we can configure many additional aspects, both before and after the creation of the virtual machine.
Visual Studio 2019 has built-in support for publishing ASP.NET and ASP.NET Core based web applications to Azure Virtual Machines running Windows. The feature uses the Web Deploy tool to deploy the application to IIS (Internet Information Services) web server on the selected virtual machine. It’s the same tool that we can use to deploy to our on-premise servers.
For this to work, the virtual machine must have the Web Deploy tool installed, as well as the .NET framework and IIS itself with ASP.NET support configured. All of this can be done manually via a remote desktop connection to the virtual machine. There are detailed instructions available along with a PowerShell script for automating the process. The documentation also includes a link to a template file which can be used to create a new virtual machine with all the required software already preinstalled.
To host an ASP.NET Core web application in IIS, the .NET Core Hosting Bundle must be installed in addition to all of the prerequisites above. To deploy the application in framework-dependent mode, a compatible version of .NET Core must be installed on the server as well. Otherwise, the application will only work when deployed in self-contained mode. This isn’t specifically listed in the linked documentation, nor does there seem to be a template available to take care of that during the virtual machine creation. It’s a .NET Core requirement for being hosted in IIS, which is in no way specific to Azure Virtual Machines.
Once the virtual machine is correctly set up, the publishing process from Visual Studio 2019 is straightforward. From the Publish window for an ASP.NET or ASP.NET Core web application, a wizard can be launched which can connect to an Azure account and list the available virtual machines when publishing to an Azure Virtual Machine is selected. Additional settings (e.g. build configuration) can be configured afterwards.

Figure 1: Publish to Azure Virtual Machines from Visual Studio
Of course, we don’t want to deploy applications directly to production using Visual Studio. To have more control over the deployment, it should be done from our build server as part of the CI/CD (continuous integration and continuous deployment) process. Microsoft’s build server in the cloud is named Azure Pipelines and it’s a part of Azure DevOps.
To build and deploy a web application with Azure Pipelines, the source code must be published to a remote Git repository in Azure Repos, GitHub or elsewhere (TFVC – Team Foundation Version Control and SVN – Subversion repositories are also supported).
First, a build pipeline must be created to build the application and run the tests. Although its configuration is saved as a YAML file, most of it will be generated automatically based on the selected source code repository and the type of the application (ASP.NET or ASP.NET Core).
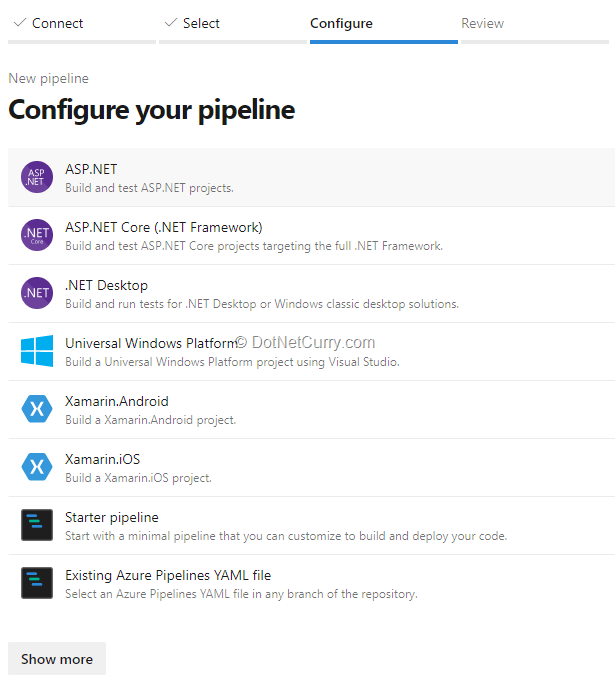
Figure 2: Selecting the application type for the build pipeline
Only one additional task must be added to the end of the file and there’s even a graphical user interface for that. The Publish build artifacts task will make the result of the build available to the release pipeline which will deploy the application to the virtual machine.
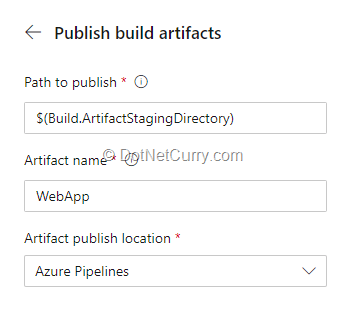
Figure 3: Configuring the Publish build artifacts task
The task wizard will insert the corresponding YAML snippet at the current cursor location in the file. This should result in the following final build pipeline configuration (in case of ASP.NET application):
# ASP.NET
# Build and test ASP.NET projects.
# Add steps that publish symbols, save build artifacts, deploy, and more:
# https://docs.microsoft.com/azure/devops/pipelines/apps/aspnet/build-aspnet-4

trigger:
- master

pool:
  vmImage: 'windows-latest'

variables:
  solution: '**/*.sln'
  buildPlatform: 'Any CPU'
  buildConfiguration: 'Release'

steps:
- task: NuGetToolInstaller@1

- task: NuGetCommand@2
  inputs:
    restoreSolution: '$(solution)'

- task: VSBuild@1
  inputs:
    solution: '$(solution)'
    msbuildArgs: '/p:DeployOnBuild=true /p:WebPublishMethod=Package /p:PackageAsSingleFile=true /p:SkipInvalidConfigurations=true /p:PackageLocation="$(build.artifactStagingDirectory)"'
    platform: '$(buildPlatform)'
    configuration: '$(buildConfiguration)'

- task: VSTest@2
  inputs:
    platform: '$(buildPlatform)'
    configuration: '$(buildConfiguration)'

# Added by the Publish build artifact task wizard
- task: PublishBuildArtifacts@1
  inputs:
    PathtoPublish: '$(Build.ArtifactStagingDirectory) '
    ArtifactName: 'WebApp'
    publishLocation: 'Container'
The release pipeline will use Web Deploy for deployment just like Visual Studio does. There’s detailed documentation available for configuring it. The process consists of the following steps:
- Creating an Azure Pipelines deployment group and adding the target server to it by installing an agent on the virtual machine using the provided PowerShell script.
- Installing a free extension for Azure Pipelines for deploying applications using Windows Remote Management (WinRM) and Web Deploy.
- Configuring the release pipeline to deploy the build artifact from the previously created build pipeline to the previously created deployment group.
With everything configured correctly, each new commit to the selected Git repository will trigger a new build. If it succeeds and all tests pass, the release pipeline will deploy the application to the virtual machine.
As you can see, the Platform-as-a-Service approach doesn’t provide a lot of benefit in comparison to hosting applications on on-premise servers, except for the obvious fact that we don’t need to worry about the hardware anymore. To benefit more by migrating to the cloud and have a simpler deployment processes, we will need to choose one of the other approaches.
Platform as a Service (PaaS)
The Platform-as-a-Service approach is a great compromise that doesn’t require too much modification to our web applications or development processes, but still makes the hosting and the deployment process much simpler than the Infrastructure-as-a-Service approach. Instead of having to manage the virtual machine, we only interact with the web server software which is exposed as a cloud service.
In Microsoft Azure, the service is called Azure App Service Web Apps. When creating a new instance, we start by selecting the stack of our application. For .NET applications different versions of the .NET framework and .NET Core are available. For .NET Core applications, we can also choose between the Windows and Linux operating systems.
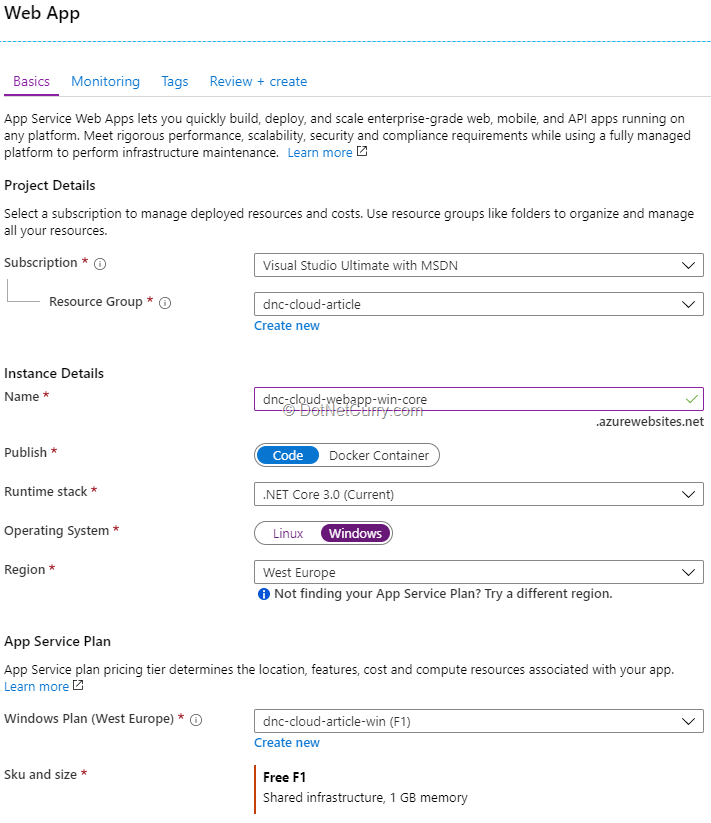
Figure 4: Configuring a new Azure App Service Web App
No matter the choice, an ASP.NET or ASP.NET Core web application can be easily deployed to the Azure App Service Web App instance using Visual Studio 2019.
From the Publish window, a wizard can be launched to select the target instance from those available in the selected Azure subscription. After clicking Publish, the application files will be copied to Azure and the deployed web application will be launched in the default web browser.
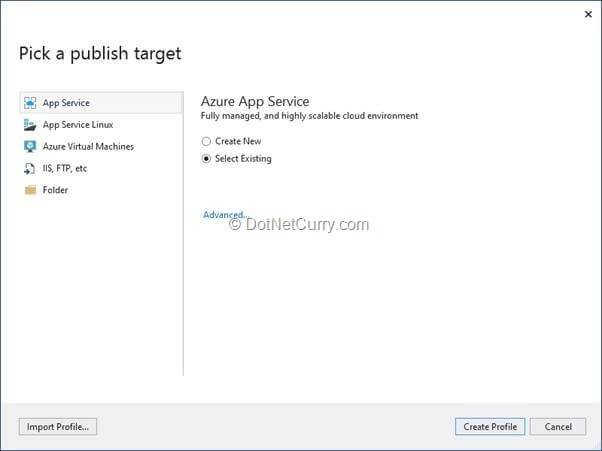
Figure 5: Publish to Azure App Service Web App
Of course, deployment to Azure App Service Web Apps is also supported from Azure DevOps. The build pipeline will remain configured the same as it was for deployment to Azure Virtual Machines. Only the release pipeline will be different.
When creating a new release pipeline for deploying to Azure App Service Web Apps, we can start with the Azure App Service deployment template which is mostly preconfigured for our needs.
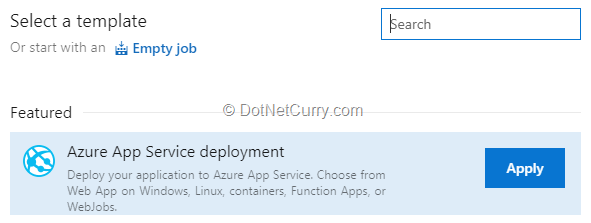
Figure 6: Azure App Service deployment release pipeline template
The most important part remaining is the configuration of the deployment task in the template. We must authorize a connection to the selected Azure subscription and then choose the App Service type (Web App on Windows or Web App on Linux) and the App Service name (from the list of services in our subscription).
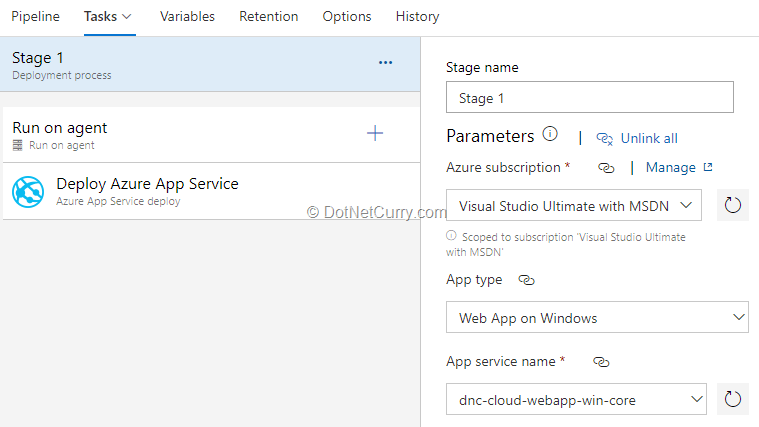
Figure 7: Configuring the deployment task
Just like in the case of deploying to Azure Virtual Machines, we need to select the artifact from the build pipeline we want to deploy. Once we set that up, the web application will be deployed to the selected Azure App Service Web App instance whenever a new commit is pushed to the corresponding Git repository.
As you can see, deploying to Azure App Service Web Apps is much simpler than to Azure Virtual Machines. However, since the server is preconfigured, the application is running in its sandbox and there’s no way to install additional software components on the hosting server. All required dependencies must be deployed as part of the application.
Also, there’s no guarantee that any files stored locally from the application will persist. The application might be migrated to a new server and at that time, only application files that were deployed to the service, will be preserved. So any application state must be stored elsewhere, e.g. in a separate Azure Storage instance for files and unstructured data, and in an Azure SQL Database or Azure Database for PostgreSQL instance for relational data.
If this is too restrictive, deploying to one or more Docker containers might be a better fit.
Cloud-Native Applications
Docker containers can be thought of as lightweight virtual machines. They still provide an isolated environment for the software running inside them but share the kernel of the operating system they are running on. Hence, they require less resources than virtual machines.
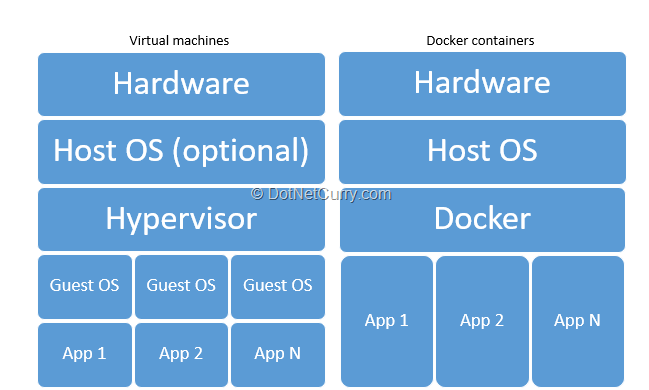
Figure 8: Comparison between applications hosted in virtual machines (left) and Docker containers (right)
Azure App Service Web App for Containers is a variation of Azure App Service Web Apps which runs the web application from a Docker image instead from the files deployed to it. It requires the Docker image with that application to be published into a container registry. The one in Azure is named Azure Container Registry.
To publish an ASP.NET Core application to a container registry (and from there deploy to Azure App Service Web App for Containers), it must be configured correctly so that the build pipeline can create a Docker image with it. The simplest way to achieve that for an ASP.NET Core application is to Enable Docker Support when creating a new project from the Visual Studio 2019 template.
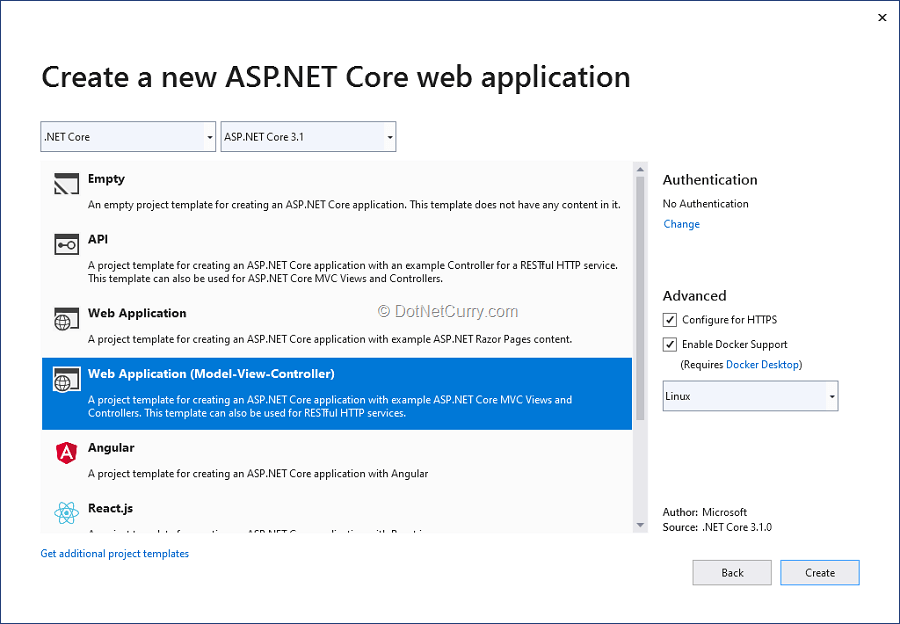
Figure 9: Enabling Docker support in a new web application
Visual Studio 2019 will transparently take care of running and debugging such an application from a Docker container on the development machine as long Docker Desktop for Windows is installed. However, there’s no built-in functionality in Visual Studio 2019 to publish the resulting Docker image to a container registry.
On the other hand, Azure DevOps doesn’t lack such support. In a typical setup, the build pipeline will be responsible for publishing the Docker image to the container registry. Although there is a Docker template for a new build pipeline, it unfortunately doesn’t include all the necessary steps preconfigured.
Most of the pipeline will need to be configured manually:
a) To allow publishing an image to a container registry, a new service connection to it must first be created in the Azure DevOps Project Settings. If you want to use an Azure Container Registry, you need to create one beforehand.
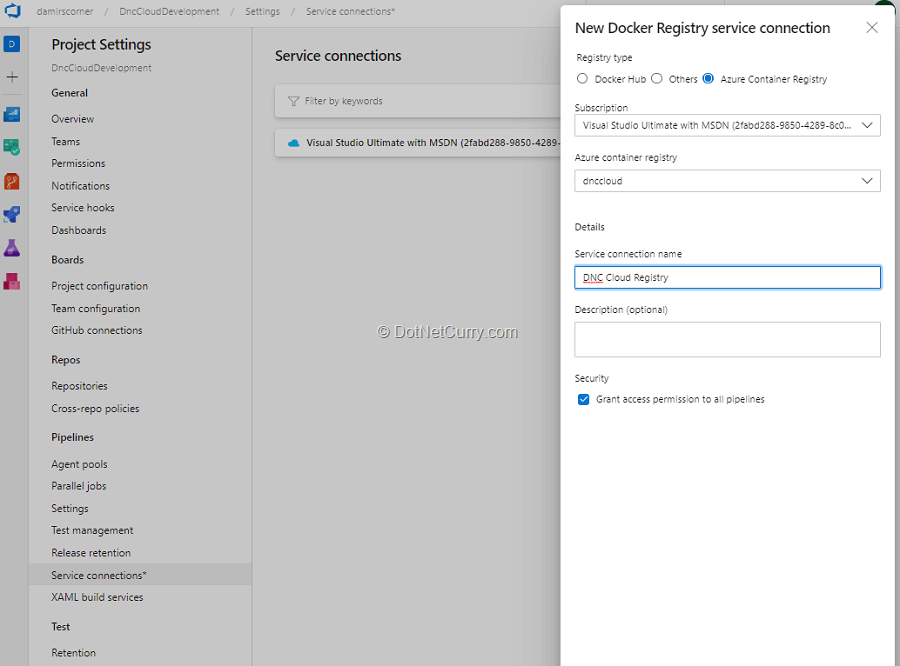
Figure 10: Creating a new service connection to a container registry
b) With that in place, a new pipeline can be created; preferably from the Starter pipeline template because the Docker template in its current state, needs to be changed considerably to be helpful.
c) The existing steps from the template must be replaced with the Docker task available in the assistant. Only the previously connected Container registry must be additionally configured for the task along with a unique Container repository name for the application. In Docker terminology, a repository is a collection of images with the same name but different tags. Tags correspond to versions of these images. A container registry will typically host multiple repositories.
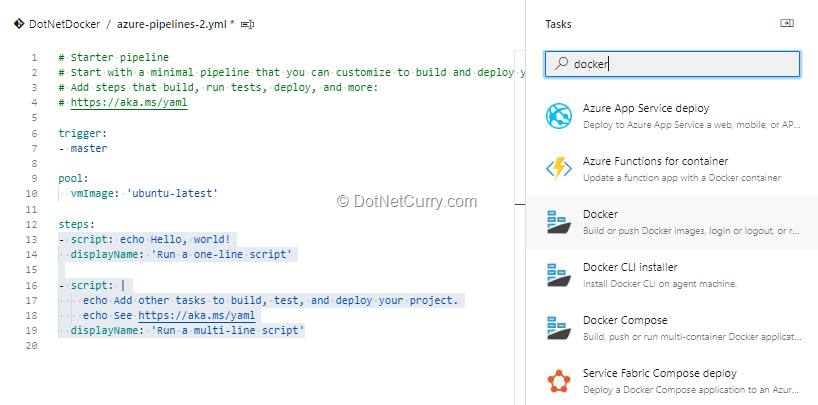
Figure 11: Adding a Docker task to the build pipeline
d) A Docker image is built from a Dockerfile. The step created in the pipeline assumes that the file will be placed in the root folder of the code repository. Since it is placed in the project folder by the Visual Studio template, the working directory must be set to root using the buildContext input or the build will fail:
- task: Docker@2
  inputs:
    containerRegistry: 'DNC Cloud Registry'
    repository: 'dnc-cloud-article'
    command: 'buildAndPush'
    Dockerfile: '**/Dockerfile'
    buildContext: .
When the newly configured build pipeline is run, it will publish the image to the container registry so that it can be used by the Azure App Service Web App for Containers which requires the Registry, Image (corresponds to repository name) and Tag to be specified.
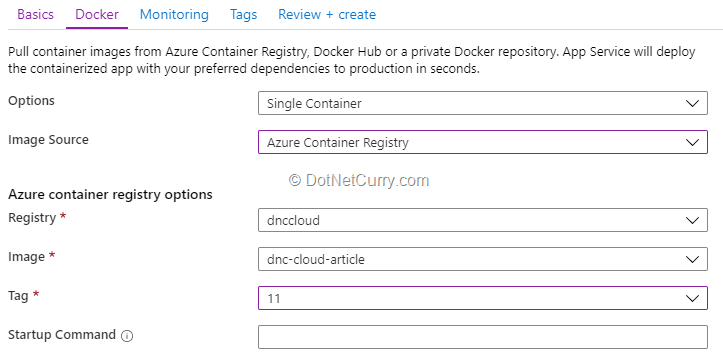
Figure 12: Configuring the image for the Web App for Containers
This is already enough to get the application running in Azure. The build pipeline publishes the container image with the application in the container registry. In the Azure App Service Web App for Containers configuration, we selected a previously published specific version (i.e. tag in Docker terminology) of the image to deploy. This version of the application can already be accessed by opening the URL of the created Web App in the browser.
For automatic deployment of new versions, an Azure DevOps release pipeline must be configured.
Again, the Azure App Service deployment template will be used, but this time Web App for Containers (Linux) must be selected as the App type. In addition to selecting the Azure subscription and the target App service name, the Docker image to deploy must be specified in the Registry or Namespace (Login server of the container registry found on its Overview page in Azure Portal) and Repository (i.e. repository name as set earlier) fields.
Editorial Note: If you are new to Azure DevOps, I strongly recommend these Azure DevOps tutorials.
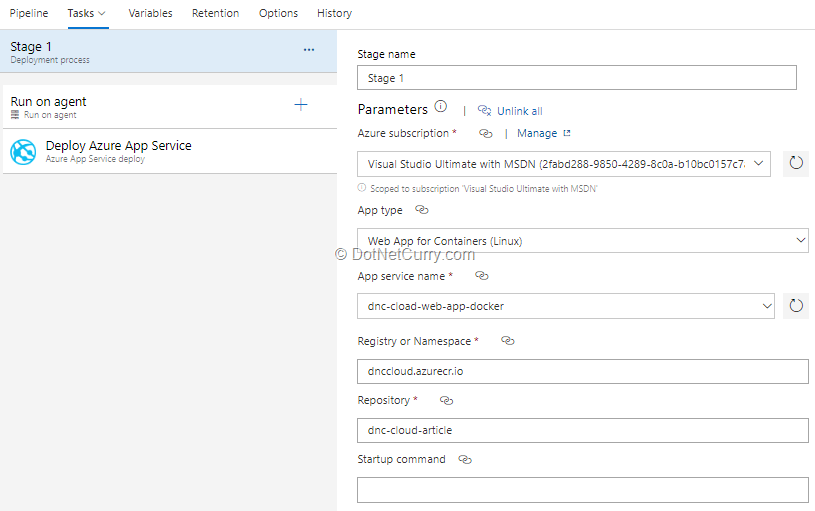
Figure 13: Release pipeline deployment step configuration
The Azure Container Registry should act as the artifact source for the release pipeline; configured with details pointing at the Docker image published by the corresponding build pipeline. This will ensure that the release pipeline is triggered every time the build of the Docker image succeeds.
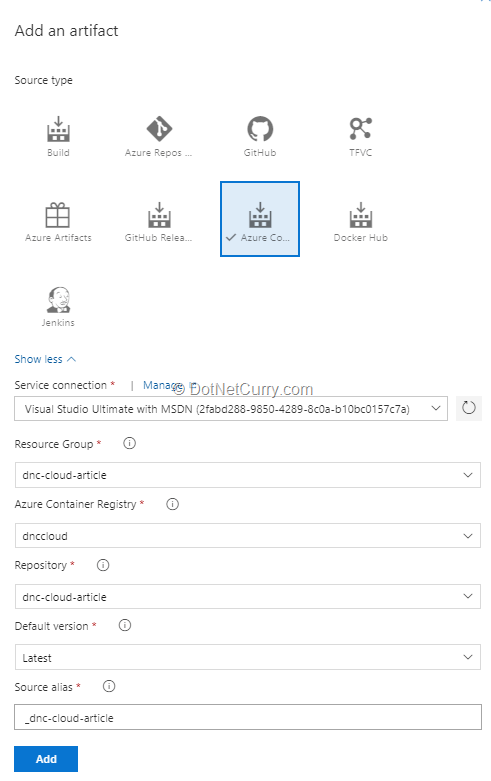
Figure 14: Release pipeline artifact configuration
Advantages of Docker Images
If you’re not familiar with Docker images, you might wonder what are the advantages of this deployment approach over simply deploying the web application file to an Azure App Service Web Apps instance.
For one, Docker images are in no way specific to the service where they are hosted. Changing the hosting service or the provider in the future will only affect the release pipeline, keeping the application code and build pipeline unchanged.
More importantly, Docker images can include additional software dependencies apart from .NET Core runtime, although the default Docker image as configured in the Dockerfile created by the Visual Studio template, doesn’t have any.
If these dependencies are standalone services and not components directly used by the application, they will typically be deployed as separate Docker images. The multiple images required by an application and their interaction are configured using a docker-compose.yml file. Azure App Service Web App for Containers already has preview support for using such a Docker compose file instead of a single Docker image.
However, as the number of required Docker images grows, a dedicated service for hosting Docker images becomes a better choice. In Azure, there are two available: Azure Kubernetes Service (a managed instance of a standard container orchestration service) and Azure Service Fabric (recommended choice when fully supported Microsoft’s technology stack is required).
When this point is reached, it makes sense to use separate Docker images not only for third party dependencies, but also for different internally developed components of the application. To allow for this, each one of them needs to be developed as a standalone service. Such services are usually called microservices. They are a key part of the so-called cloud-native applications, i.e. applications which are built from the ground up for hosting in the cloud so that they can be easily horizontally scaled.
Serverless Computing
All deployment models described so far include server resources available and payed (paid) for full-time (either directly in Infrastructure-as-a-Service model or indirectly in Platform-as-a-Service and Cloud-Native Applications models).
Serverless computing is different from all of those in that server resources are only consumed and payed for, when they are used. The idea of not choosing specific server resources in advance and paying for those is also where the name serverless computing originates from.
In Azure, there are two serverless services available. Azure Container Instances is a serverless hosting model for Docker containers. Since it doesn’t include any advanced orchestration capabilities, it’s more like Azure App Service Web App for Containers than Azure Kubernetes Service (AKS) or Azure Service Fabric. The main difference is that the resources are paid for based on actual consumption not the selected performance specifications.
The second serverless service is Azure Functions. This one is quite similar to Azure App Service Web Apps. However, it doesn’t support hosting of regular ASP.NET or ASP.NET Core web applications. Instead, a specific Azure Functions application model must be used.
As the name implies, Azure Functions applications consist of individual functions. These can be invoked using different triggers, e.g. a timer, an HTTP request, a message arriving in a queue etc. Such an application model is often also called Function-as-a-Service. Of course, C# is one of supported languages. Azure Functions runtime version 1.x requires development in the .NET framework, later runtimes (versions 2.x and 3.x) require development in .NET Core. All runtimes are still fully supported.
Visual Studio 2019 has built-in support for developing Azure Functions applications in C# for any runtime version which also includes running and debugging them locally and publishing them directly to Azure.
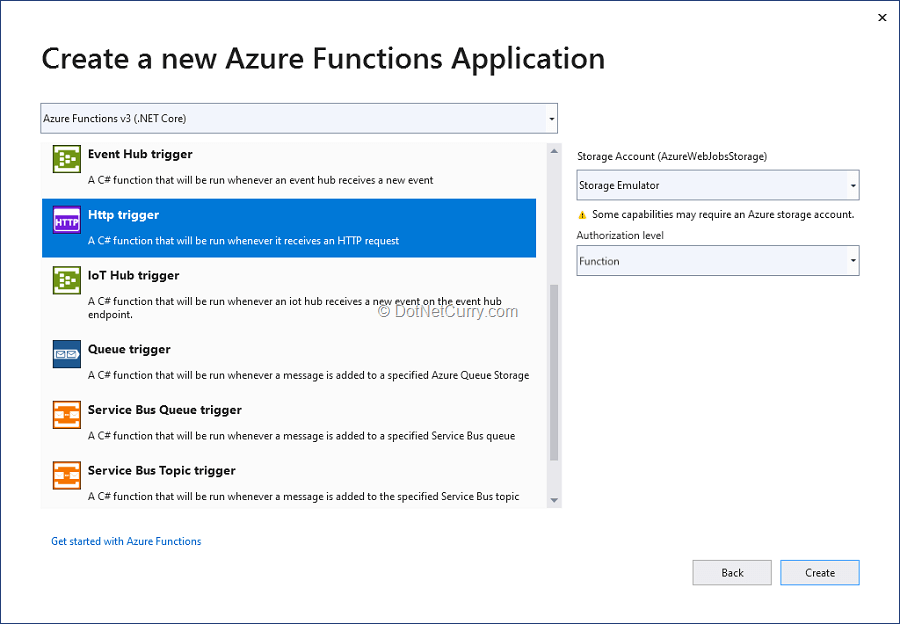
Figure 15: Selecting Azure Functions runtime version and function triggers
When creating a new application using the Azure Functions project template, the runtime version needs to be selected first. For every new function, the type of trigger to bind it to, must be selected. The selected trigger is then further configured using attributes as can be seen from the following code snippet:
[FunctionName("Function1")]
public static async Task<IActionResult> Run(
    [HttpTrigger(AuthorizationLevel.Anonymous, "get", "post", Route = null)] HttpRequest req,
    ILogger log)
{
    log.LogInformation("C# HTTP trigger function processed a request.");

    string name = req.Query["name"];

    string requestBody = await new StreamReader(req.Body).ReadToEndAsync();
    dynamic data = JsonConvert.DeserializeObject(requestBody);
    name = name ?? data?.name;

    return name != null
        ? (ActionResult)new OkObjectResult($"Hello, {name}")
        : new BadRequestObjectResult("Please pass a name on the query string or in the request body");
}
Once the application is ready, it can be deployed to Azure from the Publish window in Visual Studio just like a regular web application. In the wizard, an Azure Functions application previously created in Azure Portal can be selected, or a new one can be created in the selected Azure subscription directly from Visual Studio.
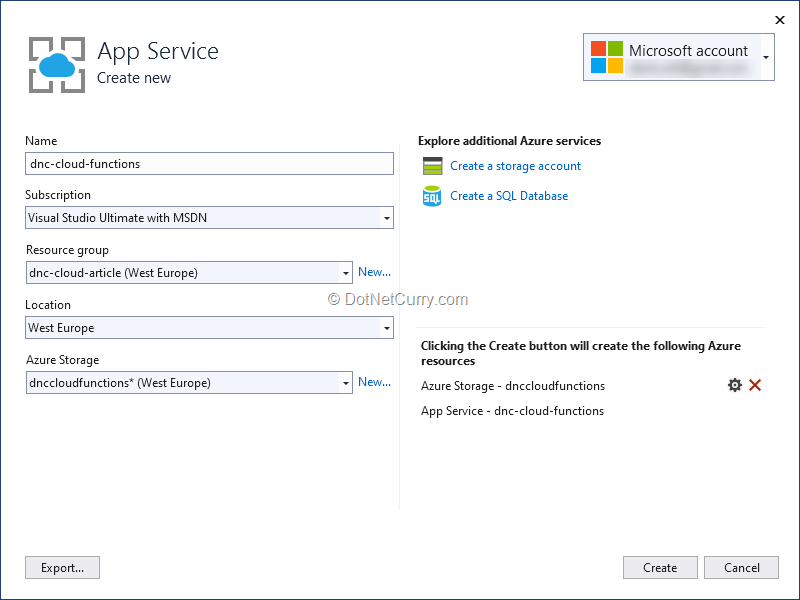
Figure 16: Creating a new Azure Functions application inside Visual Studio
Since a live application is usually not deployed directly to production from Visual Studio, there’s support for building and deploying Azure Functions applications also in Azure DevOps. The build pipeline for that should be created from the .NET Core Function App to Windows on Azure pipeline template.
It creates a mostly preconfigured pipeline which only requires us to select the target Azure Functions application to deploy the application to. The reason for that is that unlike many other build pipeline templates, this one also includes a step to publish the application and not only to build it.
To trigger application deployment on every commit, this should be good enough. But to take advantage of additional functionalities provided by release pipelines such as manual approvals, a separate release pipeline needs to be created.
In this case, we first need to delete the second stage of the build pipeline which does the deployment and only keep the first stage which builds the application and publishes the artifact to be consumed from the release pipeline. We can create the release pipeline from the Deploy a function app to Azure Functions pipeline template and configure it by selecting the build artifact from the build pipeline as the trigger and an Azure Functions application as the deploy target.
Developing applications in .NET
Found this tutorial useful? To learn more about developing applications in .NET, you may read my previous article from this series:
Developing Web Applications in .NET
Developing Desktop applications in .NET
Developing Mobile Applications in .NET
Conclusion
It’s easy to think of the cloud as just a deployment model for your application.
In a way, it is exactly that. However, cloud services offer much more than having virtual machines without your own hardware. If you’re migrating an existing application to the cloud, moving the virtual machine from your on-premise hardware to the cloud, might be the only option.
But there are many other options which can be simpler and more cost-effective if they fit your requirements. Especially, if you’re creating a brand-new application, it’s a good idea to consider the services available and choose the most appropriate one before you start the development. This choice is likely to affect the way you need to develop your application even if you already know that you want to stay in the .NET ecosystem you’re familiar with.
This article was technically reviewed by Daniel Jimenez Garcia.
This article has been editorially reviewed by Suprotim Agarwal.
C# and .NET have been around for a very long time, but their constant growth means there’s always more to learn.
We at DotNetCurry are very excited to announce The Absolutely Awesome Book on C# and .NET. This is a 500 pages concise technical eBook available in PDF, ePub (iPad), and Mobi (Kindle).
Organized around concepts, this Book aims to provide a concise, yet solid foundation in C# and .NET, covering C# 6.0, C# 7.0 and .NET Core, with chapters on the latest .NET Core 3.0, .NET Standard and C# 8.0 (final release) too. Use these concepts to deepen your existing knowledge of C# and .NET, to have a solid grasp of the latest in C# and .NET OR to crack your next .NET Interview.
Click here to Explore the Table of Contents or Download Sample Chapters!
Was this article worth reading? Share it with fellow developers too. Thanks!
Damir Arh has many years of experience with software development and maintenance; from complex enterprise software projects to modern consumer-oriented mobile applications. Although he has worked with a wide spectrum of different languages, his favorite language remains C#. In his drive towards better development processes, he is a proponent of Test-driven development, Continuous Integration, and Continuous Deployment. He shares his knowledge by speaking at local user groups and conferences, blogging, and writing articles. He is an awarded Microsoft MVP for .NET since 2012.