This tutorial on React js is the first in a series of articles we will posting. We will be adding links to other React.js tutorial very soon.
JavaScript libraries and frameworks like React js have taken the world of full stack development by storm. Because of the capabilities these frameworks provide, the JavaScript language in itself has been getting a lot of attention and as a result, is now being used in non-browser platforms like server, mobile apps and devices.
This article is published from the DNC Magazine for Developers and Architects. Download this magazine from here [PDF] or Subscribe to this magazine for FREE and download all previous and current editions.
The usage of the language at this level has brought in a lot of challenges and as a result, has opened up new doors for innovation.
Several open source developers and even big companies are investing heavily in contributing to this growing community, and helping to find solutions to the common problems developers face.
One of the popular front end libraries that solves problems related to the “View” or UI is React js from Facebook.
This React js tutorial will introduce you to the basic concepts of React.js and will get you started with the library through a few simple examples.
Why React js?
Facebook created the React library to address the age-old challenge of efficiently dealing with the View part of large-scale websites built using the Model-View-Controller (MVC) architecture.
React js understands that DOM manipulation is an expensive operation, so it provides the developer a Virtual DOM. Whenever a change is made to a portion of the UI, React.js calculates the minimum number of DOM operations needed to achieve the new state. This allows you to render the page on every change without worrying about DOM performance.
React provides a declarative way to build custom UI components and render them on the page. It is built with simplicity and unidirectional data flow in mind. This is also called top-down approach, as the data always flows from the top UI element to the bottom.
The library is also easy to learn and use.
A simple trend search shows its growing popularity in comparison to other JavaScript languages and frameworks:
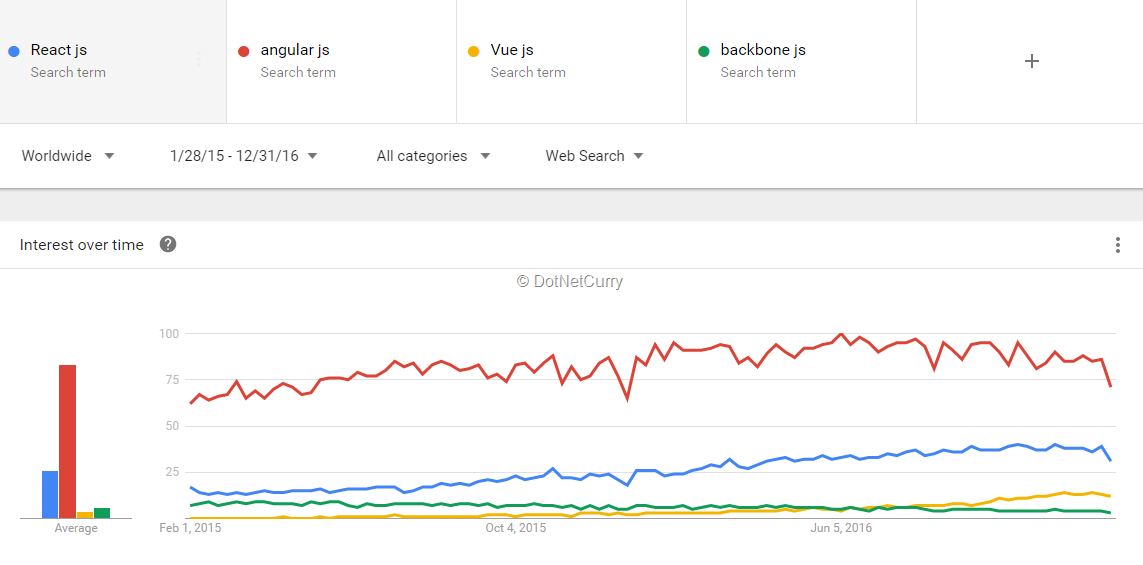
Figure 1: React js interest over time
Note: It is very important to remember that React deals with only the UI (view). It is not a complete framework like Angular that deals with UI, Data, Bindings, Routing, HTTP Calls etc. To manage data flow and data in React apps, Facebook created Flux and Redux.
Both Flux and redux have libraries to support the usage of these patterns in React applications. There are third party libraries or react plugins to get other features like Routing. To build a full SPA using React, we need to make these libraries work together. Discussing these features is out of scope for this article. Redux is covered in another article by Gil Fink in this edition. We will discuss the other libraries mentioned in this article in the near future.
React.js - Basic Concepts
Before we write a basic React js application, let’s spend a moment to understand the concepts around the React library.
Virtual DOM
We are all aware of the DOM created and managed by browsers. React creates another DOM, called Virtual DOM to work with the application.
The Virtual DOM is updated whenever the data of the component is modified. After updating the Virtual DOM, React finds the difference between the states of previous Virtual DOM and the current one. Then it renders only the portions where it finds difference between the two and not the whole UI. This makes the applications running on React more performant, as only the required portions of the UI are updated when there is a change in data.
Components
Components are custom HTML elements with business specific behavior. In React, every component is created as a component class. A component has a render method, which returns the view to be rendered when the component is used on the page. The component also manages the data used for binding the view.
A component in React can be created either using the React.createClass method or as a JavaScript class by extending the Component class in React. The following snippet shows a simple component:
var First = React.createClass({
  render(){
    return <div>This is my first component!</div>;
  }
});
JSX
JSX adds XML to JavaScript.
The views in the react components are defined using JSX. The HTML elements and the other react components to be rendered inside the component have to be mentioned in the component using JSX. It allows us to bind data on the HTML elements, handle events using the methods on the component and bind values to the properties of the HTML elements.
Every component in React has to implement a method named render, this method has to return the JSX to be presented on the view.
The component example in the previous section shows a simple example of JSX. We will see more examples later.
React js Component Lifecycle Methods
Every React component goes through a series of lifecycle events. React provides us with lifecycle methods to run a piece of logic when these events occur.
The lifecycle events occur when an instance of the component gets created, when the component has to be updated and when the component has to be removed from the page.
The following are some of the lifecycle methods provided by React:
- componentWillMount: Gets invoked when the component is about to mount on the page
- componentDidMount: Gets invoked after the component is rendered on the page
- componentWillUpdate: Gets invoked before a component is updated after a change in data
- componentWillReceiveProps: Gets invoked when the component receives properties or when the properties are updated
- componentDidUpdate: Gets invoked immediately after the component is updated because of change in the data of the component
- componentWillUnmount: Gets invoked before a component is removed from the DOM. It can be used to perform any clean up tasks on the component
State, Props and Unidirectional data flow
Every component has a state object that plays the role of view model for the component. React works on immutable data, so the state object has to be re-created whenever there is a change in the value. The lifecycle methods componentWillUpdate and componentDidUpdate are invoked when the value of state changes.
A component can receive inputs from another component through attributes on the component element. They are called Props. The lifecycle method componentWillReceiveProps is invoked when the props are set or changed. As the values of the props are passed from the component containing the current component, values of the props can be modified only in the parent component. When these values change, it triggers the componentWillReceiveProps life cycle method of the child component.
The data in a React application flows from top to bottom. A typical React application can be seen as a tree of components. The data always flows from the components at the higher level, to the components at the lower level. React doesn’t support flow of data from the lower level components to higher level components. The unidirectional data flow is a performance booster for applications, as the library has to now perform lesser number of checks to update the UI.
The unidirectional data flow also makes the behavior of the application predictable, as there won’t be any cyclic dependencies between the components.
Building a Reactjs Hello World Example on Codepen
Now that we are familiar with the core concepts of React, let’s explore the usage of these concepts through an example. Like any other front-end technology, the development environment for React needs Node.js to be installed.
Download and install Node.js from the official website, if you don’t already have it installed on your machine. This installer installs Node.js and the package manager npm. A React application can be written using any version of JavaScript as well as JavaScript preprocessors like TypeScript. The JavaScript static type checker Flow can also be used in React applications.
For this article, we will stick to JavaScript and use the ES2016 version of JavaScript, as it is the current version of JavaScript and is the recommended version to be used these days.
To get familiar with the minimum set of things needed to write a react application, let’s build a small demo using Codepen which is a very useful website to share front-end based demos.
You can quickly write your demo using HTML, CSS and JavaScript and share it with others. It also supports JavaScript transpilers like Babel, TypeScript, CoffeeScript and CSS preprocessors like LESS, SCSS to allow for demos using the tools we are comfortable with.
Note: In addition to npm, we have one more package manager for JavaScript packages called yarn. Yarn is created by Facebook to address most of the issues developers face while working with npm.
Yarn is a fast, secured and a reliable package manager. It doesn't have a new package repository, it works on npm and helps in maintaining the right versions of the packages. It is gaining a lot of popularity these days because of these features. To learn more about yarn, you can visit the official site https://yarnpkg.com/en/.
Open the site codepen.io in your favorite browser. Click on the New Pen button on the top right corner to create a new demo.
To write a react application, we need to apply a few settings to codepen.
Click the Settings button located in the menu on the top right corner of the page. The settings dialog has multiple tabs to apply different settings for HTML, CSS and JavaScript. Switch to the JavaScript tab.
Here we need to set the transpiler and apply the libraries required to work with React. Apply the settings as shown in the following figure:
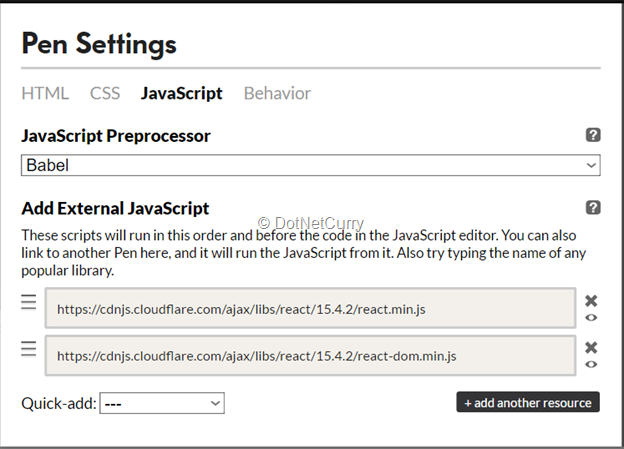
Figure 2: CodePen Settings for React js demo
The following changes are made in the above dialog:
Click the Save and Close button below the dialog to apply these changes.
Now this pen has all the required resources. Let’s write a hello world kind of a sample first. Add the following div element to the HTML template of the pen:
<div id="root"></div>
We will render a React component inside this div. Add the following code to the JavaScript pane in the pen:
var Hello = React.createClass({
  render: function(){
    return (
      <div>This is my first react component!</div>
    );
  }
});
The above component is created using ES5 syntax. As you can see, it uses the createClass method on the React object to create the component. The render function in the component object returns the JSX object to be rendered inside the component. Though it looks like HTML now, it is not pure HTML.
We will see more examples of JSX shortly.
Now this component has to be rendered on the page. To do so, add the following statement to the JavaScript pane:
ReactDOM.render(, document.getElementById('root'));
Observe the way the Hello component is used in the template. The object of the component is used in JSX passed to the ReactDOM.render method. The second argument passed to this method is the target DOM element where the component has to be rendered.
Here, we are selecting the div added to the template and passing it to the render method. The object itself is the selector for the component.
Now you will see the output of this code below the code section. The following screenshot shows how codepen looks like after these changes:
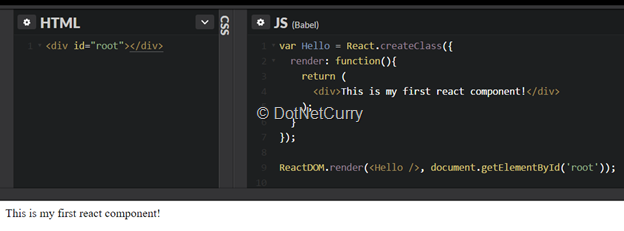
Figure 3: React Hello Word component
The message shown in the component is now hard coded in the div element. Let’s refactor this code to move the message into the state object and use it from there.
The following snippet shows the modified Hello component:
var Hello = React.createClass({
  getInitialState: function(){
    return { message: "This is my first react component!" };
  },
  render: function(){
    return (
      <div>{this.state.message}</div>
    );
  }
});
The component now has a new method, getInitialState. This method returns the state object of the component. The state object can be used to bind data and events on the component’s view. The div element in JSX is now modified to bind the message using the state object. The output of this code still remains the same.
Let’s set a new value to the message after 5 seconds.
Doing so involves changing the value in the state object. As mentioned earlier, the state object is immutable and any modifications to this object will create a new state object. React provides us with the setState method on every component to modify the value of the state object. And it is better to set the timeout to change the message after the component is initialized. We need to use the componentDidMount lifecycle method for this.
Add the following method to the component:
componentDidMount: function(){
  setTimeout(() => {
    this.setState({ message: "This message is modified after 5 seconds!" });
  }, 5000);
}
Now you will see that the message displayed inside the div element gets modified after 5 seconds. The setState method accepts the change to be applied to the state object and it creates a new state object and modifies the change it received.
You can find the codepen containing this demo over here. codepen.io/sravikiran/pen/wgZRRB?editors=1010
Building a More Meaningful React js Example
Now that we have completed the hello-world tradition, let us build a more meaningful example to explore a few more features of React.js.
As we saw in the codepen sample, to build a React application, we need a transpiler like babel. For most React applications, babel is the de facto transpiler as Facebook uses babel quite extensively and there are a number of babel plugins built to support the development of React. These plugins are available as a babel preset, named babel-preset-react.
Along with these babel packages, we need a good development setup.
The task of setting up a development environment for React takes some time and effort. To save some setup time, we have the npm package create-react-app.
We will look at the process of environment setup later in a separate article. To keep this article focused on the features of React, we will use the generator create-react-app. This package has to be installed globally using npm.
The following command does this:
> npm install –g create-react-app
Once the above command runs successfully, we can create a new React js application by running the following command from any location in the system:
> create-react-app my-app
This command creates a new folder with the name my-app and adds a few files and folders inside it. It also installs all the required dependencies for the project.
We can start writing react application directly without worrying too much about the setup. The application created already has some basic code in it. The following image shows the folder structure of the application created in Visual Studio Code:
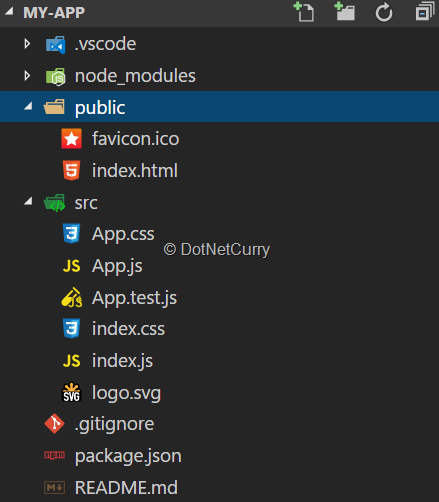
Figure 4: React js VS Code folder structure
The generated application already has some React code. It has a component named App and the component is rendered on the page in the file index.js.
To start this application, open a command prompt and run the following command:
> npm start
This command starts the application and launches it in your default browser.
You will see the following screen on the browser:
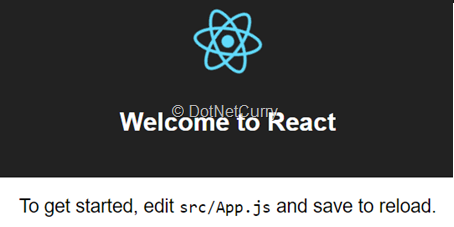
Figure 5: React js app running in browser
We will modify this sample to add two new components and use them in the main App component.
We are going to display a list of people working in an imaginary software company and will allow the user to filter the data based on different parameters.
Add a new file to the application and name it ListView.js. This file will contain a component displaying the list of employees.
The following snippet shows the code of this component:
import React, { Component } from 'react';
export class ListView extends Component {
  constructor(props) {
    super(props);
    this.state = {
      employees: [
        {
          name: "Alex Kesler",
          designation: "Software Architect",
          project: "URR"
        },
        {
          name: "Raghu Shah",
          designation: "Software Engineer",
          project: "SHU"
        },
        {
          name: "Kim Lee",
          designation: "Intern",
          project: "URR"
        },
        {
          name: "Joe Walsh",
          designation: "Manager",
          project: "SHU"
        },
        {
          name: "Christine Sam",
          designation: "QA Engineer",
          project: "FHD"
        },
        {
          name: "Tim Asermeley",
          designation: "UX Designer",
          project: "FHD"
        },
        {
          name: "Raji Sinha",
          designation: "Tech Lead",
          project: "SHU"
        }
      ]
    };
  }
  render() {
    let jsx = <table style={{ display: "inline-table" }}>
      <thead>
        <tr>
          <th>Name</th>
          <th>Designation</th>
          <th>Project</th>
        </tr>
      </thead>
      <tbody>
        {
          this.state.employees.map(function (employee) {
            return <tr key={employee.name}>
              <td>{employee.name}</td>
              <td>{employee.designation}</td>
              <td>{employee.project}</td>
            </tr>
          })
        }
      </tbody>
    </table>;

    return jsx;
  }
}
This component looks different from the component we built earlier.
As we are using the ES2015 syntax now, we are creating a class for the component rather than calling the React.createClass method on the React object. React supports this way to create the component while using the ES2015 syntax to write JavaScript.
To set the state object in the class, we don’t have to write the getInitialState method as the constructor of the class has to initialize the state. So we are setting the state object directly in the constructor.
One more thing to be noticed in the constructor is the call to the super() class constructor. This call passes the properties of the current component.
Some of you may have a question on support of this special mix of JavaScript and XML in Visual Studio code. Thankfully, the editor has good support for the JSX syntax. It also supports emmet, also known as zen coding of HTML inside the JSX blocks.
Take a close look at JSX of this component. It has a table that iterates through the entries in the employees array and prints rows on the screen. The table element has a style applied.
The following snippet shows the table element:
<table style={{ display: "inline-table" }}>
The value of the style is applied in an expression. As the display type of the table is set to a static value, it is assigned using double quotes. The value to the display type can be set using a variable as well.
To loop through the employees array, we are using the map method of the array in JSX and the map method builds the row to be printed for every record.
The following snippet shows the loop that goes through the employees list:
this.state.employees.map(function (employee) {
  return <tr key={employee.name}>
    <td>{employee.name}</td>
    <td>{employee.designation}</td>
    <td>{employee.project}</td>
  </tr>
})
If you worked on jQuery before, this loop looks similar to the way we used to hand build the markup inside the loops. But now we are building the markup to be rendered more natively, rather than doing it inside a string. And we are using data binding to bind the values of the objects rather than appending them using string concatenation. This snippet shows the essence of JSX, the right mix of markup and the JavaScript functionality.
To use this component in the App component, we need to import the component there and use it in the JSX of the App component.
The code is shown below:
import React, { Component } from 'react';
import { ListView } from './ListView';
import logo from './logo.svg';
import './App.css';
class App extends Component {
  render() {
    let jsx = <div>
      <div>
        <img src="{logo}" alt="logo" />
        <h2>A list of Employees</h2>
      </div>
      <ListView />
    </div>;
    return (
      jsx
    );
  }
}
export default App;
Now the page looks like the following image:
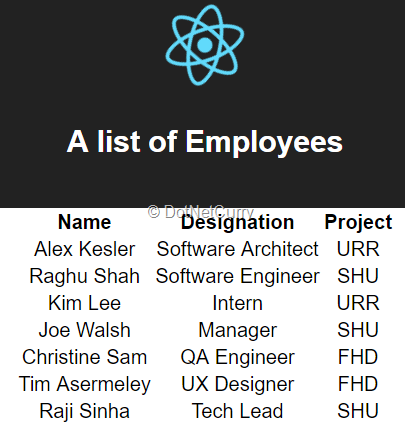
Figure 6: List of Employees
React.js Filter example
Now let’s add capabilities to filter this data.
For this, we will create another component to show the controls required to filter the data and communicate the applied filters to the ListView component.
Let’s build the component to filter the data. The following snippet shows this component:
import React, { Component } from 'react';
import { ListView } from './ListView';
export class Filter extends Component {
  constructor(props) {
    super(props);
    this.state = {
      field: "name",
      value: ""
    };
    this.filter = this.filter.bind(this);
    this.setField = this.setField.bind(this);
  }
  render() {
    let jsx = <div>
      <div>Field:
        Name
        Designation
        Project
      </div>
      <div>Value: </div>
      <ListView field={this.state.field} value={this.state.value} />
    </div>;
    return (
      jsx
    );
  }
  setField(event) {
    this.setState({ field: event.target.value });
  }
  filter(event) {
    this.setState({ value: event.target.value });
  }
}
This component has a drop down to select the field on which the filter has to be applied. It also has a textbox to accept the value to be used for filtering. Notice that the dropdown and the text box have their onChange event bound with the methods in the component class. These methods are invoked when the change event is triggered on the HTML elements.
Notice the last two statements inside the constructor where the current object of the component is bound with the methods filter and setField:
this.filter = this.filter.bind(this);
this.setField = this.setField.bind(this);
This is done to ensure that meaning of this remains the current component inside the methods handling events. Otherwise, the event handling methods are called in the global context and we won’t have access to the members defined inside the component class.
The JSX of the Filter component uses the ListView component and it passes the values of state.field and state.value to the ListView component. These values will be accessible inside the ListView component through props. When these values are modified, React will invoke the render method of the ListView component.
So, we need to use these values in the render method to filter the data and create the JSX of the component.
The following snippet shows the modified render method of the ListView component and a method to filter the data:
filterEmployees() {
  let employees = this.state.employees;
  if (this.props.field && this.props.value) {
    employees = this.state.employees.filter((e) => {
      return e[this.props.field].toLowerCase().indexOf(this.props.value.toLowerCase()) >= 0;
    });
  }
  return employees;
}

render() {
  let employees = this.filterEmployees();
  let jsx = <table style={{ display: "inline-table" }}>
    <thead>
      <tr>
        <th>Name</th>
        <th>Designation</th>
        <th>Project</th>
      </tr>
    </thead>
    <tbody>
      {
        employees.map(function (employee) {
          return <tr key={employee.name}>
            <td>{employee.name}</td>
            <td>{employee.designation}</td>
            <td>{employee.project}</td>
          </tr>
        })
      }
    </tbody>
  </table>;
  return jsx;
}
Now all we need to do is, update the App component to use the Filter component.
The following snippet shows the modified App component:
import React, { Component } from 'react';
import { Filter } from './Filter';
import logo from './logo.svg';
import './App.css';

class App extends Component {
  render() {
    let jsx = <div>
      <div>
        <img src="{logo}" alt="logo" />
        <h2>A list of Employees</h2>
      </div>
      <Filter />
    </div>;
    return (
      jsx
    );
  }
}
export default App;
Now run the application after saving these changes.
You will see the filters on the page and the data in the table getting updated when the filters are modified.
The following screenshot shows an instance of the page when the filters are applied:
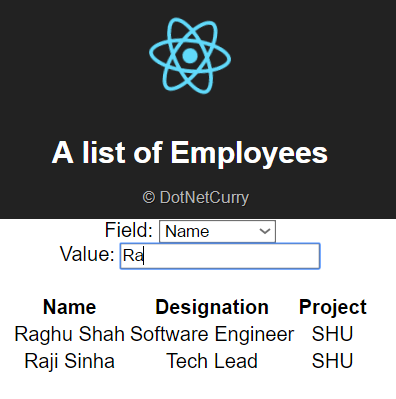
Figure 7: React js filtering data
Conclusion
Component based declarative programming is the approach developers want to use in their daily work these days. React js is a library that supports this model of development. This introductory React tutorial is an attempt to let you understand what React is and to get you started with it.
We will explore more features of React in our forthcoming tutorials.
Download the entire source code of this article (Github)
This article has been editorially reviewed by Suprotim Agarwal.
C# and .NET have been around for a very long time, but their constant growth means there’s always more to learn.
We at DotNetCurry are very excited to announce The Absolutely Awesome Book on C# and .NET. This is a 500 pages concise technical eBook available in PDF, ePub (iPad), and Mobi (Kindle).
Organized around concepts, this Book aims to provide a concise, yet solid foundation in C# and .NET, covering C# 6.0, C# 7.0 and .NET Core, with chapters on the latest .NET Core 3.0, .NET Standard and C# 8.0 (final release) too. Use these concepts to deepen your existing knowledge of C# and .NET, to have a solid grasp of the latest in C# and .NET OR to crack your next .NET Interview.
Click here to Explore the Table of Contents or Download Sample Chapters!
Was this article worth reading? Share it with fellow developers too. Thanks!
Rabi Kiran (a.k.a. Ravi Kiran) is a developer working on Microsoft Technologies at Hyderabad. These days, he is spending his time on JavaScript frameworks like AngularJS, latest updates to JavaScript in ES6 and ES7, Web Components, Node.js and also on several Microsoft technologies including ASP.NET 5, SignalR and C#. He is an active
blogger, an author at
SitePoint and at
DotNetCurry. He is rewarded with Microsoft MVP (Visual Studio and Dev Tools) and DZone MVB awards for his contribution to the community