In SharePoint 2010 if you had to customize or add new features to SharePoint, the only way was to reluctantly install code (which could be untrusted) directly into SharePoint's servers. Although sandbox solutions existed, the restrictions applied were stringent which forced devs to run even untrusted custom code, in full-trust mode.
SharePoint 2013 Apps uses JavaScript Object Model (JSOM). Think of it as similar to the development models introduced for Windows Phone 8, Windows 8, WinRT, Office 2013.
SharePoint App Model
Everything (including lists and libraries) in SharePoint is now an App. To solve the problem of running custom code on the server, SharePoint apps do not live on the server. They can run on a cloud server like Azure, IIS or within a browser client. Apps are granted permissions to SharePoint sites via OAuth, and communicate with SharePoint via REST APIs or via Client side object model.
Some of the issues of running fully trusted code in SharePoint 2010 was it could destabilize the whole farm and it was a challenge to migrate to newer versions of SharePoint. These issues get resolved in SharePoint 2013 as Apps can be easily deployed on the site, upgraded and can also be easily removed when they are no longer required. They do not use any Server-Side Object Model (SSOM) in the code, hence the code does not create any unmanageable code on the server farm and does not corrupt memory.
More information on the App Model can be obtained from the link here: http://msdn.microsoft.com/en-us/library/office/fp179930(v=office.15).aspx
Some Points to Note:
- SharePoint App can be created on the Developer Site
- The default Administrator cannot create App. So there should be other users with Administrator credentials in the Active Directory
- This user now must be the Administrator user group of the Developer site
The necessary details for configuration of the environment for apps for SharePoint can be found here: http://technet.microsoft.com/en-us/library/fp161236(v=office.15).aspx
Some important points regarding SharePoint App
When we work on SharePoint Apps, we come across two major concepts: App Web and Host Web.
App Web - App is required to access SharePoint components like Lists, WorkFlow types, Pages, etc. so we need a separate site where these components are deployed. This site is called as App Web.
Host Web - This is the SharePoint site where the App is actually installed, it is called as Host web.
Detailed information for App Web and Host web can be found from here: http://msdn.microsoft.com/en-us/library/office/fp179925.aspx
In the following steps, we will see the implementation of a SharePoint 2013 App
Step 1: Open SharePoint 2013 Developer Site and create a List App with the following Fields:
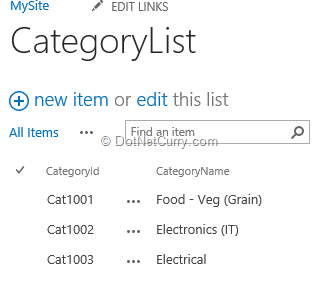
Note: When we create a List in SharePoint, the default field of name ‘Title’ is already available. Rename the Title field to CategoryId. But when we write the code, we need to refer this field using ‘Title’ and not as CategoryId.
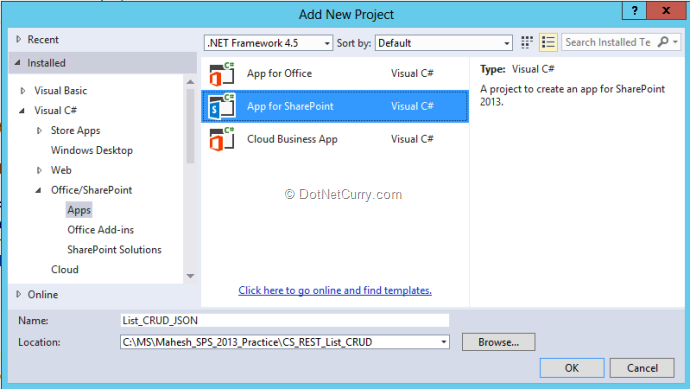
Step 2: Open Visual Studio 2013 and create a new SharePoint App as shown here:
Step 3: Open the Default.aspx from the ‘Pages’ folder and in the asp.Content with id as PlaceHolderMain, add the below HTML markup code:
<table>
    <tr>
    <td>
    <table>
        <tr>
            <td>Category Id</td>
            <td>
                <input type="text" id="CategoryId" class="c1"/>
            </td>
            </tr>
            <tr>
            <td>Category Name</td>
            <td>
                <input type="text" id="CategoryName" class="c1"/>
            </td>
            </tr>
            <tr>
            <td>
                <input type="button" value="New" id="btn-new" />
            </td>
            <td>
                <input type="button" value="Add" id="btn-add" />
            </td>
            <td>
                <input type="button" value="Update" id="btn-update" />
            </td>
            <td>
                <input type="button" value="Delete" id="btn-delete" />
            </td>
            <td>
                <input type="button" value="Find" id="btn-find" />
            </td>
        </tr>
    </table>
    </td>
    <td>
    <table id="tblcategories">

    </table>
    </td>
    </tr>
</table>
<div id="dvMessage"></div>
Step 4: Since we are creating a SharePoint App, the complete code will be written using JavaScript. In SharePoint 2013 we are provided with the JavaScript Object Model (JSOM), so we need to understand some of the main objects which are usable for App development. In the project, we have _references.js file under the Scripts folder which contains necessary references for JavaScript files for App development. In this case we will be using SP.ClientContext object.
Sp.ClientContext
- Represents the SharePoint Objects and Operations context.
- Used to access SiteCollection, WebSite, List, etc.
- Used to perform async calls to the SharePoint to accessing data.
- Load method: Retrieves the properties of a client object from the server.
- executeQueryAsync method: Executes the current pending request asynchronously on the server.
Step 5: Open App.js from the Scripts folder and add the JavaScript code for performing CRUD operations on the CategoryList. There are some specific steps we need to implement for every operation:
We need to work with the App Web and Host Web URL. To do that the following helper method with querystring parameter will help us out:
function manageQueryStringParameter(paramToRetrieve) {
    var params =
    document.URL.split("?")[1].split("&");
    var strParams = "";
    for (var i = 0; i < params.length; i = i + 1) {
        var singleParam = params[i].split("=");
        if (singleParam[0] == paramToRetrieve) {
            return singleParam[1];
        }
    }
}
In the App.js declare variables to store the Host web and App web:
var hostWebUrl;
var appWebUrl;
Get the Host Web and App Web Url in document.ready:
hostWebUrl = decodeURIComponent(manageQueryStringParameter('SPHostUrl'));
appWebUrl = decodeURIComponent(manageQueryStringParameter('SPAppWebUrl'));
In the above code: SPHostUrl represents the full URL of the host site and SPAppWebUrl represents the full URL of the app web.
Declare the following global object for the current object context for SharePoint:
var context = SP.ClientContext.get_current();
For performing operations using JSOM, we need to implement the following logic:
//Creating the Client Content object using the Url
var ctx = new SP.ClientContext(appWebUrl);

//Get the Web site
var web = appCtxSite.get_web();

//Get the List using its name
var list = web.get_lists().getByTitle("CategoryList");
The above steps are commonly used across each of the methods.
Add the following method in the App.js for Loading List items:
function listAllCategories() {

    var ctx = new SP.ClientContext(appWebUrl);
    var appCtxSite = new SP.AppContextSite(ctx, hostWebUrl);

    var web = appCtxSite.get_web(); //Get the Web

    var list = web.get_lists().getByTitle("CategoryList"); //Get the List

    var query = new SP.CamlQuery(); //The Query object. This is used to query for data in the List

    query.set_viewXml('<View><RowLimit></RowLimit>10</View>');

    var items = list.getItems(query);

    ctx.load(list); //Retrieves the properties of a client object from the server.
    ctx.load(items);

    var table = $("#tblcategories");
    var innerHtml = "<tr><td>ID</td><td>Category Id</td><td>Category Name</td></tr>";

    //Execute the Query Asynchronously
    ctx.executeQueryAsync(
        Function.createDelegate(this, function () {
            var itemInfo = '';
            var enumerator = items.getEnumerator();
            while (enumerator.moveNext()) {
                var currentListItem = enumerator.get_current();
                innerHtml += "<tr><td>"+ currentListItem.get_item('ID') +"</td><td>" + currentListItem.get_item('Title') + "</td><td>" + currentListItem.get_item('CategoryName')+"</td></tr>";
            }
            table.html(innerHtml);
        }),
        Function.createDelegate(this, fail)
        );

}
The above code performs the following operations:
- Use SP.CamlQuery() to create query object for querying the List
- The query object is set with the criteria using xml expression using set_viewXml() method
- Using getItems() method of the List the query will be processed
- executeQueryAsync() methods processes the batch on the server and retrieve the List data. This data is displayed using HTML table after performing iterations on the retrieved data
Add the following method in App.js to create a new list entry:
function createCategory() {
    var ctx = new SP.ClientContext(appWebUrl);//Get the SharePoint Context object based upon the URL
    var appCtxSite = new SP.AppContextSite(ctx, hostWebUrl);

    var web = appCtxSite.get_web(); //Get the Site

    var list = web.get_lists().getByTitle("CategoryList"); //Get the List based upon the Title
    var listCreationInformation = new SP.ListItemCreationInformation(); //Object for creating Item in the List
    var listItem = list.addItem(listCreationInformation);

    listItem.set_item("Title", $("#CategoryId").val());
    listItem.set_item("CategoryName", $("#CategoryName").val());
    listItem.update(); //Update the List Item

    ctx.load(listItem);
    //Execute the batch Asynchronously
    ctx.executeQueryAsync(
        Function.createDelegate(this, success),
        Function.createDelegate(this, fail)
       );
}
The above code performs the below operations:
- To add a new item in the list, the SP.ListCreationInformation() object is used
- This object is then passed to the addItem() method of the List. This method returns the ListItem object
- Using the set_item() method of the ListItem the values for each field in the List is set and finally the list is updated
In App.js, add the following code to search the items for the list based upon it:
function findListItem() {

    listItemId =  prompt("Enter the Id to be Searched ");
    var ctx = new SP.ClientContext(appWebUrl);
    var appCtxSite = new SP.AppContextSite(ctx, hostWebUrl);

    var web = appCtxSite.get_web();

    var list = web.get_lists().getByTitle("CategoryList");

    ctx.load(list);

    listItemToUpdate = list.getItemById(listItemId);

    ctx.load(listItemToUpdate);

    ctx.executeQueryAsync(
        Function.createDelegate(this, function () {
            //Display the Data into the TextBoxes
            $("#CategoryId").val(listItemToUpdate.get_item('Title'));
            $("#CategoryName").val(listItemToUpdate.get_item('CategoryName'));
        }),
        Function.createDelegate(this,fail)
        );


}
Now add the following code to Update the ListItem based upon the id:
function updateItem() {
    var ctx = new SP.ClientContext(appWebUrl);
    var appCtxSite = new SP.AppContextSite(ctx, hostWebUrl);

    var web = appCtxSite.get_web();

    var list = web.get_lists().getByTitle("CategoryList");
    ctx.load(list);

    listItemToUpdate = list.getItemById(listItemId);

    ctx.load(listItemToUpdate);

    listItemToUpdate.set_item('CategoryName', $("#CategoryName").val());
    listItemToUpdate.update();

    ctx.executeQueryAsync(
        Function.createDelegate(this, success),
        Function.createDelegate(this,fail)
        );

}
In the above two methods, the implementation is almost similar. The only difference is that in the updateItem() method after searching the record, the new value is set for the CategoryName and the ListItem is updated.
In App.js add the below code to Delete ListItem:
function deleteListItem() {
    var ctx = new SP.ClientContext(appWebUrl);
    var appCtxSite = new SP.AppContextSite(ctx, hostWebUrl);

    var web = appCtxSite.get_web();

    var list = web.get_lists().getByTitle("CategoryList");
    ctx.load(list);

    listItemToUpdate = list.getItemById(listItemId);

    ctx.load(listItemToUpdate);

    listItemToUpdate.deleteObject();

    ctx.executeQueryAsync(
        Function.createDelegate(this, success),
        Function.createDelegate(this, fail)
        );
}
This code too is similar with the updateItem() method, only difference is that after searching the ListItem based upon the id, the ‘deleteObject()’ method is called on ListItem object.
Now add the following two methods for Callback in App.js
function success() {
    $("#dvMessage").text("Operation Completed Successfully");
}

function fail() {
    $("#dvMessage").text("Operation failed  " + arguments[1].get_message());
}
Call the ‘listAllCategories()’ method in document.ready() and call the above methods in the HTML buttons’ click event as below:
listAllCategories();

    $("#btn-new").on('click', function () {
        $(".c1").val('');
    });


    $("#btn-add").on('click', function () {
        createCategory();
        listAllCategories();
    });

    $("#btn-update").on('click', function () {
        updateItem();
        listAllCategories();
    });

    $("#btn-find").on('click', function () {
        findListItem();
    });


    $("#btn-delete").on('click', function () {
        deleteListItem();
        listAllCategories();
    });
Step 6: Since the App makes call to the SharePoint List, we need to set permission for the App to access list. To set these permissions, in the project double-click on AppManifest.xml and from the permission tab set the permissions as below:

Step 7: Build the project and make sure that it is error free. To deploy the App, right click on the project name and select the Option deploy. Once the deployment is successful, since we have defined the permissions for the App, we will be asked to Trust the App, this is shown here:
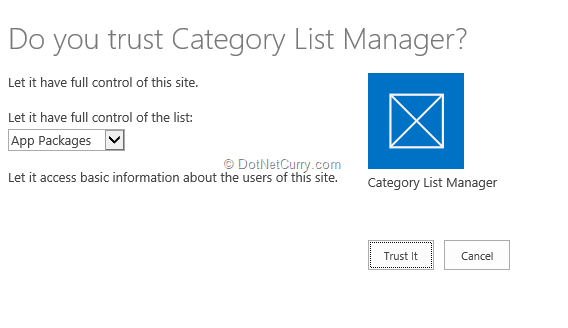
After clicking on ‘Trust it’, the browser will show the login where the credential information needs to be entered. Now the App will be displayed as follows:: (Since I already had data it is showing some values)
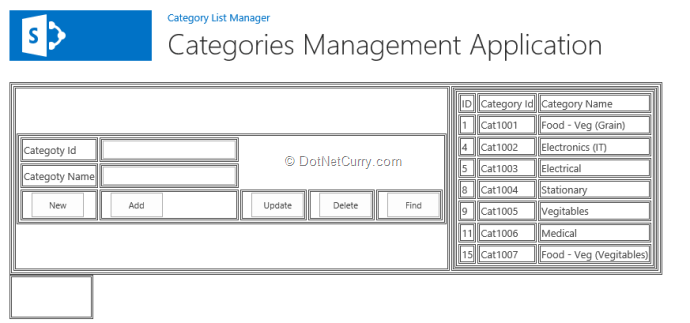
(Note: The project focuses on the JSOM coding and permission part, so pardon the HTML UI and my design skills)
To Search the record, click on the ‘Find’ button which brings up a JavaScript Prompt. Enter Item Id in it from the ID column of the table.
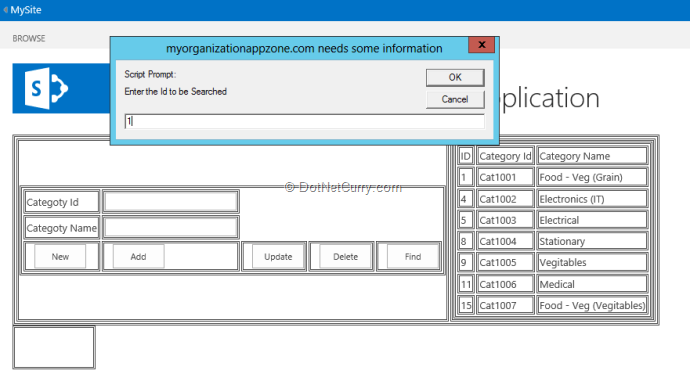
Click on ‘OK’, the record will be displayed in the TextBoxes as below:
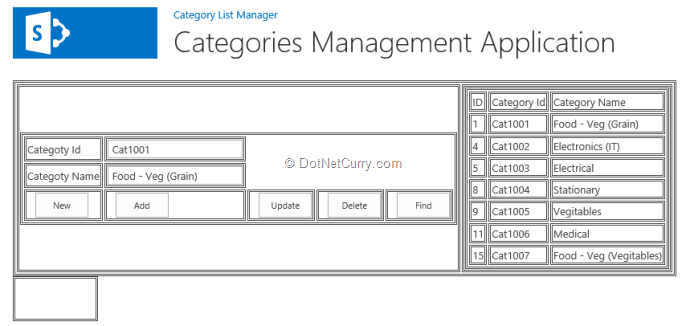
Now this record can be Updated and Deleted by using corresponding buttons.
Conclusion: Using JSOM in SharePoint 2013, an App part can be easily created. Using App Model, a developer can make use of his or her own skills of JavaScript and study of JavaScript API to manage the code for App in SharePoint.
Download the entire source code of this article (Github)
This article has been editorially reviewed by Suprotim Agarwal.
C# and .NET have been around for a very long time, but their constant growth means there’s always more to learn.
We at DotNetCurry are very excited to announce The Absolutely Awesome Book on C# and .NET. This is a 500 pages concise technical eBook available in PDF, ePub (iPad), and Mobi (Kindle).
Organized around concepts, this Book aims to provide a concise, yet solid foundation in C# and .NET, covering C# 6.0, C# 7.0 and .NET Core, with chapters on the latest .NET Core 3.0, .NET Standard and C# 8.0 (final release) too. Use these concepts to deepen your existing knowledge of C# and .NET, to have a solid grasp of the latest in C# and .NET OR to crack your next .NET Interview.
Click here to Explore the Table of Contents or Download Sample Chapters!
Was this article worth reading? Share it with fellow developers too. Thanks!
Mahesh Sabnis is a DotNetCurry author and a Microsoft MVP having over two decades of experience in IT education and development. He is a Microsoft Certified Trainer (MCT) since 2005 and has conducted various Corporate Training programs for .NET Technologies (all versions), and Front-end technologies like Angular and React. Follow him on twitter @
maheshdotnet or connect with him on
LinkedIn