Those working on SharePoint are aware of Business Connectivity Services (BCS). If you are new to BCS, check this nice intro to BCS by Mark. Although BCS was released with SharePoint 2010, SharePoint 2013 made some changes in BCS. Technically, BCS supports exposing external Line-Of-Business (LOB) applications data to SharePoint. This data may be stored in Relational Database like Sql Server or in any other enterprise system e.g. ERP or CRM.
Advantages offered by BCS are that since the data is integrated with SharePoint as standard data element like lists; any office client application e.g. Excel, Outlook, can makes use of this data and work with it without interacting or integrating with external system. Since the external LOB data is available in SharePoint using BCS, this can be manipulated (CRUD Operations) without writing any custom code. SharePoint manage BCS using Business Data Connectivity (BDC) service. This is the SharePoint service application residing on the SharePoint server farm to process business entity requests.
The BDC service accesses an external LOB application data using BCS Connector Framework. Following are the connectors provided:
- SQL: Connects BCS directly to SQL Server Database.
- WCF: The WCF service act as a contract interface from external LOB system to BCS.
- .NET Framework: This allows to uses custom code component (an assembly) to act as an interface between external LOB to BCS.
- OData: The change in BCS in SharePoint 2013 is the OData Service endpoints.
The following diagram, shows the BCS architecture:
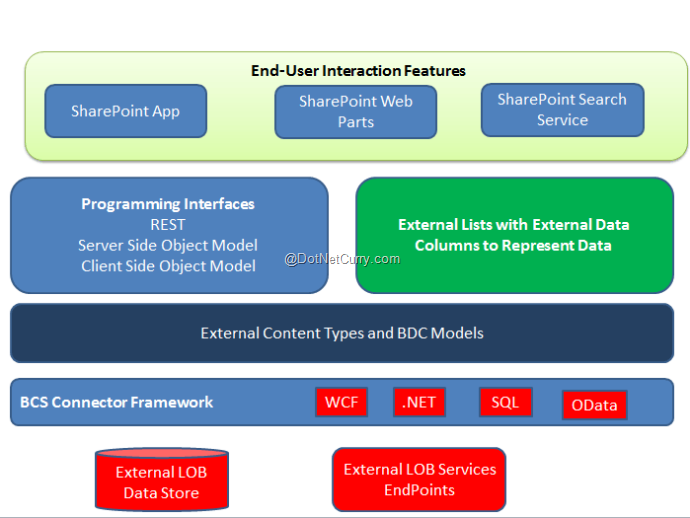
In a SharePoint environment, BDC services expose the modeled business entities from external LOB systems as External Content Types (ECT). ECT is used for creating External Lists and data columns on SharePoint sites so that it can be used by the end-users to interact with external LOB system data.
External Content Type
ECT is the building block for providing interaction with external LOB system. In earlier versions of SharePoint, ECT was deployed and managed at a farm level. To make this possible, it was mandatory for the user to have farm level privileges. But in SharePoint 2013, we have App Scoped ECT. This means that an ECT can be packaged in the SharePoint App. This restricts the access of the ECT only by that App who created it. This is more flexible because to manage an App-Scoped ECT, farm-level privileges are not needed.
Creating App-Scoped External Content Type using OData and Business Connectivity Service
In the following steps, we will create an App-Scoped ECT using OData and BCS. We will implement this using the WCF Data Service and SharePoint 2013 App.
Creating an OData EndPoint for SharePoint App
Since SharePoint Apps have an isolated nature, to create App-Scoped External Content Type, the OData Connector is the only valid connector that can be used to work with the external data exposed by BCS. We can build OData Endpoint using Visual Studio with WCF Data Services and ADO.NET EF.
We will create Sql Server Data with Table. Open Sql Server 2012/2014 IDE and create Database of the name ‘Company’
Create Database Company
Create the following Table in it:
Create Database Company
Create the following Table in it:
CREATE TABLE [dbo].[ExpensesDetails](
    [ReportId] [int] IDENTITY(1,1) NOT NULL,
    [SubmittedBy] [varchar](100) NOT NULL,
    [RegionName] [varchar](50) NOT NULL,
    [SalesTarget] [decimal](18, 0) NOT NULL,
    [SalesAchieved] [decimal](18, 0) NOT NULL,
    [SalesDifference] [decimal](18, 0) NOT NULL,
    [Expenses] [int] NOT NULL,
    [Approved] [bit] NULL,
 CONSTRAINT [PK_ExpensesDetails] PRIMARY KEY CLUSTERED
(
    [ReportId] ASC
)WITH (PAD_INDEX = OFF, STATISTICS_NORECOMPUTE = OFF, IGNORE_DUP_KEY = OFF, ALLOW_ROW_LOCKS = ON, ALLOW_PAGE_LOCKS = ON) ON [PRIMARY]
) ON [PRIMARY]

GO
Creating WCF Data Service
Step 1: Open Visual Studio 2013 (the article is developed using Visual Studio 2013 Community Edition), and create a new blank solution, name it as ‘MyBCS’. In this solution, add a new WCF Service Application of the name ‘WCF_DataServ’. In this project, we will have IService1.cs and Service1.svc, these files contain standard code for implementing WCF Service. Delete these files.
Step 2: Since we need to create a WCF Data Service, in this project add a new WCF Data Service of the name ExpenseService.svc.
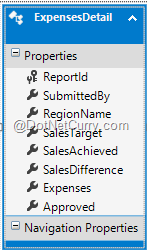
Step 3: In the project, add a new ADO.NET Entity Framework of name CompanyEDMX. This will open a wizard, from this wizard select the option for Generate from Database. Select Company database and ExpensesDetails table. After completing the wizard, the following table mapping will be displayed:
Step 4: Change the code for ExpenseService class as shown: (Highlighted)
public class ExpenseService : DataService<CompanyEntities>
{
    public static void InitializeService(DataServiceConfiguration config)
    {

        config.UseVerboseErrors = true;
         config.SetEntitySetAccessRule("ExpensesDetails", EntitySetRights.All);
         config.SetServiceOperationAccessRule("*", ServiceOperationRights.All);
        config.DataServiceBehavior.MaxProtocolVersion = DataServiceProtocolVersion.V3;
    }
}
Please read more about WCF 4.5 data services from here.
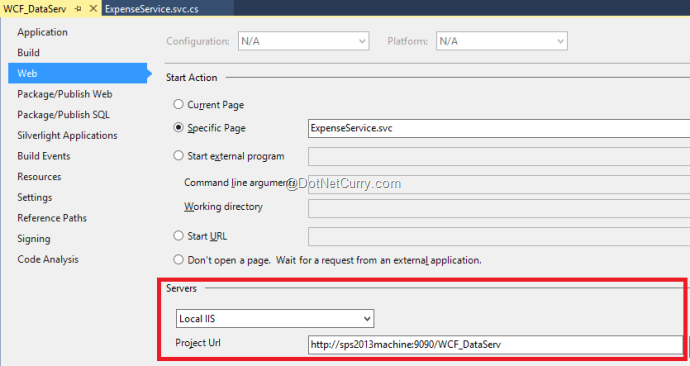
Since we will be using WCF Data Service in SharePoint App, we need to host it in IIS. To do so, create a new Application Pool on IIS targeted to .NET 4.0 and Create a Web Site in it. The detailed steps for hosting WCF service on IIS are provided over here Hosting WCF 4.0 Service on IIS 7.5 with SSL. (Note: Please ignore the SSL part from the article). The WCF service can be published on IIS in the Web Site created in it OR alternatively we can directly set the web server path from the Project Properties of the WCF Service as shown here:
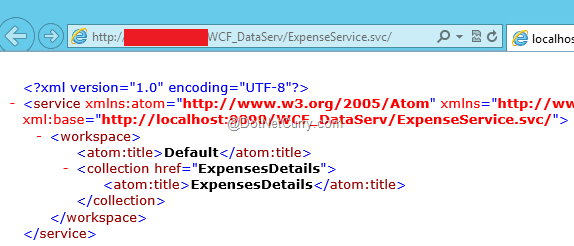
View the service using a browser. The service details will be displayed as shown here:
The data from the service can be displayed by adding the /ExpensesDetails in the URL as shown here:
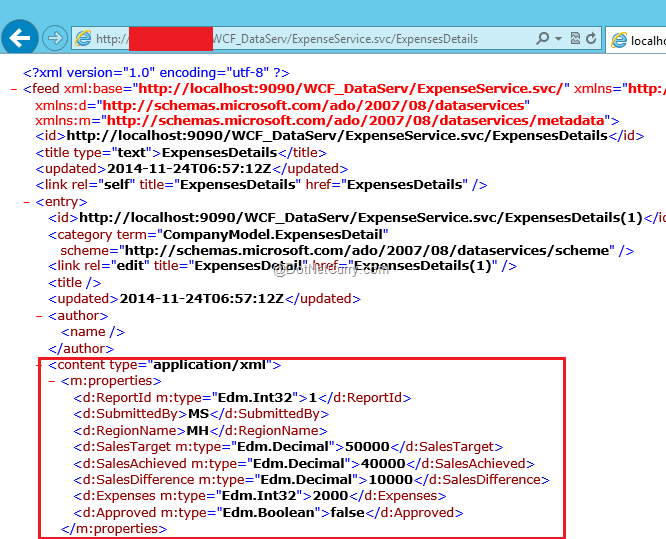
Note: If this data is not displayed correctly and if Page Not Found types of errors are displayed then there may be an issue with the connectivity from WCF hosted on IIS and Sql Server database. This can be sorted out using ‘config.UserVerboseErrors=true’ statement in the WCF Data Service class. To overcome these errors, we need to set the Company Database access rights to the NT Authority\System account.
Creating SharePoint 2013 App
Step 1: In the same solution created above, add a new SharePoint 2013 App project, name it as ‘MyBCS’. In this project, right-click > select Add and select Content Types for External Data Source as shown here:
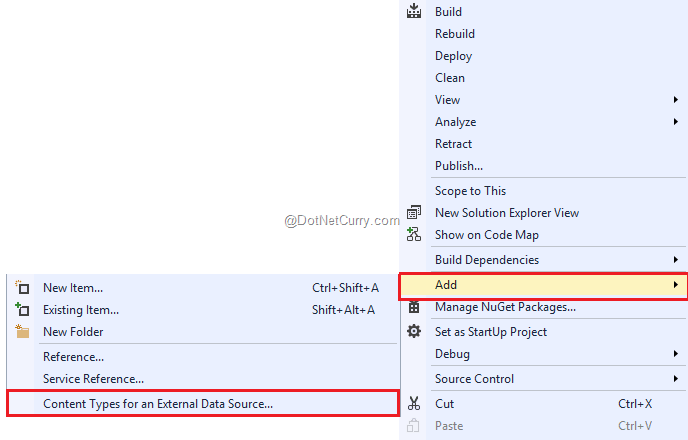
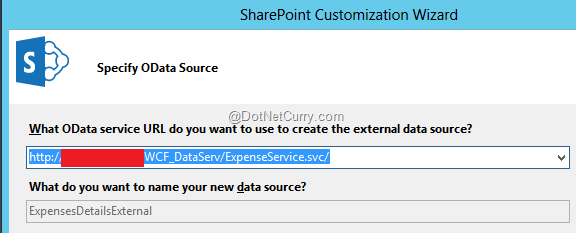
This will start a SharePoint Customization Wizard. In this window, enter the URL for the OData Service published on IIS, in the What OData Service URL do you want to use to create the external data source? comboBox. Also provide the data source name in the What do you want to name to your data source? textbox as shown in the figure. Here ExpensesDetailsExternal name is entered.
Clicking on Next, the following window will display data entities in the OData service. This window will provide the option of selecting the data entities to generate external content type. This Window also has a checkbox which will be used to create list instances for the selected data entities. This will create a SharePoint List.
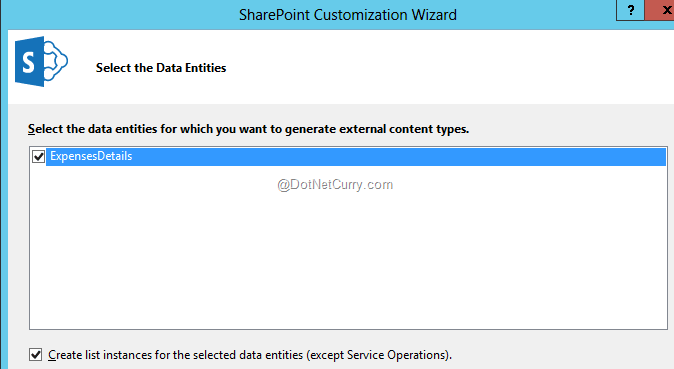
Clicking on Finish will add new project nodes in the project:
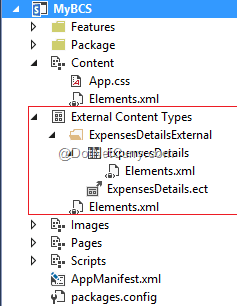
In the above diagram, the newly created file nodes are displayed. The most important file here is ExpensesDetails.ect, this file contains BDC Data model for the service. The ExpensesDetails, an external list instance is also added in the app web.
Step 2: To view the list created, click on the ‘AppManifest.xml’ file and in the startup page, set the URL for the List to the following:
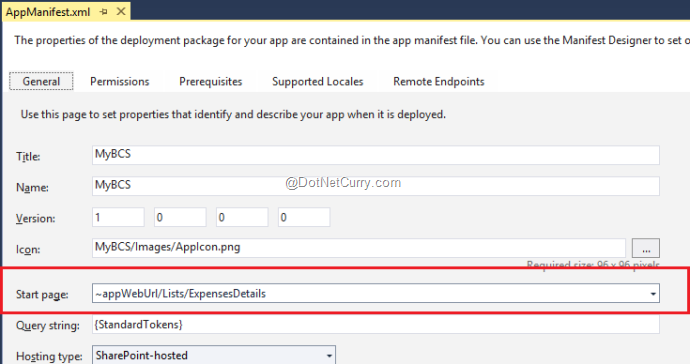
Run the application and the ExpensesDetails list will be display as below:
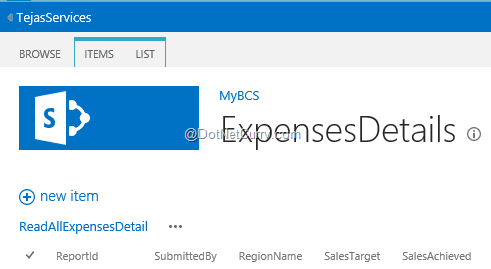
That’s it, the List is created. Now the list operations can be performed i.e. Insert, Update and Delete, list items. From the Ribbon on the top of the page, select ITEMS and click on New Item. A New Item page will be displayed:
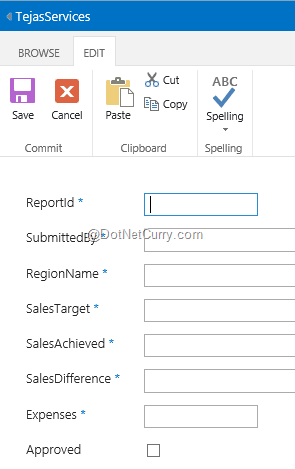
This is a pre-created page for the SharePoint List instance. Now the end-user can enter data in the List and after clicking on the Save, it will be saved in SQL Server using underline BCS Service. The added data will be shown in the list as can be seen here:
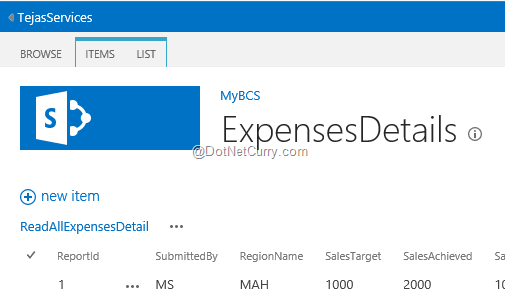
This means that without writing any custom code, the end-user can perform operations with the List and hence can interact with external data.
Creating the SharePoint App to interact with the App-Scoped ECT List for performing Read/Write Operations
We have already created a SharePoint List instance using App-Scoped ECT. But now the challenge is to provide interactive UI to the end-user to perform CRUD operations with the list. To implement this, we will make use of REST API and jQuery with Knockout.js.
Step 1: Open AppManifest.xml and from the General Tab and change the Start Page to Default.aspx:

Step 2: In the SharePoint App project, add the latest jQuery and Knockout JavaScript libraries.
Step 3: Open App.js file from the Scripts folder and replace the already available logic with the following:
/// <reference path="jquery-2.1.1.min.js" />
/// <reference path="knockout-3.2.0.js" />


'use strict';

var SPHostUrl;
var SPAppWebUrl;

// read URL parameters
function retrieveQueryStringParameter(param) {
    var params = document.URL.split("?")[1].split("&");
    var strParams = "";
    for (var i = 0; i < params.length; i = i + 1) {
        var singleParam = params[i].split("=");
        if (singleParam[0] == param) {
            return singleParam[1];
        }
    }
}

//The App and WEB URL
SPAppWebUrl = decodeURIComponent(retrieveQueryStringParameter("SPAppWebUrl"));
SPHostUrl = decodeURIComponent(retrieveQueryStringParameter("SPHostUrl"));


$(document).ready(function () {

    var viewmodel = new expensesDetailsModel();

    ko.applyBindings(viewmodel);

    viewmodel.loadReports();

});


//The Knockout ViewModel
var expensesDetailsModel = function () {

    var self = this;
    //S1: Array to store the Expenses reports
    self.Reports = ko.observableArray([]);
    self.errorMessage = ko.observable();

    //S2: Observables for Storing Expense Details
    self.ReportId = ko.observable(0);
    self.SubmittedBy = ko.observable("");
    self.RegionName = ko.observable("");
    self.SalesTarget = ko.observable(0.0);
    self.SalesAchieved = ko.observable(0.0);
    self.SalesDifference = ko.observable(0.0);
    self.Expenses = ko.observable(0.0);
    self.Approved = ko.observable("");
    //Ends Here


    //S3:Function to Load All Expenses Records
    self.loadReports = function(){

        var url = _spPageContextInfo.webServerRelativeUrl + "/_api/lists/getbytitle('ExpensesDetails')/items";

        $.ajax({
            url: url,
            type: "GET",
            headers: {
                "Accept": "application/json;odata=verbose",
                "X-RequestDigest": $("#__REQUESTDIGEST").val()
            }
        }).done(function (resp) {
            alert("Success");
            self.Reports(resp.d.results);

        }).error(function (err) {

            self.errorMessage("Some Error Occurs " + err.status + "  " + err.success);
        });
    }

    //S4: Fundtion to Clear values of Obsevable
    self.clearEntries = function () {

      self.SubmittedBy("");
      self.RegionName("");
      self.SalesTarget(0.0);
      self.SalesAchieved(0.0);
      self.SalesDifference(0.0);
      self.Expenses(0.0);
      self.Approved(false);
    }

    //S5:Function to Submit the new Expense Record
    self.submitReport = function () {

        var url = _spPageContextInfo.webServerRelativeUrl + "/_api/lists/getbytitle('ExpensesDetails')/items";

        //Get the Difference between
        //Actual Sales arget and Achieved Sales Target
        var diff = self.SalesAchieved() - self.SalesTarget();

        diff = diff.toString();

        //The Rule for Approving the Expenses
        if (diff > 5000 && self.Expenses() < 5000) {
            self.Approved(true);
        }
        else {
            self.Approved(false);
        }

        self.SalesDifference(diff);

        var itemType = "SP.Data.ExpensesDetailsListItem";

        //The Expense Details Object

        var expensesDetails = {
            "__metadata": { "type": itemType },
            "SubmittedBy": self.SubmittedBy(),
            "RegionName": self.RegionName(),
            "SalesTarget": self.SalesTarget(),
            "SalesAchieved": self.SalesAchieved(),
            "SalesDifference": self.SalesDifference(),
            "Expenses": self.Expenses(),
            "Approved" : self.Approved()
        };

        $.ajax({
            url: url,
            type: "POST",
            data: ko.toJSON(expensesDetails),
            headers: {
                "X-RequestDigest": $("#__REQUESTDIGEST").val(),
                "accept": "application/json;odata=verbose",
                "content-type": "application/json;odata=verbose",
              "content-length": expensesDetails.length
            }
        }).done(function (resp) {
            alert("Report Added Successfully");
            //self.ReportId(resp.d.results);

            self.loadReports();

        }).error(function (err) {
            self.errorMessage("Some Error Occurs " + err.status + "  " + err.statusText);
        });
    }
};
In the above code expensesDetailsModel defines the knockout View-Model so that it can be bound with the View which we will be creating in the next steps. The Reports observable array will be used to store the expenses report data received from the OData Service to the App-Scoped ECT List instance of name ‘ExpensesDetails’. The View-Model defines several observables so that they can be bound with textboxes on the view. The loadReports function is used to make an Ajax call to the ECT List and read data from it. This data is then stored in the Reports Observable array. The function clearEntries is used to clear all observables. The function submitReport is used to add new Expense details. submitReport contains logic for approving the expenses report. If the difference between the Actual Sales Target and Sales Achieved is more than 5000 and Expenses are less than 5000, then the report will be approved else it will be rejected.
Step 4: Open Default.aspx and add the following HTML in the <asp:Content> with ID as PlaceHolderMain
<table id="tblMain">
<tr>
    <td>
        <table id="tblRecordView">
            <tr>
                <td>
                   Submitted By:
               </td>
                <td>
                    <input type="text" id="submittedBy" class="c1" data-bind="value: $root.SubmittedBy"/>
                </td>
            </tr>
             <tr>
                <td>
                   Region:
               </td>
                <td>
                    <input type="text" id="regionName" class="c1" data-bind="value: $root.RegionName"/>
                </td>
            </tr>
            <tr>
                <td>
                   Actual Sales Target:
               </td>
                <td>
                    <input type="text" id="actualSalesTarget" class="c1" data-bind="value: $root.SalesTarget"/>
                </td>
            </tr>

            <tr>
                <td>
                   Achieved Sales Target:
               </td>
                <td>
                    <input type="text" id="achievedSalesTarget" class="c1" data-bind="value: $root.SalesAchieved"/>
                </td>
            </tr>
            <tr>
                <td>
                  Difference Sales Target:
               </td>
                <td>
                    <input type="text" id="differenceSalesTarget" class="c1" data-bind="value: $root.SalesDifference"/>
                </td>
            </tr>
            <tr>
                <td>
                  Expenses Made:
               </td>
                <td>
                    <input type="text" id="expensesMade" class="c1" data-bind="value: $root.Expenses"/>
                </td>
            </tr>

             <tr>
                <td>
                  Status (Approved/Rejected):
               </td>
                <td>
                    <input type="text" id="status" class="c1" data-bind="value: $root.Approved"/>
                </td>
            </tr>
           <tr>
               <td>
                   <input type="button" id="new" value="New" data-bind="click:$root.clearEntries"/>
               </td>
               <td>
                   <input type="button"
                        id="submitReport" value="Submit Report"  data-bind="click: $root.submitReport"/>
               </td>
           </tr>
        </table>
    </td>

    <td>
        <div id="dvListView">
            <table id="tblListView">
                <thead>
                    <tr>
                        <td>ReportId</td>
                        <td>Submited By</td>
                        <td>Region Name</td>
                        <td>Actual Sales Target</td>
                        <td>Achieved Sales Target </td>
                        <td>Difference </td>
                        <td>Expenses</td>
                        <td>Status(Approved/Rejected)</td>
                    </tr>
                </thead>
                <tbody data-bind="foreach:Reports">
                    <tr>
                        <td><span data-bind="text:ReportId"></span></td>
                        <td><span data-bind="text:SubmittedBy"></td>
                        <td><span data-bind="text:RegionName"></td>
                        <td><span data-bind="text:SalesTarget"></td>
                        <td><span data-bind="text:SalesAchieved"></td>
                        <td><span data-bind="text:SalesDifference"></td>
                        <td><span data-bind="text:Expenses"></td>
                        <td><span data-bind="text:Approved"></td>
                    </tr>
                </tbody>
            </table>
        </div>

    </td>
</tr>
</table>
<div>
<span data-bind="text:errorMessage"></span>
</div>
The above HTML markup has the necessary data binding with knockout observable.
Step 5: Run the Application
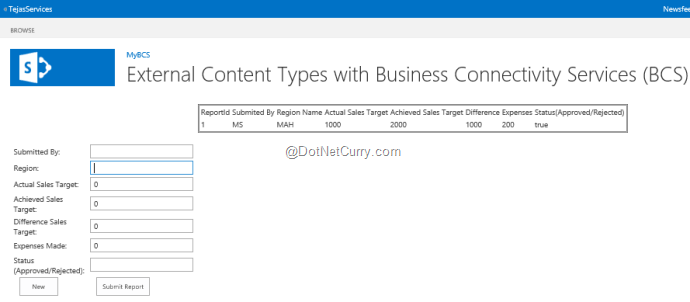
Enter data in the TextBoxes and click on the Submit Report Button, the result will be as shown here:
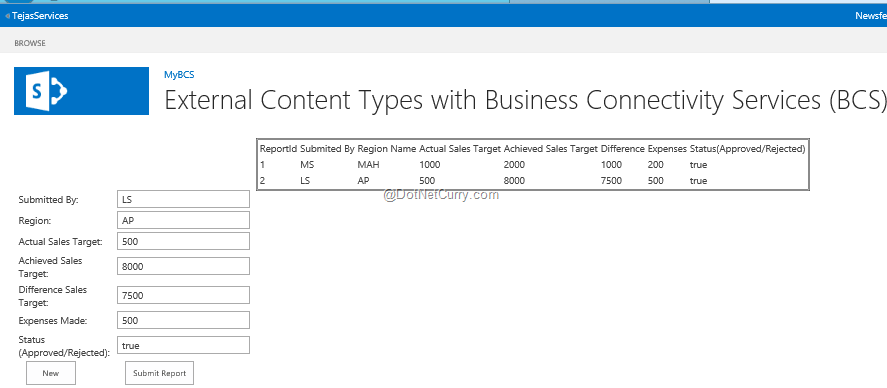
This shows the newly added Expenses report.
Conclusion
In SharePoint 2013, the App-Scoped External Content Type (ECT) using BCS allows the end-user to make use of isolated SharePoint App to interact with External Line-Of-Business Applications for manipulating data.
Download the entire source code of this article (Github)
This article has been editorially reviewed by Suprotim Agarwal.
C# and .NET have been around for a very long time, but their constant growth means there’s always more to learn.
We at DotNetCurry are very excited to announce The Absolutely Awesome Book on C# and .NET. This is a 500 pages concise technical eBook available in PDF, ePub (iPad), and Mobi (Kindle).
Organized around concepts, this Book aims to provide a concise, yet solid foundation in C# and .NET, covering C# 6.0, C# 7.0 and .NET Core, with chapters on the latest .NET Core 3.0, .NET Standard and C# 8.0 (final release) too. Use these concepts to deepen your existing knowledge of C# and .NET, to have a solid grasp of the latest in C# and .NET OR to crack your next .NET Interview.
Click here to Explore the Table of Contents or Download Sample Chapters!
Was this article worth reading? Share it with fellow developers too. Thanks!
Mahesh Sabnis is a DotNetCurry author and a Microsoft MVP having over two decades of experience in IT education and development. He is a Microsoft Certified Trainer (MCT) since 2005 and has conducted various Corporate Training programs for .NET Technologies (all versions), and Front-end technologies like Angular and React. Follow him on twitter @
maheshdotnet or connect with him on
LinkedIn