Connected Web Parts in SharePoint 2010 - an Architectural Framework
Posted by: Mark Kendall ,
on 3/31/2011,
in
Category SharePoint
Abstract: Creating an Enterprise Portal in SharePoint 2010 can be daunting task when you are using custom Web parts in just about all cases and you want to be able to communicate with the other web parts via some sort of custom navigation system. In this article, we will rely on our experience as a team, who has actually implemented a successful connected Webparts Enterprise Portal, and hope that it will help you implement your own version.
This article has been co-authored by Lavanya Kammari (Main Author), Nataraj Yadavalli (Main Author) and Mark Kendall.
Creating an Enterprise Portal can be a daunting task when you are using custom Webparts in just about all cases and you want to be able to communicate with the other web parts, via some sort of custom navigation system. Microsoft has done a good job creating the framework, but not so good of a job explaining how to use the connected Webpart Framework. See this article for a brief overview. http://msdn.microsoft.com/en-us/library/ms469765.aspx.
In this article, we will rely on our experience as a team, who has actually implemented a successful connected Webparts Enterprise Portal, and hope that it will help you implement your own version.
The main advantage of connected Webparts is to exchange data between web parts at run time. For this, we should have at least two web parts one for provider and the other for consumer. Provider web part will pass data to the consumer web part. Here we will explain the required steps to create connectable web parts in Visual Studio 2010 using Visual Webpart template.
Basic Steps
Creating the web part connection interface.
-
Creating a Web Part by using the Visual Studio Visual Web Part item template.
-
Creating a provider Web Part that defines a string.
-
Creating a consumer Web Part that uses and displays the string.
-
Creating a Web Part page and connecting the provider and consumer Web Parts.
-
Adding code-behind in Visual Web Parts to handle post back properly
Before we begin with our steps, let’s start by creating an empty solution which will be used later in our steps.
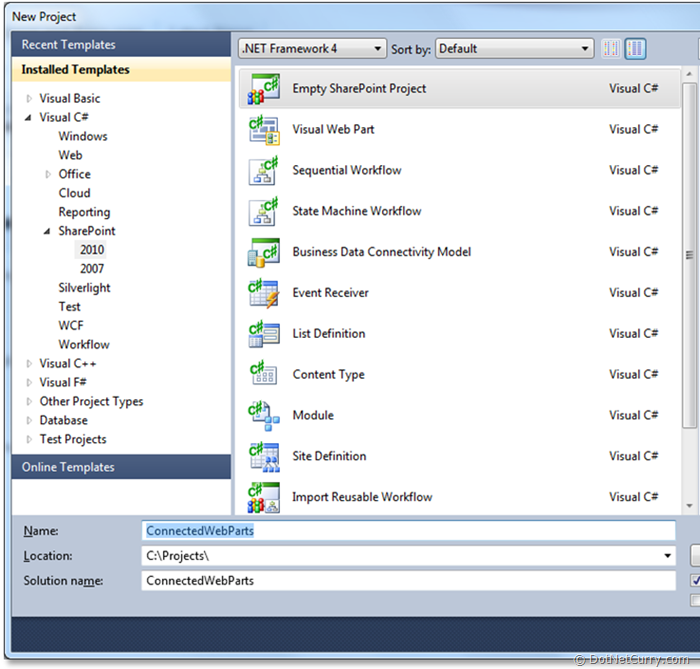
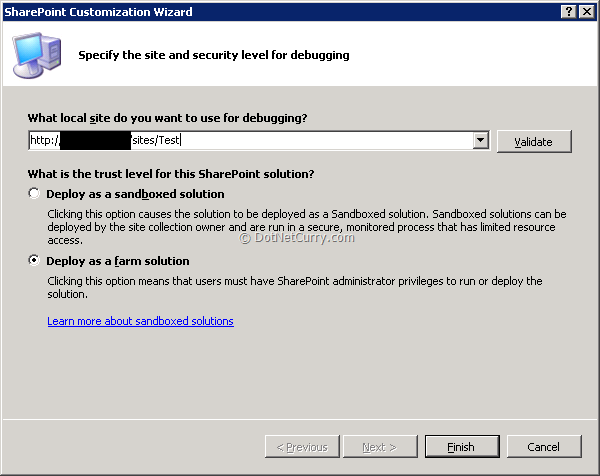
Step 1: Creating the web part connection interface:
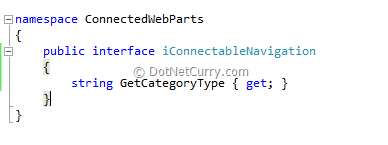
SharePoint uses an interface to communicate/ exchange data between the web parts. Now we will create an interface called ‘iConnectableNavigation’, which has a method to get the selected Category.
Right click on your solution and Click ‘Add new item’ and select ‘Interface’ to create an interface.
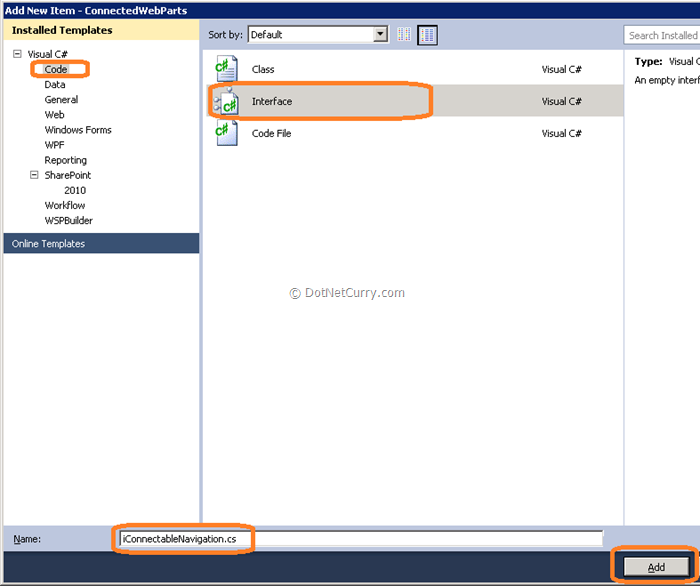
Once you have created ‘iConnectableNavigation’ interface, add the following code.
Step 2: Creating a Web Part by using the Visual Studio Visual Web Part item template -
In Visual Studio 2010, you can create two types of Web Parts. The first type, Visual web part, creates a user control and deploys this in content Template. Here all controls can be created using the design mode. The other one is a default web part, which inherits from ‘System.Web.UI.WebControls.WebParts’ namespace. Here you have to define all the controls in code behind.
In this article, we are creating ‘Visual Web Parts’ for both provider and consumer.
Step 3: Creating a provider Web Part that defines a string:
Now we create a provider visual web part, which has a drop down of Categories. When user selects an item from the drop down, that value will be provided as string for other webparts which are consumers.
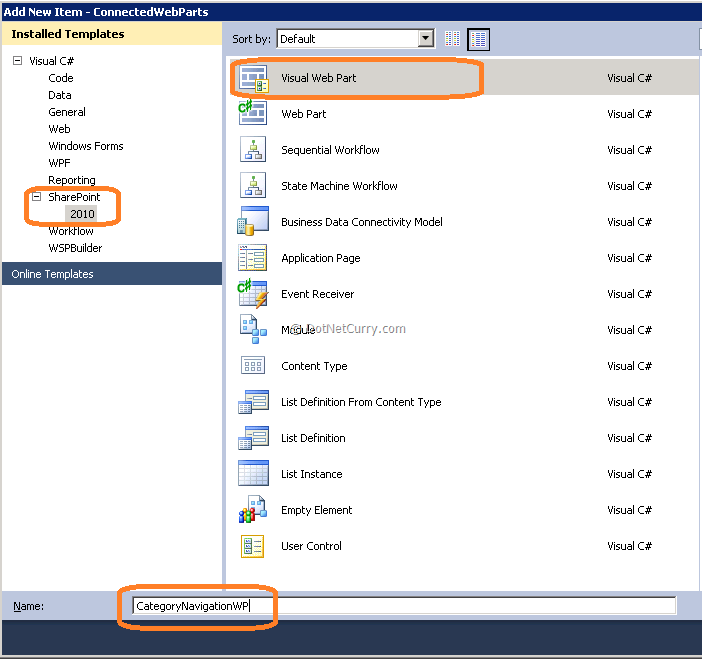
To create a provider web part, right click on the solution and select add a new item. Select “Visual Web Part” template and Name it as “CategoryNavigationWP”. Once you click “Add”, all the required files are created for you.
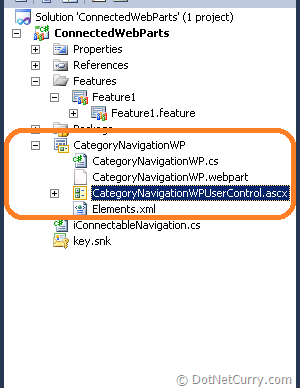
Now open CategoryNavigationWPUserControl.ascx file and add the dropdown and all necessary code.
Add a public method called GetCategoryType which returns the selected drop down item text.

Now Open CategoryNavigationWP.cs file and update code as shown below.
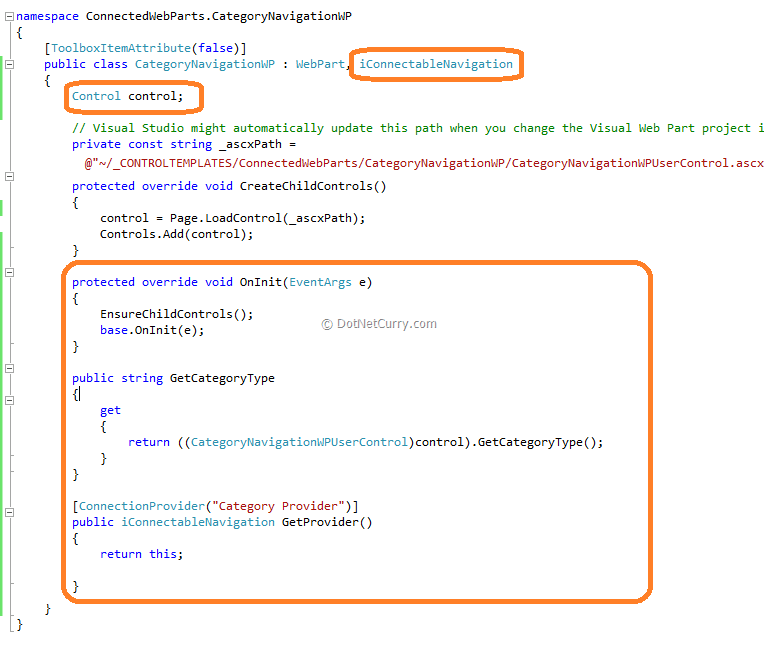
Note the Attribute on the GetProvider Method. This Attribute must be placed on all webparts that implement the interface. It’s name can be anything you want- in this example Category Provider.
Step 4: Creating a consumer Web Part that uses and displays the string.
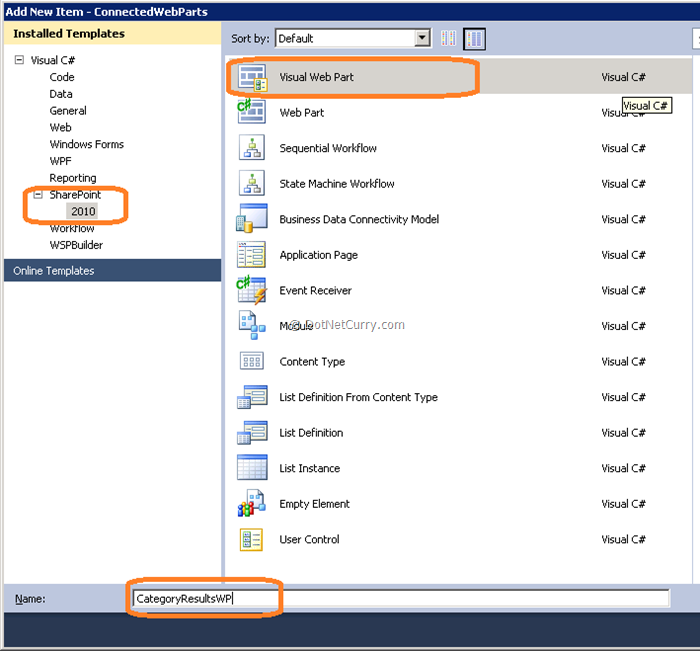
Follow the same steps as in Provider web part and create a Visual Web part called ‘CategoryResultsWP’ as a consumer web part and update code as shown below.
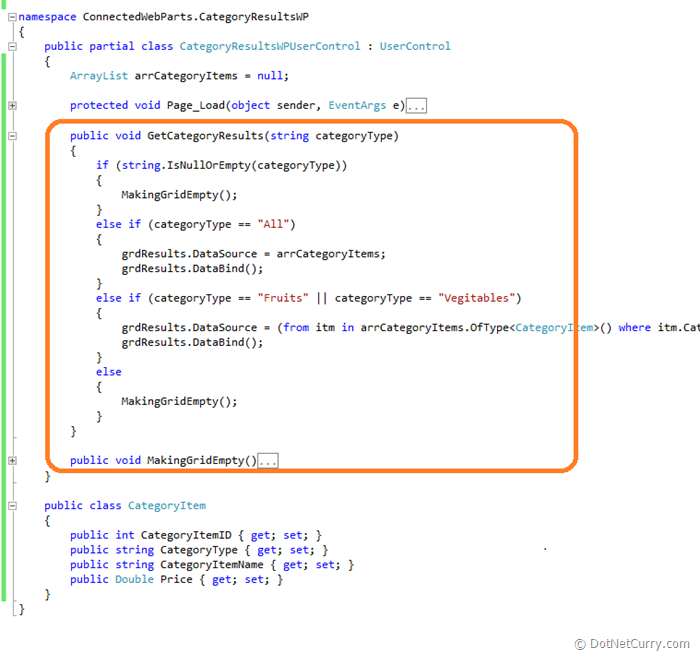
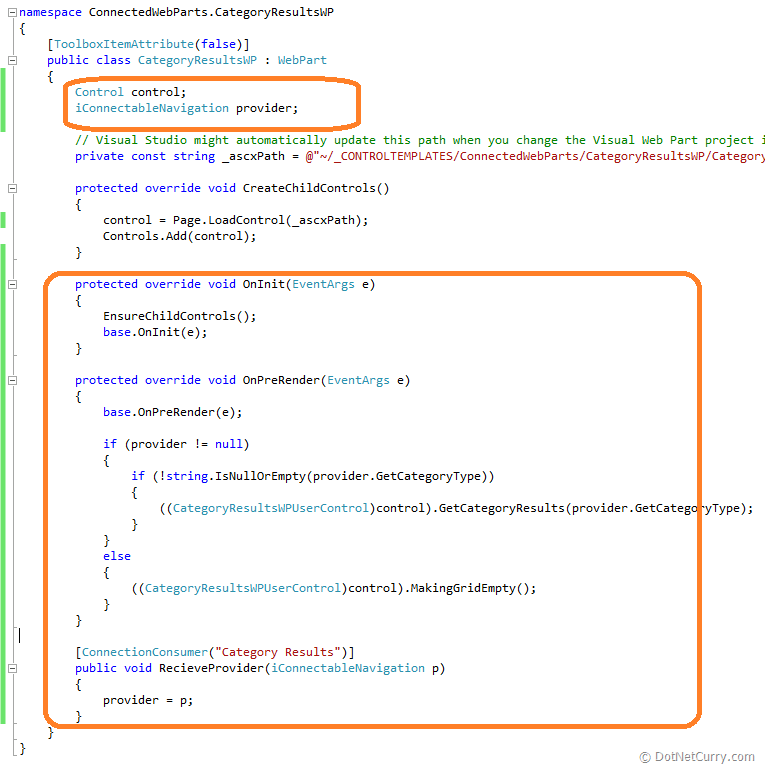
Step 5: Creating a Web Part page and connecting the provider and consumer Web Parts.
Once you add all your code, compile and deploy your solution to SharePoint site.
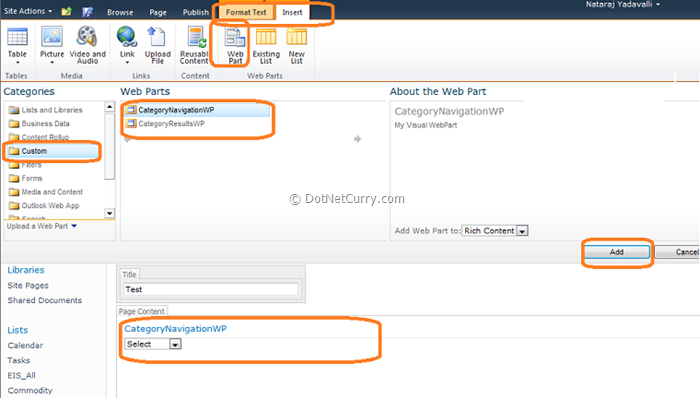
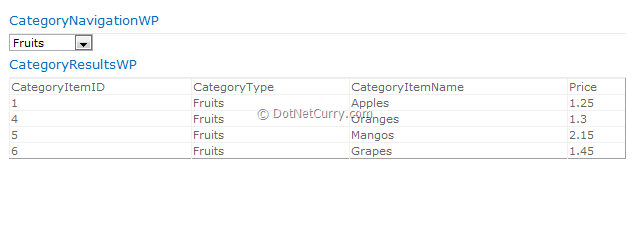
Now go to your site page and edit to add the web parts. Once you add your web parts and connected your web parts as shown below, it is time for testing. (Or you can add a new Webparts page)
Two new Webparts will appear in your custom section when you click Add Webpart: Place them on the page as shown below: When you have both of the Webparts on the Webparts page, click on the dropdown on the CategoryResultsWP and select connection. Get category results from, CategoryNavigationWP and the connection will be established. Now you can select from the dropdown and get the results that you would expect. (See screenshots below)
CategoryNavigationWP
CategoryResultsWP

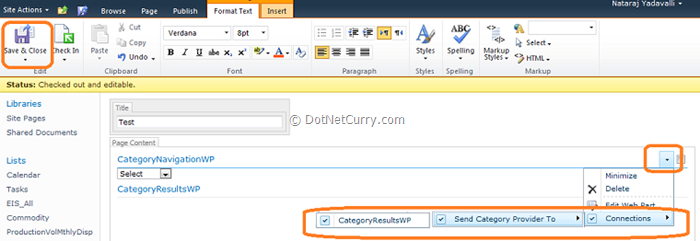
When you are done, you will end up with 2 webparts on a webparts page that will communicate with each other as you make click on the dropdowns. You can have as many webparts as you want on a webparts page that communicate with each other, as long as you implement the correct interfaces- as this article explains.

Step 6: Adding code-behind in Visual Web Parts to handle post back properly.
There are a couple of points to note when you are trying to use connected web parts with Post back.
-
It is always better to call “EnsureChildControls” in Web part OnInit overload method. OnInit method will make sure your view state is loaded at time of control initialization.
-
Call your user control method during the OnPreRender method overload. When you have complex controls or multiple controls to load, it is always better to call during the Pre Render instead of Render Contents method.
Summary:
Congratulation, you’re on your way to creating a framework for your next Enterprise SharePoint rollout which will enable you to connect to all of your web parts on a typical web parts page.
The entire source code of this article can be downloaded over here
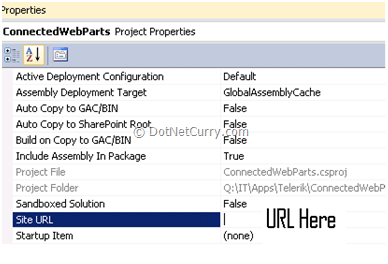
Note: After downloading the source code, when you open the VS 2010 project, you must set the SharePoint URL as shown below- right mouse click on ConnectedWebParts and select properties:
This article has been editorially reviewed by Suprotim Agarwal.
C# and .NET have been around for a very long time, but their constant growth means there’s always more to learn.
We at DotNetCurry are very excited to announce The Absolutely Awesome Book on C# and .NET. This is a 500 pages concise technical eBook available in PDF, ePub (iPad), and Mobi (Kindle).
Organized around concepts, this Book aims to provide a concise, yet solid foundation in C# and .NET, covering C# 6.0, C# 7.0 and .NET Core, with chapters on the latest .NET Core 3.0, .NET Standard and C# 8.0 (final release) too. Use these concepts to deepen your existing knowledge of C# and .NET, to have a solid grasp of the latest in C# and .NET OR to crack your next .NET Interview.
Click here to Explore the Table of Contents or Download Sample Chapters!
Was this article worth reading? Share it with fellow developers too. Thanks!
Mark Kendall is a Software Engineer working in the Oil Industry in Dallas,Texas. He has been a programmer/developer for past 15 years specializing in .NET/C# development. Currently, he is a Sharepoint/Silverlight developer specializing in BCS Services. He has published a book on Dotnetnuke, and written several articles on many .net subjects. Apart from his passion for making money writing software to improve business, Mark enjoys ranting-and-raving about current events and taking long runs on the beach. He blogs at
kendallsoft and can be reached at Kendallsoft[attherate]hotmail[dot]com