Silverlight 4: End-to-End Application using Prism 4, WCF 4 and DataGrid Custom Behavior
Posted by: Mahesh Sabnis ,
on 5/12/2011,
in
Category Silverlight 2, 3, 4 and 5
Abstract: With the support for Prism 4 and the growing popularity of Silverlight 4 for line-of-business application development, there is a lot of buzz amongst developers to use the new features these technologies has to offer. So for example, I have observed that the demand for providing a simple and more interactive UX for developing DML UI using DataGrid is increasing. In this article, we will cover just that. I have explained the mechanism for performing CRUD operations using the Silverlight 4 DataGrid and have used SL 4, Prism 4 and WCF 4.0, along with DataGrid Custom behavior.
With the support for Prism 4 and the growing popularity of Silverlight 4 for line-of-business application development, there is a lot of buzz amongst developers to use the new features these technologies has to offer. So for example, I have observed that the demand for providing a simple and more interactive UX for developing DML UI using DataGrid is increasing. In this article, we will cover just that. I have explained the mechanism for performing CRUD operations using the Silverlight 4 DataGrid and have used SL 4, Prism 4 and WCF 4.0, along with DataGrid Custom behavior. The architecture is as below:

Creating WCF Service
Step 1: Open VS2010 and create a blank solution. Name it as ‘SL4_Prism4_App’. In this solution, add a new WCF service Application project and name it as ‘WCF_Service_DML_OP’. In this project rename ‘IService1.cs’ to ‘IService.cs’ and ‘Service1.svc’ to ‘Service.svc’.
Step 2: Now add a new ADO.NET Entity-Data Model to the project and name it as ‘CompanyEDMX.edmx’. Here I have used ‘EmployeeInfo’ table with the following columns:
The EDM designer is as below:

Step 3: In ‘IService.cs’ add the following interface

Step 4: Implement this interface in the Service class as shown below:

Note: The methods form above class makes call to the ADO.NET EF methods.
Step 5: Publish the service on IIS.
Creating Silverlight Client Application
Step 1: In the solution created above, add a new Silverlight application. Name it as ‘SL4_DataGrid_Custom_Command_Behavior’. In this application, add the following Prism 4 namespaces.
-
Microsoft.Practices.Prism.
-
Microsoft.Practices.Prism.ServiceLocation.
-
Microsoft.Practices.Prism.Interactivity.
-
Microsoft.Practices.Prism.UnityExtensions.
-
Microsoft.Practices.Unity.Silverlight
Step 2: In the Silverlight project, add the reference of the WCF service. Now the service proxy will be consumed by the ServiceAdapter or ServiceAgent class. The use of this class is to isolate the asynchronous calls from the ViewModel class. In the SL project, add a new class file and name it as ‘ServiceAdapter.cs’. This file contains ServiceAdapter class. This class implements the IServiceAdapter interface. This interface defines methods which accepts EventHandler<T> delegate as an input parameter. This delegate is typed to the Asynchronous ‘EventArgs’ class generated by the WCF proxy class. The code for the ServiceAdapter and IServiceAdapter is as shown below:

Note: You can create a folder and can put the above file in that folder.
Step 3: Now in the UI, we are going to make use of the DataGrid for performing CRUD operation. The reason behind using this control is that most of the users using Silverlight are comfortable with the ASP.NET GridView or the DataGridView control provided in WinForms. The nice part of these controls is they are capable to provide the facility for Insert, Update and Delete. In Silverlight DataGrid, you can perform these by adding the Template Button for Update and Delete. In some cases, the user demands that when the data is entered in all cells of the DataGrid row and control shifts to next row, the data should be Inserted/Updated. In such cases, you need to provide some custom behavior to DataGrid to perform such types of operation. In Silverlight, using Prism 4, custom behavior can be added to any control with its interactive out-of-box event e.g. for DataGrid the event can be RowEditEnded. For this event, the custom command behavior can be added. To do so, add a new class file in the SL project and name it as ‘DataGridCustomCommandBehavior.cs’. This file defines classes for custom behavior and command. The code is as below:


The DataGridCustomCommandBehavior class is inherited from ‘CommandBehaviorBase<T>’ class. The constructor of this class raises, the event for which custom command behavior and custom command parameter is to be configured. In this case, the DataGrid event used is ‘RowEditEnded’. The class RowEditEnded actually defines custom Command, CommandParameter and Behavior. The important part of the ‘RowEditEnded’ class is the ‘GetOrCreateDataGridBehavior’ method. This method is used to define the behavior of the DataGrid on the UI, based upon the user interaction on the DataGrid, the concerned Command is executed on the ViewModel class by choosing the concerned CommandParameter.
Step 4: After adding the ServiceAdapter and Custom CommandBehavior, now its time for us to define the ViewModel for the application. This class defines the following:
-
Constructor creating an instance of the ServiceAdapter.
-
DelegateCommand object for CRUP operations using DataGrid.
-
Public properties used for DataBinding.
-
Methods for making call to ServiceAdapter.
-
CanExecute and Execute methods for DelegateCommand object.
The DelegateCommand and its CanExecute and Execute methods relation is as shown below:

The code for the ViewModel class is as shown below:


The rest of the code can be viewed in the ViewModel class.
The important part of the above class is that, since it makes a call to ServiceAdapter and further an Async call is made to WCF service, the DataGrid refresh will not happen immediately. To do a timely refresh, we make use of the DispatcherTimer object. This class will come into picture for Insert/Update and Delete operations to refresh the DataGrid. The interval is set to 5 Seconds. In the Tick event of this class, the LoadEmployee() method is called. Another important method of the above class is the ‘UpdateEmployee’ method. This method accepts the EmployeeInfo object and then based upon the Operation type (Insert/Update), the ‘If’ condition is executed.
Step 5: Open MainPage.Xaml and write the following Xaml code:

The above xaml shows that the ViewModel instance is created in the UserControl resources. This instance is bound with the ‘LayRoot’ grid. The important part of the XAML code is that the DataGrid is bound with the custom command and custom command parameter as shown below:

The UpdateEmployeeCommand object of the type DelegateCommand is bound with the custom RowEditEnded command object and the custom CommandParameter is bound with the ‘SeelctedItem’ property of the DataGrid. Since the DataGrid is bound with the Employees property of the type ObservableCollection<EmployeeInfo> of the ViewModel class, the SelectedItem will be of the type ‘EmployeeInfo’. This means that when the user either Updates any cell or enters record in an empty row of the DataGrid, the parameter will be of the type EmployeeInfo and the UpdateEmployeeCommand will be raised on the ViewModel which will perform the concerned operation i.e. Update or Insert. The above XAML also has buttons for the following:
-
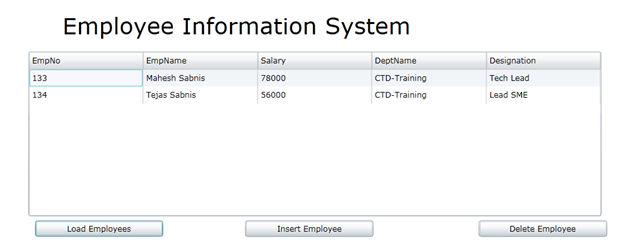
Load Employees - When clicked, all employees will be loaded in DataGrid.
-
Insert Employee - When clicked, a new Blank row will be appended in the DataGrid.
-
Delete Employee - When clicked, the selected record will be deleted.
These buttons are bound with the concerned commands and command parameter.
Step 6: Run the application and click on the Load Employees button, the following result will be displayed:
Click on Insert Employee button and the following result will be displayed:

Add values to this row and using ‘TAB’, navigate through all cells (Cell first ‘EmpNo’ is readonly). When you press TAB in the last cell, the result will be as shown below (after 5 seconds-read about the DispatcherTimer in Step 4):

Click on ‘Ok’

Select any row, change any cell value and TAB out of that row. The result will be as shown below (I changed the Salary of EmpNo 140 from 78000 to 90000)

Click on Ok

Select a row and click on Delete Employee. Here I deleted the Last Row

Click on Ok

On a side note, there are modifications you can make in this application:
Conclusion: In Silverlight, using the DataGrid control and its custom behavior, it is easily possible for us to develop an application for users to give them the same look, feel and functionality that they have been using in other DataGrids.
The entire source code of this article can be downloaded over here
This article has been editorially reviewed by Suprotim Agarwal.
C# and .NET have been around for a very long time, but their constant growth means there’s always more to learn.
We at DotNetCurry are very excited to announce The Absolutely Awesome Book on C# and .NET. This is a 500 pages concise technical eBook available in PDF, ePub (iPad), and Mobi (Kindle).
Organized around concepts, this Book aims to provide a concise, yet solid foundation in C# and .NET, covering C# 6.0, C# 7.0 and .NET Core, with chapters on the latest .NET Core 3.0, .NET Standard and C# 8.0 (final release) too. Use these concepts to deepen your existing knowledge of C# and .NET, to have a solid grasp of the latest in C# and .NET OR to crack your next .NET Interview.
Click here to Explore the Table of Contents or Download Sample Chapters!
Was this article worth reading? Share it with fellow developers too. Thanks!
Mahesh Sabnis is a DotNetCurry author and a Microsoft MVP having over two decades of experience in IT education and development. He is a Microsoft Certified Trainer (MCT) since 2005 and has conducted various Corporate Training programs for .NET Technologies (all versions), and Front-end technologies like Angular and React. Follow him on twitter @
maheshdotnet or connect with him on
LinkedIn