Microsoft DevOps strategy revolves around Team Foundation Server (TFS) and Visual Studio Team Services (VSTS). They provide the services for requirement management, effort management, source and version control, build management, software deployment, customer feedback and monitoring of availability and performance of the application.
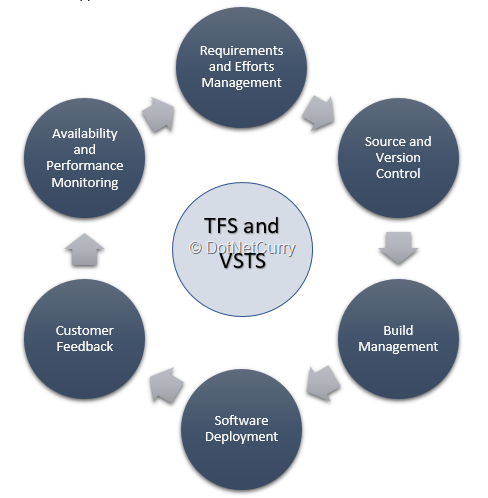
Figure 1: Microsoft DevOps Strategy around TFS and VSTS
Creating VM and Provisioning - Introduction
Responsibility of the operations team starts with deployment of the software. Deployment of the software is a set of activities that are usually done in a series. It begins with creating target machines which can be physical machines or virtual machines on which the built software components are to be deployed. These machines may be created once or may be created every time the deployment has to be done. Particularly for testing environments, it may be necessary to recreate the VMs every time the release is deployed.
Once the machines are up and running, they need to be provisioned with necessary prerequisites like appropriate operating systems, roles like application server or DNS, SQL Server etc. Once the prerequisites are provisioned, built software components are deployed on those machines.

Figure 2: Deployment of software after build
After the deployment, the operations team monitors the availability and performance of the application. In case of any fine tuning, it does it so the software availability and performance are optimum. In case they cannot optimize those, they go back to development team for necessary modifications in the software. They also monitor feedback from stakeholders and convey that feedback to the development team for appropriate action.
Microsoft Team Foundation Server (TFS) and Visual Studio Team Services (VSTS) enable operations team to do all these activities. Today we are setting our focus on the first two activities of the deployment i.e. creation of machines and provisioning them.
Assumptions
We are making following assumptions:
1. We are working with TFS and not with VSTS
2. All the software components are going to work on premises and not in the cloud
3. We are going to use virtual machines in Hyper-V and not the physical machines
4. The VM template will contains all the necessary software prerequisites and roles that the VM will require so that it is provisioned automatically when created.
5. A build that creates the software application that is needed to be deployed is already created.
TFS and VSTS for Release Management - Setting the environment
We will first create a template for virtual machine. This template will be used by the Release Management (RM) service of TFS to create a virtual machine on the fly. To create such a template, we have the following prerequisites:
1. We need a Hyper-V host – a physical machine with Windows Server operating system. Although Windows 10 also can work as Hyper-V host, it does not integrate well with our next prerequisite, SCVMM.
2. System Centre Virtual Machine Manager (SCVMM) server. We need a separate server with the installation of SCVMM server and console. This can be a virtual machine hosted on the same host that is mentioned earlier.
3. We also need to install SCVMM console on the Hyper-V host and connect it to the SCVMM server.
4. Both of these machines as well as our TFS needs to be in the same Active Directory domain. We should use separate accounts for running the SCVMM service and for connecting to SCVMM Server to create the template.
In the example that I am showing, I have used Windows Server 2012 R2 for both the machines and have used SCVMM 2012. My TFS is also on the similar VM and that also hosts the DC of my AD domain.
Create a VM that will get converted to a template
Once SCVMM is installed and is connected from the console, we can now create a VM that is going to get converted into a template. After creating that VM, I enabled the roles of Application Server and Web Server with all the necessary features to host an ASP.NET application.
We should not add this machine to the AD Domain. When SCVMM converts the VM to template, it may throw an exception. Ideally, we should run sysprep on this machine and that too does not accept a machine that is in the AD Domain. We should be able to see the VM in the SCVMM console under the Hyper-V host.
Create a VM Template
Now we can create a VM Template based upon this VM. To do so, stop the VM from the SCVMM console.

Figure 3: SCVMM console showing stopped virtual machine
From the Create menu select Create VM Template option. VM template can be created either from a virtual hard disk or another template or as we have chosen to do - from a hosted virtual machine.
Since the process of creating VM template from the VM destroys the existing VM, I chose to create a clone of the VM so that I can create other templates from that clone. This is the first screen of the wizard for creating the VM template.
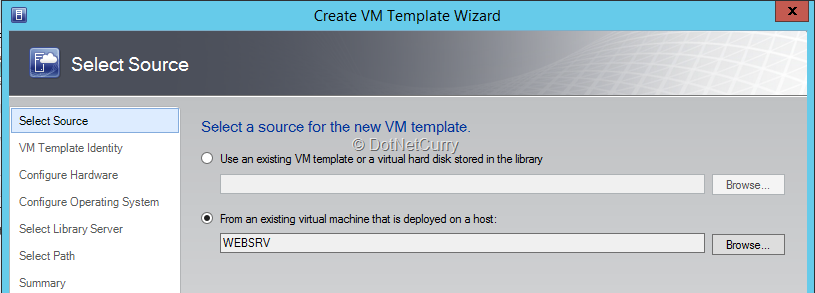
Figure 4: Selection of VM to convert to VM Template
In the next step of the wizard, we have to provide a unique ID for the template. I have given the name VM-Template to this template.
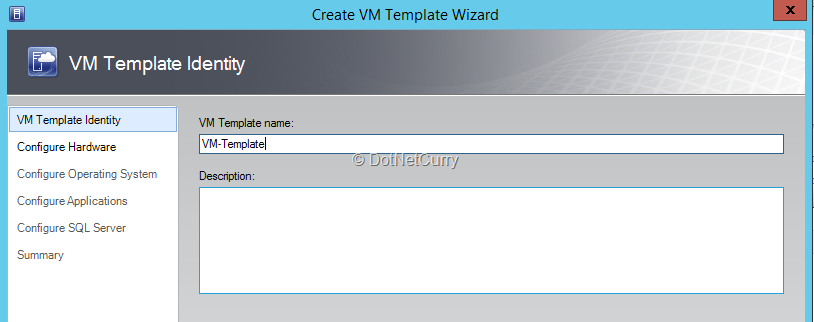
Figure 5: Providing ID to the VM template
On the next screen of the wizard, we now provide the settings for expected hardware of the VM that should be stored in the template. It has many settings:
- Cloud Capability
- Processor: Single or multiple
- Memory: Static or Dynamic, how much if static, if dynamic then starting memory and minimum and maximum memory to be allocated.
- Floppy drive
- COM ports
- IDE devices – hard disk with the path where it should be stored when the VM is created, a virtual DVD drive which may represent an ISO file etc.
- SCSI devices if any
- SQL Server Details if that is to be installed
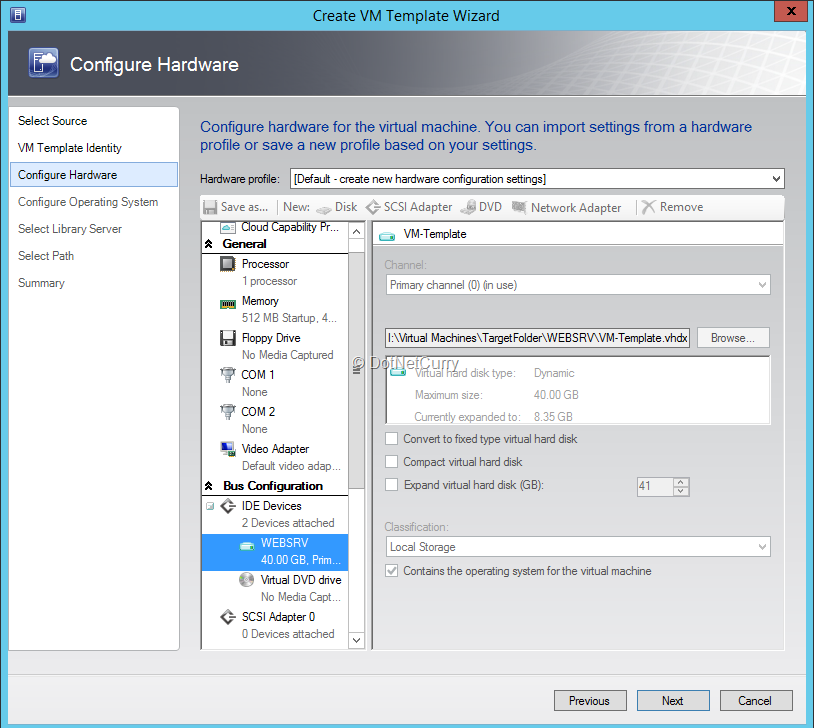
Figure 6: Setting hardware profile for the VM template
Next screen of the wizard allows us to set the Operating System of the VM when it is created. On this screen, we can also provide the product key for that OS.
Then we will need to set the library server and the path under where the VM will be stored when created.
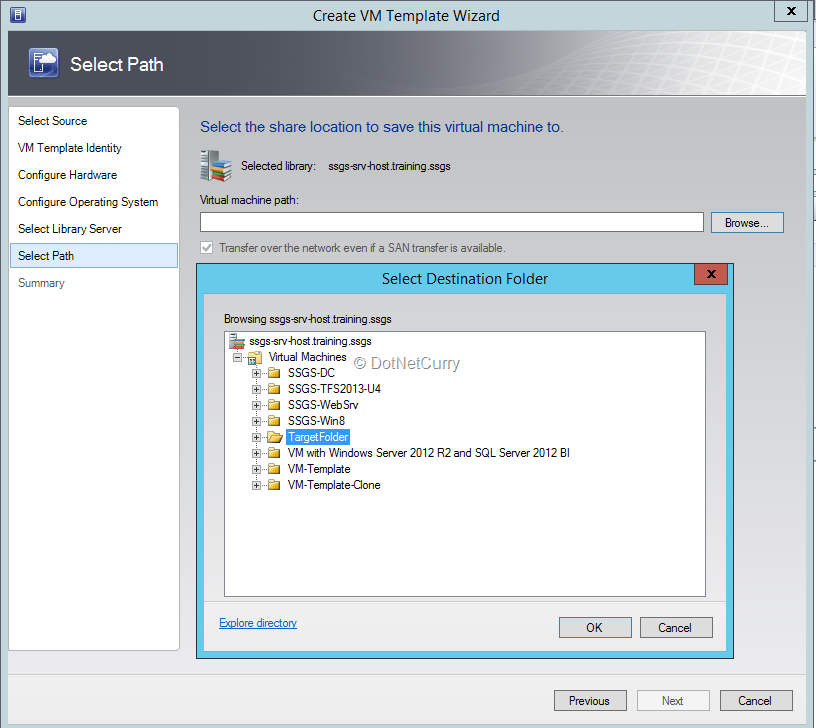
Figure 7: Shared location of VM when it is created
When we click finish, the wizard will convert the source VM into a template which can be used to create as many VMs as required of the same configuration. We are going to use the same template in the release definition to create VM whenever a release is deployed by the RM service.
Linking SCVMM to TFS
Now that the template is ready, we need to link SCVMM to our TFS so that it can use SCVMM to create VM at an appropriate place in the release. To link these two entities, TFS 2015 provides creating a Service Endpoint for SCVMM. To create such a service endpoint, we should go to the Team Project administration page and select Services tab. On that tab on the left-hand side, we can see various existing service end points and a green + sign to add a new service endpoint. If the SCVMM service endpoint does not already exist, we will click on that green + sign and select SCVMM from the drop down that appears.
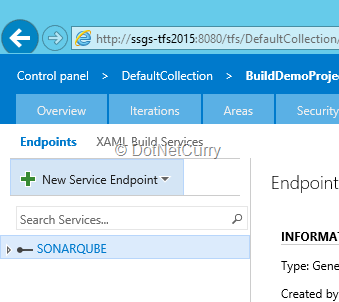
Figure 8: Creating the Service End Point
To create a SCVMM Service Endpoint, we have to provide a unique name, name of the SCVMM Server and credentials of user with administrative privileges.
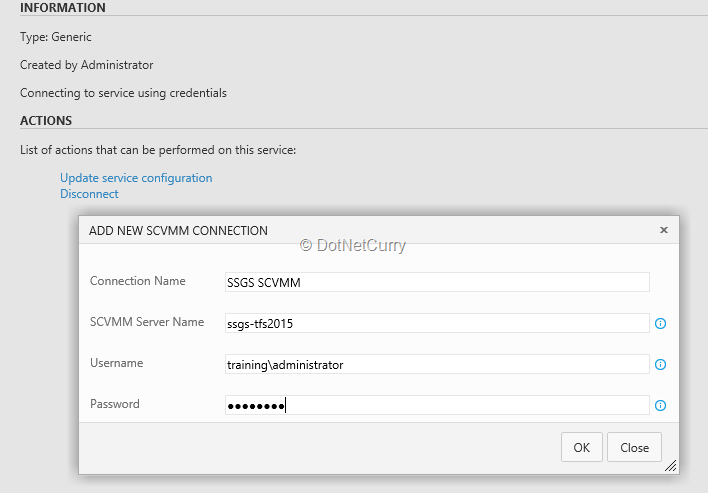
Figure 9: Providing the details for SCVMM Service Endpoint
Install SCVMM Integration Extension
This created service endpoint will be used by the SCVMM Integration Extension that is available from Visual Studio Marketplace (https://marketplace.visualstudio.com). To get that extension installed on TFS, click on the Marketplace icon on the TFS Team Web access page and select Browse Extensions. If you do not find the SCVMM Integration extension, then click on Access Now. From the VSTS section, search for SCVMM and select the SCVMM Integration extension and download it on your machine.
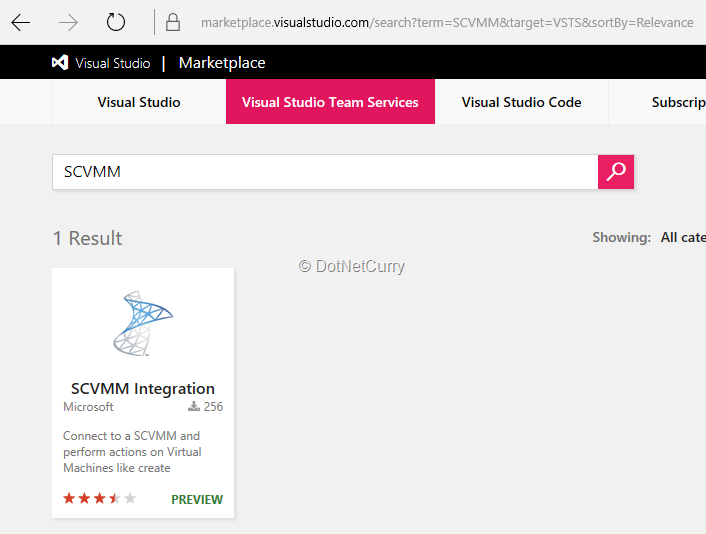
Figure 10: SCVMM Integration extension on Visual Studio Marketplace
What gets downloaded is a file named ms-vscs-rm.scvmmapp-0.0.11.vsix.
After this step, open the page http://:8080/tfs/_gallery/manage to see the installed extensions.

Figure 11: Extensions available on our TFS
If SCVMM Integration extension is not installed, click on the green button to Upload New Extension and select the downloaded ms-vscs-rm.scvmmapp-0.0.11.vsix file to upload to TFS. It will show the extension in the list but it is not installed yet. When you hover the mouse over that extension name, it will show the Install button.
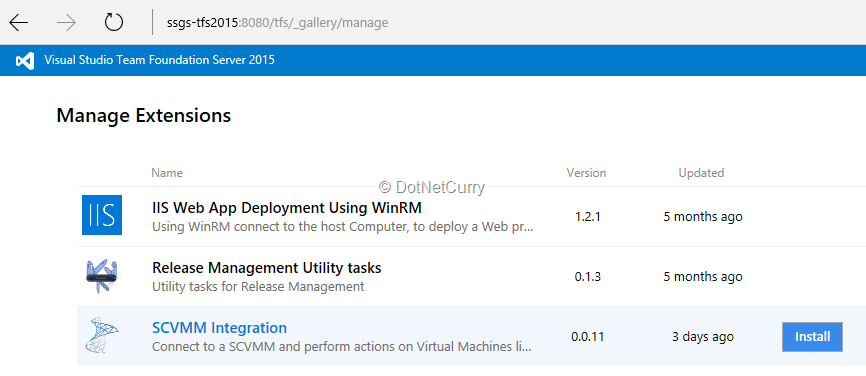
Figure 12: Install SCVMM Integration Extension
Click that button to install SCVMM Integration task. It will not show any visual difference on the page of the team project or collection, it just makes this task available in the Build and Release while creating the definitions. For step by step walkthrough of how to download and install a new extension to TFS, you may visit the page https://blogs.msdn.microsoft.com/visualstudioalm/2016/03/31/team-foundation-server-extensions-2/
Create release definition with SCVMM task
Now we reach to the part where we have to add the SCVMM Integration task to a release definition and then use that to deploy the VM. To do so, let us select the Release tab on the team project. We can create a new Release Definition by clicking on the green + sign. We will select an empty template because we do not want to deploy anything on Azure. It will create a new release definition for us with one environment without any tasks in it. We will give this release definition a name and link it to an existing build definition to indicate that we will be deploying the artifacts created by the build of that definition.
Now we will add the task for creating a VM. That task is SCVMM integration task that is available in the Deploy section.
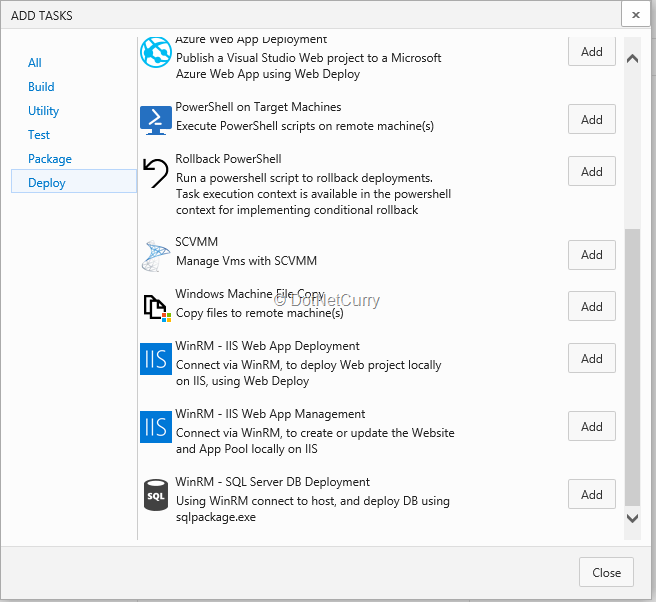
Figure 13: Add SCVMM Integration task to the release definition
After adding the SCVMM Integration task to the default environment, we will now set the properties of that task.
- · SCVMM Service Connection: This is the name of the SCVMM Service Endpoint that we had created earlier. It is available from the dropdown.
- · Action: Other set of options are dependent on selection of action that we make here. Various actions that are available are:
- Create Checkpoint: Snapshot of a VM as is the state of it right now
- Delete Checkpoint: Delete an existing snapshot
- New Virtual Machine using Template: This is the one that we will use
- Restore Checkpoint: Restore VM to the state as it was when a snapshot was taken
- Run Powershell script for SCVMM: Take some action that is not in this list by running a Powershell script on SCVMM
- Start Virtual Machine
- Stop Virtual Machine
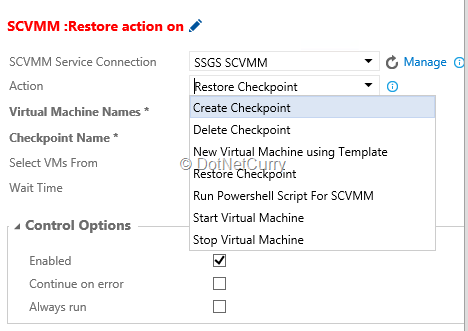
Figure 14: Actions possible with SCVMM Integration task
- Virtual Machine Name: to be given when VM is created
- VM Template Name: ID we had given when we created the template. I had given VM-Template
- Host Name: Hyper-V host name
- Placement path for VM: Path where the VM is to be created on host
- Some more miscellaneous properties
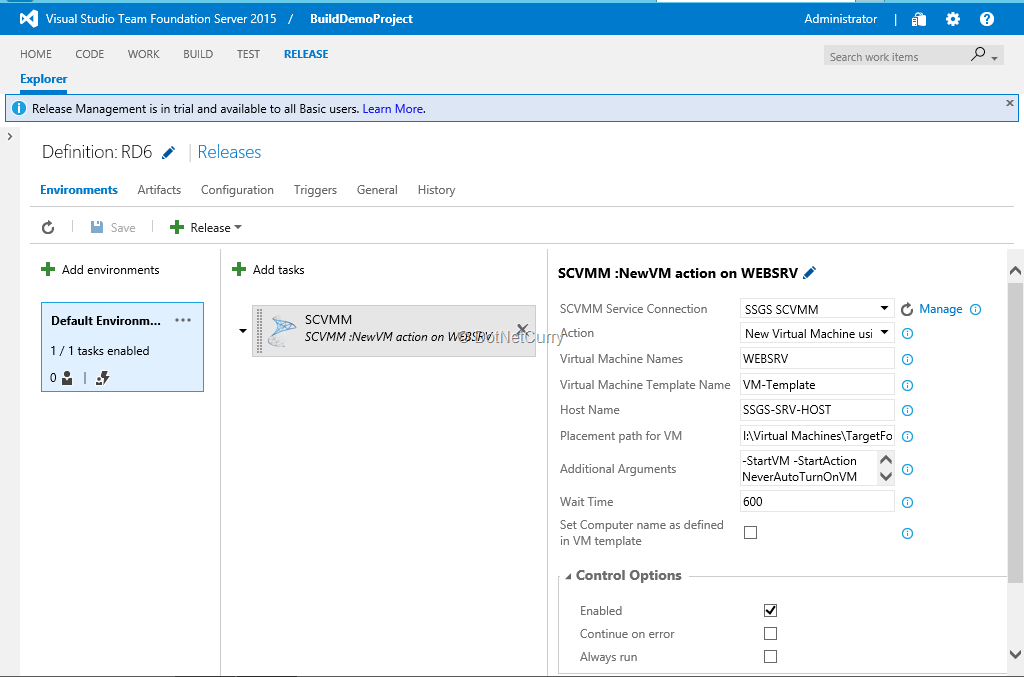
Figure 15: SCVMM Integration task properties
We can add more tasks for deployment of the software on the created VM as necessary.
Now that the release definition is ready, we can make a release and deploy it. Depending upon the size of the VM template and other resources (like a virtual DVD drive in the form of an .ISO file) that we may have chosen, the VM creation will take some time. Finally it will show the results.
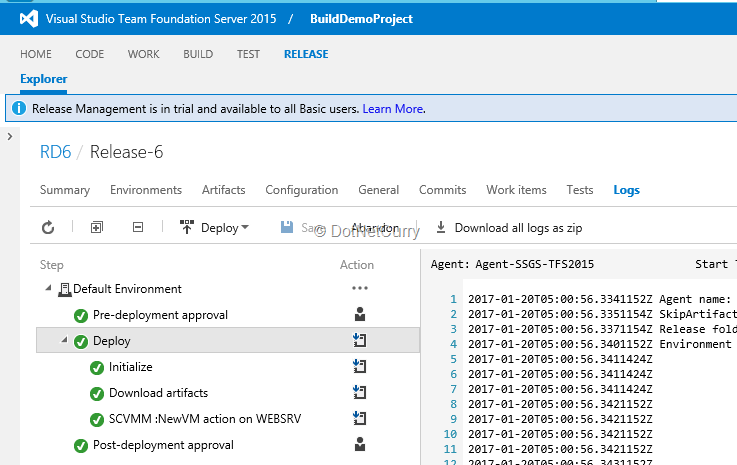
Figure 16: New VM created and provisioned on the host as part of deployment process
If you check in the SCVMM console, you will see the VM is created, running and if any necessary software was to be deployed; it gets deployed on it. I had set it to be added to an AD Domain, which is achieved.
Summary:
In this article, I have described the process to create a VM from the release management service of the TFS as a first step of the deployment of built software. Creating such a VM is necessary when we want to deploy our software for various types of testing on a fresh VM so that it has no effect of any earlier installations. In the process that we mentioned, we are deploying the software on-premises on a VM that is hosted on Hyper-V and controlled by SCVMM.
This article has been editorially reviewed by Suprotim Agarwal.
C# and .NET have been around for a very long time, but their constant growth means there’s always more to learn.
We at DotNetCurry are very excited to announce The Absolutely Awesome Book on C# and .NET. This is a 500 pages concise technical eBook available in PDF, ePub (iPad), and Mobi (Kindle).
Organized around concepts, this Book aims to provide a concise, yet solid foundation in C# and .NET, covering C# 6.0, C# 7.0 and .NET Core, with chapters on the latest .NET Core 3.0, .NET Standard and C# 8.0 (final release) too. Use these concepts to deepen your existing knowledge of C# and .NET, to have a solid grasp of the latest in C# and .NET OR to crack your next .NET Interview.
Click here to Explore the Table of Contents or Download Sample Chapters!
Was this article worth reading? Share it with fellow developers too. Thanks!

Subodh is a Trainer and consultant on Azure DevOps and Scrum. He has an experience of over 33 years in team management, training, consulting, sales, production, software development and deployment. He is an engineer from Pune University and has done his post-graduation from IIT, Madras. He is a Microsoft Most Valuable Professional (MVP) - Developer Technologies (Azure DevOps), Microsoft Certified Trainer (MCT), Microsoft Certified Azure DevOps Engineer Expert, Professional Scrum Developer and Professional Scrum Master (II). He has conducted more than 300 corporate trainings on Microsoft technologies in India, USA, Malaysia, Australia, New Zealand, Singapore, UAE, Philippines and Sri Lanka. He has also completed over 50 consulting assignments - some of which included entire Azure DevOps implementation for the organizations.
He has authored more than 85 tutorials on Azure DevOps, Scrum, TFS and VS ALM which are published on
www.dotnetcurry.com.Subodh is a regular speaker at Microsoft events including Partner Leadership Conclave.You can connect with him on
LinkedIn .