I plan to start a series of article on Visual Studio 2012 LightSwitch. In the first part of this series, we will build an application using “Visual Studio 2012 LightSwitch HTML application” which will display data from the SQL Server database. We will also see how to “Sort” and “Filter” the data by adding parameters. For this demonstration, I am using Windows 7 and Visual Studio 2012.
Visual Studio LightSwitch is used for building Business Applications for Desktop and the cloud. LightSwitch HTML Application can also be used for building applications for Mobile.
To create a LightSwitch application in Visual Studio 2012, open Visual Studio and click on New Project and create a project with the name “NorthwindBusinessApplication” as shown below –

Once your project is ready, you can start with “Start with data” option as shown below –

The “Start with data” has two options –
1. Create new table – by using this option, we can create our own tables with our own structures.
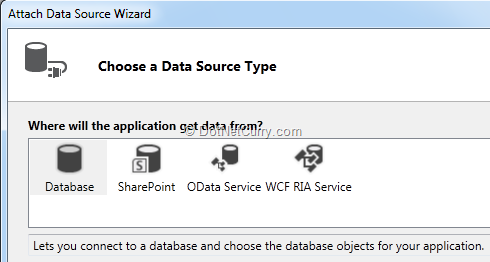
2. Attach to external Data Source – by using this option, we can connect to external Data Sources like –
- a. Database – using this external data source, we can connect to SQL Server database and fetch the Tables or Views.
- b. SharePoint – using this external data source, we can connect to SharePoint site and fetch the lists data in our project.
- c. OData [Open Data Protocol] – using this external data source, we can connect to existing OData services to fetch the data into our project.
- d. WCF RIA Service – using this external data source, we can fetch the data using WCF Services in our project.
Click on “Attach to external Data Source”. It will show the attach data source wizard as shown below –
 .
.
Choose “Database” and click on the “Next” button. Specify the SQL Server name, choose the authentication and then select “Northwind” database as shown below –
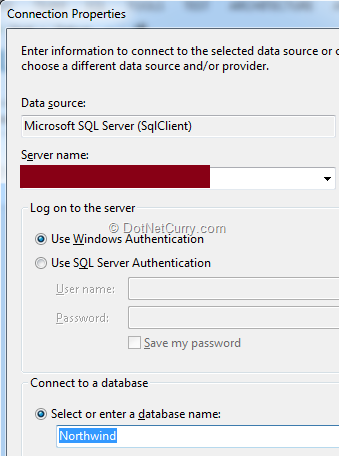
Once your connection is successful, it will show you the “Tables” and “Views” from the Northwind database. Choose “Customers”, “Orders” table from “Tables” section and click on “Finish” button.
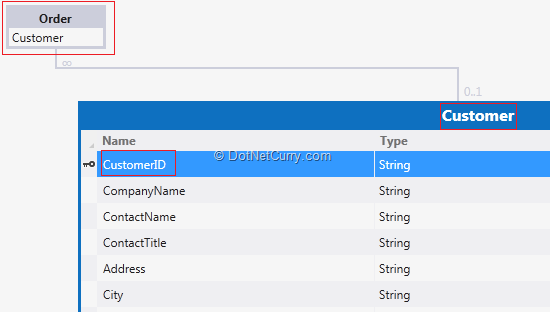
Now in the “NorthwindBusinessApplication Designer” window, it will show you “Customers” with its properties. It also shows you the relationship with “Orders” as shown below –
 .
.
You can change the type of properties as per your business needs. For example, change the Phone type to Phone Number as shown below –

Now let’s take a closer look in our solution explorer. If you check, in our Project, we have two sections. First is “Server” and second is “Client”. If you expand the “Server” folder, you will see our Tables under NorthwindData. The “Client” folder will have our Screens on which we will display our data.
Right click the “Client” folder and click on “Add Screen” as shown below –

You will now see the “Screen Template Window”. Here we can choose the template to display our data, name the screen and choose the data for the screen as shown below –
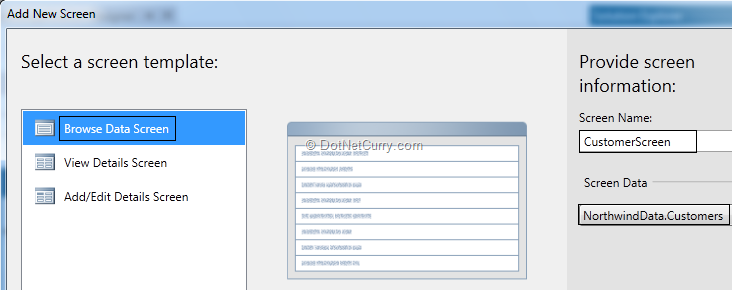
Click on the OK button. You will see “Customer Screen” with layout option and a Query Designer as shown below –

Run your project with the default options of the screen. You will see the following output in your browser –

You can change the display of this Customer Screen from List to Tile list as shown below –
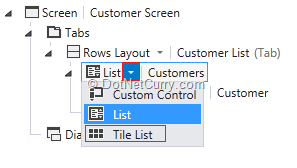
Run your project again and observe the Tile List output as shown below –

Let’s change the Layout of the Customer Screen. You have multiple choices to display the layout of the screen, as shown below –

Try all the different layouts by running your project.
Edit Query Option
Now let’s take a look at the “Edit Query” option. On the left hand side section, you will find the “Customer” Edit Query option. Click on Edit Query as shown below –
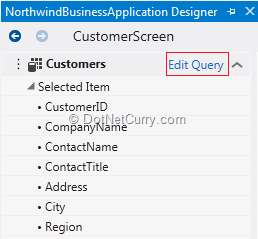
Under Edit Query option, you will find three different options as described –
1. Filter – In this filter section, you can add a Single or Group Filter.
2. Sort – You can add Sorting expression while displaying the data.
3. Parameter – You can add the Parameter(s), which can be mapped to your filters as per your business need.
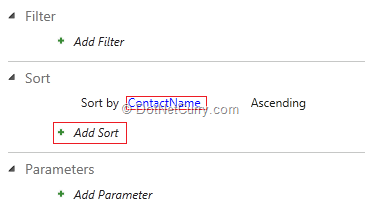
For this demonstration, we will do the sorting of our “Customer” data by ContactName property. In the “Edit Query” window, click on “Add Sort” and set the “Sort by” expression to “ContactName” from the drop down list. Keep the sorting direction “Ascending” which is default as shown below –
Run your project and now you will see the Customers sorted with ContactName ascending order. After sorting the data, now let’s add a Filter and Parameter to our query.
To add the “Parameter” and “Filter”, let’s click on “Edit Query” from the designer window located at the left hand side. Click on “Add Parameter”. Name the parameter as “City” and set its Type to String as shown below –

Let’s add a “Filter”. Click on “Add Filter” drop box and click on “Single” from the “Filter” section. Choose the “Where” condition and a “City” property. Operator should be “=”. The Filter value should be taken from parameter and set the name of the Parameter “City” as shown below –

Now go back to main design window. On the left hand side, you will see “Query Parameters” with the City parameter. Drag and drop “City” Parameter under “Rows Layout” as shown below –
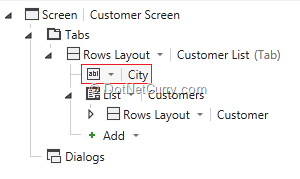
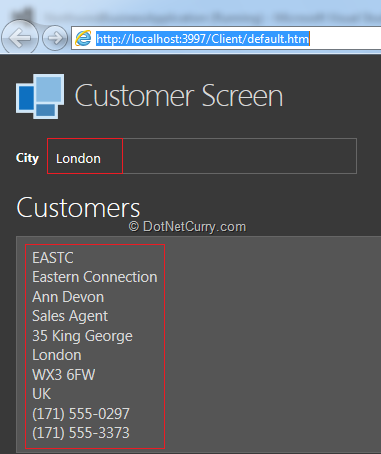
Now let’s run the project. Your will see a “Textbox” where we can add our “City” to filter the data. Write “London” city and press Tab Key. This brings up all the customers from “London” city as shown below –
That's it for now. In the next part, we will see how to create connected screens and add a dialog box in our application.
Conclusion
In this article, we have created a Visual Studio 2012 LightSwitch application which fetches the data from SQL Server database. We have also seen how to Sort the data as well as Filter the data by adding the Parameters.
This article has been editorially reviewed by Suprotim Agarwal.
C# and .NET have been around for a very long time, but their constant growth means there’s always more to learn.
We at DotNetCurry are very excited to announce The Absolutely Awesome Book on C# and .NET. This is a 500 pages concise technical eBook available in PDF, ePub (iPad), and Mobi (Kindle).
Organized around concepts, this Book aims to provide a concise, yet solid foundation in C# and .NET, covering C# 6.0, C# 7.0 and .NET Core, with chapters on the latest .NET Core 3.0, .NET Standard and C# 8.0 (final release) too. Use these concepts to deepen your existing knowledge of C# and .NET, to have a solid grasp of the latest in C# and .NET OR to crack your next .NET Interview.
Click here to Explore the Table of Contents or Download Sample Chapters!
Was this article worth reading? Share it with fellow developers too. Thanks!
Pravinkumar, works as a freelance trainer and consultant on Microsoft Technologies. He is having over 10 years of experience in IT and is also a Microsoft Certified Trainer(MCT). He has conducted various corporate trainings on all versions of .NET Technologies including .NET, SharePoint Server, Microsoft SQL Server, Silverlight, ASP.NET, Microsoft PerformancePoint Server 2007 (Monitoring). He is passionate about learning new technologies from Microsoft. You can contact Pravinkumar at dabade[dot]pravinkumar [attherate] gmail[dot]com