Windows Azure, is a cloud-Computing platform and infrastructure provided by Microsoft. This platform allows features like building, deploying and managing applications and services so that they can be accessed globally. Azure is available as Platform as a Service (PaaS) and Infrastructure as a Service (IaaS).
To make the .NET application deployment easier on Windows Azure, Visual Studio 2012 and Visual Studio 2013 provides you the necessary tools. You can download the fully functional Visual Studio 2013 Community Edition over here. In order to use Azure, we first need to visit manage.windowsazure.com and subscribe to this service. You can also get a free trial subscription to get started. Please make sure that you read the pricing details of various services before you start using them. Once you login on the portal, the following image shows some service/features that can be accessed:

In this article we will use one of the previous application created using Angular.js, MVC, and WEB API for performing CRUD operation. We will publish this application on Azure as a web site. Download the source code and open this application in Visual Studio 2013.
Creating Database Server using SQL Azure
To execute our website successfully, we must deploy the database used by our web site on the cloud. To deploy the database on Azure, we must create a database server using SQL Azure.
Step 1: Click on SQL DATABASES (see image above). You will see a database page as shown here:

Click on Servers, this will allow to create a new SQL SERVER DATABASE. On clicking ‘CREATE A SQL SERVER DATABASE’, the below window will be displayed:

Enter the required details. After entering details, click on the tick sign on lower right to create the database server:

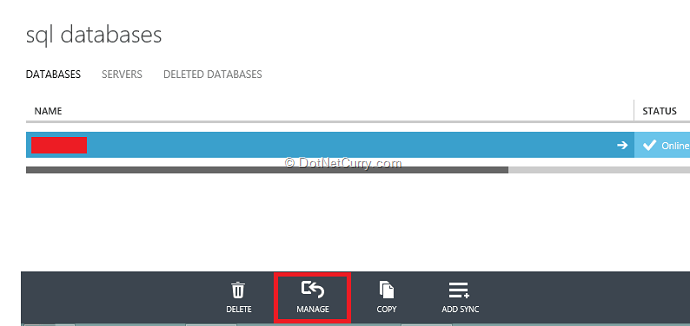
Click on ‘MANAGE’ at the bottom of the page (not shown in the image), this will add the server access firewall rules so that it can be accessed by the application. These rules will add the IP address of your machine in the firewall rules. To know about the Database Server instance name, click on the database name to display a dashboard. Scroll down the dashboard page to display the MANAGE URL. It starts from https://<SERVER_NAME>.database.windows.net. The part of the URL after https://, is the database instance name.
Step 2: To Connect to the database server instance, copy the part of the URL after http://, and from the local SQL Server instance, click on Connect on the object explorer, and in the Connect To Server window enter the database details as shown here:

This will display the SQL Azure Database Server instance in the object explorer on the local SQL Server instance.
Creating Database on SQL Azure to use it in the Application
In the previous step we created a SQL Server. In this step we will create a new SQL Server Database on this server so that we can use it in our MVC application. In the Azure Portal click on SQL DATABASES and click the link ‘CREATE A SQL DATABASE’. The following window will be shown to enter database details:

Enter the necessary details. The SERVICE TIERS will allow the database tier selection as BASIC|STANDARD|PREMIUM. Select the BASIC tier. Select the SEERVER as the database server we have created in the above steps. The created database will be shown as below:

Click on the MANAGE button at the bottom of the Page which will create a Firewall rule to set the access of the database:

..and will open the following page where the Database Admin information needs to be entered:

Clicking on Log On will display the following page:

Click on ‘Design’ to create Tables, Views and Stored Procedures.

Click on the ‘New Table’ link and create an Employee table as shown here:

Enter sample records in this table using New Query link.
Making changes in the Web.config File of the MVC Application
Open the MVC application in Visual Studio 2013 and make the following changes in the Connection String.
<add name="ApplicationEntities" connectionString="metadata=res://*/Models.ApplicationEDMX.csdl|res://*/Models.ApplicationEDMX.ssdl|res://*/Models.ApplicationEDMX.msl;provider=System.Data.SqlClient;provider connection string="data source=<server_name>;initial catalog=Application;user id=<User_Name>;password=<PWD>;MultipleActiveResultSets=True;App=EntityFramework"" providerName="System.Data.EntityClient" />
(Alternatively you can run the Entity Framework Wizard in the Project in the Models folder to generate the Connection string)
Creating Web Site Using Windows Azure Portal
Click on the Website to display options of creating Web Site. Click on the link CREATE A WEBSITE. This will bring up the following options for creating WEB Site:

Here you can enter the URL information. This is a unique URL i.e. the URL name entered will be verified by the Azure. If it does not exist, then the URL will be <YOUR_URL>.azurewebsites.net. The Data Center must be selected as per your choice. Once the Data Center is selected, then all the other resources needed by the web site e.g. SQL Database must be hosted at the same Data Center as this will help in managing the cost. Once the Web Site is created, the portal will show the details:

To get the details of the web site, click on its name, the below dashboard will be displayed, the dashboard will help in managing and monitoring the web site.

To publish the Web Site created in Visual Studio using VS tools, we need to download the Publish Profile. This can be downloaded from the Download the publish profile link as seen in the above image (lower right).
Publishing the Web Site from Visual Studio
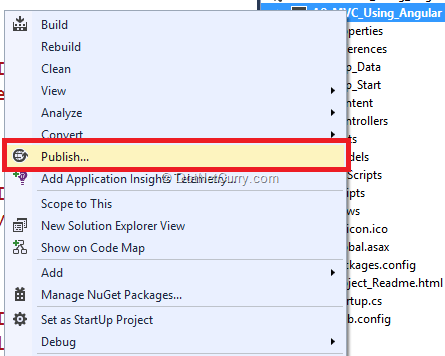
Open the SPA Application created in the previous article in Visual Studio 2013. Right click on the project name to display the context menu with Publish Option.

This option will display the following window:

The above window has the following options:
- Microsoft Azure Websites – supports direct login on the Windows Azure based upon the subscription.
- Import – helps to import the web site publish profile which is downloaded from the Azure Portal.
- Custom – allows to create a new publish profile for deploying the web site.
Click on ‘Import’ and the following window will be displayed for importing the publish profile:

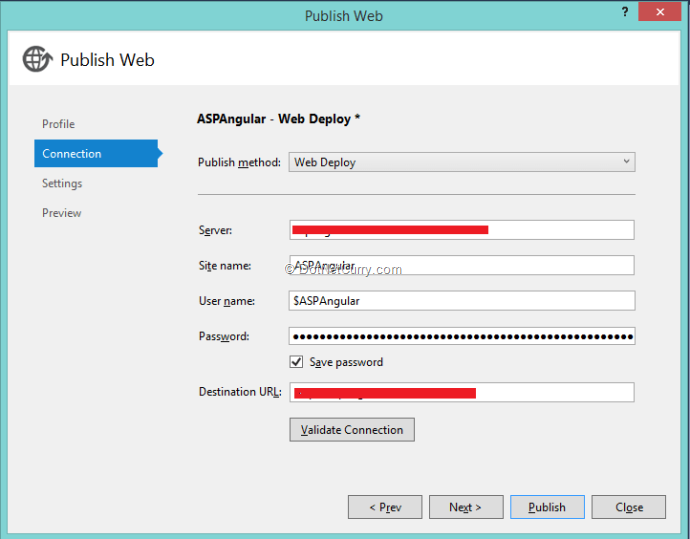
Once the ‘OK’ button is clicked, the following window will be displayed with web deploy details:

Click on ‘Next’. Since we already deployed the database on SQL Azure and the database connection string is already updated in the web.config file, the following window will show the connection string:

Click on Next to display list of files to be published:

Click on the Publish button, the Web Site will be published with all required references.
Once the Web Site is published successfully, it can be browsed.

Note: I have not used any CSS, hence the distorted layout. Feel free to add a dash of CSS to beautify the page.
And that’s how to deploy a website on Azure.
This article has been editorially reviewed by Suprotim Agarwal.
C# and .NET have been around for a very long time, but their constant growth means there’s always more to learn.
We at DotNetCurry are very excited to announce The Absolutely Awesome Book on C# and .NET. This is a 500 pages concise technical eBook available in PDF, ePub (iPad), and Mobi (Kindle).
Organized around concepts, this Book aims to provide a concise, yet solid foundation in C# and .NET, covering C# 6.0, C# 7.0 and .NET Core, with chapters on the latest .NET Core 3.0, .NET Standard and C# 8.0 (final release) too. Use these concepts to deepen your existing knowledge of C# and .NET, to have a solid grasp of the latest in C# and .NET OR to crack your next .NET Interview.
Click here to Explore the Table of Contents or Download Sample Chapters!
Was this article worth reading? Share it with fellow developers too. Thanks!
Mahesh Sabnis is a DotNetCurry author and a Microsoft MVP having over two decades of experience in IT education and development. He is a Microsoft Certified Trainer (MCT) since 2005 and has conducted various Corporate Training programs for .NET Technologies (all versions), and Front-end technologies like Angular and React. Follow him on twitter @
maheshdotnet or connect with him on
LinkedIn