Windows Azure provides a stable environment for deploying and managing enterprise applications. Typically enterprise applications are designed with multi-layer components. These applications often need to communicate with other applications and such communications is implemented and handled using Queue. Queue provides feature of sending and receiving messages. But only offline messaging across applications is not sufficient. A better way here is to make use of Publish-Subscribe model.
Windows Azure provides Service Bus is a multi-tenant cloud service and can be shared by multiple-users. Windows Azure Service Bus provides cloud based and message oriented middleware technologies for reliable message queuing and durable publish-subscribe messaging. Each user who wants to make use of Service Bus can create a namespace within which different methods of communication are provided as listed here:
o Queues - allows one-directional communication. The queue acts as a broker which stores messages until they are received.
o Topics - provides one-directional communication using subscription. Like queue, topics also act as a broker but messaging is managed based on matching specific criteria.
o Relays - provides bi-directional communication. This does not store any message, instead it just passes them to the destination application.
The Service Bus runs in the cloud, but applications which make use of service bus can run anywhere. The application must provide some name to the queue, topic, and relay so that it can be used by Service Bus for communication.
In the application explained in this article, we will use service bus and its objects to manage communication between applications. To make use of these objects we need to create Service Namespace on the Windows Azure Portal. You have to make sure that you have active subscription on the portal. To get a trial subscription, you can visit http://manage.windowsazure.com.
Section 1: Creating Service Namespace on the Windows Azure Portal
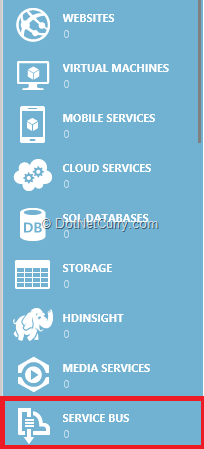
Step 1: Visit the Windows Azure portal and log in with your subscription credentials. In the browser, select Service Bus as shown here:
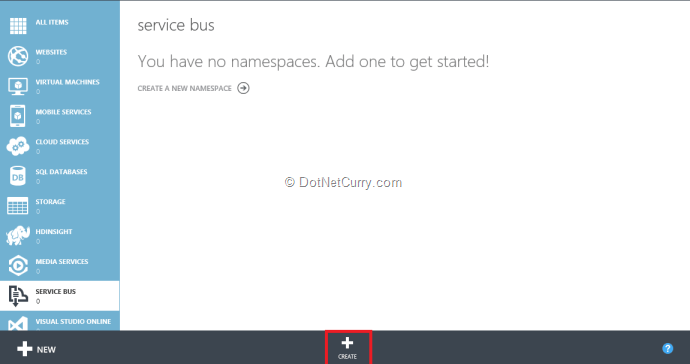
Step 2: The following page will be displayed. Select the Create option:
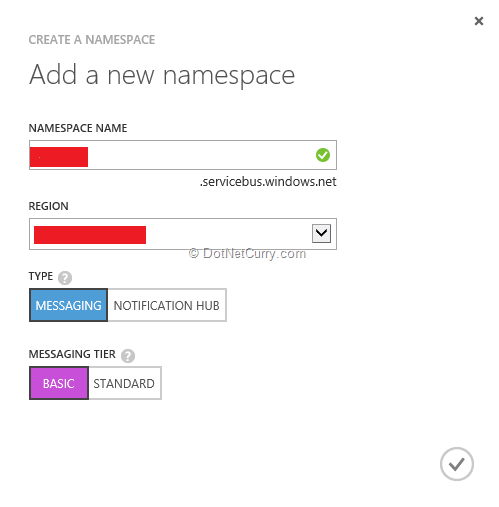
Step 3: Clicking on Create will bring up a dialog box where we need to enter details for the namespace like name, region etc.
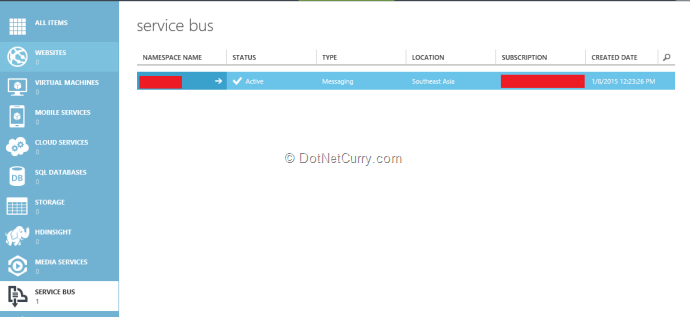
The created namespace will be displayed as shown here:
Step 4: To perform operations like creating queues on this namespace, we must retrieve management credentials for the namespace. This information will then further be made available with the applications who want to make use of the Service Bus queues for communicating with each other. To obtain these credentials, select the namespace created and click on the Connection Information at the bottom of the page.

The Access Connection Information dialog box will be displayed as shown here:
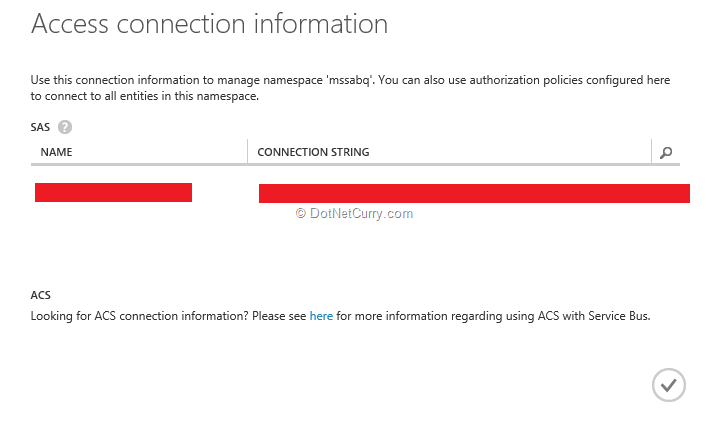
Copy the Connection string and paste it in notepad for further use.
Section 2 - Creating Queue
The next step is to create a queue so that our applications can use it for communication. Alternatively, we can create a queue using an application with the help of Windows Azure API which we can download using NuGet package.
Step 1: On the Windows Azure Portal, click on the Service Bus and click on the namespace we created in Section 1. The following page will be displayed:
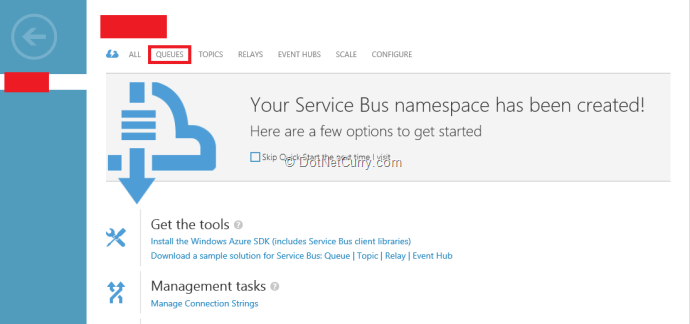
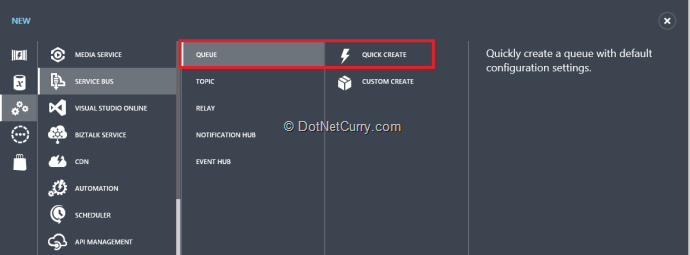
Step 2: In this page, click on ‘Queues’ and create a queue:
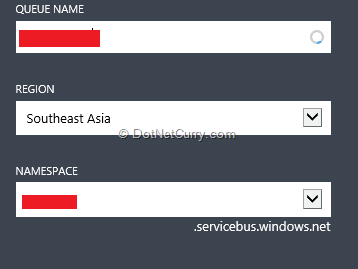
Enter the queue details as shown here:
The created queue will be displayed as shown below:

Section 3: Understanding Service Bus Queue
Queues offers First-In-First-Out (FIFO) message delivery. The sender sends the message through the queue and receiver receives the message and processes it. The message is received and processed by only one message consumer. This mechanism provides decoupling across the applications. The following diagram depicts the behavior of the Service Bus Queue.
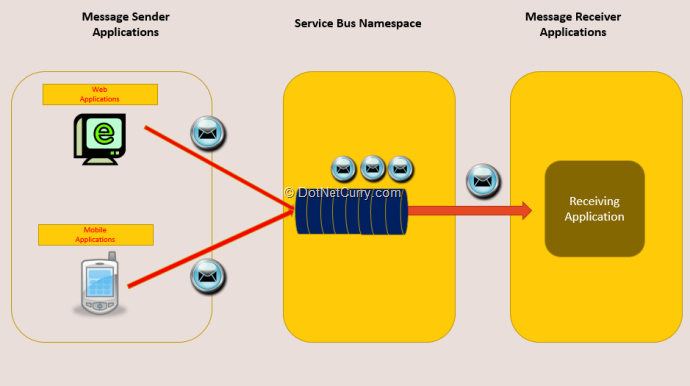
The above diagram clearly explains the working behavior of the Service Bus Queue. It provides brokered message communication model. This means that the sender and receiver application do not communicate directly, instead they exchange messages via queue. The sender application sends message to the queue and continues its work. The receiver application on the other hand pulls the message asynchronously from the queue and processes it. The receiver application processes message with the order in which they are put in the queue.
Using Service Bus Queue in an ASP.NET MVC application
In real world applications, Service Bus Queues are used for the disconnected communication between components of the distributed applications. In the following implementation, we will be implementing two ASP.NET MVC 5 Applications. The first application OrderPlacer, will be used by customers to place orders for medicines. The second application OrderPorcessor will be used by the Medicine provider to process orders.
The OrderPlacer application will place orders for medicine and the information will be stored in the queue. The OrderProcessor application will pull all orders from queue and process it.
Section 4: Designing the database required for the application
Step 1: Login on to the Windows Azure portal
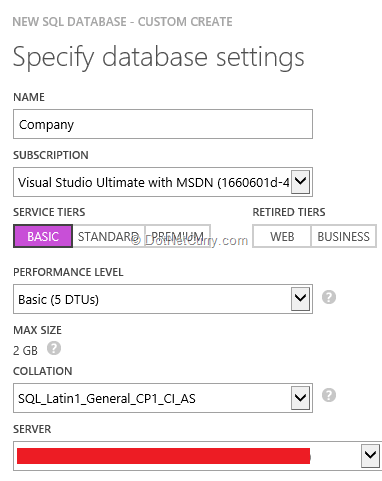
Step 2: In the portal from the database, create a new database server with credentials and create a database as shown here:
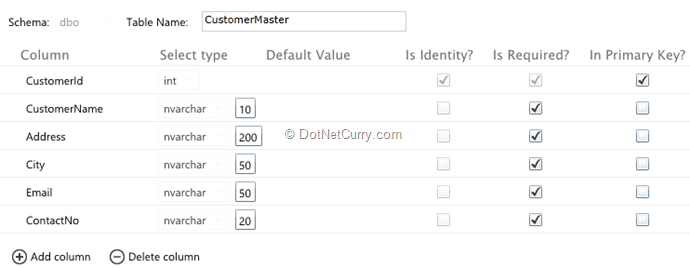
Step 3: After creating the database, click on Manage at the bottom of the page. In the Manage page, enter database credentials. Select Design from the Manage page and create tables as shown here: (Alternatively Sql Server Management Studio can also be used)
CustomerMaster
ItemMaster

OrderMaster

ProcessOrder

Add some test data in CustomerMaster and OrderMaster so that we can use it during the application development.
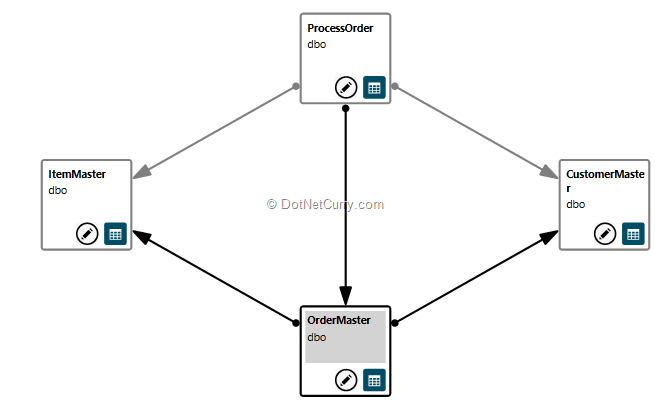
All tables are related as shown here:
Section 5: Create MVC 5 applications and make use of Service Bus queues for offline communications
Step 1: Open Visual Studio and create a new Empty ASP.NET MVC application of the name ‘OrderPlacer’. In this project, in the Models folder, add a new ADO.NET Entity Data Model of the name CompanyEDMX and start the wizard. Select the Sql Azure Database which we have created in Section 4. In the wizard, select CustomerMaster, ItemMaster and OrderMaster. After the completion of the wizard, the table mapping will be displayed as follows:
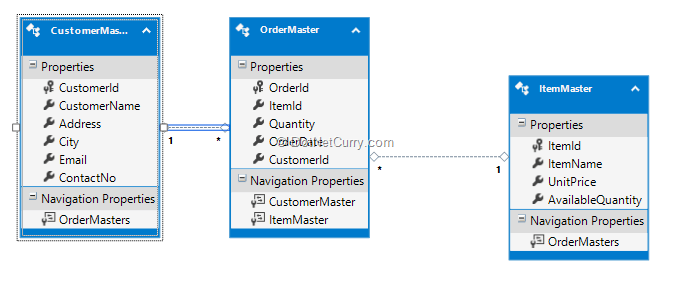
Since we need to send order information to Service Bus Queue, we need to make the following changes in the OrderMaster:
[DataContract(Name="OrderMaster",Namespace="OrderMaster")]
public partial class OrderMaster
{
    [DataMember]
    public int OrderId { get; set; }
    [DataMember]
    public int ItemId { get; set; }
    [DataMember]
    public int Quantity { get; set; }
    [DataMember]
    public System.DateTime OrderDate { get; set; }
    [DataMember]
    public int CustomerId { get; set; }

    public virtual CustomerMaster CustomerMaster { get; set; }
    public virtual ItemMaster ItemMaster { get; set; }
}
Since Service Bus Queue requires objects to be serialized, we need to make use of the DataContract attribute on the object.
Build the project.
Step 2: To make use of the Windows Azure Service Bus, add the necessary package in the project from the NuGet Package Manager. Add the following package in the MVC Project:
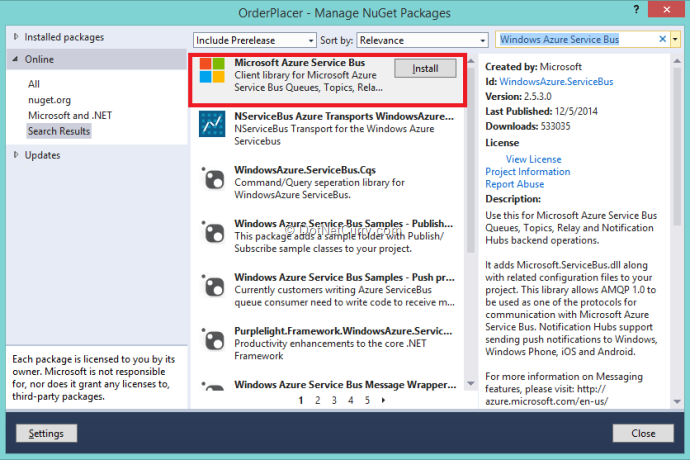
After completion the Package installation, the following references will be added in the project:
· Microsoft.ServiceBus
· Microsoft.WindowsAzure.Configuration
The web.config file of the application will have necessary references added in it under <system.serviceModel>.
Step 3: In the web.config file of the application, we need to add the Service Bus endpoints in <appSettings> as shown here:
<add key="Microsoft.ServiceBus.ConnectionString"
   value="Endpoint=sb://myqueue.servicebus.windows.net; SharedAccessKeyName=RootManageSharedAccessKey;SharedAccessKey=[Shared Access Key]" />
Step 4: In the Models folder, add a new class file and add the following code in it:
using Microsoft.ServiceBus;
using Microsoft.ServiceBus.Messaging;
using System;
using System.Collections.Generic;
using System.Configuration;
using System.Linq;

namespace OrderPlacer.Models
{

/// <summary>
/// Class for Combining Customer, Order and Item Information with
/// CustomerId and ItemId
/// </summary>
///
public class CustomerOrderItemMaster
{
    public int CustomerId { get; set; }
    public OrderMaster Order { get; set; }
    public int ItemId { get; set; }

}

/// <summary>
/// Class cotaining method for placind order
/// </summary>
public class PlaceOrder
{
    CompanyEntities ctx;
    public PlaceOrder()
    {
        ctx = new CompanyEntities();
    }

    public List<ItemMaster> GetItems()
    {
        return ctx.ItemMasters.ToList();
    }

    public List<CustomerMaster> GetCustomers()
    {
        return ctx.CustomerMasters.ToList();
    }

    /// <summary>
    /// Method to Create Order and Storing it in Queue
    /// </summary>
    /// <param name="coi"></param>
    public void CreateOrder(CustomerOrderItemMaster coi)
    {
        OrderMaster ord = new OrderMaster()
        {
             OrderId = coi.Order.OrderId,
             CustomerId= coi.CustomerId,
             Quantity = coi.Order.Quantity,
             ItemId = coi.ItemId,
              OrderDate = DateTime.Now
        };

        ctx.OrderMasters.Add(ord);
        ctx.SaveChanges();

         //Code for Adding Message in Queue

        //S1: The NamespaceManager object used to manage queues, topics etc.
        string connString = ConfigurationSettings.AppSettings["Microsoft.ServiceBus.ConnectionString"];
        NamespaceManager namespaceManager = NamespaceManager.CreateFromConnectionString(connString);

        //S2: The Queue Description using QueueName
        QueueDescription queue = new QueueDescription("orderqueue");
        queue.MaxSizeInMegabytes = 5120; //5 MB
        queue.DefaultMessageTimeToLive = new TimeSpan(0, 30, 0); //For 30 Mins


        //S3: Send the Message
        QueueClient client = QueueClient.CreateFromConnectionString(connString, "orderqueue");
        BrokeredMessage message = new BrokeredMessage(ord);
        client.Send(message);
        //Ends Here


    }

}
}
The above code has the following specifications:
The class CustomerOrderItemMaster defines properties which are used to scaffold view.
The class PlaceOrder, contains logic for accessing data from Sql Azure and Placing Order
- The method GetItems() contains logic to read all items.
- The method GetCustomers() contains logic to read all customers.
- The CreateOrder() method receives data from CustomerOrderItemMaster and passes it to the OrderMaster. The method also contains logic for creating queue client object using QueueClient class. The class NamespaceManager is used to manage Queues, Topics, Subscriptions, etc. The class QueueDescription is used to set the queue description such as size of the queue and the time for the message to live. The class BrokeredMessage represents the unit of messages communication between ServiceBus Clients.
Step 5: In the Controllers folder, add a new empty MVC Controller of the name OrderManagerController. Add the following action methods code in it:
using System;
using System.Collections.Generic;
using System.Linq;
using System.Web;
using System.Web.Mvc;
using OrderPlacer.Models;

namespace OrderPlacer.Controllers
{
public class OrderManagerController : Controller
{


    PlaceOrder obj;

    public OrderManagerController()
    {
        obj = new PlaceOrder();
    }

    // GET: OrderManager
    public ActionResult Index()
    {
        var info = new CustomerOrderItemMaster() {
         Order =new OrderMaster()
        };
        //Customers Info
        ViewBag.CustomerId = new SelectList(obj.GetCustomers(), "CustomerId", "CustomerName");
        //Items Info
        ViewBag.ItemId = new SelectList(obj.GetItems(), "ItemId", "ItemName");
        return View(info);
    }

    [HttpPost]
    public ActionResult Index(CustomerOrderItemMaster c)
    {
        obj.CreateOrder(c);
        ViewBag.CustomerId = new SelectList(obj.GetCustomers(), "CustomerId", "CustomerName");
        ViewBag.ItemId = new SelectList(obj.GetItems(), "ItemId", "ItemName");
        return View(c);
    }


}
}
Step 6: Scaffold the Empty Index View (with model) from the Index Http Get method and add the following Html helpers in it:
@model OrderPlacer.Models.CustomerOrderItemMaster

@{
    ViewBag.Title = "Index";
}

<h2>Place Order</h2>


@using(Html.BeginForm())
{
<table>
    <tr>
        <td>
            Customer Name:
        </td>
        <td>
            @Html.DropDownList("CustomerId")
        </td>
    </tr>
    <tr>
        <td>
            Item Name:
        </td>
        <td>
            @Html.DropDownList("ItemId")
        </td>
    </tr>
    <tr>
        <td>
            Quantity:
        </td>
        <td>
            @Html.EditorFor(m => m.Order.Quantity)
        </td>
    </tr>
</table>
    <input type="submit" value="Submit"/>
}
Step 6: Run the Application, the Index View will get displayed:
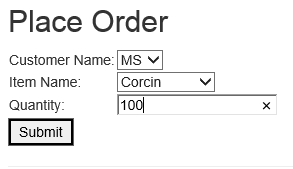
After clicking on the Submit, the Order will be stored in the queue, which we can see from the portal:

Create Order Processor application
Step 1: Open another instance of Visual Studio and create a new empty MVC application, name it as OrderProcessor. In this project in the Models folder, add a new ADO.NET Entity Data Model of the name CompanyEDMX. This will start the wizard, select the Sql Azure Database created in Section 4. In the wizard select all tables and after the completion of the wizard, the table mapping will be displayed as shown here:
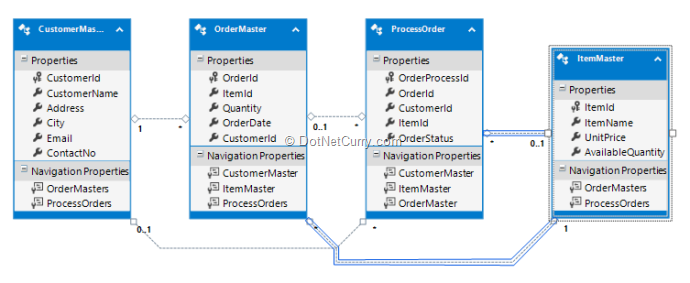
Since we need to send order information to Service Bus Queue, we need to make the following changes in the OrderMaster:
[DataContract(Name="OrderMaster",Namespace="OrderMaster")]
public partial class OrderMaster
{
    [DataMember]
    public int OrderId { get; set; }
    [DataMember]
    public int ItemId { get; set; }
    [DataMember]
    public int Quantity { get; set; }
    [DataMember]
    public System.DateTime OrderDate { get; set; }
    [DataMember]
    public int CustomerId { get; set; }

    public virtual CustomerMaster CustomerMaster { get; set; }
    public virtual ItemMaster ItemMaster { get; set; }
}
Since Service Bus Queue requires objects to be serialized, we need to make use of the DataContract attribute on the object, the same way we used previously.
Step 2: Add the NuGet Package for Windows Azure Service Bus in this project as we did in the OrderPlacer project.
Step 3: In the Models folder, add a new class file to contain the class managing Order Processing Information:
public class ProcessOrderInfo
{
    public int ProcessOrderId { get; set; }
    public int OrderId { get; set; }

    public int CustomerId { get; set; }
    public string CustomerName { get; set; }
    public int ItemId { get; set; }
    public string ItemName { get; set; }
    public int Quantity { get; set; }
    public int AvailableQuantity { get; set; }
    public string OrderStatus { get; set; }
}
Step 4: In the Models folder, add a new class file with the following code:
using System.Collections.Generic;

using Microsoft.ServiceBus;
using Microsoft.ServiceBus.Messaging;
using System.Configuration;

namespace OrderProcessor.Models
{
/// <summary>
/// The Class Constructor Receive Messages from Service Bus Queue
/// </summary>
public class QueueMessageReceiver
{
    string connStr = "";
    NamespaceManager nameSpaceManager;

    public QueueMessageReceiver()
    {
        connStr = ConfigurationSettings.AppSettings["Microsoft.ServiceBus.ConnectionString"];

        nameSpaceManager = NamespaceManager.CreateFromConnectionString(connStr);


    }

    /// <summary>
    /// Read All messages from Queue and Put it in the List of OrderMaster
    /// </summary>
    /// <returns></returns>
    public List<OrderMaster> GetOrdersFromQueue()
    {
        QueueClient qClient = QueueClient.CreateFromConnectionString(connStr, "orderqueue", ReceiveMode.PeekLock);
        //BrokeredMessage message = qClient.Receive();


        var messages = qClient.ReceiveBatch(1);

        List<OrderMaster> Orders = new List<OrderMaster>();


        foreach (var item in messages)
        {
            Orders.Add(item.GetBody<OrderMaster>());
            item.Complete(); //Remove Message from queue
        }

        return Orders;
    }
}
}
The above class makes a call to the Service Bus Queue and receives message from it. Messages received from the Queue will be stored in the list of OrderMaster. Once the message is received it will be removed from the queue.
Step 5: In the Controllers folder, add a new OrderMasterController with the following methods:
using System.Collections.Generic;
using System.Data.Entity;
using System.Linq;
using System.Web.Mvc;
using OrderProcessor.Models;

namespace OrderProcessor.Controllers
{
public class OrderMastersController : Controller
{
    private CompanyEntities1 db = new CompanyEntities1();

    // GET: OrderMasters
    public ActionResult Index()
    {
        List<OrderMaster> Orders = new List<OrderMaster>();

        //Get Message from Queue
        var msgs = new QueueMessageReceiver().GetOrdersFromQueue();

        if (msgs!=null)
        {
            var orderMasters = db.OrderMasters.Include(o => o.CustomerMaster).Include(o => o.ItemMaster);

            foreach (var msg in msgs)
            {
                foreach (var ord in orderMasters)
                {
                    if (msg.OrderId == ord.OrderId)
                    {
                        Orders.Add(ord);
                        break;
                    }

                }
            }

            return View(Orders);
        }
        else
        {
            return View("Index");
        }
    }

    /// <summary>
    /// Process Order View
    /// </summary>
    /// <param name="id"></param>
    /// <returns></returns>
    public ActionResult ProcessOrder(int id)
    {
        var Ord = db.OrderMasters.Find(id);

        ProcessOrderInfo ordProcess = new ProcessOrderInfo();
        ordProcess.OrderId = Ord.OrderId;
        ordProcess.CustomerId = Ord.CustomerId;
        ordProcess.CustomerName = db.CustomerMasters.Find(Ord.CustomerId).CustomerName;
        ordProcess.ItemId = Ord.ItemId;
        ordProcess.ItemName = db.ItemMasters.Find(Ord.ItemId).ItemName;
        ordProcess.Quantity = Ord.Quantity;
        ordProcess.AvailableQuantity = db.ItemMasters.Find(Ord.ItemId).AvailableQuantity;
        ordProcess.OrderStatus = "Processing";
        ViewBag.OrderStatus = new SelectList(new List<string>() {"Approved","Rejected"});
        return View("ProcessOrder",ordProcess);
    }

    [HttpPost]
    public ActionResult ProcessOrder(ProcessOrderInfo p)
    {
        ProcessOrder OrdToProcess = new ProcessOrder();

        OrdToProcess.OrderId = p.OrderId;
        OrdToProcess.CustomerId = p.CustomerId;
        OrdToProcess.ItemId = p.ItemId;
        OrdToProcess.OrderStatus = p.OrderStatus;

        //Save th processor Order Data
        db.ProcessOrders.Add(OrdToProcess);
        db.SaveChanges();

        if(OrdToProcess.OrderStatus=="Approved")
        {
            //Update Item Quantity
            var itemUpdated = db.ItemMasters.Find(OrdToProcess.ItemId);
            itemUpdated.AvailableQuantity -= p.Quantity;
            db.SaveChanges();
        }

        //Delete the Order if it is Approved
        var order = db.OrderMasters.Find(OrdToProcess.OrderId);
        db.OrderMasters.Remove(order);
        db.SaveChanges();
        return View("ProcessedOrders", db.ProcessOrders.ToList());

    }

}
}
The above code has the following specifications:
- The Index method will make a call to the GetOrdersFromQueue() method and check these orders with the OrderMaster Database table. If the order is found, it will be added in the list of OrderMaster and this list will be passed to the Index.cshtml view.
- The ProcessOrder method will display the selected order from the Index View to be processed and will be displayed in the ProcessOrder.cshtml view.
- The HttpPost ProcessOrder method will complete the Order Processing. Once the order is Approved, the Item’s AvailableQuantity will be reduced from the ItemMaster table. The Order will be removed from the OrderMaster table irrespective of Approved or Rejected. Processed Orders will be displayed in the ProcessedOrders.cshtml view.
Index.cshtml
@model IEnumerable<OrderProcessor.Models.OrderMaster>

@{
    ViewBag.Title = "Index";
}

<h2>Index</h2>

<p>
    @Html.ActionLink("Create New", "Create")
</p>
<table class="table">
    <tr>
        <th>
            @Html.DisplayNameFor(model => model.OrderId)
        </th>
        <th>
            @Html.DisplayNameFor(model => model.Quantity)
        </th>
        <th>
            @Html.DisplayNameFor(model => model.OrderDate)
        </th>
        <th>
            @Html.DisplayNameFor(model => model.CustomerMaster.CustomerName)
        </th>
        <th>
            @Html.DisplayNameFor(model => model.ItemMaster.ItemName)
        </th>
        <th></th>
    </tr>

@foreach (var item in Model) {
    <tr>
        <td>
            @Html.DisplayFor(modelItem => item.OrderId)
        </td>
        <td>
            @Html.DisplayFor(modelItem => item.Quantity)
        </td>
        <td>
            @Html.DisplayFor(modelItem => item.OrderDate)
        </td>
        <td>
            @Html.DisplayFor(modelItem => item.CustomerMaster.CustomerName)
        </td>
        <td>
            @Html.DisplayFor(modelItem => item.ItemMaster.ItemName)
        </td>
        <td>
            @Html.ActionLink("Select Order to Process", "ProcessOrder", new { id = item.OrderId }) |
        </td>
    </tr>
}

</table>
ProcessOrder.cshtml
@model OrderProcessor.Models.ProcessOrderInfo

@{
    ViewBag.Title = "ProcessOrder";
}

<h2>ProcessOrder</h2>
@using (Html.BeginForm())
{

    <table>
        <tr>
            <td>
                Order Id:
            </td>
            <td>
                @Html.EditorFor(m => m.OrderId)
            </td>
        </tr>
        <tr>
            <td>
                Customer Id:
            </td>
            <td>
                @Html.EditorFor(m => m.CustomerName)
                @Html.Hidden("CustomerId", Model.CustomerId)
            </td>
        </tr>
        <tr>
            <td>
                Item Id:
            </td>
            <td>
                @Html.EditorFor(m => m.ItemName)
                @Html.Hidden("ItemId", Model.ItemId)
            </td>
        </tr>

        <tr>
            <td>
                Ordered Quantity:
            </td>
            <td>
                @Html.EditorFor(m => m.Quantity)
            </td>
        </tr>

        <tr>
            <td>
                Available Quantity:
            </td>
            <td>
                @Html.EditorFor(m => m.AvailableQuantity)
            </td>
        </tr>
        <tr>
            <td>
                Order Status:
            </td>
            <td>
                @Html.DropDownList("OrderStatus")
            </td>
        </tr>
    </table>
    <input type="submit" value="Save Process Order" />
}
ProcessedOrders.cshtml
@model IEnumerable<OrderProcessor.Models.ProcessOrder>

@{
    ViewBag.Title = "PrecessedOrders";
}

<h2>PrecessedOrders</h2>

<p>
    @Html.ActionLink("Create New", "Create")
</p>
<table class="table">
    <tr>
        <th>
            @Html.DisplayNameFor(model => model.OrderProcessId)
        </th>
        <th>
            @Html.DisplayNameFor(model => model.OrderStatus)
        </th>
        <th>
            @Html.DisplayNameFor(model => model.CustomerMaster.CustomerName)
        </th>
        <th>
            @Html.DisplayNameFor(model => model.ItemMaster.ItemName)
        </th>
        <th>
            @Html.DisplayNameFor(model => model.OrderMaster.OrderId)
        </th>
        <th></th>
    </tr>

@foreach (var item in Model) {
    <tr>
        <td>
            @Html.DisplayFor(modelItem => item.OrderProcessId)
        </td>
        <td>
            @Html.DisplayFor(modelItem => item.OrderStatus)
        </td>
        <td>
            @Html.DisplayFor(modelItem => item.CustomerMaster.CustomerName)
        </td>
        <td>
            @Html.DisplayFor(modelItem => item.ItemMaster.ItemName)
        </td>
        <td>
            @Html.DisplayFor(modelItem => item.OrderMaster.OrderId)
        </td>

    </tr>
}

</table>
Run and Test the application. The List of Orders will be displayed:

Click on the ‘Select Order to Process’ and the order details will be displayed
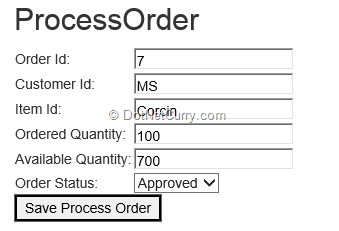
Select Order to Approve from the List and click on ‘Save Process Order’. The Processed Orders List will be displayed as shown here:

Visit the Portal and see the queue length, it will be zero.
Conclusion
The Windows Azure Service Bus Queue is one of the best approaches for developing decoupled distributed applications.
Download the entire source code of this article (Github)
This article has been editorially reviewed by Suprotim Agarwal.
C# and .NET have been around for a very long time, but their constant growth means there’s always more to learn.
We at DotNetCurry are very excited to announce The Absolutely Awesome Book on C# and .NET. This is a 500 pages concise technical eBook available in PDF, ePub (iPad), and Mobi (Kindle).
Organized around concepts, this Book aims to provide a concise, yet solid foundation in C# and .NET, covering C# 6.0, C# 7.0 and .NET Core, with chapters on the latest .NET Core 3.0, .NET Standard and C# 8.0 (final release) too. Use these concepts to deepen your existing knowledge of C# and .NET, to have a solid grasp of the latest in C# and .NET OR to crack your next .NET Interview.
Click here to Explore the Table of Contents or Download Sample Chapters!
Was this article worth reading? Share it with fellow developers too. Thanks!
Mahesh Sabnis is a DotNetCurry author and a Microsoft MVP having over two decades of experience in IT education and development. He is a Microsoft Certified Trainer (MCT) since 2005 and has conducted various Corporate Training programs for .NET Technologies (all versions), and Front-end technologies like Angular and React. Follow him on twitter @
maheshdotnet or connect with him on
LinkedIn