Cloud computing with Windows Azure provides the capability for developing scalable, durable and highly available applications. For high availability, application data should be always available with scalable data repositories which have the capability of auto-load balancing. Windows Azure Storage APIs make this possible. Windows Azure Storage is a scalable and highly available service for storing any kind of application and non-application data. It has the capability to store and process hundreds of terabytes of data.
Windows Azure Storage services provides some of the following storage options: Tables, Blob and Queue.
Tables are a type of heterogeneous entity container that you can store and retrieve using a key. Blob can be used to store files, and you can use queues to decouple two applications and enable async communication. Since our application makes use of Table and BLOB, we won’t be focusing on Queue in this article. Please visit this link to read about Queue and other kinds of storage.
Table Storage
A Table Storage is a NoSQL key-attribute data store. The data is stored in a structured form and allows rapid development and fast access to a large amount of data. The table storage offers highly available and largely scalable storage. The difference between a Table Storage and a Relational table is, the Table Storage has a schema less design of the data storage. Since it is schema less in nature, the data can be stored as per the needs of the application. For e.g. in a People Survey application, some people may not have a Mobile No, Email, or a permanent address. Here imagine the pain of designing a relational table where it is always a challenge to choose between Allow NULL or Not NULL columns. The Table storage is a key-attribute store because each value is stored with a type property name, the collection of properties and values, called as entity. The property can further be used for filtering or selecting information from the Table Storage. Each row in the Table Storage has a RowKey, which is a unique identification of the entity in the Table Storage. This also has PartitionKey which is used to define partition groups in Table Storage.
Blob Storage
A Blob Storage offers a cost-effective and scalable solution to store large amount of unstructured data in the cloud. This data can be in the following form:
- Documents
- Photos, Videos, etc.
- Database backup files or Device backup
- High Definition Images and Videos, etc.
Every blob is organized into a container. A storage account can contain any number of containers, which can further contain any number of blobs, up to a 500 TB capacity limit of the storage account. The Blob storage provides two types of blobs - Block blobs and Page blobs (disks). Block blobs are optimized for streaming and storing cloud objects. These are good for storing documents, media files, backups etc. The size can be up to 200 GB. Page blobs are optimized for representing VHDs disks for Azure Virtual Machines, which supports random writes, and its size can be up to 1 TB.
In case you are interested, read a good article by Kunal on Azure Blob Storage Snapshots using Client Library and REST APIs.
In this article, we will implement an application for managing profiles of Job seekers. The application will allow a Job seeker to enter his/her basic information after login and also allow to upload a resume. The application will store the profile information in Table Storage, whereas the resume will be stored using BLOB Storage.
Before we get started, we need an active Windows Azure Subscription. Head over to manage.windowsazure.com and create a trial subscription using your Hotmail account. On the portal page, select the Storage Account and create a new storage account. Once the storage account is created, select it and the portal will display the Manage Access Keys option at the bottom of the page. Click on it and copy the Storage Name and primary access keys and paste them in a notepad. We will be needing it later.
Step 1: Open Visual Studio. This article code uses VS 2013 and Windows Azure SDK 2.5. Create a blank solution of the name Az_tbl_app. In this solution, add a class library project of the name EntityStores and an MVC application of the name mvcapp.
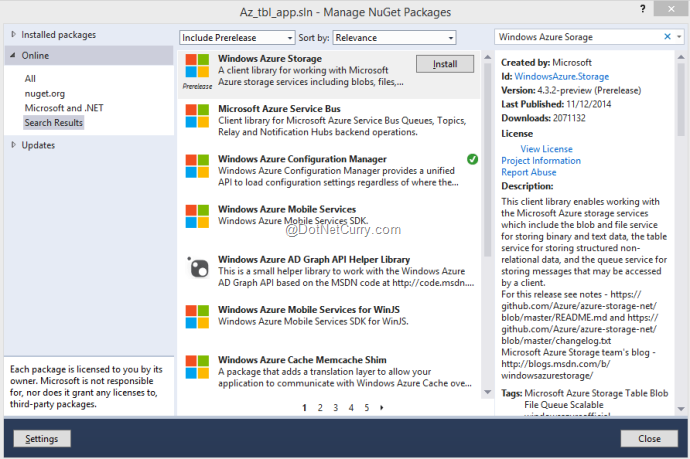
Step 2: Since we need Windows Azure Storage APIs for our application, right-click on the solution and from the Manager NuGet Packages > select Windows Azure Storage as shown in the following figure:

This will add the necessary libraries in both the projects.
Step 3: In the EntityStores project, add a class as shown here:
using Microsoft.WindowsAzure.Storage.Table;
using System.ComponentModel.DataAnnotations;

namespace EntityStores
{
    public class ProfileEntity : TableEntity
    {
        public ProfileEntity()
        {

        }

        public ProfileEntity(int profid, string email)
        {
            this.RowKey = profid.ToString();
            this.PartitionKey = email;
        }


        public int ProfileId { get; set; }
        [Required(ErrorMessage="FullName is Must")]
        public string FullName { get; set; }

        public string Profession { get; set; }
        public string Qualification { get; set; }
        [Required(ErrorMessage = "University is Must")]
        public string University { get; set; }
        [Required(ErrorMessage = "ContactNo is Must")]
        public string ContactNo { get; set; }
        [Required(ErrorMessage = "Email is Must")]
        public string Email { get; set; }
        public int YearOfExperience { get; set; }
        public string ProfessionalInformation { get; set; }
        public string ProfilePath { get; set; }

    }
}
In this code, the ProfileEntity class is derived from the TableEntity class. This class defines properties used for storing profile information. Here the ProfileId is the row key and the Email is the partition key which can be further used for data filtering.
Build the project and add its reference in the MVC application, which we created earlier in the same solution.
Step 4: In the MVC Application, open the web.config file of the application and in , add the Storage Account Name and the key as shown in the following code:
I have added placeholders in the AccountName and AccountKey for obvious reasons. Replace them with the ones you have received when you signed up for an Azure subscription.
Step 5: In the Models folder, add a class file that contains the code for working with the Table Storage. This class reads Storage Account information from the web.config file. The code creates an instance of the CloudStorageAccount object. This object makes the Storage available to the application. The code also creates an instance of the CloudTableClient object. This object represents the Windows Azure Table Storage Service client object using which CRUD Operations can be performed on the table. To perform operations on the Table Storage, we need an instance of the CloudTable object, which represents the Windows Azure Table. This contains an Execute() method to execute operations on the table. The TableOperation object contains method like the Insert (), Delete (), Replace () and Retrieve () to perform operations on the Windows Azure table. The TableQuery object is used to query against the table based upon a condition criteria. The following code shows detailed operations.
using EntityStores;
using Microsoft.WindowsAzure.Storage;
using Microsoft.WindowsAzure.Storage.Table;
using System.Collections.Generic;
using System.Configuration;

namespace mvcapp.Models
{
    ///
    /// Interface Containing Operations for
    /// 1. Create Entity in Table => CreateEntity
    /// 2. Retrieve Entities Based upon the Partition => GetEntities
    /// 3. Get Single Entity based upon partition Key and Row Key => GetEntity
    ///
    public interface ITableOperations
    {
        void CreateEntity(ProfileEntity entity);
        List GetEntities(string filter);
        ProfileEntity GetEntity(string partitionKey, string rowKey);

    }

    public class TableOperations : ITableOperations
    {
        //Represent the Cloud Storage Account, this will be instantiated
        //based on the appsettings
        CloudStorageAccount storageAccount;
        //The Table Service Client object used to
        //perform operations on the Table
        CloudTableClient tableClient;

        ///
        /// COnstructor to Create Storage Account and the Table
        ///
        public TableOperations()
        {
            //Get the Storage Account from the conenction string
            storageAccount = CloudStorageAccount.Parse(ConfigurationManager.AppSettings["webjobstorage"]);
            //Create a Table Client Object
            tableClient = storageAccount.CreateCloudTableClient();

            //Create Table if it does not exist
            CloudTable table = tableClient.GetTableReference("ProfileEntityTable");
            table.CreateIfNotExists();
        }

        ///
        /// Method to Create Entity
        ///
        ///
        public void CreateEntity(ProfileEntity entity)
        {

            CloudTable table = tableClient.GetTableReference("ProfileEntityTable");
            //Create a TableOperation object used to insert Entity into Table
            TableOperation insertOperation = TableOperation.Insert(entity);
            //Execute an Insert Operation
            table.Execute(insertOperation);
        }
        ///
        /// Method to retrieve entities based on the PartitionKey
        ///
        ///
        ///
        public List GetEntities(string filter)
        {
            List Profiles = new List();
            CloudTable table = tableClient.GetTableReference("ProfileEntityTable");

            TableQuery query = new TableQuery()
            .Where(TableQuery.GenerateFilterCondition("Email", QueryComparisons.Equal, filter));


            foreach (var item in table.ExecuteQuery(query))
            {
                Profiles.Add(new ProfileEntity()
                {
                    ProfileId = item.ProfileId,
                    FullName = item.FullName,
                    Profession = item.Profession,
                    Qualification = item.Qualification,
                    University = item.University,
                    ContactNo = item.ContactNo,
                    Email = item.Email,
                    YearOfExperience = item.YearOfExperience,
                    ProfilePath = item.ProfilePath,
                    ProfessionalInformation = item.ProfessionalInformation
                });
            }

            return Profiles;
        }

        ///
        /// Method to get specific entity based on the Row Key and the Partition key
        ///
        ///
        ///
        ///
        public ProfileEntity GetEntity(string partitionKey, string rowKey)
        {
            ProfileEntity entity = null;

            CloudTable table = tableClient.GetTableReference("ProfileEntityTable");

            TableOperation tableOperation = TableOperation.Retrieve(partitionKey, rowKey);
            entity = table.Execute(tableOperation).Result as ProfileEntity;

            return entity;
        }

    }
}
Step 6: In the Models folder, add a new class file where we will implement the code for performing BLOB operations. This class will be used to upload the Profile file of the end-user to the BLOB storage. This class makes use of the CloudBlobContainer class used to create the BLOB container. This container will act as a repository for all blobs uploaded. The CloudBlobClient object represents the Cloud Blob Storage service object using which requests against the BLOB service can be executed. The CloudBlockBlob represents the Blob to be uploaded as a set of blocks.
using System;
using System.Web;

using Microsoft.WindowsAzure.Storage;
using Microsoft.WindowsAzure.Storage.Blob;
using System.Configuration;
using System.Threading.Tasks;
using System.IO;


namespace mvcapp.Models
{

    ///
    /// Class to Store BLOB Info
    ///


    ///
    /// Class to Work with Blob
    ///
    public class BlobOperations
    {
        private static CloudBlobContainer profileBlobContainer;

        ///
        /// Initialize BLOB and Queue Here
        ///
        public BlobOperations()
        {
            var storageAccount = CloudStorageAccount.Parse(ConfigurationManager.AppSettings["webjobstorage"].ToString());

            CloudBlobClient blobClient = storageAccount.CreateCloudBlobClient();

            // Get the blob container reference.
            profileBlobContainer = blobClient.GetContainerReference("profiles");
            //Create Blob Container if not exist
            profileBlobContainer.CreateIfNotExists();
         }


        ///
        /// Method to Upload the BLOB
        ///
        ///
        ///
        public async Task UploadBlob(HttpPostedFileBase profileFile)
        {
            string blobName = Guid.NewGuid().ToString() + Path.GetExtension(profileFile.FileName);
            // GET a blob reference.
            CloudBlockBlob profileBlob = profileBlobContainer.GetBlockBlobReference(blobName);
            // Uploading a local file and Create the blob.
            using (var fs = profileFile.InputStream)
            {
                await profileBlob.UploadFromStreamAsync(fs);
            }
            return profileBlob;
        }

    }
}
Step 7: In the Controllers folder, add a new controller of the name ProfileManagerController. This will contain the Index() and Create() HttpGet and HttpPost action methods.
using System;
using System.Collections.Generic;
using System.Web;
using System.Web.Mvc;

using EntityStores;
using mvcapp.Models;
using System.Threading.Tasks;
using Microsoft.WindowsAzure.Storage.Blob;

namespace mvcapp.Controllers
{
    [Authorize]
    public class ProfileManagerController : Controller
    {
        BlobOperations blobOperations;
        TableOperations tableOperations;
        public ProfileManagerController()
        {
            blobOperations = new BlobOperations();
            tableOperations = new TableOperations();
        }
        // GET: ProfileManager
        public ActionResult Index()
        {
            var profiles = tableOperations.GetEntities(User.Identity.Name);
            return View(profiles);
        }

        public ActionResult Create()
        {
            var Profile = new ProfileEntity();
            Profile.ProfileId = new Random().Next(); //Generate the Profile Id Randomly
            Profile.Email = User.Identity.Name; // The Login Email
            ViewBag.Profession = new SelectList(new List()
            {
               "Fresher","IT","Computer Hardware","Teacher","Doctor"
            });
            ViewBag.Qualification = new SelectList(new List()
            {
               "Secondary","Higher Secondary","Graduate","Post-Graduate","P.HD"
            });
            return View(Profile);
        }


        [HttpPost]
        [ValidateAntiForgeryToken]
        public async Task Create(
               ProfileEntity obj,
          HttpPostedFileBase profileFile
            )
        {

            CloudBlockBlob profileBlob = null;
            #region Upload File In Blob Storage
            //Step 1: Uploaded File in BLob Storage
            if (profileFile != null && profileFile.ContentLength != 0)
            {
                profileBlob = await blobOperations.UploadBlob(profileFile);
                obj.ProfilePath = profileBlob.Uri.ToString();
            }
            //Ends Here
            #endregion

            #region Save Information in Table Storage
            //Step 2: Save the Information in the Table Storage

            //Get the Original File Size
            obj.Email = User.Identity.Name; // The Login Email
            obj.RowKey = obj.ProfileId.ToString();
            obj.PartitionKey = obj.Email;
            //Save the File in the Table
            tableOperations.CreateEntity(obj);
            //Ends Here
            #endregion


            return RedirectToAction("Index");
        }
    }
}
The ProfileManagerController is decorated with the [Authorize] filter. This indicates that the end-user must login before making a call to this controller. The Constructor of the controller creates objects of TableOperations and BlobOperation class. These will create the Table and BLOB storage. The Index action method retrieves profile information based on the UserName. The Create() HttpGet action method generates the ProfileId using Random class. This also defines ViewBag for Profession and Qualification collection so that they can be passed to the Create view during scaffolding. The Create HttpPost action method accepts ProfileEntity instance and the HttpPostedFileBase object to upload the file. This action method contains code in two steps. Step 1 uploads the file in BLOB and Step 2 stores profile information in the Table storage. Scaffold the Index and Create views from the above controller. Make the following changes in the Create View, (highlighted)
@using (Html.BeginForm("Create", "ProfileManager", FormMethod.Post, new { enctype = "multipart/form-data" }))
{
@Html.AntiForgeryToken()
ProfileEntity
@Html.ValidationSummary(true, "", new { @class = "text-danger" })
}
Since we are uploading the file using this view, the Html.BeginForm method contains parameters for FormMethod.Post and enctype=”multipart/form-data”.
Step 8: Run the application and create a user for the application e.g. user1@user.com
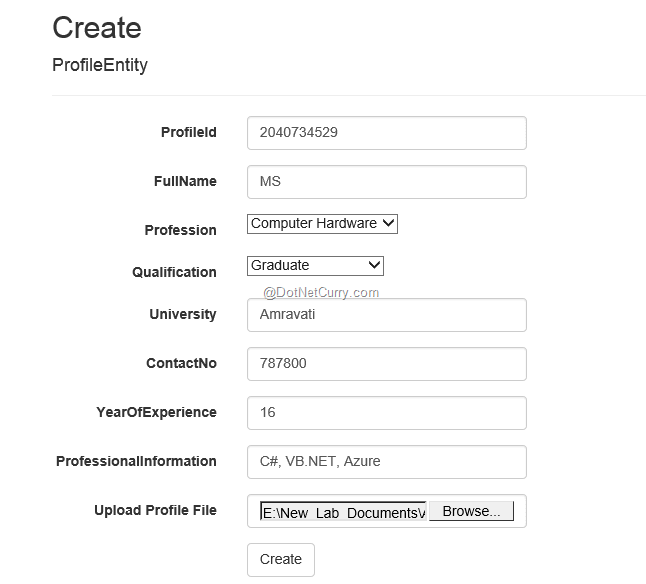
Now navigate to the Create View and enter the Profile Information as shown here:

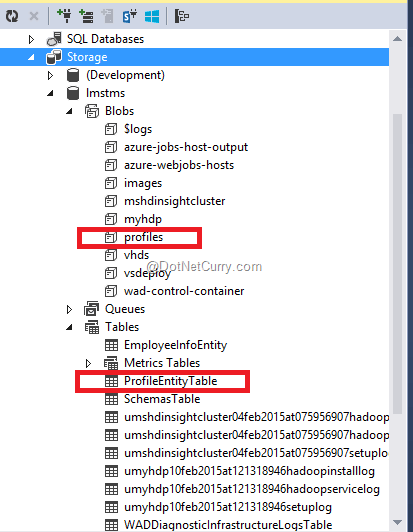
Click on the Create button and the data will be saved. To verify the operation, in the Visual Studio Server Explorer expand the Table and BLOB Storage and you will find the following information

The above figure shows the profiles Blob and ProfileEntityTable. The data can be seen from the Table Storage as shown here:

Similarly we can see the uploaded BLOB as shown here:

Conclusion: Windows Azure Storage provides highly scalable and available storage for applications. The schema less Table storage allows us to store application data whereas BLOB storage provides the file repositories for the application. This eliminates the need for complex Sql Server Relational tables and the Image column in it.
In one of our future articles, we will see how to compress BLOB before storing it.
Download the entire source code from our GitHub Repository at bit.ly/dncm17-azurestoragemvc
This article has been editorially reviewed by Suprotim Agarwal.
C# and .NET have been around for a very long time, but their constant growth means there’s always more to learn.
We at DotNetCurry are very excited to announce The Absolutely Awesome Book on C# and .NET. This is a 500 pages concise technical eBook available in PDF, ePub (iPad), and Mobi (Kindle).
Organized around concepts, this Book aims to provide a concise, yet solid foundation in C# and .NET, covering C# 6.0, C# 7.0 and .NET Core, with chapters on the latest .NET Core 3.0, .NET Standard and C# 8.0 (final release) too. Use these concepts to deepen your existing knowledge of C# and .NET, to have a solid grasp of the latest in C# and .NET OR to crack your next .NET Interview.
Click here to Explore the Table of Contents or Download Sample Chapters!
Was this article worth reading? Share it with fellow developers too. Thanks!
Mahesh Sabnis is a DotNetCurry author and a Microsoft MVP having over two decades of experience in IT education and development. He is a Microsoft Certified Trainer (MCT) since 2005 and has conducted various Corporate Training programs for .NET Technologies (all versions), and Front-end technologies like Angular and React. Follow him on twitter @
maheshdotnet or connect with him on
LinkedIn