Update (18th Oct) - Azure Remote Apps will get deprecated soon. Use Citrix on Azure going forward.
Azure Remote Apps is a fantastic feature to make your corporate desktop/ windows applications run in the Cloud, while ensuring that corporate policies and compliances are adhered to. Using this feature, users can experience true Bring-Your-Own-Device (BYOD) scenarios while using their corporate applications. This article explores various possibilities of Azure Remote Apps feature and demonstrates how to run a sample Windows application with SQL Azure DB as backend and using “cloud only collection” of Azure Remote apps in Microsoft Azure.
This article is published from the DNC Magazine for .NET Developers and Architects. Download this magazine from here [Zip PDF] or Subscribe to this magazine for FREE and download all previous and current editions
Introducing Azure Remote Apps
In this article we’ll explore the following important aspects of Azure Remote Apps –
1. Azure Remote Apps - Why?
2. Concept
3. Architecture of Remote Apps deployment model
4. Demonstration
Let’s get started!
Applicable Technology Stack
1. Valid Microsoft Azure subscription. A Free trial is available here.
2. Sample desktop application. You can use the one I have posted with source code that accompanies this article.
Why do I need to run desktop applications in the Cloud?
Let us start with a very important question – Why do I need to run desktop apps in the Cloud? To understand this, we will spend some time understanding the use case of this feature.
Corporate Scenario
To understand a corporate scenario, first let me take a few steps back into the initial days of cloud computing. What was the important concept behind cloud computing evolution?
If you were an Application Development Company wanting to develop an internet application to solve a specific business problem, then to save you from the hassles of infrastructure set up and let you focus on your application, Cloud Computing came into existence. This is the basic essence of cloud computing. In Microsoft Azure, we have various features existing today that can take care of all your infrastructure needs of hosting an internet application. Some popular features are –
1. Cloud Services (Web and Worker Role) – PaaS offering
2. Azure Apps Service (Web Apps and WebJobs) – PaaS offering
3. Azure Virtual Machines – IaaS offering
These offerings take care of web application hosting. So the problem of Enterprise level web applications is solved, but what about Enterprise level desktop applications? Let’s take an example to understand this a bit more.
Case 1 – Productivity and high sensitive data loss
I have observed a very common scenario in my country India where data entry work is outsourced from various global companies. Let’s say a data entry company in India is having a couple of hundred workers performing data entry, related to health care claims information. These workers are allocated a desktop machine which has an application developed using C# or WPF. Now imagine if the hardware crashes for a desktop machine, then that unfortunate employee has to go to Support IT team of his/her organization and report the problem. The IT team will then need to provide a new desktop machine. They will need to configure the pre-requisites on the new desktop, then install the actual application. In big companies, this can take a couple of days, after which that employee can start his/her work. Additionally if there is any sensitive data on the failed machine, then it needs to be restored. This problem arose at the first place because a local desktop machine was being used for performing some sensitive work. In this scenario, Productivity is affected and Loss of sensitive data is high.
Case 2 – Device Portability
Today, the world is experiencing an explosion of devices. People want an application that can work on Laptop, should be able to work on their tablet, smartphone, mobile, desktop and so on. Additionally if an application can run on any device, users of the application don’t necessarily have to be part of their corporate network and don’t have to be present in their company premises. Rather they should be able to work remotely. However if an application is a legacy app, then it may not work on the latest hardware/ software. Here device portability of desktop application and mobility is another challenge corporates face.
Case 3 – Moving from Capex to Opex
Usually large organization take the help from vendors to perform many activities. Sometimes these corporates hire people on contract for a short duration to get their work done. In such cases, companies are not willing to spend on hardware cost as this might be a temporary affair for them. In other words, they don’t want to spend money on Capex (Capital Expenditure) but they want to move to Opex (that is operational cost), so that they use the resources when in need and free them when not required. In traditional model of desktop application environments, this flexibility is quite challenging. So moving from Capex to Opex which is recommended in today’s IT world is another important challenge corporates face.
Domestic Scenario
This section will help you understand the challenges individual desktop users may face to cope up with changing technologies, hardware and software requirements.
Let’s say a user having a desktop PC is running Windows 7 basic edition with 4GB of RAM and 100GB of HDD. At a later date, he wishes to use modern software’s like Office 2016, Visual Studio 2015, or assuming he is game freak; he would like to run Call Of Duty latest version on his existing desktop machine. Now all this with 4GB RAM will kill the machine if these software were to run on it simultaneously. In fact some of the software’s hardware prerequisites may not get full filled because of the existing desktop configuration. So what is the solution?
One solution is to increase the capacity of the existing machine. In that case, he will have to purchase 8GB or 16GB of RAM, a bigger capacity HDD and so on. In essence, he will have to shell out money from his pocket to make use of all the modern software’s. Now even if he does invest, software gets outdated very soon. He may not need to use Office 2016 every day and after clearing all stages of the Call of duty game, he may want to get rid of it. So the additional investment done on this machine to run these modern software, will not be recoverable in this scenario and it may not get utilized to its fullest capacity. This is the problem.
High Level Solution
To overcome these challenges faced in corporate and domestic scenarios, companies like Microsoft offering cloud computing for Enterprise Web Applications came up with the concept of Desktop as a Service (DaaS) commonly known as Desktop Virtualization.
So as a part of this concept, there is a desktop application installed on user’s machine/ device. The user logs in to that desktop application from his machine / device. After successful login, all the modern software & services would be available for consumption. Although the services/ application run on remote machine (cloud environment), they will appear to the user as if they are running locally. Once done, the user closes the application and he would be charged only for what he has consumed.
This approach helps in –
1. Getting rid of hardware and software upgrades
2. Any modern device compatibility can be achieved easily
3. Applications scale without large capital expense
4. Provide access to corporate applications from anywhere
5. User specific shared storage helps in avoiding data loss
Looking at these benefits, it is quite clear running desktop applications in Cloud environment is a much better option.
Azure Remote Apps is an offering from Microsoft Azure that makes it easy to run desktop applications on the reliable platform of Azure.
The concept behind Azure Remote Apps
Running desktop application on a remote machine and accessing the app through a remote connection is the basic concept behind Azure Remote Apps. However this is not a new concept. This concept has been in practice since long and is commonly known as Remote Desktop Service on Windows. Basically anyone who is remoting from one computer to another computer using remote desktop connection (.rdp file) client from Windows PC, is using RDS technology behind the scene.
A typical high level architecture of RDS is as shown here –
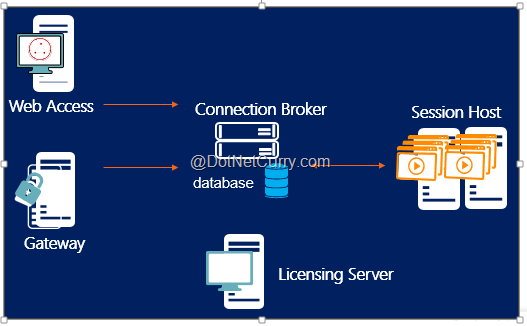
Session Host (RDSH) - The first component of RDS is session host. This is where the actual code or application executes. You can run farms of these session host servers and you can run same application on multiple server machines.
Connection Broker - When we use multiple session host server to host the same application, then user connections should be distributed across them. This is where connection broker helps. Its job is similar to load balancer in Azure.
RD Web Access - RD Web Access is a simple web portal that helps users to consume applications from browsers.
Gateway - Helps you to make connection from public internet to your private network of multiple session host servers and farm.
License Server - Used for keeping a track of users using the application.
Creating RDS on Azure VM is out of scope for this article. Once you have configured RDS in Azure VM, you can publish the application from that VM and can access it using a web browser. A typical url of RDS web access is as follows: https://yourCloudServiceName.cloudapp.net/rdweb.
If you access the url of RDWeb, the browser will display a published application from session host server as shown here –
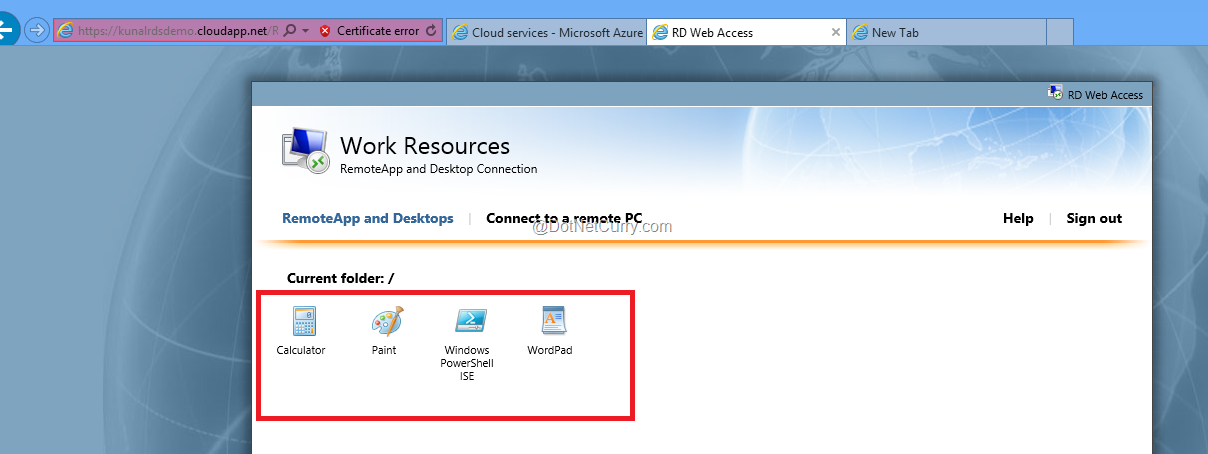
The red highlighted box displays the applications that are running on Azure VM (a remote machine) and can be accessed from the local machine (the RDP) from which RDWeb Access URL is opened.
And yes you guessed it correct, Azure Remote Apps uses RDS behind the scene!
What is Azure Remote Apps ?
Azure Remote Apps is a combination of Windows applications and RDS capabilities on Azure platform that brings in scalability, agility, resiliency, high availability, global access and all cloud inherent benefits you can think of, to corporate applications.
Remote Apps Deployment Choices
Azure Remote Apps support two types of deployment.
1. Cloud Only
This is a very straight forward and easy deployment option. Microsoft has planned to make software readily available through this option. This is also called as “Cloud Collection”. This collection resides completely in Azure.
Users can authenticate against cloud only collection based apps using Azure AD or individual Microsoft Account.
As of today, with this deployment choice, you get a trial version of Office 2013.
When you provision Remote Apps cloud only namespace with Office 2013 trial version, internally Windows Server 2012 and RD session host gets configured for you. On these RD session host machine, the business application which in current case would be Office 2013 trial version, will get configured automatically and published as well. So internally they have prebuild image of Office 2013 trial version that gets configured on session host.
2. Hybrid
Hybrid deployment is where your application can work in Azure environment as well as on-premises environment. For Hybrid deployment, Site to Site VNET connectivity is mandatory. Also hybrid collection needs Azure AD and on premises AD setup to make corporate users authenticate against it. Additionally, in case of hybrid, you can bring your own custom app based image VM to run in Azure Remote Apps.
More deployment choices can be found out here - http://azure.microsoft.com/en-in/documentation/videos/azure-remoteapp-cloud-deployment-overview/.
Preparing custom image for Azure Remote Apps Cloud only collection
In the next section we will see a step by step process to run our own custom desktop application developed in C# and with SQL Azure DB as backend; in Azure Remote Apps Cloud Only collection.
Earlier during the preview version of remote Apps, bringing custom applications based VM image was only possible with Hybrid collection. Starting Sep 2014, now Cloud only collection also supports custom application based VM image. Moreover the custom image can be prepared in Azure itself (by using Azure VM’s) and have it configured in Azure Remote Apps cloud only collection.
Following are the high level steps we will perform going forward –
1. Create a cloud service and setup Azure storage account and upload sample DB .bacpac to storage for restore operation. (.bacpac file is present in the source code of this article)
2. Setup SQL Azure DB in Azure subscription
3. Create Azure VM based on RDS template
4. Configure application and create template image (in source code)
5. Upload template image in Azure remote Apps
6. Create cloud only collection and consume the application from Remote Apps.
The sample application we will be using was downloaded from CodeProject and it has been changed to suit our needs and demo of Azure remote Apps. The final version of the sample application download link is at the end of this article.
Note – Steps 1 and 2 are not necessary for Azure Remote Apps. These steps are very specific to our scenario. Instead of using SQL Azure DB, you may use SQL Server on Azure VM or on- premises SQL server depending on your application requirements. In that case, you may not need to perform these steps at all.
Steps 3 to 6 are generalized steps and any production Azure Remote Apps cloud collection deployment will need it.
Setup Azure Storage account and Cloud Service
Login to Azure portal with your Microsoft account. Then select the subscription of your choice.
We need to have storage account created in our scenario because the SocialClub.bacpac file is present as of now on your local machine. To create a database in SQL Azure DB, we will be using Azure Portal. However we can create/ import the database from Azure Portal only if the .bacpac is present in Azure storage account.
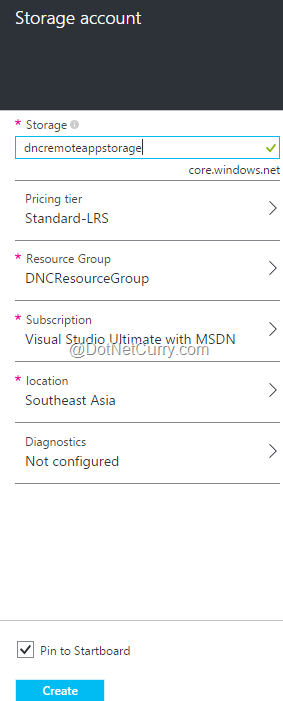
Click on Browse > Data + Storage > Storage Account > Classic Deployment Model > Create. Provide the values as shown here:

Click Create button to proceed with storage account creation.
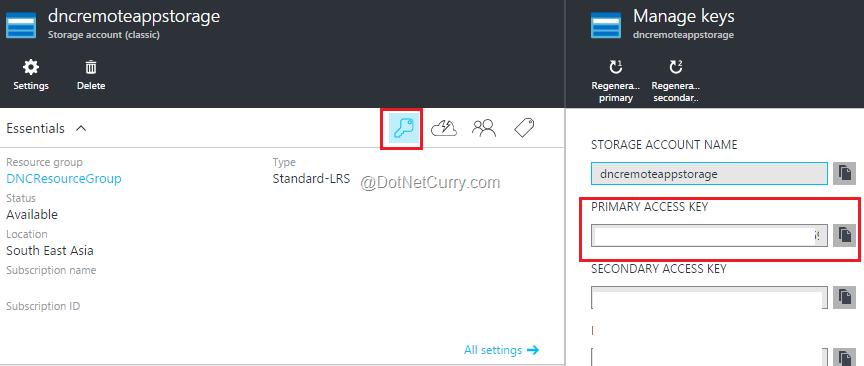
Click on the Key icon of storage account and note down the name and primary key which we will need to create container and blob in storage account.
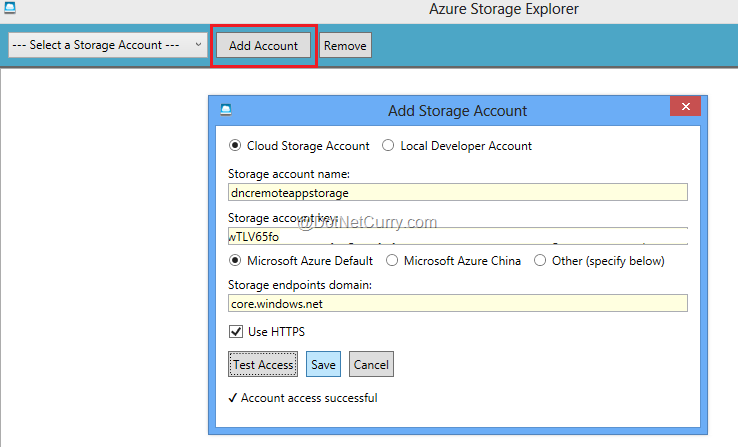
Now we need to upload the SocialClub.bacpac file to blob within this storage account. I usually use the free storage explorer known as Azure Storage Explorer to perform most of the storage operations. It is free and satisfies all basic storage operations need. Alternative to this will be Visual Studio 2012 and above. Assuming you have installed Azure Storage Explorer, click on “Add Account” button. Provide the name of storage account and the primary key we noted in the previous step, and click on Save.
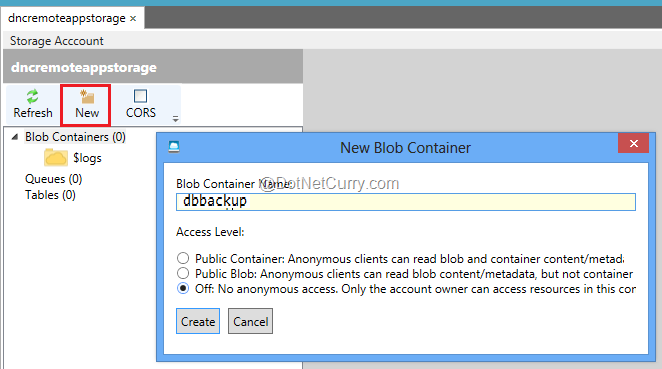
In Azure Storage Explorer after successful connection, select “Blob Containers” -> “New”. A pop up will appear wherein put the container name as “dbbackup” and Access Level as “Off:No anonymous access”. Click create.
After container creation, select it and click on “Upload” button. A file selection window will appear. Select the Social.Club.bacpac file path from your local machine and click ok. This will create a blob named as “SocialClub.bacpac”.
Similarly click on New > Compute > Cloud Service > Create.
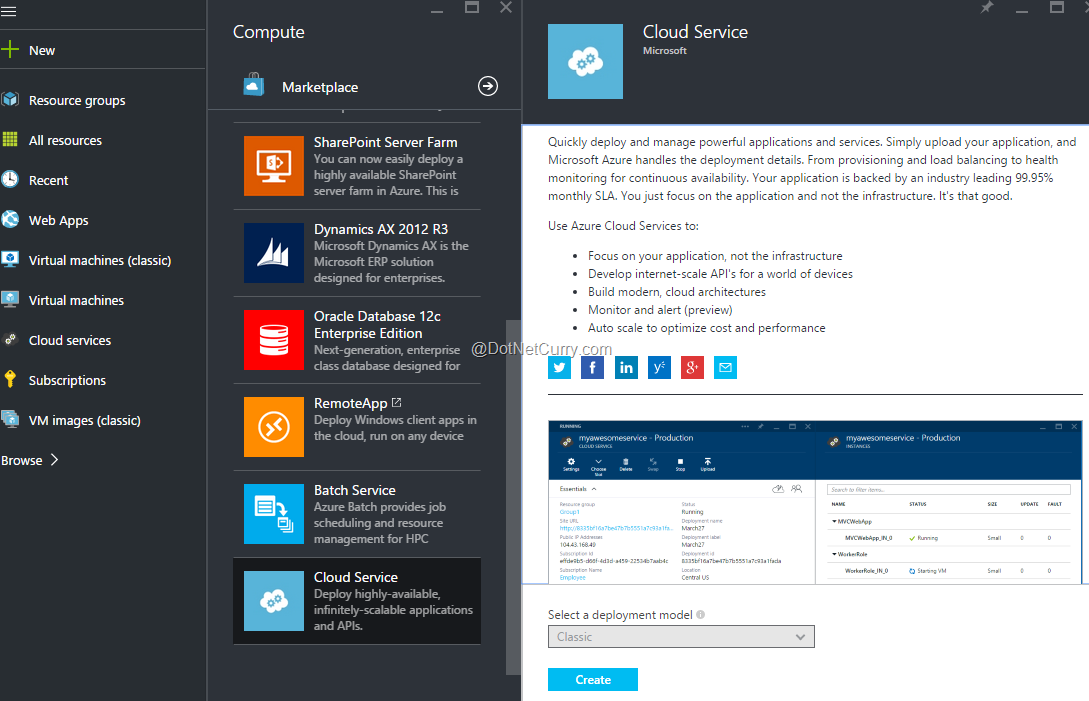
Provide the values as depicted below –

Click on Create button to finish cloud service wizard.
Setup SQL Azure Server and SQL Azure DB
In the Azure preview portal, we first need to setup SQL Server (PaaS). However standalone SQL server creation is not available as of today unless a single DB exists in it. Therefore we will create Test database along with server. After server creation, we will delete the Test database and create our own SocialClub database.
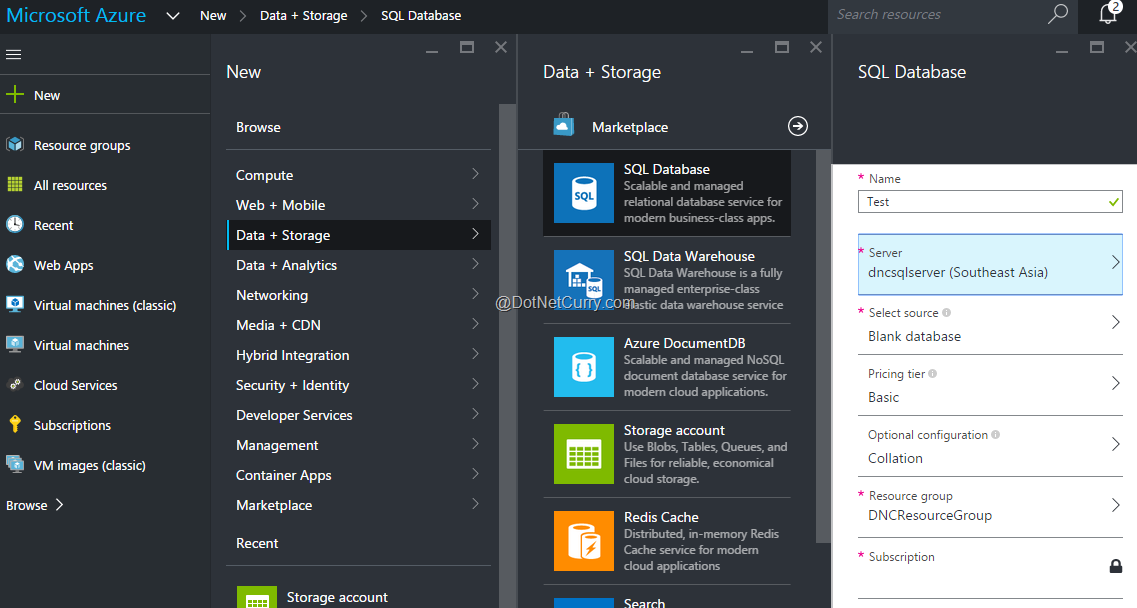
In Azure Management Portal click on New > Data + Storage > SQL Database. Provide the values of server configuration settings as shown here -

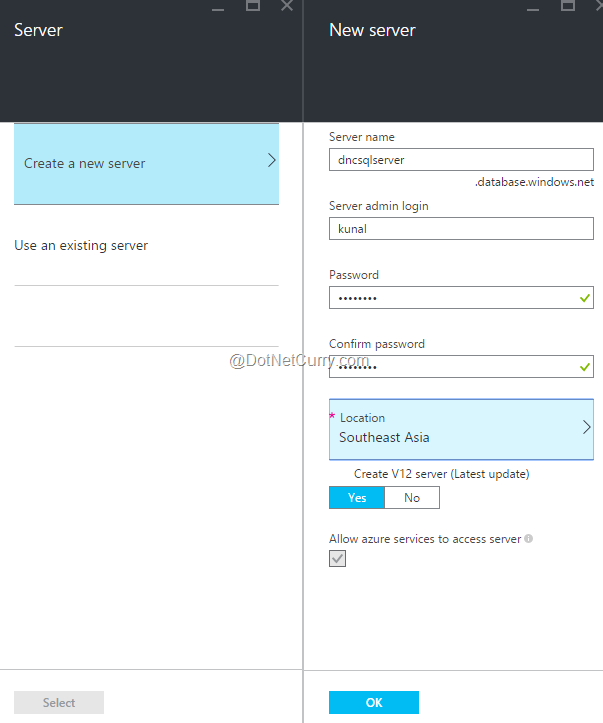
The rest of the values is as shown here –
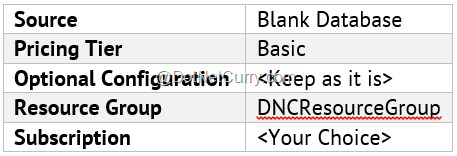
Click on create to finish SQL server DB creation wizard.
After SQL Server creation, open the database Test that we created in above steps and since we don’t need it, delete it by clicking on Delete button in management portal.
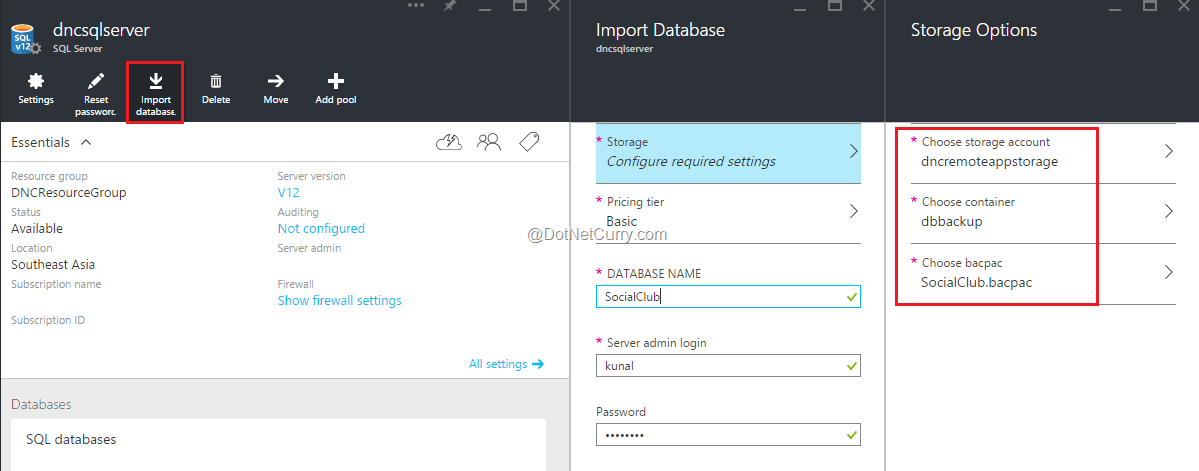
To import the actual database, open Resource group “DNCResourceGroup” in Azure portal. Open the server “dncsqlserver”. Select the values as shown below to import the SocialClub.bacpac –
Click on “Show Firewall Settings”. The firewall settings will list current machine IP address automatically. Click on “Add Client IP” and then “Save” button to make sure that SQL server DB is accessible from the local machine.

Now open the app.config file of the project SocialClub.Desktop and replace the name of server, database, username and password in connection string. A sample connection string would be as follows –
connectionString="Server=tcp:dncsqlserver.database.windows.net,1433;Database=SocialClub;User ID=kunal@dncsqlserver;Password=<YourPasswordGoesHere>;Trusted_Connection=False;Encrypt=True;Connection Timeout=30;"
This completes the SQL server DB configuration for our scenario.
Create Azure VM based on Remote Desktop Session Host template
In this step, we will create a VM template image that can be used to run our sample desktop application of SocialClub. This step is nothing but creating Azure remote app image based on Azure VM. However if you look at the prerequisites and steps mentioned in this link for creating custom image based on Azure VM is complex. Therefore to relieve the user from this cumbersome job, Azure provides you ready base template VM that satisfies all prerequisites of Remote App image and on top of it, you can have it customized for your needs. Therefore we will use the same one as recommended which saves you from many complex steps.
Note: For creating VM, we should use the New Azure Preview portal (https://portal.azure.com). However RemoteApps and the template image of Remote Desktop Session Host as of this writing is not available on preview portal. In future it will be available on preview portal but for this article we have to fall back to full management portal (http://manage.windowsazure.com). So by the time you read this article and proceed, check to see if remote apps is available on preview portal. The steps would be similar and will not change to a great extent even if you are following new portal in the future.
Open the full management portal and login with Microsoft account and select the subscription of your choice.
Click on New > Compute > Virtual Machine > From Gallery option. This will open up a pop up. Select the VM image named as “Windows Server Remote desktop Session host” as shown here and click Next to continue –
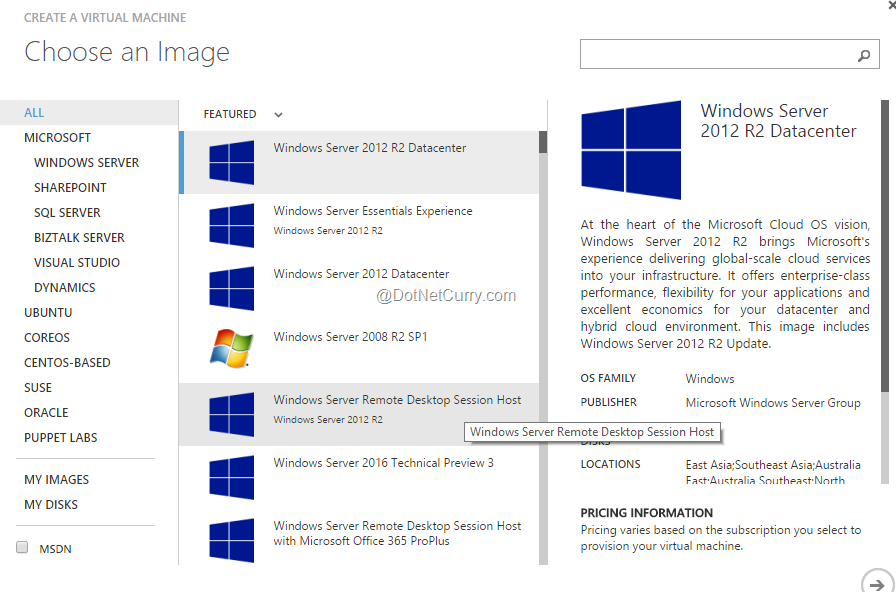
On the Virtual Machine configuration page, provide values as given below and click on Next to continue –

Now on the subsequent Virtual Machine Configuration page, provide the following values and click Next to continue –

In the next screen, select the check box “Install the VM agent” and click on Complete to start the VM creation.
Once the VM is in running state, download the RDP file by clicking on “Connect” button in management portal and login with RDP credentials that was provided during provisioning. Now we need to copy our sample SocialClub application on this VM so that we can publish the application later when Azure Remote App is provisioned. Open Visual Studio 2013 and build the sample application in Release mode. After this, create a folder named SocialClub on ‘C’ drive of Azure VM and copy the contents of Release folder. Please make a note of the path of exe as we will need it later during publishing programs in Azure Remote Apps collection. If you have created a folder on C drive with the same name, then your complete path will be – C:\SocialClub\SocialClub.Desktop.exe
To verify everything is working, run the exe named as SocialClub.Desktop.exe on Azure VM and confirm if the application is working fine.
Now we are done with customization of our Azure Remote App VM. All we need to do is to check the VM against prerequisites and capture the template image using Sysprep. As we have provisioned our VM based on Remote Desktop Session Host image, we will have a readymade PowerShell script shortcut present on the desktop of VM named as “ValidateRemoteAppImage”. Just run it and it will start the entire process of validating the current VM against remote app requirements. Once PowerShell is through with VM validation a prompt will popup in the same window asking for Sysprep. Input “Y” to proceed ahead.
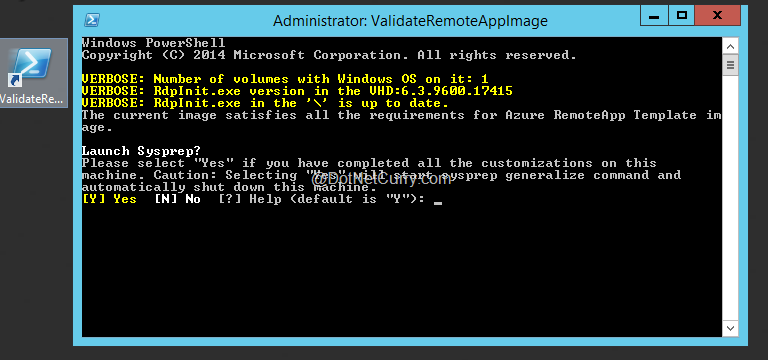
Sysprep is a utility used for generalization of VMs. After sysprep, you can capture the image of your VM. You can then upload it to Azure Remote App program to provision the required session host VM. Once the sysprep process completes, the RDP will get disconnected automatically and status of the VM will be shown as “Stopped” in the management portal as seen here –

Click on the Capture button present at the bottom pane of the portal and provide the values as shown here –
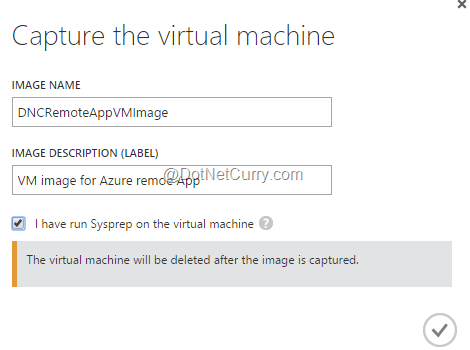
This process will capture the VM image and it will be available under the Images tab in management portal.

Now you must have observed that the original VM has been deleted. However the associated OS disk of original VM is still present. As we have captured the image from this VM, we do not need this disk. Moreover after a generalized process, it is not recommended to use the same disk for provisioning a new VM. Therefore instead of retaining this unnecessary disk, just delete it. So click on “Disks” tab and look out for the original VM OS disk. It must be having name of VM in it. So locate and delete the disk from management portal by selecting option of “Delete the associated vhd”.
This completes the process of custom template VM image creation.
Upload VM image to Azure Remote Apps
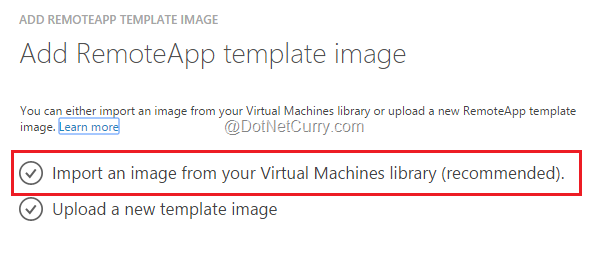
To upload VM image to Remote App, click on Remote Apps option in management portal. Select the tab “Template Images” and select “Import or Upload a template image” or click on “Add” button as shown here –

Select the option “Import an image from your Virtual Machine library (recommended)” and click on Next to continue –
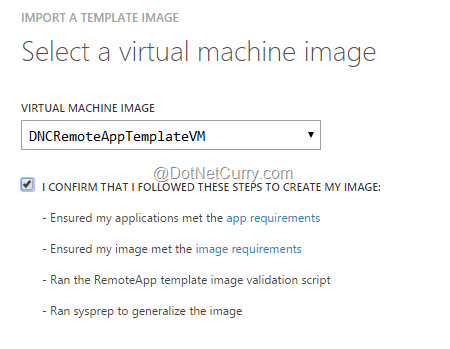
The image we had created earlier will appear in the drop down. So click on the checkbox that has the confirm option as shown here and click on Next to continue.
Provide the name of remote app template as “DNCRemoteAppTemplateVM” and location as “South East Asia” and click create. The image upload to the Azure Remote App is an asynchronous process and it will take a good amount of time depending on your bandwidth connection. After a successful upload operation, the image will appear as shown here –

Now we are all set to create cloud collections in Azure Remote App and publish our SocialClub application.
Create Remote App Cloud collection
Select New > App Services > Remote App > Quick Create option. Provide the name as “DNCCollection”, region as South East Asia, Plan as Standard and most important, the template image as “DNCREmoteAppTemplateVM”. Then click on “Create Remote App Collection” option.
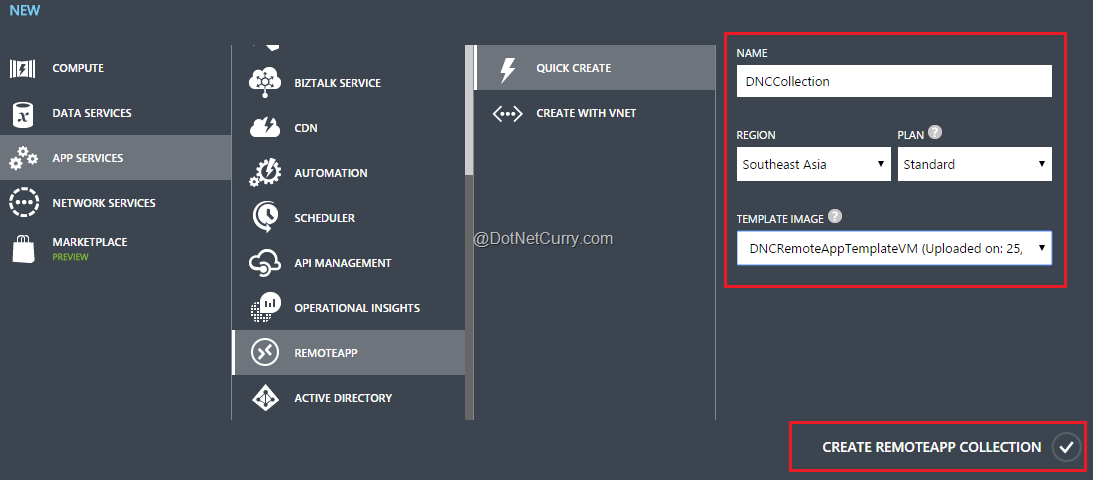
Creating remote app collection takes at least half an hour to get ready for use. Once the collection status becomes active, click on it and select the “Publishing” tab. Click on the “Publish” button present at the bottom and select the option “Publish Program using Path”. A pop up will appear. Provide the name of program as “Social Club App” and path of the program which we had noted earlier when we created custom image – “C:\SocialClub\SocialClub.Desktop.exe”. Now click on Complete.


Now we need to make sure that proper user access is given. Therefore click on “User Access” tab and verify that your Microsoft account has access. In case you wish to add access to another Microsoft account, you can do so.
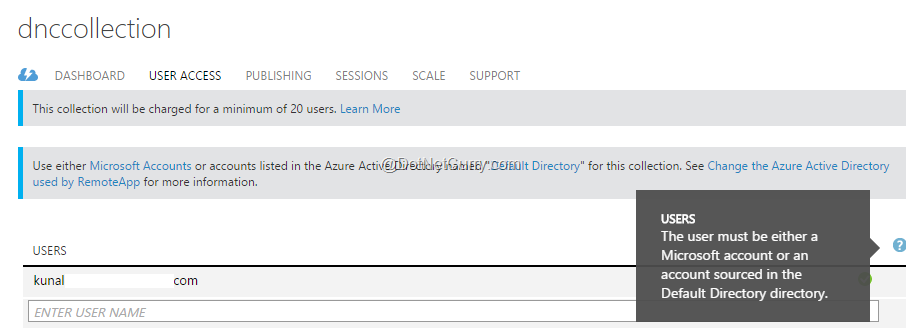
Now we are all set to use the application we published.
Using the Remote App published application
The beauty of remote apps is that you can run/ access the published application on any platform by using Remote App client. As shown below the url provides a download link from which you can download any version of the client app –
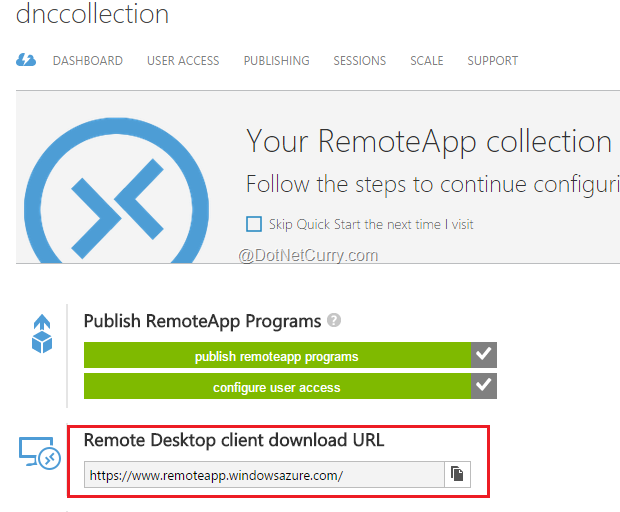
Open the link and click on the “download” menu. Download the client exe for Windows platform as I will be using it from my windows 8 laptop. Alternatively you can have it downloaded as per your device platform. Once the client application has downloaded, signin with your Microsoft Account which has access to remote app collection. After successful login, the SocialClub application will appear as shown below –
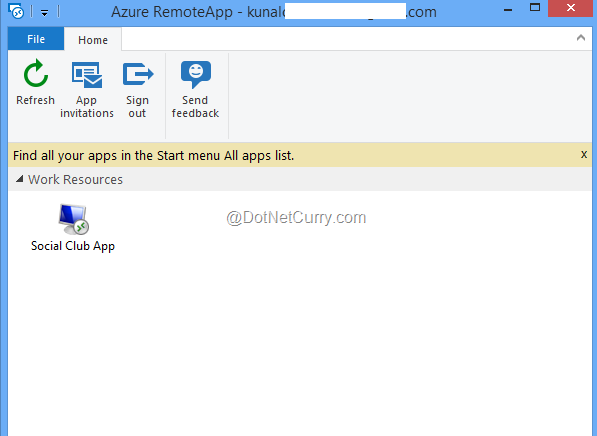
Double click on Social Club app and a RDP session will get activated automatically and the login screen of our Social Club application will appear. Click on Search/ Manage Members menu which will retrieve data from SQL Azure DB and populate the existing members, if any. Also any new members and data should get inserted in SQL Azure DB.
This way you can download the client app on any device running any platform such as iOS, Android, Windows and access the application. You don’t need any installation, configuration to be done on your device and this is greatest benefit of Azure Remote App. The application is running on remote computer in Azure and it appears as if it is running on your local machine. I hope the steps above must have given you good understanding of running desktop application in cloud using Azure remote apps. Now in next section we will particularly understand an advanced scenario of Redirection which is very common in enterprise corporate applications.
Advanced topic - Redirection and User Profile Disk (UPD)
Azure remote app users get their own dedicated persistent storage space of 50GB and it is stored in a disk called as User Profile Disk (UPD). The user’s configuration data, personal data and customization data across various devices is stored in UPD. The name of the disk is derived from the user name. When a user saves any data, it always gets saved in his Documents folder and it appears as if it is local to his device [which is not]. There is some excellent information already present in the documentation about UPD at http://bit.ly/206TMxm .
Our focus in this section is to determine how exactly can you use this feature in your application.
In the same sample application, I have added a button called as “Upload” under Manage tab. Click on it and a file dialog will open. The functionality of this button is simple. It allows a user to upload a file which is a very common scenario in many desktop based corporate or enterprise application. So in this case, the file should get uploaded to the user specific UPD. The code I have written on this button click is very straight forward and is shown here –
OpenFileDialog fd = new OpenFileDialog();
DialogResult result = fd.ShowDialog();
if (result == System.Windows.Forms.DialogResult.OK)
{
string file = fd.FileName;
       string fileName = Path.GetFileName(file);

       //get current logged in user MyDocuments folder
string documentPath = Environment.GetFolderPath(Environment.SpecialFolder.MyDocuments);
       //MessageBox.Show(documentPath);

File.Copy(file, documentPath + "\\" + fileName);

MessageBox.Show("File uploaded successfully");
}
It simply copies the file selected to current logged in User’s Document folder. So in this way, by using Environment.SpecialFolder.MyDocuments we are accessing UPD of current logged in user in Azure remote app based application. Let’s say using the upload functionality of our Social Club application, we want to upload a PDF document from our “desktop” to Azure remote App UPD based Document folder. The screenshot of my desktop file is as shown here –
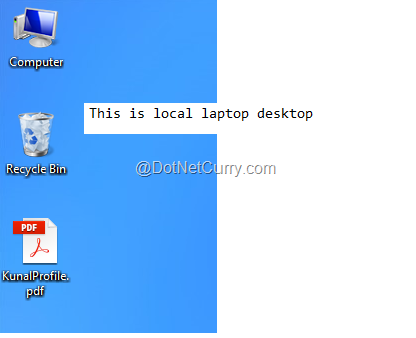
When we click on the Upload button in the application, the folders and files present on the desktop of local laptop should be listed. We click on Upload button and click on desktop and unfortunately we don’t SEE LOCAL LAPTOP DESKTOP. Instead the desktop of Remote App RDSH VM is displayed, which is running Social Club application in Azure as shown below –
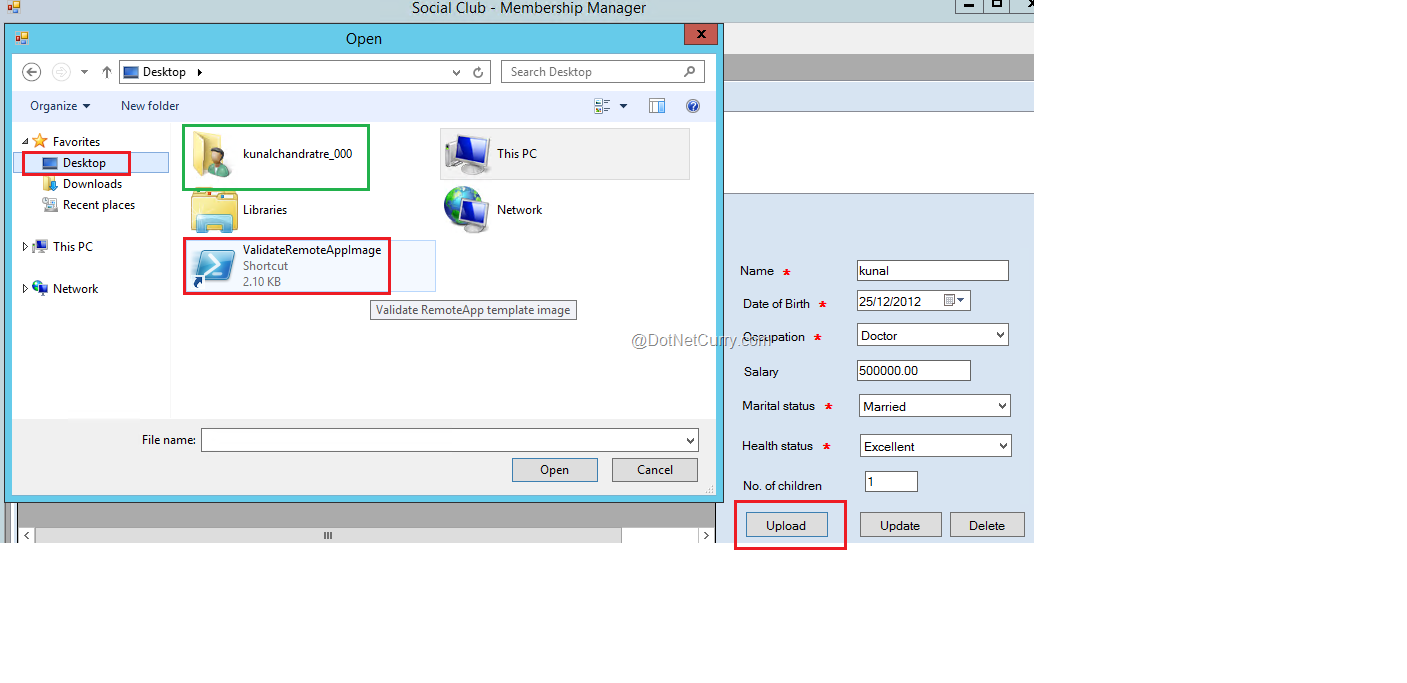
The reason of it showing Remote App VM desktop is quite obvious as the application is not running on our local laptop, rather it is running in Azure VM, hence desktop of Azure VM is displayed in file dialog box which is perfectly fine. However we want to save the document from the desktop of our laptop to Document folders (which is UPD) highlighted in green in above screenshot. In your case, the green folder will be displaying your name.
As the application is running in Azure VM, LOCAL FOLDER and FILEs of laptop are not getting listed through file dialog box and to make it happen we need REDIRECTION.
Redirection helps users to interact with Remote Apps using the devices attached to their local computer, laptop, tablet or phone. The devices can be camera, printers, speakers, monitors and so on. Of course by default, some of the redirection services are already enabled when you use remote app based application on your devices, however drive redirection is not enabled by default and that’s the reason local computer drives are not shown in remote session. Once we enable the drive redirection, local computer drives get mapped to remote session and we would be able to access local folders and files in remote session.
To enable drive redirection, we need to use Azure PowerShell. Make sure that you have Azure PowerShell latest version downloaded and installed on your local machine from http://bit.ly/1PPnfr9 .
Once installed, open the Azure PowerShell window as administrator. Run the following commands to make a connection to your Azure subscription.
Add-AzureAccount
Select-AzureSubscription –SubscriptionId “YourSubscriptionId”
The azure subscription Id can be found out from the “Settings” option in management portal as shown below –

To enable drive redirection, run the following command –
Set-AzureRemoteAppCollection -CollectionName "dnccollection" -CustomRdpProperty "drivestoredirect:s:*”
In your case, the collection name can be different in the above command. This commands enables the drive redirection to all the published apps within Azure Remote App collection.
Now open the remote app client and open Social Club application again. Click on Upload and then you should be able to view the local drives of your computer as shown here –
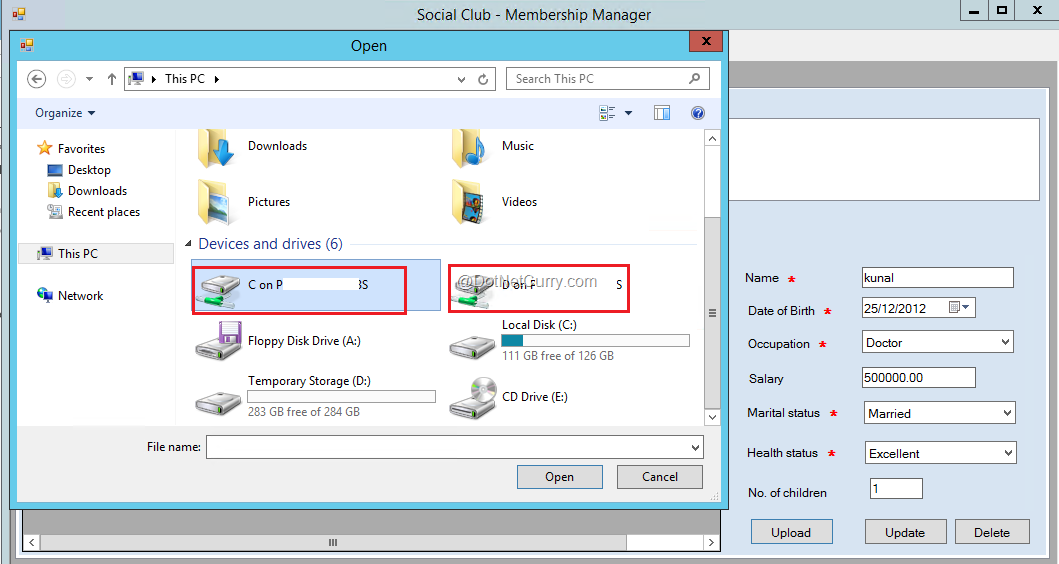
Go ahead and select the path of local desktop as c:\Users\<YourLoginName>\Desktop\<YourFileName> and the selected file will get copied to Documents folder of Remote apps and “file uploaded successfully” message will appear in the application. This is how Redirection can be used to make remote app communicate with local devices.
Is Redirection a new concept?
Redirection is not new. It is already being used with RDP files. For example, get a .rdp file and right click on it and select “Open With Notepad”. The RDP file will open in notepad and you will see something similar to the following –
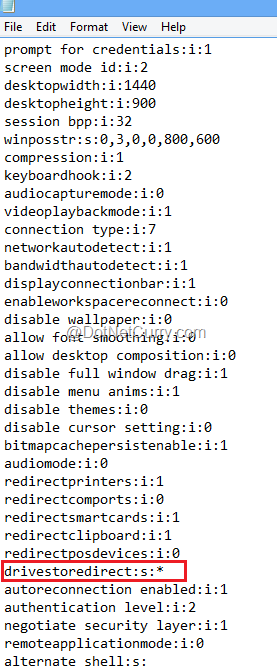
As you can see, redirection settings already exist in RDP file and you can change it from notepad and save it. In case of remote app, we are changing the same setting but through PowerShell. The highlighted block in the above screenshot shows drive redirection settings. Similarly there are many other settings that can be changed through redirection in Azure Remote apps. Learn more about redirection at http://bit.ly/1kH396F .
Conclusion
In this article, we saw how Microsoft Azure Remote Apps features can run desktop application. We also saw the benefits associated with running desktop apps in the Cloud. With the help of redirection, we saw how to make remote app based application more user interactive and device independent, thereby enabling true BYOD (Bring Your Own Device) environment for users.
Download the entire source code from GitHub at
bit.ly/dncm21-azuremoteapps
This article has been editorially reviewed by Suprotim Agarwal.
C# and .NET have been around for a very long time, but their constant growth means there’s always more to learn.
We at DotNetCurry are very excited to announce The Absolutely Awesome Book on C# and .NET. This is a 500 pages concise technical eBook available in PDF, ePub (iPad), and Mobi (Kindle).
Organized around concepts, this Book aims to provide a concise, yet solid foundation in C# and .NET, covering C# 6.0, C# 7.0 and .NET Core, with chapters on the latest .NET Core 3.0, .NET Standard and C# 8.0 (final release) too. Use these concepts to deepen your existing knowledge of C# and .NET, to have a solid grasp of the latest in C# and .NET OR to crack your next .NET Interview.
Click here to Explore the Table of Contents or Download Sample Chapters!
Was this article worth reading? Share it with fellow developers too. Thanks!
Kunal Chandratre is a Microsoft Azure MVP. He is working as Azure SME in leading software company in (Pune) India. He also works as a Freelancer with various organizations for Azure support and provides quick start trainings on Azure to corporates and individuals on weekends. He regularly blogs about his Azure experience and is a very active member in various Microsoft Communities and also participates as a ‘Speaker’ in many events. You can follow him on Twitter at: @kunalchandratre or subscribe to his
blog