.Net Core is a new lightweight modular platform maintained by Microsoft and the .NET Community on GitHub. .NET Core is open source and cross platform, and is used to create applications and services that run on Windows, Linux and Mac.
Docker is a software containerization platform. Docker containers wrap a piece of software in a complete filesystem that contains everything needed to run: code, runtime, system tools, system libraries. This guarantees that the software will always run the same, regardless of its environment.
This article is published from the DNC Magazine for Developers and Architects. Download this magazine from here [PDF] or Subscribe to this magazine for FREE and download all previous and current editions.
This article explores Docker, and how .NET Core applications can be run inside Docker containers by building your own version of dotNetFiddle.
dotNetFiddle is an online environment where users can write and execute simple .Net applications, in a very similar way to the more popular jsfiddle.
.Net Core inside Docker containers - Introduction
If you have never used docker before, I would recommend you to check www.docker.com. Download and install docker for your OS, and make sure you run through some of the examples in the Getting Started Tutorial.
The docker website explains What is Docker? In simple words:
Docker allows you to build an image for your application with its necessary dependencies (frameworks, runtimes etc). These images can be distributed, deployed and run within any Docker containers.
Docker also changes the way applications are deployed. The apps as such are no longer deployed to different environments, but it’s the images – app with its dependencies, that gets deployed. This way, the application is guaranteed to work with any environment as the image contains everything that’s required to run the application.
These containers are different from virtual machines as they share the OS kernel with the host machine. That means they are lighter and easier to start/stop. But they still provide many of the benefits of virtual machines like isolating your processes and files.
Assuming that you are up and running with docker on your machine, let us get started with .Net Core and Docker.
This article's code is available on github.
Hello World app inside Docker
Microsoft has conveniently created and published .Net Core Docker images that we can use as a starting point. You can check these images in their GitHub or Docker Hub sites.
Run the following command to start a new container in an interactive mode, attaching the terminal, so we can run commands inside the container:
>docker run --rm –it Microsoft/dotnet:latest
A few things will happen when running that command:
1. Docker will look for the image Microsoft/dotnet with the tag name latest in the host machine’s local cache.
2. If the image is not found, it searches and pulls it from the docker registry. If the image is found locally, it doesn’t download it again.
3. Docker instantiates and starts a new container with the downloaded image. The entry point of that image is executed, which in this case is a linux bash.
4. The container’s terminal is exposed and attached to your host terminal so you can interact with it.
After executing the command, you will see something like the following:
root@888e80f25148:/#
What you see here is the Linux shell which is running inside the container, waiting for you to enter a command! Let’s create and run a new .Net Core app:
>mkdir helloworld
>cd helloworld
>dotnet new
>dotnet restore
>dotnet run
If everything is configured correctly, you will see the following message after the last command:
Project helloworld (.NETCoreApp,Version=v1.0) will be compiled because expected outputs are missing
Compiling helloworld for .NETCoreApp,Version=v1.0
Compilation succeeded.
    0 Warning(s)
    0 Error(s)
Time elapsed 00:00:01.0110247

Hello World!
Congratulations, you have run your first .Net Core app inside docker.
What just happened is interesting. We started a Linux container with its own isolated file system. We then initialized an entirely new .Net Core application which was compiled and run. Everything happened inside the container, leaving the host machine clean. And if you are on Windows, it is even more interesting as the docker host is running on a Linux virtual machine!
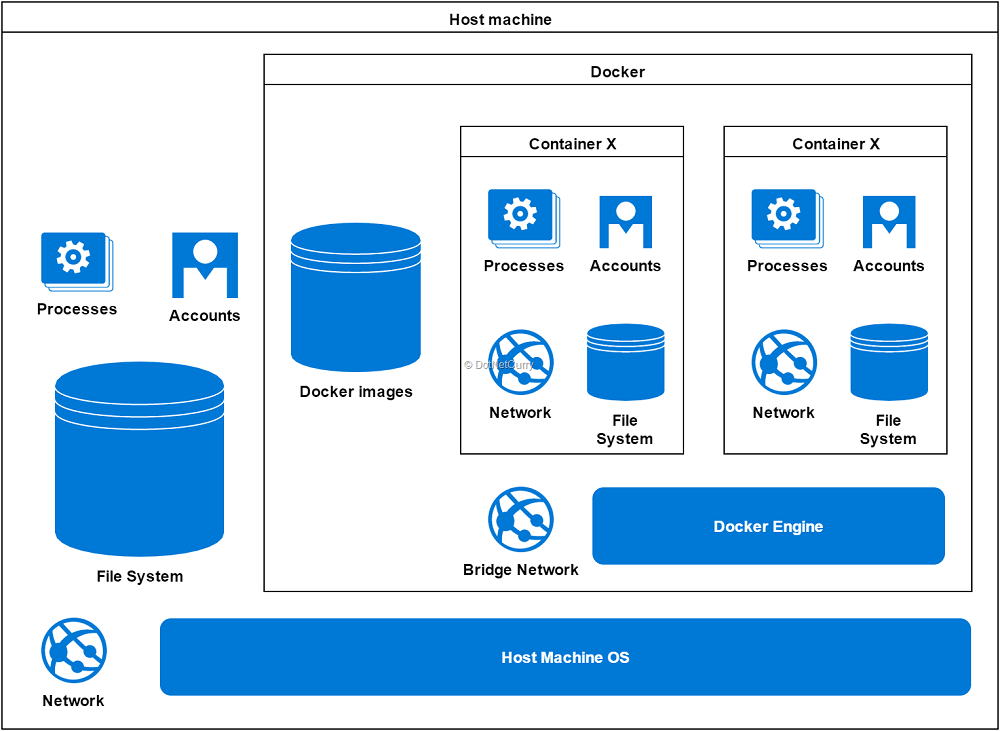
Figure 1: simplified vision of Docker
On the command line, type exit to terminate the container shell. This command will also stop the container and return back to the OS shell. Since the container was started with the --rm option, it will also be automatically removed as soon as it was stopped. (You can check that by listing all the containers with docker ps -a)
File System and Volumes
I hope you found the hello world demo interesting. However docker won’t be too exciting if that was all you could do with it. The hello world application was created inside the container, and was lost as soon as the container was removed.
Let’s explore some options you have to deal with the file system isolation.
Mounting host folders as volumes
Docker allows you to mount any folder of your host machine at any point of the file system inside the container. So let’s revisit the hello world application, this time making sure the application files are created in your host machine.
Start a new command line in your host machine and create a new .Net Core application:
>mkdir helloworld
>cd helloworld
>dotnet new
You should see the new folder in your machine, which should contain 2 files: Program.cs and project.json.
Let’s now start a new container mounting this folder so that it is available as /app inside the container:
>docker run --rm -it -v /c/Users/Daniel.Garcia/helloworld:/app microsoft/dotnet:latest
If you are on windows, the format you need to use to specify the folder depends on whether you are on Windows 10 or not. On Windows 10, docker is accessible from your default command line and you just need to use forward slashes. In previous versions of Windows, you will be using the docker toolbox and will likely be using the git bash as your command line, so apart from using forward slashes, you have to specify your drives as /c instead of c:. In case of any doubts, please check the docker documentation online.
The volume option (-v) maps a folder from your host machine (C:\Users\Daniel.Garcia\helloworld) to a folder inside the container (/app).
- If you use Docker for Windows, you will need to enable volume mapping in the settings, as explained in this article.
- If you use Docker Toolbox for Windows 8.1 and earlier, you have to check the shared folder settings of the VM created in the Virtual Box. By default, only folders inside C:\Users can be shared, but you can include other folders here.
You can now run ls /app (remember your command line is now attached to the shell inside the container) and you will see the two files (program.cs and project.json) of the application.
Build and run the application:
>cd /app && dotnet restore && dotnet run
Running this command should show the same output as before, but if you check the helloworld folder in your host machine, you will see the generated bin and obj folders! Try deleting all the files inside the container and see what happens to the files in your host machine.
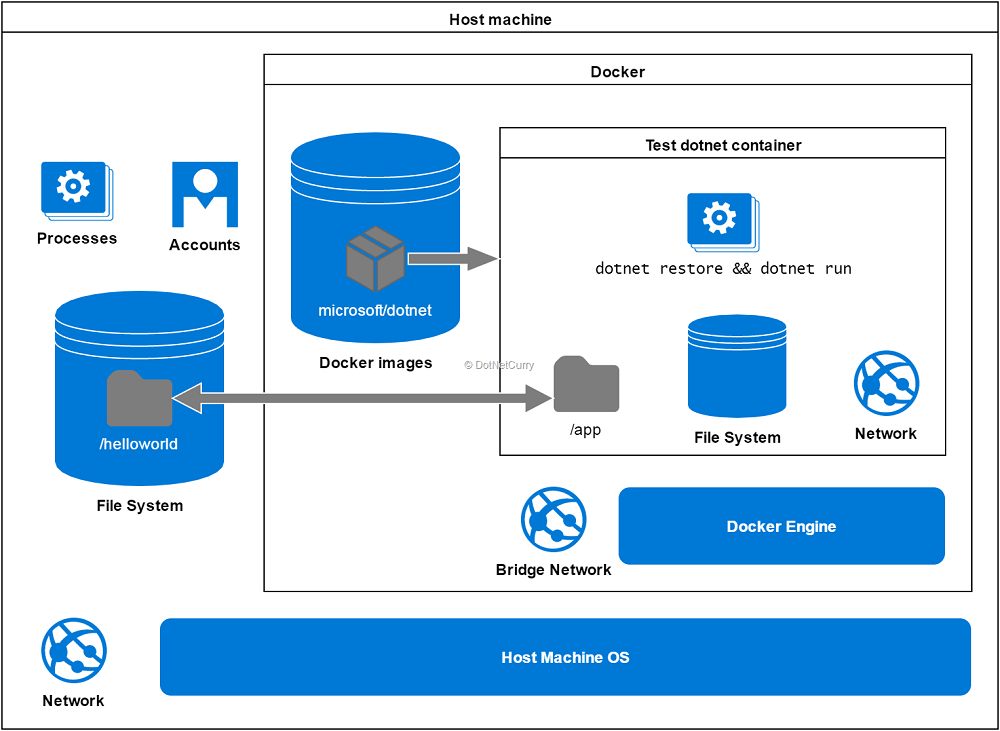
Figure 2: Sharing host folders as a mounted volume
Although this way of sharing data might be useful during development, it is host dependent, which means you cannot easily redeploy your containers on a different host machine.
Building your own images
Reset the files of your hello world application. You are back to a folder in your host machine that contains only Program.cs and project.json.
Let’s now create our own image by using Microsoft’s image as the starting point, and copying the application files to the file system inside the container. You will then be able to create containers using this image, and the files will be available inside the container.
Create a new file helloworld.dockerfile inside that folder, and write the following lines of code inside it:
FROM microsoft/dotnet
COPY . /app
Now build that file in order to create a docker image named helloworld (Observe the dot at the end of the command which is intentional!):
>docker build –t helloworld -f helloworld.dockerfile .
Finally, let’s start a new container from our recently created helloworld image, instead of the default one from Microsoft:
>docker run --rm -it helloworld
Once you are inside the container shell, list the files of the /app folder. You will see that both Program.cs and project.json are there in the folder. Try compiling and running the application again:
>cd /app && dotnet restore && dotnet run
Did you notice how nothing gets added this time to the folder in your host machine? Try removing the files inside the container with cd / && rm -r /app and notice how the files of your host machine are still not affected.
Once you exit the container, try starting a new container using the same helloworld image. What you did previously had no effect, everything is in the expected state, and you can compile and run the application again!
As you can see, you can easily start a new container using your image, and the state will always be the same. This makes it very easy to start containers on different hosts, replacing containers when something goes wrong, or horizontally scaling applications by running more containers.
The way docker builds images using layers is very interesting and understanding the way it works is critical for optimizing your images. It’s worth taking a look!
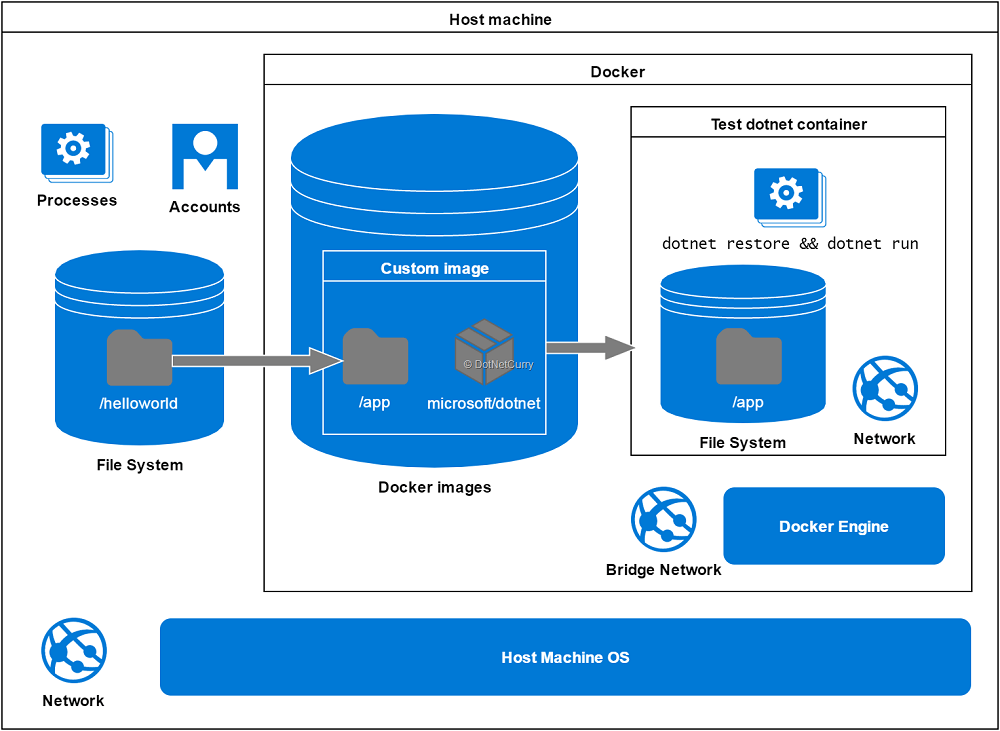
Figure 3: Build an image including folders from host
Creating DockNetFiddle using Docker and ASP.NET Core!
Hopefully you have found this brief introduction interesting. I hope it has triggered multiple use cases for docker (and lots of questions too!) in your brain.
In the rest of the article, we will create DockNetFiddle, a simple clone of dotNetFiddle that will use docker as a sandbox for running programs written online by its users.
As seen during the previous sections, a valid .Net Core application just needs a couple of files, Program.cs and project.json. The site will allow users to enter the code they want to run, as well as its dependencies. We will then create the corresponding Program.cs and project.json files and use docker to run the application, sending the output back to the user!

Figure 4: DockNetFiddle high level view
Setting up the project
Although we are going to use ASP.Net Core to create DockNetFiddle, the focus of the article will remain on docker. This means I might speed things up a bit on this section, but don’t worry, we just need a very simple website. At its core, it’s just a couple of text area fields and a bit of JavaScript to get their values, send a request to the server, and display the results.
Let’s start by creating a new ASP .Net Core Web Application. Use the Web Application template and select No Authentication.
Once the project has been generated, delete the About and Content views (and their actions), leaving just the Index view.
Then create a new model class ProgramSpecification:
public class ProgramSpecification
{
    [Required]
    public string Program { get; set; }
    [Required]
    public string ProjectJSON { get; set; }
}
In order to make it easier for users to enter the code they want to run, let’s display the default hello world program generated by dotnet new. For example, add a static field ProgramSpecification.Default hardcoding the Program and ProjectJSON fields. (By all means, feel free to use a more sophisticated approach using configuration or by getting the values after running dotnet new)
Now update the Index view so it uses the ProgramSpecification as its model and contains a form with textarea inputs for Program and ProjectJSON, and a submit button. There should also be an element to display the results of running that code.
Go as simple as you want. If you need some inspiration, check the components available on the bootstrap framework, or just take a look at the article code in GitHub! Once you are done, you should have something like this:
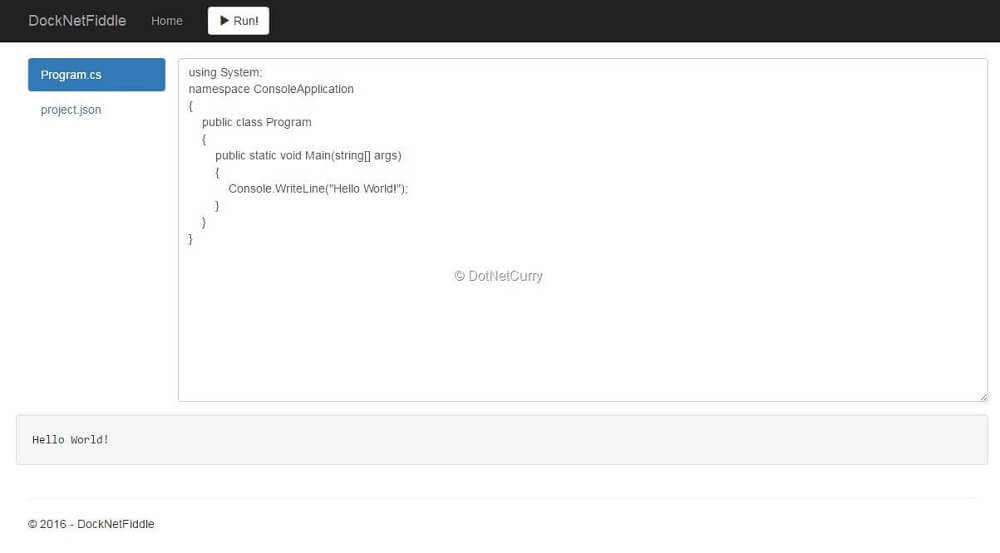
Figure 5: DockNetFiddle design sample
If you feel like giving it a real frontend, feel free to explore some JavaScript editors and replace the raw text areas.
The next step is to create a new controller RunController with a single action that will receive POST requests from the client, run the code specified in the request, and send the results back to the browser:
[HttpPost]
public IActionResult Index([FromBody]ProgramSpecification model)
{
    if (!ModelState.IsValid) return StatusCode(400);

    return Json(new { result = "Hello World!" });
}
Don’t worry, this is just a placeholder implementation that will be revisited in the next sections.
The final piece needed is a bit of JavaScript to be executed when the user clicks the submit button. It should just send a POST AJAX request and display the results. I feel like honoring Jose Aguinaga’s post How it feels to learn JavaScript in 2016 and will just drop some of that old fashioned jQuery code into the site.js file:
$(function () {
  var resultEl = $("#program-result");
  var resultContainerEl = $("#program-result-container");
  $("#run-program-btn").click(runProgram);

  function runProgram() {
    if (!$("#program-form").valid()) return false;

    var data = {
      program: $("#Program").val(),
      projectjson: $("#ProjectJSON").val()
    };

    $.ajax({
      method: 'POST',
      url: '/run',
      data: JSON.stringify(data),
      contentType: 'application/json',
      dataType: 'json',
      success: showResults
    });
    return false;
  }

  function showResults(data, status, xhr) {
    if (data && data.result) {
      resultEl.text(data.result);
      resultContainerEl.removeClass("hidden");
    }
  }
});
Feel free to use a different and better approach for the frontend code. For the time being, I just need something functional that can be used through the following sections without overcomplicating the article, and losing the focus on docker.
It’s now time to implement the logic that will actually run the received ProgramSpecification and send the results back to the browser.
A simple initial approach
A very simple way of running the received program inside a container is basically replicating some of the steps we went through in the introduction:
- Create a temporal directory
- Save Program and ProjectJSON properties into files named Program.cs and project.json respectively.
- Execute a command to start a new docker container mounting the temp directory into /app, using the sequence cd /app && dotnet restore && dotnet build as the argument for the container.
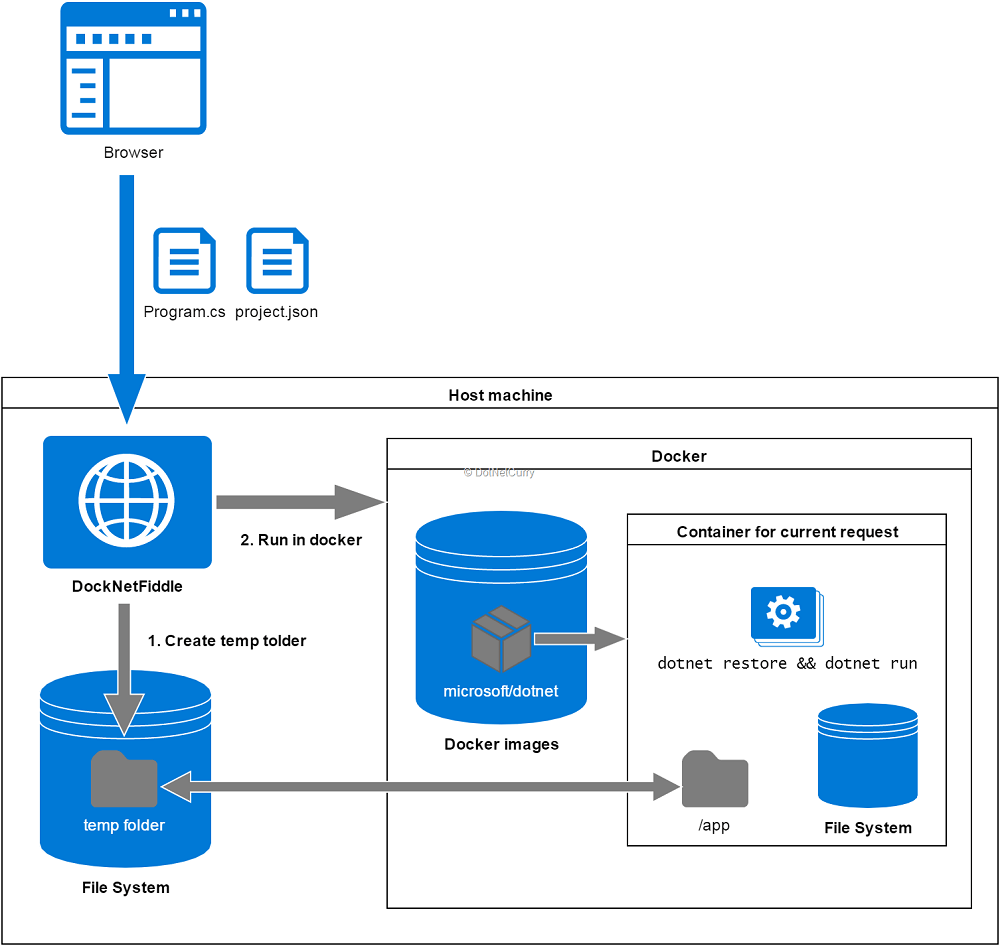
Figure 6: The container per request approach
We can try this easily; just create a folder in your machine containing the two files. Assuming that folder is C:\Users\Daniel.Garcia\helloworld, execute the following command (Remember in windows we still had to specify the volume path in Linux fashion):
>docker run --rm -t -v /c/Users/Daniel.Garcia/helloworld:/app -w /app microsoft/dotnet /bin/sh -c "dotnet restore && dotnet run"
Let’s take a look at the command:
- --rm: remove the container once it finished building and running the program.
- -t: attach the terminal so we can see the output from compiling and running the program.
- -v: mount the folder containing the program files into the /app folder inside the container
- -w: set the working directory inside the container to /app
- microsoft/dotnet: create the container from Microsoft’s default image. You can specify a version here too
- /bin/sh -c “dotnet restore && dotnet run”: open a shell inside the container and run dotnet restore and otnet run
So all we need to do is create a temporal folder with the program files, craft that command from DockNetFiddle, execute it, and return the command output back to the browser. The good old classes Process and ProcessStartInfo are available in .Net Core, and can be used to run a command. We just need to make some considerations mostly for windows users:
· Path to local folders being mounted as volume should use forward slashes. If you are not using Windows 10, you also need to specify your drives using /c instead of c:
· If you don’t use Windows 10, docker isn’t available in the command line by default and some environment variable needs to be set. The command to set all the environment variables can be obtained by running docker-machine env default in another cmd window, and copying the command from the last line which will look like:
@FOR /f "tokens=*" %i IN ('docker-machine env default') DO @%i
I will implement it as a windows user, so I will just create a bat file executeInDocker.bat that will be invoked from the DockNetFiddle application with the path to a temp folder as the argument:
@ECHO off
FOR /f "tokens=*" %%i IN ('docker-machine env default') DO @%%i
docker run --rm -t -v %1:/app -w /app microsoft/dotnet /bin/sh -c "dotnet restore && dotnet run"
I will then create a new service interface IProgramExecutor and class ProgramExecutor (remember to register it as a transient service in your Startup.ConfigureServices method). The service will expose a single method that we will use from the RunController:
public interface IProgramExecutor
{
    string Execute(ProgramSpecification program);
}

//In RunController.Index:
return Json(new {
    result = executorService.Execute(model)
});
The implementation of ProgramExecutor is quite straightforward:
private IHostingEnvironment env;
public ProgramExecutor(IHostingEnvironment env)
{
    this.env = env;
}

public string Execute(ProgramSpecification program)
{
    var tempFolder = GetTempFolderPath();
    try
    {
        CopyToFolder(tempFolder, program);
        return ExecuteDockerCommand(tempFolder);
    }
    finally
    {
        if (Directory.Exists(tempFolder))
            Directory.Delete(tempFolder, true);
    }
}
There are a couple of private methods to create a temp folder and to create the required files using the received program specification:
private string GetTempFolderPath() =>
    Path.Combine(Path.GetTempPath(), Guid.NewGuid().ToString());

private void CopyToFolder(string folder, ProgramSpecification program)
{
    Directory.CreateDirectory(folder);
    File.WriteAllText(
      Path.Combine(folder, "Program.cs"),
      program.Program);
    File.WriteAllText(
      Path.Combine(folder, "project.json"),
      program.ProjectJSON);
}
And another private method that will execute the bat file with the temp folder as argument (taking care of the path format) and get the results:
private string ExecuteDockerCommand(string folder)
{
    var dockerFormattedTempFolder = folder
            .Replace("C:", "/c")
            .Replace('\\', '/');
    var proc = Process.Start(new ProcessStartInfo
    {
        FileName = Path.Combine(env.ContentRootPath, "executeInDocker.bat"),
        Arguments = dockerFormattedTempFolder,
        RedirectStandardOutput = true,
        RedirectStandardError = true
    });
    var result = proc.StandardOutput.ReadToEnd();
    var error = proc.StandardError.ReadToEnd();
    proc.WaitForExit();

    return String.IsNullOrWhiteSpace(error) ? result : error;
}
Once you have everything in place, you should be able to enter any piece of code in your site and execute it!
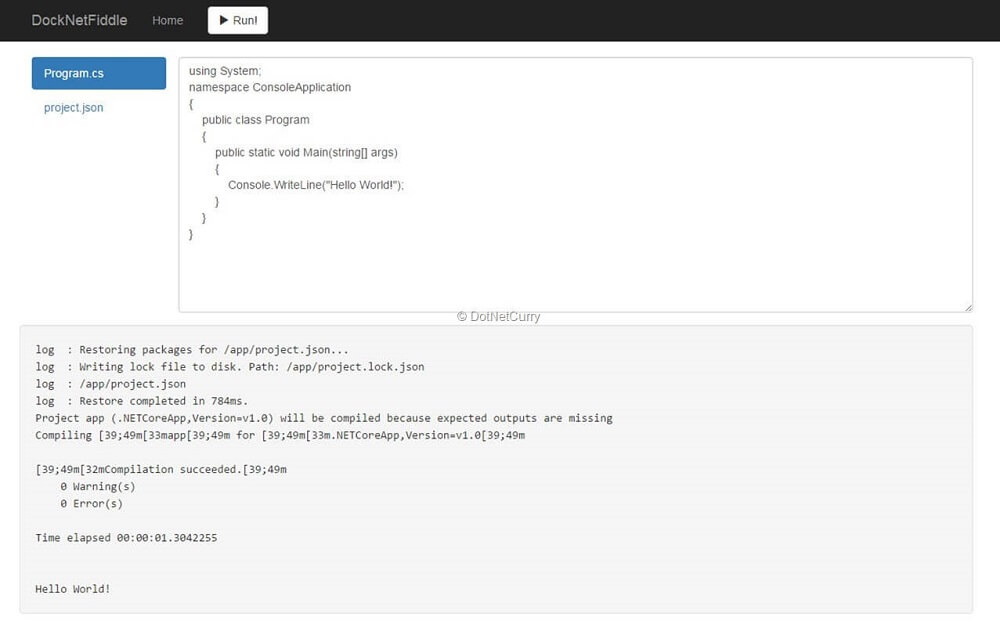
Figure 7: Testing the first implementation
Take a moment and play with your site. While this current simple approach works, it requires a new container to be created for each request. This is a waste of resources and provides poor performance.
There surely is a better approach, right?
Use a long lived container
So here is another approach that takes advantage of the fact that docker allows you to send commands to already running containers using docker exec.
We can share a folder between our machine and the container (mounting it when starting the container), copy the program files there, and use docker exec to compile and run the program inside the container!
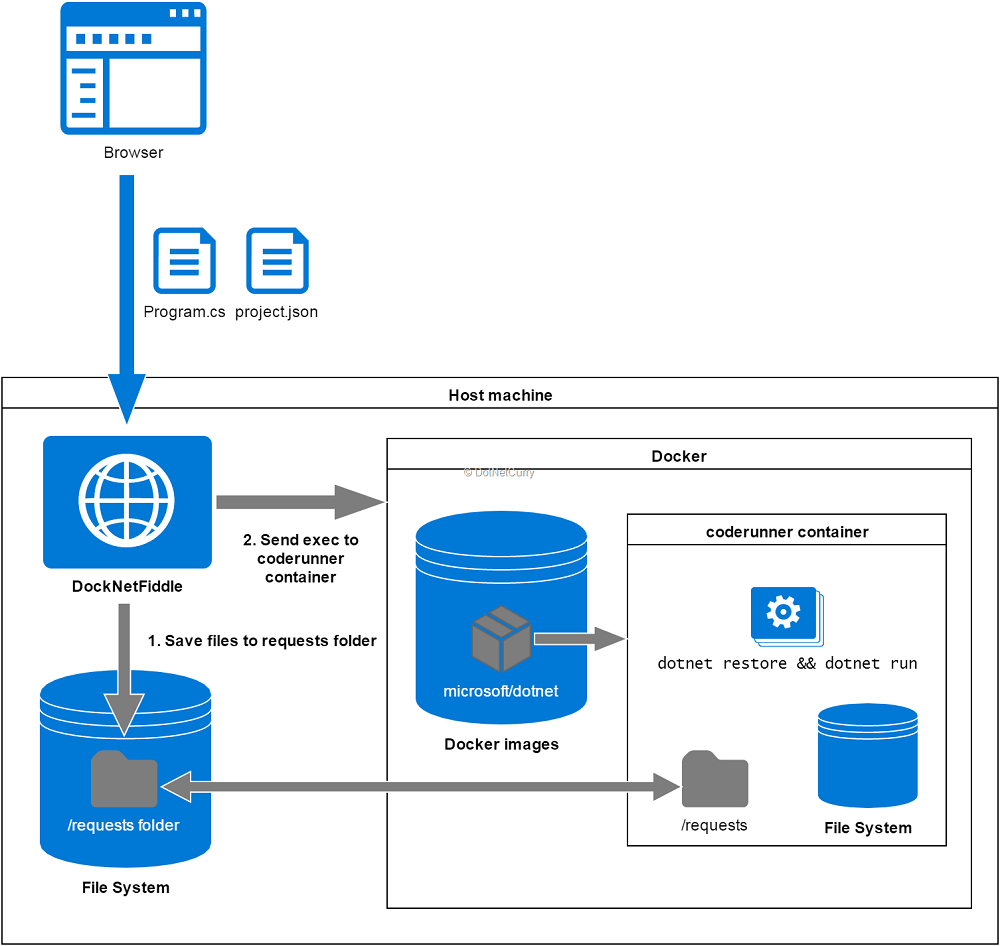
Figure 8: Using the long lived coderunner container
Let’s give it a try. Create a folder named requests somewhere in your machine and then start a new container using the following command (notice we give it a name so we can later send commands using docker exec):
>docker run --rm -it --name coderunner -v /c/Users/Daniel.Garcia/requests:/requests microsoft/dotnet
Now in your machine, create a new folder named test inside the requests folder, and put the default Program.cs and project.json files there. If you switch to your container, you should be able to run ls /requests/test and see both files.
Now open a different command line and execute the following docker exec command:
>docker exec coderunner /bin/sh -c "cd /requests/test && dotnet restore && dotnet run"
You should see the output of the program being compiled and run! Now run the same thing again but redirect the output to a file:
>docker exec coderunner /bin/sh -c "cd /requests/test && dotnet restore && dotnet run >> output.txt"
If you check the test folder on your machine, you will see that the outputs were compiled there, and our file output.txt contains the output from compiling and running the application:
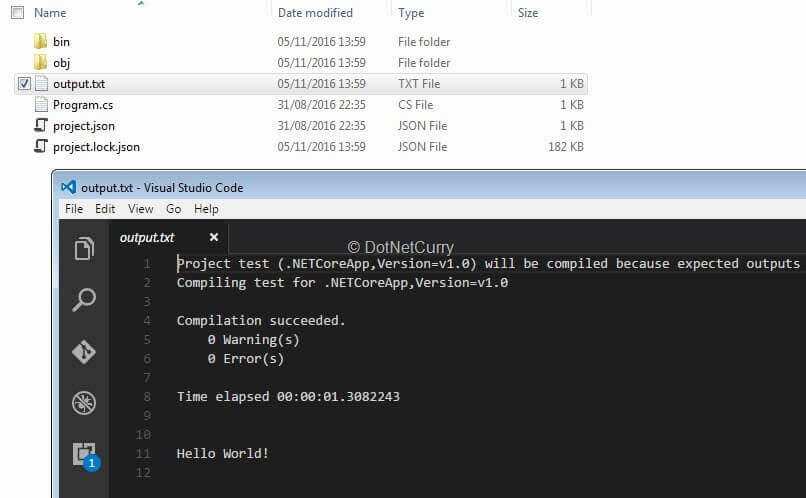
Figure 9: Testing the coderunner container
Let’s quickly adapt this technique in our application. Update your bat file so it looks like the following:
@ECHO off
FOR /f "tokens=*" %%i IN ('docker-machine env default') DO @%%i
SET folderName=%1
SET "dockerCommand=cd /requests/%folderName% && dotnet restore && dotnet run"
docker exec coderunner /bin/sh -c "%dockerCommand%"
Then just update the ProgramExecutor class to:
· copy the files into a new folder inside the same requests folder that was mapped as a volume for the coderunner container. I will just hardcode the folder but feel free to use a configuration for it.
· provide the name of the new folder as argument to the bat file instead of the full path
 public string Execute(ProgramSpecification program)
{
    var tempFolderName = Guid.NewGuid().ToString();
    var tempFolder = Path.Combine(@"C:\Users\Daniel.Garcia\requests", tempFolderName);
    try
    {
        CopyToFolder(tempFolder, program);
        return ExecuteDockerCommand(tempFolderName);
    }
    finally
    {
        // no changes
    }
}
private string ExecuteDockerCommand(string tempFolderName)
{
    var proc = Process.Start(new ProcessStartInfo
    {
        FileName = Path.Combine(env.ContentRootPath, "executeInDocker.bat"),
        Arguments = tempFolderName,
        RedirectStandardOutput = true,
        RedirectStandardError = true
    });

    // no more changes in this method
}
This is better than our initial approach, but we are not quite there yet. There are still quite a few things that are less than ideal like:
- We need to manually start the coderunner container separately from the website.
- The website shouldn’t know about the commands needed to run the program inside the container
- We rely on sending docker commands from the website. What if the website doesn’t have access to docker?
- We rely on a host folder shared between the website and the container. What would happen if you want to also host the website inside docker?
Create an image for the code runner
We will start improving things by creating a shell script for the coderunner container. This script will receive the path to a zip file containing the program files and will proceed to unzip the file, build the program, and run it. This way the website doesn’t need to know the linux commands needed to compile and run the program.
Create a new folder coderunner inside your project and populate the coderunner.sh bash script with the following contents (please ignore my newly acquired bash scripting skills!):
#!/bin/sh

zipFilePath=$1
zipFileDir=$(dirname $1)
zipFileName=$(basename $1)
tempAppFolder="/tmp/$zipFileName"

# unzip program into temp folder
unzip -o $zipFilePath -d $tempAppFolder
cd $tempAppFolder

# restore and run program, saving output in same folder as original file
dotnet restore && dotnet run > "/$zipFileDir/$zipFileName.output" 2>&1

# remove temp folder
rm -rf $tempAppFolder
If you use windows, make sure you save the file with linux line endings. For example, in Visual Studio, click File, Advanced Save Options and select Linux line endings.
Now create a docker coderunner.dockerfile file inside the same folder, which will basically create an image from Microsoft’s default image that additionally copies the coderunner.sh script, and installs zip inside the container:
FROM microsoft/dotnet:latest
RUN apt-get -qq update && --assume-yes install zip
COPY coderunner.sh /coderunner.sh
Now we can run the following commands to build our image and start a new container with our image:
>docker build -t coderunner -f ./coderunner/coderunner.dockerfile ./coderunner/
>docker run --rm -it -v /c/Users/Daniel.Garcia/requests:/requests coderunner
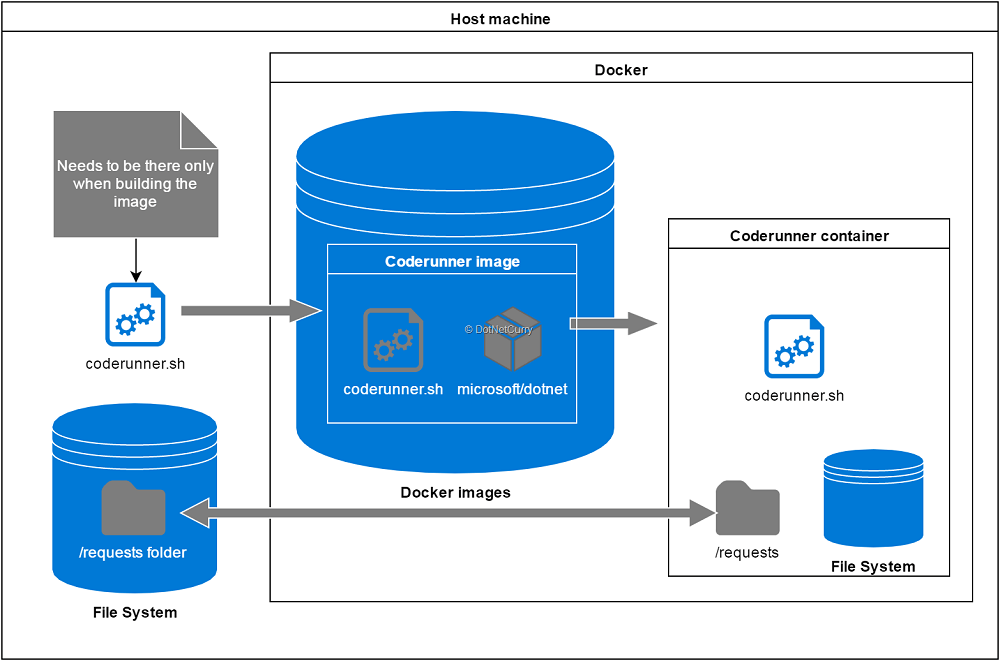
Figure 10: Creating an image for the coderunner container
Now move back to the website as we need to change the ProgramExecutor service. We now need to generate a zip file inside the requests folder and also need to monitor the folder until we see the output file. This will convert our method into an async method:
public async Task Execute(ProgramSpecification program)
{
    var zipFileName = Guid.NewGuid().ToString() + ".zip";
    var zipFilePath = Path.Combine(
        @"C:\Users\Daniel.Garcia\requests", zipFileName);
    var expectedOutputFile = zipFilePath + ".output";
    try
    {
        DropToZip(program, zipFilePath);
        ExecuteDockerCommand(zipFilePath);
        await WaitForOutputFile(expectedOutputFile);
        return File.ReadAllText(expectedOutputFile);
    }
    finally
    {
        if (File.Exists(zipFilePath))
            File.Delete(zipFilePath);
    }
}
The DropToZip utility uses the old .Net Stream to create a zip file that contains the two program files inside it:
private void DropToZip(ProgramSpecification program, string zipFilePath)
{
    using (var zipFile = File.Create(zipFilePath))
    using (var zipStream = new System.IO.Compression.ZipArchive(zipFile, System.IO.Compression.ZipArchiveMode.Create))
    {
        using (var writer = new StreamWriter(zipStream.CreateEntry("Program.cs").Open()))
        {
            writer.Write(program.Program);
        }
        using (var writer = new StreamWriter(zipStream.CreateEntry("project.json").Open()))
        {
            writer.Write(program.ProjectJSON);
        }
    }
}
The ExecuteDockerCommand is now just firing the bat file:
private void ExecuteDockerCommand(string zipFilePath)
{
    var proc = Process.Start(new ProcessStartInfo
    {
        FileName = Path.Combine(env.ContentRootPath, "executeInDocker.bat"),
        Arguments = Path.GetFileName(zipFilePath)
    });
    proc.WaitForExit();
}
..whereas the WaitForOutputFile utility uses the FileSystemWatcher events combined with Tasks:
private Task WaitForOutputFile(string expectedOutputFile)
{
    if (File.Exists(expectedOutputFile))
        return Task.FromResult(true);

    var tcs = new TaskCompletionSource();
    var ct = new CancellationTokenSource(10000);
    ct.Token.Register(
        () => tcs.TrySetCanceled(),
        useSynchronizationContext: false);

    FileSystemWatcher watcher = new FileSystemWatcher(
        Path.GetDirectoryName(expectedOutputFile));
    FileSystemEventHandler createdHandler = null;
    createdHandler = (s, e) =>
    {
        if (e.Name == Path.GetFileName(expectedOutputFile))
        {
            tcs.TrySetResult(true);
            watcher.Created -= createdHandler;
            watcher.Dispose();
        }
    };
    watcher.Created += createdHandler;
    watcher.EnableRaisingEvents = true;

    return tcs.Task;
}
The final piece of the puzzle is the bat file. Now we just need to start the sh script inside the container, which takes a path to the zip file inside the requests folder as an argument:
@ECHO off
FOR /f "tokens=*" %%i IN ('docker-machine env default') DO @%%i
SET zipFileName=/requests/%1
SET "dockerCommand=./coderunner.sh %zipFileName%"
docker exec coderunner /bin/sh -c "%dockerCommand%"
Run everything in docker!
We have improved on the previous setup, but this really was just an intermediate step. Now let’s take the final step so as to run the website too inside docker.
· This will allow us to share the folders without depending on the host machine
· It will also allow us to stop sending docker exec commands from the website. Instead we will install incron inside the coderunner image, which will start monitoring the requests folder and automatically run the script for any new zip file!
· Docker compose will allow to start/stop both containers with a single command
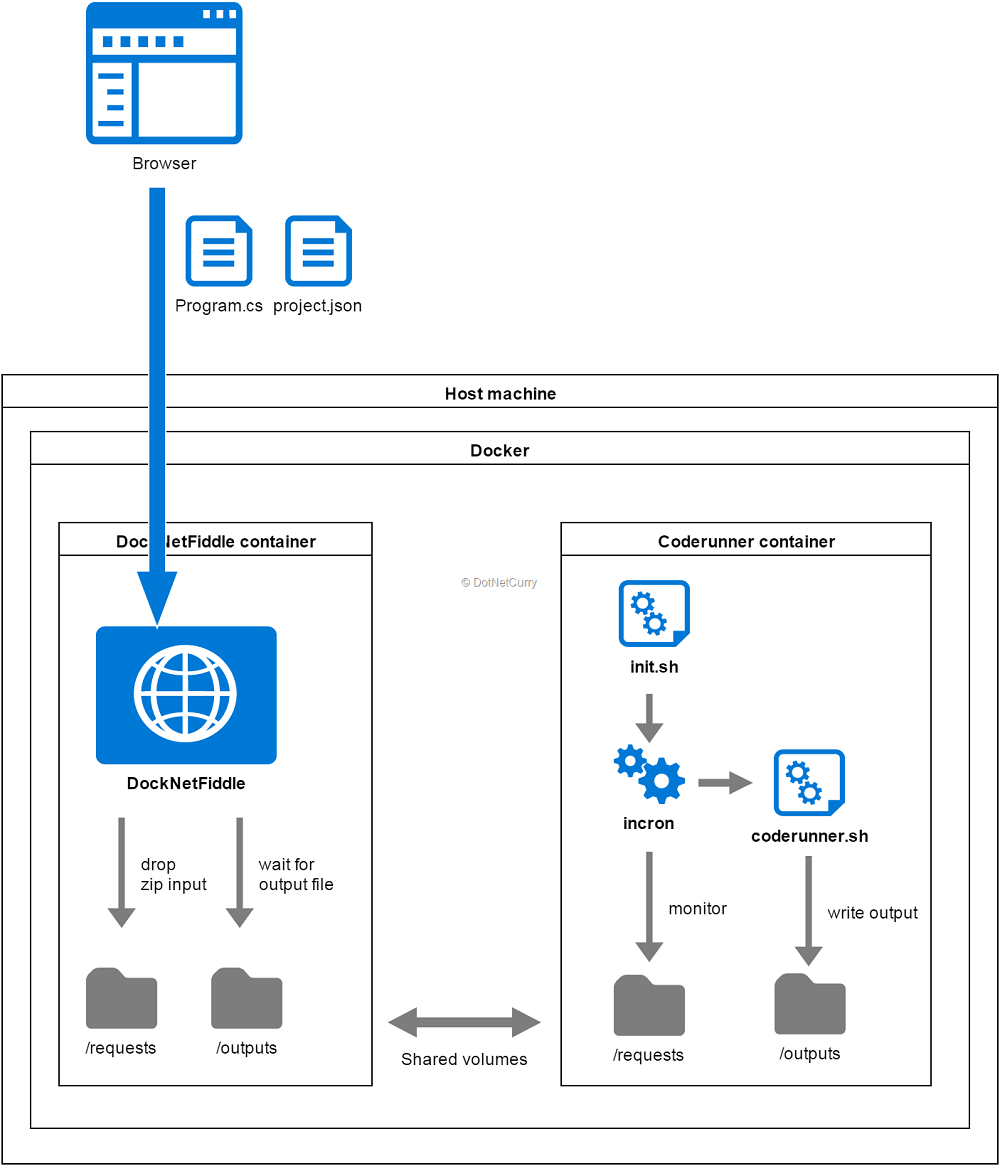
Figure 11: Updated approach, hosting everything in docker
Let’s start with the coderunner container. Update its dockerfile so:
· It exposes a couple of folders /requests and /outputs that can be shared with other containers. (But they are completely independent from the host machine)
· Installs incron and creates a rule for monitoring the new files in /requests that will run the coderunner.sh script.
There are a few caveats to take into account before we can complete this step.
· The first is that incron runs the script on a different context that doesn’t have the same environment variables, so we will create an intermediate script that will fire coderunner.sh as the root user. Create a script launcher.sh inside the coderunner folder with these contents:
#!/bin/sh
su - root -c "/coderunner.sh $1"
· The second is that when building an image on windows machines, copied files are not given executable permissions, so we will need to manually do that.
· The third is that since we are monitoring the /requests folder, we cannot create the output file in that folder, or else the coderunner.sh will enter an infinite loop. Update coderunner.sh to create the output file inside the /outputs folder at the end of the process:
dotnet restore && dotnet run > "/$tempAppFolder/$zipFileName.output" 2>&1
#copy entire output
cp /$tempAppFolder/$zipFileName.output /outputs/$zipFileName.output
· The final caveat is that docker images save the file system, but not the status of running processes! This means we need to run another script when the container starts that will start the incron service. We will also use that script to keep the container alive. Create another script init.sh with these contents (remember to save the file with linux line endings):
#!/bin/sh
service incron start
echo "Pres CTRL+C to stop..."
while true
do
   sleep 1
done
Once you have done this, update the docker file for the coderunner container:
FROM microsoft/dotnet:latest

# Install zip and incron
RUN apt-get -qq update && --assume-yes install zip incron
RUN echo 'root' >> /etc/incron.allow

# Expose required volumes
VOLUME /requests /outputs

# Copy script files
COPY /init.sh coderunner.sh launcher.sh ./

# Monitor folder where new zip files will be copied
# executing the launcher.sh script when a new file is created.
RUN touch incron.rules \
    && echo '/requests IN_CREATE /launcher.sh $@/$#' >> incron.rules \
    && incrontab incron.rules \
    && chmod +x /launcher.sh \
    && chmod +x /coderunner.sh \
    && chmod +x /init.sh

# Start incron service when container starts and keep container alive
ENTRYPOINT ["/init.sh"]
With these changes, our coderunner container is ready!
Let’s now create a dockerfile for the website. I am going to follow the quick and lazy approach of copying our entire application inside the container, then build and run the application.
For a proper way of optimizing your images for ASP.Net Core applications, check Steve Lasker’s post.
You might also want to check the VS tools for docker as it easily provides you with docker files for an ASP.Net Core application that even supports running with F5 and debugging.
If you are developing .Net core apps on Mac/Linux, you might also want to check out the Docker Support extension for VS Code that gives linting, code snippet support for docker file. Combine that with the generator-docker yeoman package to debug .net core apps from VS Code.
That said; create a new docknetfiddle.dockerfile inside the root folder of your ASP website with the following contents:
FROM microsoft/dotnet
WORKDIR /app
ENV ASPNETCORE_URLS http://+:80
ENV ASPNETCORE_ENVIRONMENT development
EXPOSE 80
COPY . .
RUN dotnet restore
RUN dotnet build
ENTRYPOINT ["dotnet", "run"]
We are almost ready to try our new setup. Before you do that, adjust the ProgramExecutor service so it creates/expects files in the /requests and /outputs folders:
var zipFilePath = Path.Combine("/requests", zipFileName);
var expectedOutputFile = Path.Combine("/outputs", zipFileName + ".output");
Note: I have seen issues with the FileSystemWatcher events when running inside docker. Sometimes the event got fired, the file was there but it was still empty. Adding a small wait before reading the file contents with Thread.Sleep(10) sufficed to fix the issue.
Finally remove the ExecuteDockerCommand function from ProgramExecutor. Now that the coderunner container will use incron to monitor the /requests folder, there is no need for the website to manually invoke coderunner.sh!
Once done with the changes, run the following commands from the website root folder. These commands will build the coderunner image and start a new container:
>docker build -t coderunner -f ./coderunner/coderunner.dockerfile ./coderunner
>docker run --rm -it --name coderunner coderunner
Open a second command line and repeat the same to start the website container. Notice how port 8080 of the host machine is mapped to port 80 inside the container, and how we mount the folders exposed by the coderunner container, so both containers share /requests and /outputs:
>docker build -f docknetfiddle.dockerfile -t docknetfiddle .
>docker run --rm -it --volumes-from coderunner –p 8080:80 docknetfiddle
Now direct your browser to localhost:8080 and you will see your site running on docker. It is still fully functional, but everything is running inside docker and is completely independent from your host machine!
Note: If you are in windows using docker toolbox, instead of localhost, you need to use the IP of the VM hosting docker. For example http://192.168.99.100:8080/
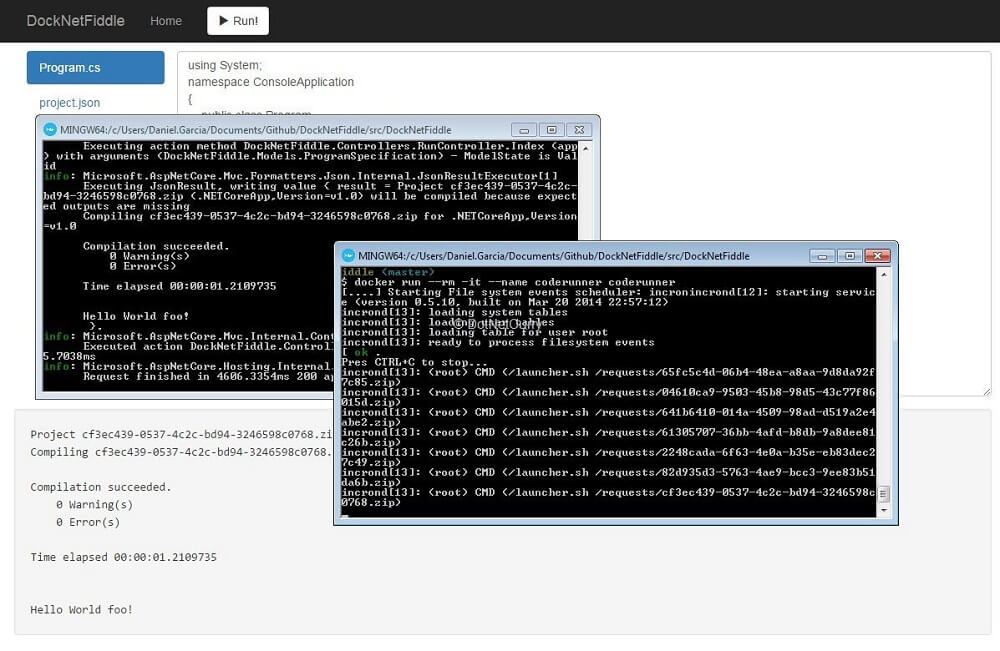
Figure 12: Testing DockNetFiddle fully hosted in docker
A Quick Improvement
There is a quick improvement you can make if you want. As you might have already realized, most of the times, you don’t add new dependencies to the default project.json.
We could set the project.json as an optional input in the website, which means we use the default project.json unless a different one is entered. Then we could create a precompiled app inside the coderunner container and use it to avoid the dotnet restore step. Basically inspect the zip file to see if it contains a project.json file and if it doesn’t, clone the precompiled app, replace its Program.cs file and run dotnet build && dotnet run instead of dotnet restore && dotnet run.
If you have any trouble making these changes, check the accompanying code in GitHub.
Introducing Docker Compose
Before wrapping up, let’s briefly introduce docker compose. If you take a look at how the application currently needs to be started, you need to open a couple of different command line windows, and run at least one command on each to start the containers (more if you also need to build the images first).
You also need to remember to start the coderunner first, and then the docknetfiddle container; as the latter mounts the volumes exposed by the former.
Docker compose is an orchestration tool that lets you easily manage setups that require multiple containers. Docker compose is installed when you install Docker for Windows/Mac. It just needs a single file describing the different containers required by your system, and their relationships. With that single file, you are able to run and stop everything with a single command!
Enough talking, let’s just create a file named docker-compose.yml within the web application folder, the same folder that contains docknetfiddle.dockerfile. Add the following lines to the file, making sure indentation uses spaces and not tabs:
version: '2'
services:
  webapp:
    build:
      context: .
      dockerfile: docknetfiddle.dockerfile
    ports:
      - "8080:80"
    volumes_from:
      - coderunner
  coderunner:
    build:
      context: ./coderunner
      dockerfile: codeRunner.dockerfile
I think the commands are self-explanatory. The file basically describes that our system is composed of two different containers, both being built from docker files. You can also see the ports and volume mapping instructions for the docknetfiddle container, same as we manually did to add to a docker run command.
Now open a new command line from the folder where the docker file is located and run the following command:
>docker-compose up
If your file name is different from docker-compose.yml, use the option –f yourfile.yml
That’s it, your DockNetFiddle site is up and running! When you are done playing with it, run the following command to stop and delete the containers:
>docker-compose down
As you can see, Docker Compose makes it easier working with non-trivial docker setups involving multiple containers.
Conclusion
I truly hope you are now intrigued by Docker and its potential. I am no expert in Docker by any means, and have only recently started exploring and learning about it. However I think it is full of potential. As soon as you start with Docker, you will start seeing how it could add value in many situations!
It also comes with its own set of challenges like debugging, security or a different approach for operations. Not to mention, Windows systems other than Windows 10 are less than ideal for serious work with Docker. Make sure you investigate these (and many other) topics before embarking on serious projects.
This article should be considered as a learning exercise rather than a guide to create a production ready application. Concerns like scalability, security or performance were not fully covered. However it demonstrates the multi-platform capabilities of .Net Core (remember, the site built in the article is running inside a docker container, which is running itself on a Linux host) and the possibilities it opens. You now have a platform that makes it really easy to decouple your system into different containers.
I would encourage you to fork this project and add some additional features to it. For example, let’s say you want to continue working on the sample DockNetFiddle application, how hard would it be to replace the communication based in shared folders with a proper messaging/queueing solution like Kafka or RabbitMQ hosted on a 3rd container? Wouldn’t you be able to easily scale up by adding multiple containers of the coderunner instance? What about adding the ELK stack for monitoring the site? And you can run everything locally the same way it would run in production!
Now think about doing the same without containers!!
The article code is available on github.
This article has been editorially reviewed by Suprotim Agarwal.
C# and .NET have been around for a very long time, but their constant growth means there’s always more to learn.
We at DotNetCurry are very excited to announce The Absolutely Awesome Book on C# and .NET. This is a 500 pages concise technical eBook available in PDF, ePub (iPad), and Mobi (Kindle).
Organized around concepts, this Book aims to provide a concise, yet solid foundation in C# and .NET, covering C# 6.0, C# 7.0 and .NET Core, with chapters on the latest .NET Core 3.0, .NET Standard and C# 8.0 (final release) too. Use these concepts to deepen your existing knowledge of C# and .NET, to have a solid grasp of the latest in C# and .NET OR to crack your next .NET Interview.
Click here to Explore the Table of Contents or Download Sample Chapters!
Was this article worth reading? Share it with fellow developers too. Thanks!
Daniel Jimenez Garciais a passionate software developer with 10+ years of experience who likes to share his knowledge and has been publishing articles since 2016. He started his career as a Microsoft developer focused mainly on .NET, C# and SQL Server. In the latter half of his career he worked on a broader set of technologies and platforms with a special interest for .NET Core, Node.js, Vue, Python, Docker and Kubernetes. You can
check out his repos.