Azure Service Fabric provides a platform for creating and deploying scalable and reliable services for the cloud. This platform has some great tools that makes it easier for developers to create applications by providing programming models and components that reduce the complexity when going cloud-scale.
WCF service for Azure Service Fabric
For this article, we will be creating a very simple Windows Communication Foundation (WCF) service for Azure Service Fabric. This service will have 2 operations:
- getting the name of the President of the United States based on the presidency number
- retrieving the list of the last five Presidents.
Set up
Make sure you have the latest version of Microsoft Azure Service Fabric SDK and Tools, if not, it needs to be installed. In any case, I recommend using the Web Platform Installer.

Install the service corresponding to the Visual Studio Version you are planning to use; for this tutorial I will be using Visual Studio 2015.
Creating your Service
Go to Visual Studio, and create a new Service Fabric Application Project; for this example, we will call it Political.
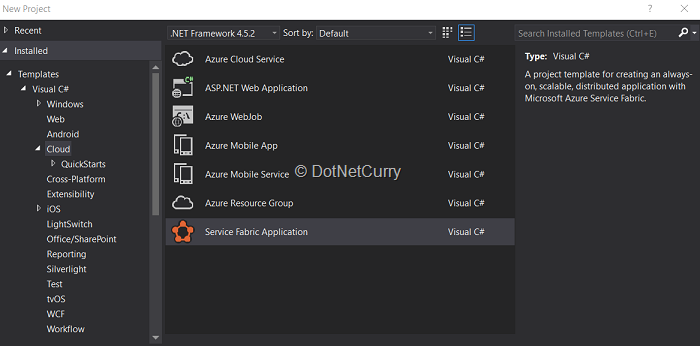
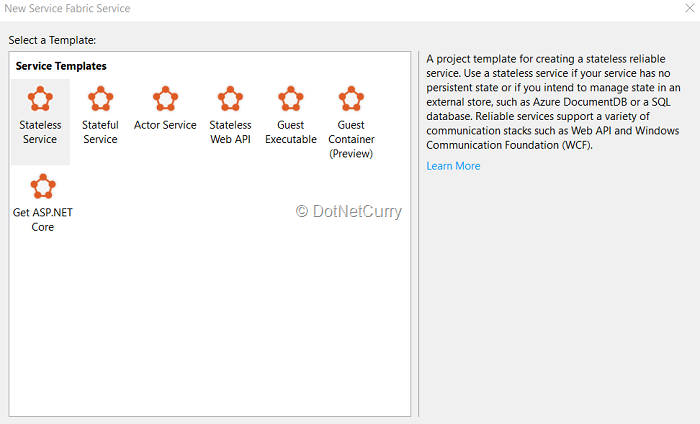
Then select the template of your first Service. In this case, it will be a Stateless Service and we will call it PresidentialService.
Once the service is created, you will notice a structure similar to the following:
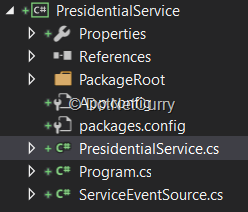
PresidentialService is our main class, and it is composed of three parts:
- Constructor
- CreateServiceInstanceListeners method
- RunAsync method
Since for this example, we are not going to create any long-running processes, we can safely remove the RunAsync method. We want our service to be of WCF type, so we first need to add the corresponding Service Contract by creating a new interface, something like this:
[ServiceContract]
public interface IPresidentialService
{
    [OperationContract]
    Task<string> PresidentName(int id);

    [OperationContract]
    Task<string> Presidents();
}
}
This interface will be added in a separate project called Contracts, so ensure you add the proper reference to the Service project.
Now we need to implement the interface in our service class. For this example, we will be using a “fake” data store, to emulate retrieving the data from an actual database or even a No-SQL store.
public Task<string> PresidentName(int id)
{
  return Task.FromResult<string>(
      string.Format("Node: {0} | PresidentName:{1}", this.Context.NodeContext.NodeName, _dataStore.GetPresidents()[id]
    )
  );
}

public Task<string> Presidents()
{
  return Task.FromResult<string>(
      string.Format("Node: {0} | Presidents:{1}", this.Context.NodeContext.NodeName, string.Join(", ",_dataStore.GetPresidents().Values)
    )
  );
}
This completes the actual service creation.
The next step is to define the listeners for the service on CreateServiceInstanceListeners method. We need to add them in order to be able to communicate with the real world through Service Fabric. Since this scenario is about WCF, we will create a WCFCommunicationListener. We will find it in a nuget package that we can install as follows:
install-package Microsoft.ServiceFabric.Services.WCF
Once installed, the listener can be created as follows:
protected override IEnumerable<ServiceInstanceListener> CreateServiceInstanceListeners()
{
    const int bufferSize = 512000; //500KB
    NetTcpBinding binding = new NetTcpBinding(SecurityMode.None)
    {
        SendTimeout = TimeSpan.FromSeconds(30),
        ReceiveTimeout = TimeSpan.FromSeconds(30),
        CloseTimeout = TimeSpan.FromSeconds(30),
        MaxConnections = 1000,
        MaxReceivedMessageSize = bufferSize,
        MaxBufferSize = bufferSize,
        MaxBufferPoolSize = bufferSize * Environment.ProcessorCount,
    };

    ServiceInstanceListener listener = new ServiceInstanceListener(context =>
            new WCFCommunicationListener<IPresidentialService>(context, this, binding, "ServiceEndpoint")
        );

    return new[] {
            listener
    };
}
We will be creating a sample NetTcp binding for this example; in a real-life scenario you might want to add proper values according to your app needs.
Build your Service project and if everything goes OK, you will be able to continue with the deployment process.
Deploying the Service Fabric application
As you may remember, Service Fabric helps you to easily replicate your service across different nodes for availability purposes, you just need to define how you want it done. For now we have an application with a single service, but it needs to be deployed to our cluster. For this scenario we will set 2 instances for the Service, so we need to update the Local.5Node.xml file located in the ApplicationParameters folder for the application project, adjusting the Instance Count parameter as follows
<Parameter Name="PresidentialService_InstanceCount" Value="2" />
If you wanted your service to be deployed on all available nodes, then set (or leave) it as -1.
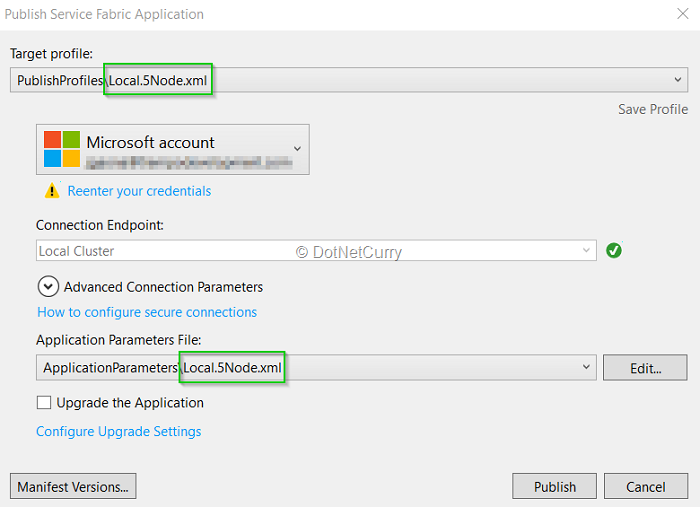
Build the application project (or the whole solution) and if everything goes well, proceed to publish. Just be sure that your Service Fabric Local Cluster is already started and set up in 5-node mode. Once done, just right-click on your application folder, select the publish option and in the window that gets displayed, be sure that Target Profile and Application Parameters File is set to the corresponding Local.5Node.xml file. Hit Publish.
Once it is deployed, open the Service Fabric Explorer by double-clicking the Service Fabric icon on the system tray or by navigating to http://localhost:19080/Explorer in your browser.
You should see something like this:
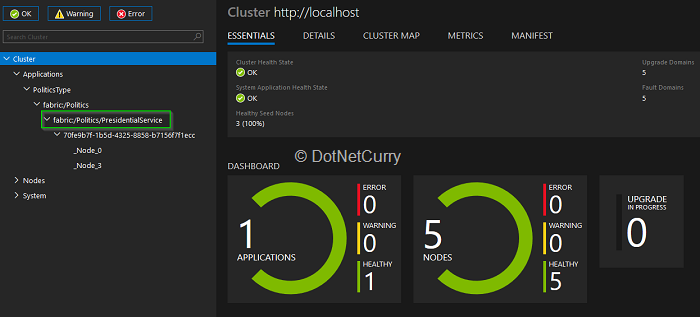
As you can see, the application has been deployed successfully and Service Fabric defines the service URI (highlighted in the green rectangle), which we will be using later to make our calls.
Calling the service
It’s nice what we have already accomplished, but now we want something that helps testing what has been done so far, so let’s go for it. We will create a Console Application that will act as our client.
It will consists of four elements
- A communication client factory
- A client
- A binding
- And last but not least, the URI of the service.
First we need to add a reference to the contract of the service we are about to call. This is the IPresidentialService interface we added within the Contracts project.
Install the Microsoft.ServiceFabric.Services.WCF nuget package (but now for our Console App) and then add a class called PresidentialServiceClient (or some other name that makes sense to you), and make it inherit from ServicePartitionClient
Create a constructor that accepts two parameters - one of type WCFCommunicationClientFactory and the other of type Uri, and pass them to the base class constructor. Now add two methods, matching the Service Contract signature, like this:
public Task<string> PresidentName(int id)
{
    return this.InvokeWithRetryAsync(client => client.Channel.PresidentName(id));
}

public Task<string> Presidents()
{
    return this.InvokeWithRetryAsync(client => client.Channel.Presidents());
}
This will complete the client class. Now we will add the code required for our console app to be able to call our deployed service. For the binding, we will be using the same as defined for the service above (you may want to consider to add it to a shared project or library, but for now we duplicate the code here for better visibility). The rest of the items will be added as follows:
ServicePartitionResolver servicePartitionResolver = new ServicePartitionResolver(() => new FabricClient());
WCFCommunicationClientFactory communicationClientFactory = new WCFCommunicationClientFactory(binding, servicePartitionResolver: servicePartitionResolver);
For the URI, we will create an object with the corresponding service address value. You will find it on the Application node in the Service Fabric Explorer that we already reviewed (something like fabric:/AppName/ServiceName). So the code will be as follows:
Uri uri = new Uri("fabric:/Politics/PresidentialService");
Now we can create an instance of the client class we defined earlier:
PresidentialServiceClient presidentialServiceClient = new PresidentialServiceClient(communicationClientFactory, uri);
The actual calling of the service can be like this:
int presidentId = 44;
string presidentName = presidentialServiceClient.PresidentName(presidentId).Result;
Console.WriteLine("{0}th president is {1}", presidentId, presidentName);
string presidents = presidentialServiceClient.Presidents().Result;
Console.WriteLine("Last 5 presidents {0}", presidents);
Console.ReadKey();
Since Microsoft.ServiceFabric.Services target is for 64 bit, we need to make a small change in our Console Application to be able to run it. Open Project properties and go to Build section. Over there, change the Platform target to “x64”.
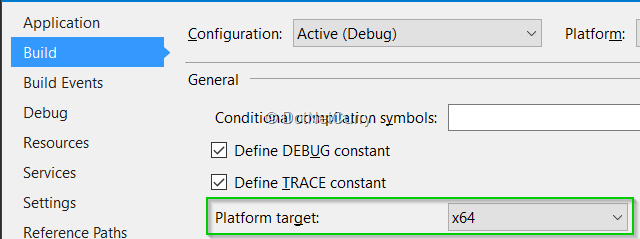
Right click on our client project, select Debug - Start new Instance, to be able to run the client application. You should see something like this:

Notice that in the call result, we are getting the actual node name (in this case _Node_3) where the service is being executed within the cluster.
Upgrading the WCF Service
One of the main advantages of working with Azure Service Fabric is that we don’t need to take down our service whenever we need to roll a new update. We are now going to test this feature, so let’s change our client by removing the Console.ReadKey() and adding an infinite loop to emulate multiple constant calls for the service. You should end up with something like this:
while (true)
{
    int presidentId = 44;
    string presidentName = presidentialServiceClient.PresidentName(presidentId).Result;
    Console.WriteLine("{0}th president is {1}", presidentId, presidentName);
    string presidents = presidentialServiceClient.Presidents().Result;
    Console.WriteLine("Last 5 presidents {0}", presidents);
    Console.WriteLine();
    Thread.Sleep(1000);
}
In order to have a clear picture of what is going on, we will space each call by adding a thread sleep() period of 1 second. Build your project; we will run the generated EXE file later in the process.
Go to the service class, where we will make two small changes. The first one will be just including the current time to the result we are returning for each call, as the third argument passed to the string format method:
string.Format("Node: {0} | PresidentName:{1} ({2})", this.Context.NodeContext.NodeName, _dataStore.GetPresidents()[id], DateTime.Now.ToLongTimeString())
and
string.Format("Node: {0} | Presidents:{1} ({2})", this.Context.NodeContext.NodeName, string.Join(", ",_dataStore.GetPresidents().Values), DateTime.Now.ToLongTimeString())
The second change will be to add the ability to log some info for diagnostic purposes by using Event Tracing for Windows. ETW is a great tool for diagnostics with virtually no impact on application performance. When we create a Service, it automatically creates a class called “Service Event Source” as you may have already noticed within the project. We will add the following calls before returning the value from each method:
ServiceEventSource.Current.ServiceMessage(this.Context, "Calling PresidentName operation with id {0} on {1}", id, this.Context.NodeContext.NodeName);
and
ServiceEventSource.Current.ServiceMessage(this.Context, "Calling Presidents operation on {0}", this.Context.NodeContext.NodeName);
Now that we have made the changes, we need to update the app and service version accordingly on the corresponding manifest files. For the service, we will change the Version value for both ServiceManifest and CodePackage nodes on ServiceManifest.xml. For the application, it will be the ApplicationTypeVersion value on ApplicationManifest node and ServiceManifestVersion value on ServiceManifestRef node on ApplicationManifest.xml file. You can set the value based on your personal versioning strategy; for this example I will set all the values to 2.0.0. Rebuild the solution, and now we are ready to publish our new version.
Run the console application client (directly from the folder this time, not by starting the instance with Visual Studio debugger), in order to see the changes at run time. Go through the same publish process we went through earlier, but this time ensure the box labeled “Upgrade the Application” is checked.
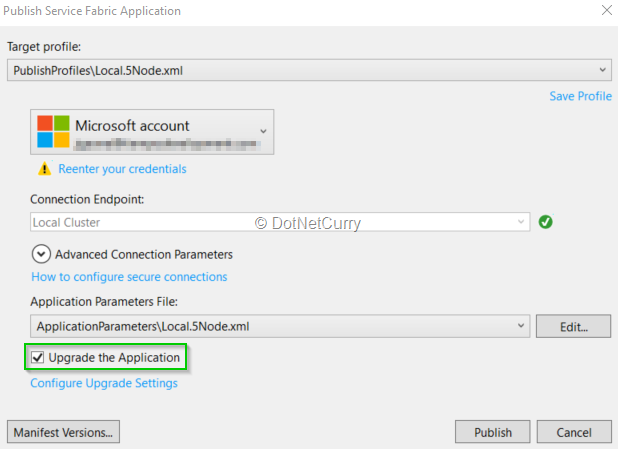
Go to the Service Fabric Explorer in your browser, and notice how it is notifying that we have an upgrade in progress:
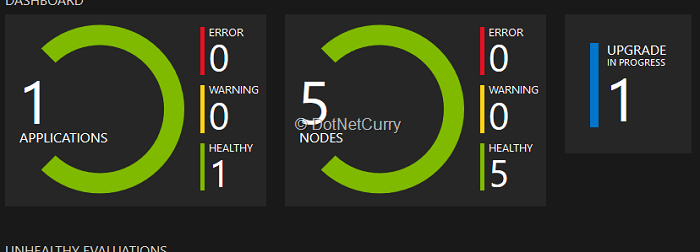
If you click on it, you will be able to see the details of the current upgrade process.
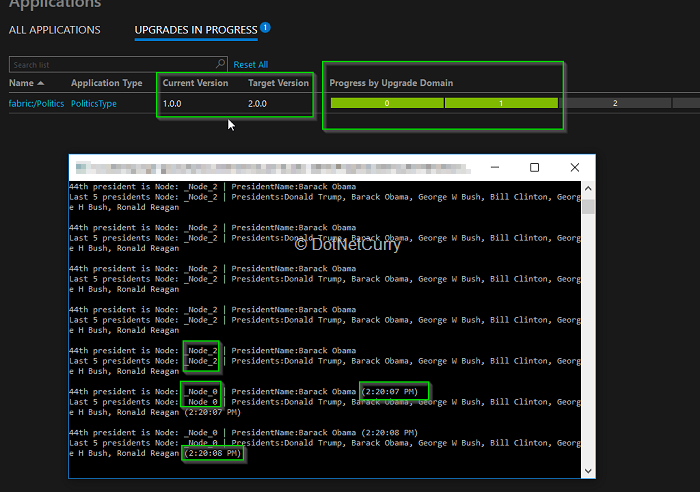
- The app version is to be changed from 1.0.0 to 2.0.0
- The upgrade is being done node by node (each node corresponding to a different Upgrade Domain).
I added the client console application running on top, so you have a better visualization of what is happening for the client. Since we kept the application running, it continues calling the service using the node Service Fabric designed to respond (_Node_2).
Once the upgrade progress reaches the node that is currently processing our calls, Service Fabric automatically redirect us to a new node, which has been already updated. So now we get the latest version of the result (with the time added at the end). The upgrade process is going on realtime without the need for us to take down the service for deployment or have a maintenance window where no clients are able to call the service.
We also added the ability of logging each time a service is called. So in Visual Studio, go to Diagnostic Events window (you can open it from View menu > Other Windows> Diagnostic Events). If your client is still running, you will be able to see event logs stacking.
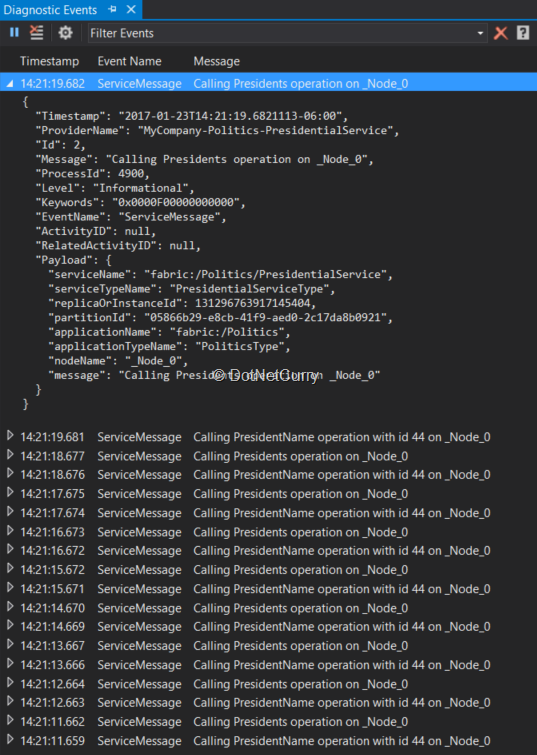
Conclusion
As you were able to see, Azure Service Fabric provides great tools for easily creating reliable and scalable WCF services and help us reducing the burden implied on the upgrade and maintenance process.
This article has been editorially reviewed by Suprotim Agarwal.
C# and .NET have been around for a very long time, but their constant growth means there’s always more to learn.
We at DotNetCurry are very excited to announce The Absolutely Awesome Book on C# and .NET. This is a 500 pages concise technical eBook available in PDF, ePub (iPad), and Mobi (Kindle).
Organized around concepts, this Book aims to provide a concise, yet solid foundation in C# and .NET, covering C# 6.0, C# 7.0 and .NET Core, with chapters on the latest .NET Core 3.0, .NET Standard and C# 8.0 (final release) too. Use these concepts to deepen your existing knowledge of C# and .NET, to have a solid grasp of the latest in C# and .NET OR to crack your next .NET Interview.
Click here to Explore the Table of Contents or Download Sample Chapters!
Was this article worth reading? Share it with fellow developers too. Thanks!
Software developer with over 15 years of experience in Web and Cloud development using Microsoft Technologies. Also enjoys working with other languages and platforms.