Windows Azure provides a high scalable and fault-tolerant environment that lets developers create powerful distributed applications without the overhead to maintain and configure hardware and operating systems. The Azure platform allows organization to deploy their applications which needs to be available 24X7X365 and accessible world-wide without any downtime. This platform facilitates storage like Blob, Table, and Queue etc. However when organizations want to store their application transactional data using a transactional persistent storage mechanism, then a database server is required.
To manage transactional data, Azure provides the SQL Azure service which allows developers to create Databases, Tables, Views and Stored procedures on the cloud. SQL Azure is a highly available and scalable cloud database service built on SQL Server technologies. For those who are comfortable using SQL Server Management studio, an integration with the SQL Azure portal is provided using which Database, Tables, Views, Stored Procedures can be created.
Apart from Database and its objects creation, developers can use their regular ADO.NET, ADO.NET EF coding styles to interact with these databases. So no additional learning curve is required.
Working with SQL Azure and Creating Database
Step 1: Visit the Azure Portal www.azure.com. You need to log-In using your ‘Windows Live Id’. For this purpose you should have a subscription. Once you log-in, you will see a screen similar to the one below:

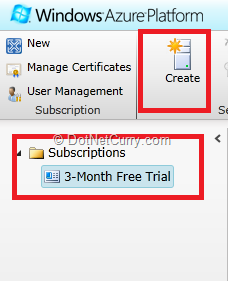
Click on Database and you will get a Page as shown below:

Step 2: Click on the Create icon

A database will be created in the Data Center, so the wizard will prompt you to enter the region where you want to create the database

Select the region as per your requirements and click on ‘Next’. You will be asked about the Database administration information. This is the Admin user used to create Database and its objects.

On clicking ‘Next’, you will asked the access rules. Here you need to specify the ‘IP Adddress’ ranges from which you can make call to the server, where the database is available. You need to make sure that the port ‘1433’ must be open to make call to SQL Database over the cloud from your SQL Server Management Studio or Visual Studio 2010 projects. Generally this IP address is from the line of your corporate network or it is of your machine. You also need to check the checkbox specifying that ‘Allow other Windows Azure Services to access this server’. This is for all other applications from your organization hosted on the Azure. The screen looks similar to the following

Specify the rule as shown below:

Once you enter the details and click on OK, the rule will be added.
Step 3: Go back to the SQL Azure portal. Now if you click on the ‘Refresh’ icon on the ribbon (not browser refresh), you will get the default master database as shown below:

To test the connectivity, click on the ‘Test Connectivity’ icon on the Ribbon:

This provide the Login Page where you need to enter your admin credentials

Once the login is successful, a SQL Administration page will be displayed as shown below:

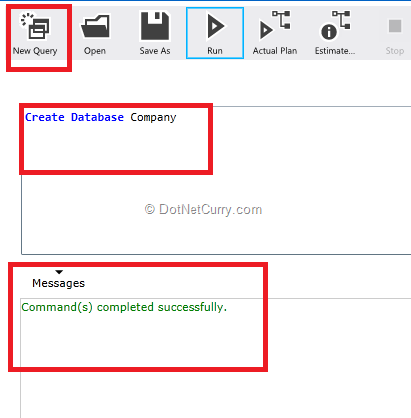
Step 4: To create a database, click on the ‘New Query’ icon. You will see two editor boxes where you can write commands to create Database. On clicking the ‘Run’ button, the command will be executed as below:

Go back to the SQL Azure portal page and click on the ‘Refresh’ icon on the Ribbon to see the database we just created

Once again go to the SQL Administration page and click on ‘Administration’. A Database summary is shown

Step 5: To design Table, click on the ‘Design’ on the Administration page, you will get Database Object Creation view for Tables, Views and Stored Procedures as below:

Click on ‘New Table’, as in the above figure. The Table Creation UI will appear

This is so user-friendly, ain’t it? Here you can specify the Column Name, its Data Type and constrains as shown below:

So the final Table Structure will be as shown below:

Now if you go back to the SQL Azure Page, you will find some database properties as shown below:

Now to write the client code from your .NET, VB, Java or a PHP based application, you require connection strings. So click on the (…) button next to ‘View’ as seen in the above figure. A list of connection strings will be displayed

You can also create Tables using Queries as shown below:

To create Stored Procedure, click on the Stored procedure and you get a nice Stored Procedure UI

Those were some basics about creating some tables on the cloud.
Connecting to Azure From the SQL Server 2008 R2 Management Studio
Step 1: Open SQL Server Management Studio and click on ‘Connect’ in the object Explorer. You need to enter the Database server and credentials information as shown below:

The object Explorer will show the List of Database objects

You can create databases, tables etc. using Management studio just like your usual Sql Server programming.
Using Sql Azure in the .NET client application
I mentioned in the beginning of this article that to consume the SQL Azure service, you need not to learn anything new, you can simply use traditional ADO.NET or ADO.NET EF programming principles. In this part of this article, we will see how to make use of ADO.NET EF to connect to SQL Azure.
Step 1: Open VS2010 and create a new ASP.NET application. In this application, add a new ADO.NET EF model. The wizard will prompt a screen where you need to create connection with the SQL Azure server as below:

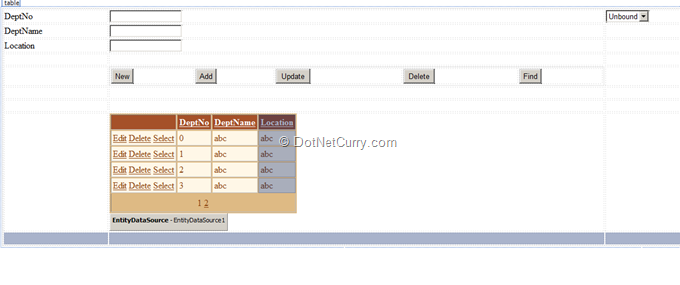
Step 2: Add a new Web Form in your ASP.NET Application and design it as shown below:

Step 3: Write the following code in button click event and in the seletedindexchanged event of the dropdownlist
public partial class Page_Sql_Azure_EF : System.Web.UI.Page
{
CompanyEntities objContext;
protected void Page_Load(object sender, EventArgs e)
{
objContext = new CompanyEntities();
if (IsPostBack == false)
{
LoadData();
}
}
protected void btnNew_Click(object sender, EventArgs e)
{
txtdno.Text = "";
txtdname.Text = "";
txtloc.Text = "";
}
/// <summary>
/// Method to Insert Record
/// </summary>
protected void btnAdd_Click(object sender, EventArgs e)
{
Department objDept = new Department();
objDept.DeptName = txtdname.Text;
objDept.Location = txtloc.Text;
objContext.AddToDepartments(objDept);
objContext.SaveChanges();
LoadData();
GetLastRecord();
}
/// <summary>
/// method to Update Record
/// </summary>
protected void btnUpdate_Click(object sender, EventArgs e)
{
var dept = Session["Department"] as Department;
var deptToupdate = objContext.Departments.First(d => d.DeptNo == dept.DeptNo);
deptToupdate.DeptName = txtdname.Text;
deptToupdate.Location = txtloc.Text;
objContext.SaveChanges();
}
/// <summary>
/// Method to delete Record
/// </summary>
protected void btndelete_Click(object sender, EventArgs e)
{
var dept = Session["Department"] as Department;
var deptToDelete = objContext.Departments.First(d => d.DeptNo == dept.DeptNo);
objContext.DeleteObject(deptToDelete);
objContext.SaveChanges();
}
/// <summary>
///Method to Search a specific Record
/// </summary>
protected void lstdno_SelectedIndexChanged(object sender, EventArgs e)
{
int dno = Convert.ToInt32(lstdno.SelectedValue);
var dept = objContext.Departments.First(d => d.DeptNo == dno);
txtdno.Text = dept.DeptNo.ToString() ;
txtdname.Text = dept.DeptName;
txtloc.Text = dept.Location;
Session["Department"] = dept;
}
/// <summary>
/// Helper method to Load data in the DropdownList
/// </summary>
void LoadData()
{
var Departments = objContext.Departments.ToList();
lstdno.DataSource = Departments;
lstdno.DataValueField = "DeptNo";
lstdno.DataTextField = "DeptName";
lstdno.DataBind();
}
/// <summary>
/// Helper method to read the last record (recently) added in the Department Table
/// </summary>
void GetLastRecord()
{
var Departments = objContext.Departments.ToList();
var dept = (from d in Departments
where(d.DeptNo == (Departments.Max(d1 => d1.DeptNo)))
select d).Single();
txtdno.Text = dept.DeptNo.ToString();
}
}
If you carefully observe the above code, you will not find any change from your regular .NET database programing. This is the regular code which we write for performing DB operations using ADO.NET EF. So one important thing I want to specify here is that just by changing the connection string in your config file to the SQL Azure database, you can connect to the cloud database without recompiling your application.
On the page, configure the GridView DataSource to EntityDataSource and browse the Page

Conclusion: SQL Azure provides a more reliable and manageable mechanism to maintain application data over the cloud which can be accessible from anywhere without any downtime.
This article has been editorially reviewed by Suprotim Agarwal.
C# and .NET have been around for a very long time, but their constant growth means there’s always more to learn.
We at DotNetCurry are very excited to announce The Absolutely Awesome Book on C# and .NET. This is a 500 pages concise technical eBook available in PDF, ePub (iPad), and Mobi (Kindle).
Organized around concepts, this Book aims to provide a concise, yet solid foundation in C# and .NET, covering C# 6.0, C# 7.0 and .NET Core, with chapters on the latest .NET Core 3.0, .NET Standard and C# 8.0 (final release) too. Use these concepts to deepen your existing knowledge of C# and .NET, to have a solid grasp of the latest in C# and .NET OR to crack your next .NET Interview.
Click here to Explore the Table of Contents or Download Sample Chapters!
Was this article worth reading? Share it with fellow developers too. Thanks!
Mahesh Sabnis is a DotNetCurry author and a Microsoft MVP having over two decades of experience in IT education and development. He is a Microsoft Certified Trainer (MCT) since 2005 and has conducted various Corporate Training programs for .NET Technologies (all versions), and Front-end technologies like Angular and React. Follow him on twitter @
maheshdotnet or connect with him on
LinkedIn