Hosting WCF Service on Windows Azure
Posted by: Mahesh Sabnis ,
on 7/6/2012,
in
Category Microsoft Azure
Abstract: In this article, we will see how to create a WCF service using Azure cloud template provided in VS 2010 and then host it in an Azure environment using Web Role.
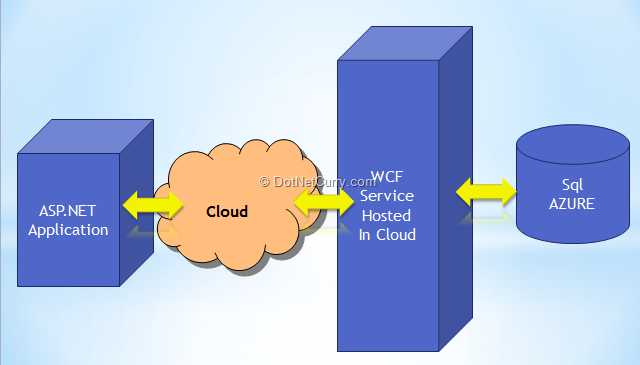
The Windows Azure platform provides an environment for developing scalable and highly available applications. Today we will look at a scenario where a multi-location company has a set of Web Services that are consumed by client applications in their various networks. This architecture is a good candidate for Azure deployment wherein the WCF service is hosted in the cloud and it communicates to SQL Azure for data.
In this article, we will see how to create a WCF service using cloud template provided in VS2010 and then host it in Cloud environment using the Web Role.
The following diagram represents the architecture of the application

The Web role handles external HTTP and HTTPS communications. This provides services like IIS 7.5 for hosting environment. This article also explains the capability of Visual Studio 2010 for publishing an application over cloud using the Publish wizard. Pre-requisite for publishing is a Azure subscription for the cloud deployment and service creation.
Creating WCF Service
Step 1: Open VS2010 and create a new Cloud project, name it as ‘WCF_Cloud_HostedService’.

Step 2: In this project, add a new WCF Service Web Role project as shown below and name it as WCF_DataService

Step 3: Rename IService1.cs to IService.cs and Service1.svc to Service.svc. For this application, I am using Company Database on Sql Azure and the EmployeeInfo table as shown below:

Now add a new ADO.NET Entity Data model in the WCF project, name it as CompanyEDMX. Complete the wizard by selecting the Sql Azure Server name, Company Database and the EmployeeInfo table. The Entity generated is as shown below:

Step 4: Add the following OperationContract in the ‘IService.cs’
using System.ServiceModel;
namespace WCF_DataService
{
[ServiceContract]
public interface IService
{
[OperationContract]
EmployeeInfo[] GetEmployees();
[OperationContract]
void CreateEmployee(EmployeeInfo obj);
[OperationContract]
void UpdateEmployee(int Id, EmployeeInfo obj);
[OperationContract]
void DeleteEmployee(int Id);
}
}
Change the implementation of the Service class as below:
using System.Linq;
namespace WCF_DataService
{
public class Service : IService
{
CompanyEntities objContext;
public Service()
{
objContext = new CompanyEntities();
}
public EmployeeInfo[] GetEmployees()
{
var Employees = objContext.EmployeeInfoes.ToArray();
return Employees;
}
public void CreateEmployee(EmployeeInfo obj)
{
objContext.AddToEmployeeInfoes(obj);
objContext.SaveChanges();
}
public void UpdateEmployee(int Id, EmployeeInfo obj)
{
var Employees = objContext.EmployeeInfoes.ToList();
var Employee = (from Emp in Employees
where Emp.ID == Id
select Emp).First();
Employee.Salary = obj.Salary;
Employee.DeptName = obj.DeptName;
Employee.Designation = obj.Designation;
objContext.SaveChanges();
}
public void DeleteEmployee(int Id)
{
var Employees = objContext.EmployeeInfoes.ToList();
var Employee = (from Emp in Employees
where Emp.ID == Id
select Emp).First();
objContext.DeleteObject(Employee);
objContext.SaveChanges();
}
}
}
Step 5: The ‘WCF_DataService.Azure’ web role project is set as the start project. To test this WCF service, press F5.

Note that the url is shown on the local machine with port 81.
Publishing the WCF Service on the Cloud
The publish feature provides a flexible and handy mechanism of deploying the application over the cloud. Before using this facility, you must have a Windows Azure Subscription, which you can get by visiting www.azure.com. Your credit card information will be required.
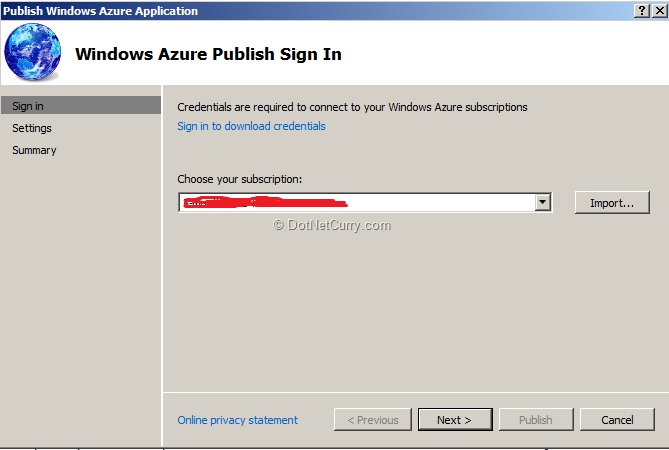
Step 1: Build the application, right-click on the ‘WCF_DataService.Azure’ and select ‘Publish’. The Azure Publish SignIn window will be displayed as seen here, where you need to select the subscription:

Clicking next will take you to the ‘Windows Azure Publish Settings’ window, where you need to set the following:
- Hosted Service: This is the repository for the application deployed on the cloud under the subscription.
- Environment: The environment for the application to be deployed, there are two values : Production and Staging.
- Build Configuration: This allows you to select whether the application is deployed under debug or release mode.
- Service Configuration: In any cloud Web role project, there exist Service Configuration files for ‘Cloud’ and ‘Local’. These are used to define configurations for application to deploy and use other services like Storage Service. For publishing over the cloud, you must select ‘Cloud’.
Now a window will display as shown below:

Since we need to created a Hosted service for the application to deploy, you will get the following window using which you can create the hosted service and select the Region for deployment, which allows to select Data Center for the application.

Enter the name and Location:

Click on ‘Ok’. The deploy process will start as shown below:

The Windows Azure Publish Settings windows is as follows:

Now once you click on the Publish buttonm, the publish activity starts and the progress can be seen in VS 2010 as shown below:

Now if you switch back to the Windows Azure portal, you will see the deployment progress:

After the deployment is successfully completed, VS 2010 will display the summary as shown below:

Now if you click on the Website URL (marked with Dark Yellow rectangle) or copy paste in the browser, the Service will be shown here: (Note: By default you will get Access Denied error, so change the URL by appending Service.svc to the URL in the Address bar.)

Now if you want to update a service and re-publish, you will be asked the following

The deployment will be replaced.
Now you can created a Client project like ASP.NET, ASP.NET MVC or WinForm and add the Service which can be tested just like an on-premise WCF service.
Conclusion: By using VS 2010 with Windows Azure tools installed, a developer can easily take a WCF application over to the cloud.
The entire source code of this article can be downloaded over here
This article has been editorially reviewed by Suprotim Agarwal.
C# and .NET have been around for a very long time, but their constant growth means there’s always more to learn.
We at DotNetCurry are very excited to announce The Absolutely Awesome Book on C# and .NET. This is a 500 pages concise technical eBook available in PDF, ePub (iPad), and Mobi (Kindle).
Organized around concepts, this Book aims to provide a concise, yet solid foundation in C# and .NET, covering C# 6.0, C# 7.0 and .NET Core, with chapters on the latest .NET Core 3.0, .NET Standard and C# 8.0 (final release) too. Use these concepts to deepen your existing knowledge of C# and .NET, to have a solid grasp of the latest in C# and .NET OR to crack your next .NET Interview.
Click here to Explore the Table of Contents or Download Sample Chapters!
Was this article worth reading? Share it with fellow developers too. Thanks!
Mahesh Sabnis is a DotNetCurry author and a Microsoft MVP having over two decades of experience in IT education and development. He is a Microsoft Certified Trainer (MCT) since 2005 and has conducted various Corporate Training programs for .NET Technologies (all versions), and Front-end technologies like Angular and React. Follow him on twitter @
maheshdotnet or connect with him on
LinkedIn