In this article, we will create the simple Tic-Tac-Toe game for Windows 8 and save the winner of the game in a Leader Board on Azure using Azure Mobile Services, also known as Zumo.
If you are subscribed to our free magazine you would have already gotten an introduction to Zumo by our friend Filip W. Unlike his sample where WebAPI was consuming the Mobile Services directly, we will use Azure Mobile Services client side SDK.
Let’s walk down the steps required.
Step 1: A valid Windows Azure subscription
You can use the 90 Day Azure trial subscription or at a minimum, a Pay-as-you-go subscription. Once you have a subscription, you have to activate the Mobile Services Preview.
Now here is something to be aware of, the Mobile Services Preview is free for most practical purposes but it needs a Database to function and there are no Database Preview options unless you are in the 90 day trial. Pay-as-you-go customers will incur a $5 per month charge at a minimum (check Azure for latest rates in your currency).
Step 2: Creating a new Zumo Service
Once your preview is activated, you will see a tab for it on your Azure Portal. You can either Click on the Create A New Mobile Service as seen below (the first time) or launch the ‘New’ dashboard from the bottom of the page by clicking on the (+) button.
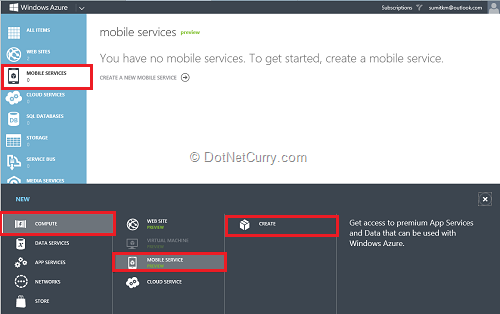
Specify the Mobile Service details as required
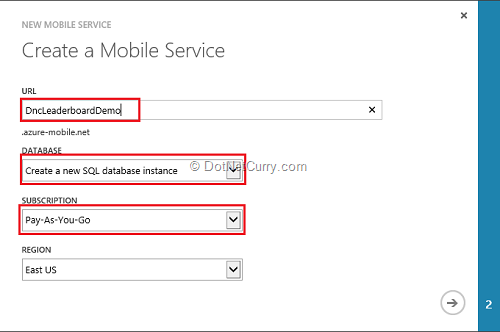
The URL you specify will be the subdomain of the public URL for the Mobile service. For example the above Service will have a URL http://dncleaderboarddemo.azure-mobile.net/ .
Notice the Database selection option. If you don’t have a database, then you’ll have to create a new one. 90 day trial users can select their 90 day trial Subscription.
Step 3: Setting up Database and its Administration (Only if creating new Database)
On Step 2 of the above wizard, you create a new Database, select an Admin account and password. The Password strength is critical. Read the requirements popup that kicks in once you start typing the password out.
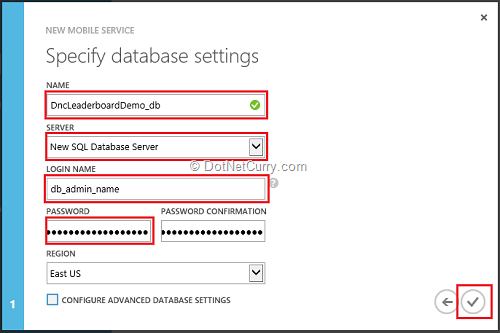
Once the DB is setup, click on the Check to finish the wizard and wait for the Service to be provisioned.

Step 5: Development Pre-requisites
Setting up the pre-requisites on your development machine. Once the Service has been provisioned, you will see a quick launch screen that will give you several options as shown below. As you can see, it allows you to even create a sample Windows 8 Store app and provision it for you. We won’t use this approach; instead we will create a Windows 8 Store app and link it to the Mobile Service.
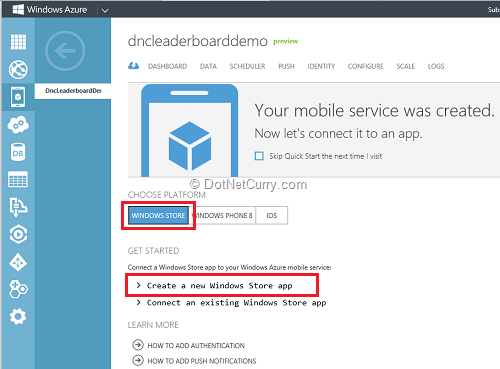
However if you are creating a Zumo client for the first time, click on the ‘Create a new Windows store App’ to expand it. From Step 1, click on the ‘Install Mobile Services SDK’ to download the SDK.

Save it and execute it to install the SDK. I am assuming you have some variant of Visual Studio already installed that lets you develop Windows 8 Store Apps. If not use the provided link to download and setup the Express edition.
Step 6: Setting up the Table for data storage
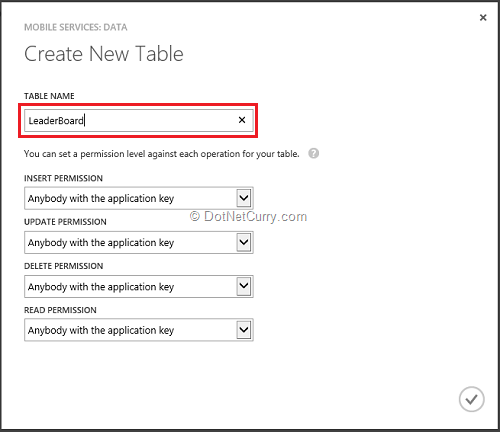
Click on the ‘Data’ tab for the current Mobile Service. It will show an empty list. Click on Create to add a new Table, give it the name ‘LeaderBoard’. As you can see in the image below, you can have multiple security options, for now we use the default that is ‘Anybody with the application key’.
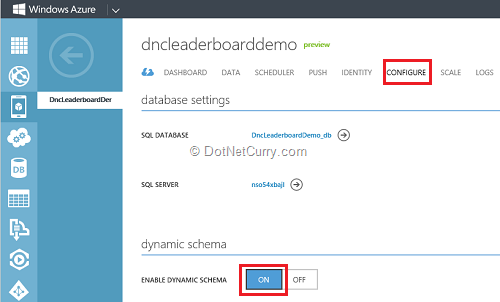
Make sure Dynamic Schema is enabled while development. To do this, go to the ‘Configure’ table and check the ‘Enable Dynamic schema’ setting. Make sure it is ‘ON’. This enables Zumo to update the schema if you change the model during development. Once development is completed, it’s recommended that you turn it ‘OFF’ for performance reasons.
Step 7: Extracting the Application Key
The Application Key will be required to submit data to your Azure Mobile Service site. To retrieve the key, navigate to the Service Dashboard or the home page and on the bottom tool bar click Manage Keys
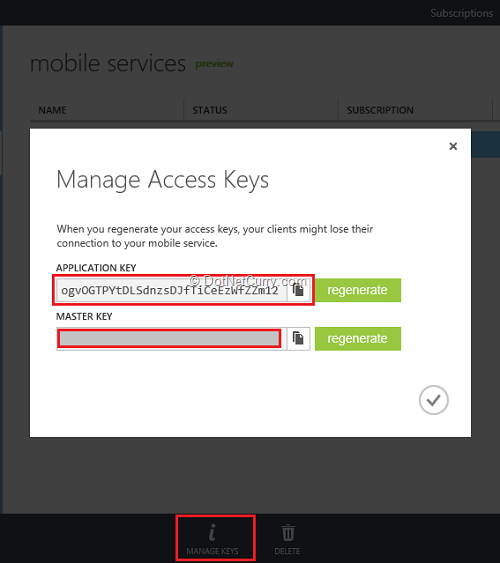
Copy the Application Key and save it on your dev machine somewhere. That concludes the Zumo Service setup. As you saw there was no code required as we setup a backend service.
Creating your Windows 8 Store Game
For this example, we create a super-simple game the ‘tic-tac-toe’ using C# and XAML. I will not delve into the code or the XAML for the game but instead will highlight the Zumo integration (if we can call it that).
The final app looks like this.
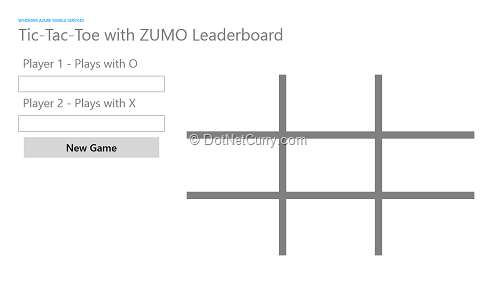
The idea being Player 1 and Player 2 have to provide their name to start playing. Once the game concludes in a Win/Loss or a Tie, the result will be stored in the Zumo backend. This will allow for querying the data to create leaderboards as required.
Steps to Integrate Zumo with a Windows 8 Store App
Step 1: The Windows 8 Application Template and additional References
You can start with a blank Windows 8 application template. From the ‘Add New References’ menu item, launch the references dialog and select ‘Windows->Extensions’ on the left hand side. From the list of References, select ‘Windows Azure Mobile Services Management Client’. This was added by the SDK installation earlier.

Step 2: Creating an Instance of Mobile Services Client
The Mobile Services Client is a managed wrapper to call Zumo via HTTP mostly. You need one Service Client per service you use in your app. In our case, there is only one service and we’ll create a static instance of it in the App.xaml.cs. The code is as follows. This is where you use the API key you had copied from the Zumo dashboard.
public static MobileServiceClient MobileService = new MobileServiceClient(
"https://dncleaderboarddemo.azure-mobile.net/",
"REPLACE_THIS_WITH_THE_APPLICATIPN_KEY_COPIED_IN_STEP_7_ABOVE"
);
Step 3: Defining the data structure to be saved
To save data to Zumo we use a very simple object of type LeaderBoard. Note the name is same as the TableName we setup on Zumo. LeaderBoard is defined as follows
public class LeaderBoard
{
public int Id { get; set; }
[DataMember(Name = "gameId")]
public string GameName { get; set; }
[DataMember(Name = "gameStatus")]
public int GameStatus { get; set; }
[DataMember(Name = "wonBy")]
public string WinnerName { get; set; }
[DataMember(Name = "player1")]
public string Player1 { get; set; }
[DataMember(Name = "player2")]
public string Player2 { get; set; }
}
As we can see, it is an overly simplistic de-normalized data that saves the name of the players, the winner, status, and a GameId which is a string representing the game assuming we will have more than one variant.
The data from Zumo is accessed as follows
private IMobileServiceTable<LeaderBoard> leaderboardTable = App.MobileService.GetTable<LeaderBoard>();
Step 4: Saving the data
Saving the data to Zumo is just a single call to the MobileServiceTable.
private async void InsertLeaderBoardItem(LeaderBoard leaderBoardItem)
{
await leaderboardTable.InsertAsync(leaderBoardItem);
}
That’s it, data is saved in Zumo. In our case, this method is called when the game completes in a win or draw case.
Step 5: Reading the data
You can use the MobileServiceTable to query the Zumo data. It doesn’t support all the Linq operators, but you can get by with some creative schema building. In this sample case, I just use bad ol’ Lists. I pickup up the ‘Wins’ registered by the current set of users and get their counts. You can get as creative as you want with your analytics.
private async void GetLeaderBoardItems()
{
IList<LeaderBoard> player1Wins = await leaderboardTable.Where(
winner => winner.WinnerName == player1Name.Text).ToListAsync();
IList<LeaderBoard> player2Wins = await leaderboardTable.Where(
winner => winner.WinnerName == player2Name.Text).ToListAsync();
leaderboard = new List<CurrentScore>();
leaderboard.Add(new CurrentScore
{
Name = (player1Wins.Count > player2Wins.Count? player1Name.Text:player2Name.Text),
Wins = (player1Wins.Count > player2Wins.Count? player1Wins.Count:player2Wins.Count)
});
leaderboard.Add(new CurrentScore
{
Name = (player1Wins.Count > player2Wins.Count ? player2Name.Text : player1Name.Text),
Wins = (player1Wins.Count > player2Wins.Count ? player2Wins.Count : player1Wins.Count)
});
ListItems.ItemsSource = leaderboard;
}
Step 6: The Game
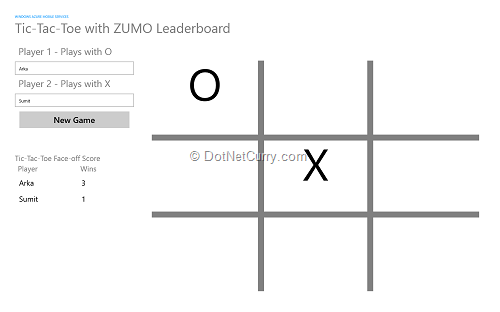
In this example, I’ve not used any best-practices like MVVM. The entire logic is in the code-behind of the MainPage.xaml.cs. The final game looks as follows, that shows my son handily beating me ;-)
Conclusion
Zumo is a super easy way to setup backend services for you mobile apps. Apart from storage, it also offers Security and Push notification capabilities that we will explore in the future.
The full code of the game is up on GitHub at https://github.com/dotnetcurry/zumo-and-tick-tac-toe-leaderboard
This article has been editorially reviewed by Suprotim Agarwal.
C# and .NET have been around for a very long time, but their constant growth means there’s always more to learn.
We at DotNetCurry are very excited to announce The Absolutely Awesome Book on C# and .NET. This is a 500 pages concise technical eBook available in PDF, ePub (iPad), and Mobi (Kindle).
Organized around concepts, this Book aims to provide a concise, yet solid foundation in C# and .NET, covering C# 6.0, C# 7.0 and .NET Core, with chapters on the latest .NET Core 3.0, .NET Standard and C# 8.0 (final release) too. Use these concepts to deepen your existing knowledge of C# and .NET, to have a solid grasp of the latest in C# and .NET OR to crack your next .NET Interview.
Click here to Explore the Table of Contents or Download Sample Chapters!
Was this article worth reading? Share it with fellow developers too. Thanks!
Sumit is a .NET consultant and has been working on Microsoft Technologies since his college days. He edits, he codes and he manages content when at work. C# is his first love, but he is often seen flirting with Java and Objective C. You can follow him on twitter at @
sumitkm or email him at sumitkm [at] gmail