Windows Azure has introduced a nice set of services on top of the Azure platform. These include the Mobile Services, the Service Bus, Media Services among a host of others.
Media Services primarily offers on demand streaming, variable bit rate or smooth streaming, encoding to various formats including smooth streaming and storage capabilities. Under, but under the covers, it uses Azure App Fabric for compute and Blob Storage for hosting data. Thus it’s a Platform as a Service(PaaS) offering additional capabilities over infrastructure provided Azure.
Today we’ll see how to leverage Media Services to build an ASP.NET MVC application that allows users to upload and encode their videos in a Web Portal and playback the content on demand.
The Application Architecture
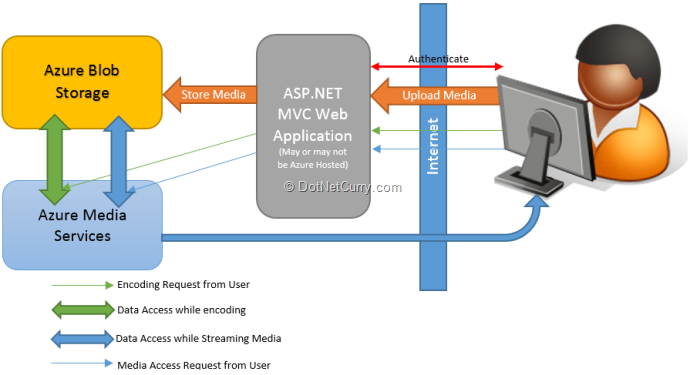
The diagram above gives us an overall view of how we can use Azure Media Services. The major steps involved are:
1. User logs into the ASP.NET MVC Web Application
2. Uploads their Video ‘assets’ to Azure Blob storage. The fact that it is going to Blob storage is transparent to the user, it’s a normal file upload for them.
3. Once uploaded, we can optionally encode the Video for smooth streaming.
4. Finally when the video (either smooth streaming version or the progressive download version) is requested by the user, it is streamed back to them.
5. On the client side, a Browser plugin is used to serve up the content.
With the basic premise out of the way, let’s get started with our application.
Setting up the ASP.NET MVC App and Pre-Requisites
Pre-Requisites – Setting up Azure Media Service
- We’ll need an active Azure account, if you don’t have one, you can avail a 90 day free trial at http://www.windowsazure.com. Keep an eye out for outgoing data and encoding charges if used.
- Login to the Azure Management Portal and click on the [+ New] button in the bottom toolbar and add a new Media Service by navigating as follows
App Service > Media Service > Quick Create
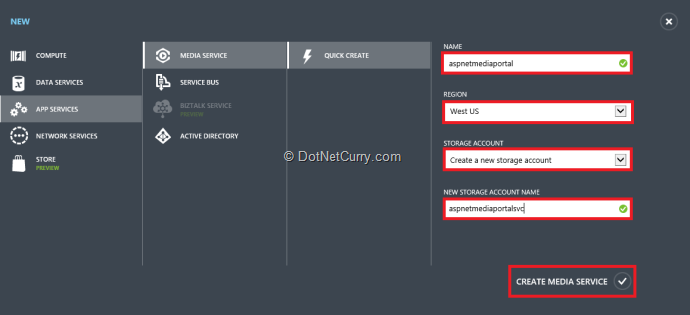
- In the Quick Create panel, provide the Name of your media service, the Region where you want it to be hosted and the Azure Storage account to use. If you don’t have a Storage Account already, you’ve to create a new one, else you can pick one of your existing Storage Accounts.
- Finally click on the ‘Create Media Service’ button to initiate service creation. Once the service is created, we’ll see a new Media Service and new Storage Service (if you opted for a new one) created.

Note: I am using an existing media service and storage account hence the names are different from the ‘Create New’ panel.
- Final step is to obtain the Service Keys. Click on the Media Service from the ‘All Items’ list.
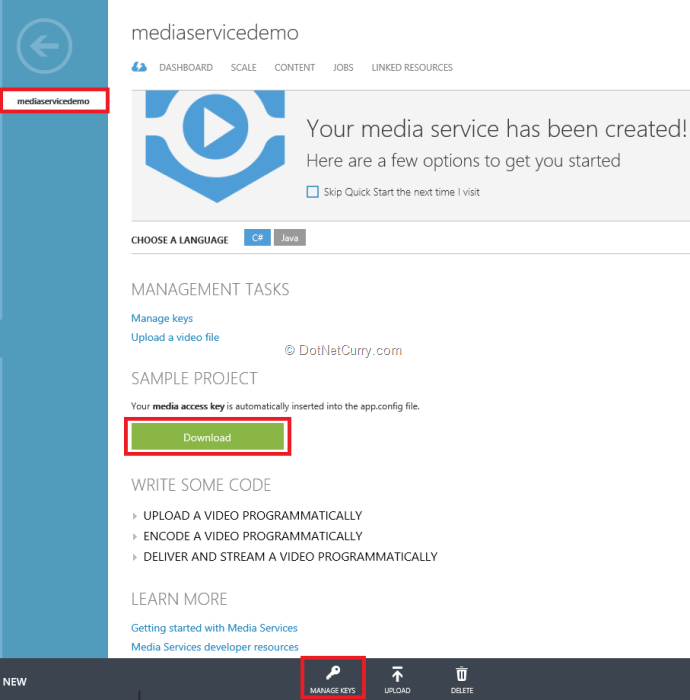
Here you have multiple options to retrieve the Keys, you can download the sample project or click on the Manage Keys button to just view the keys.

Note, the keys and save them securely for easy access later in the app. We are now set on the Azure side. Let’s setup our MVC Application.
Setting up the MVC Application – Dependencies and Model design
Project Setup and Dependencies
To setup the application, we start off with the ASP.NET MVC 4 template and use the ‘Internet’ project type. This gives us the forms authentication module out of the box. Once the project is setup, we add the following Nuget package for the media services dependencies
PM> install-package WindowsAzure.MediaServices
This installs all packages necessary to use Azure Media Services APIs
Model Design
Our data model will be simple for this example. We’ll save the UserId, Title, FileUrl and a Boolean indicating if the file is visible to others, for every media asset uploaded.
public class MediaElement
{
public int Id { get; set; }
public string UserId { get; set; }
public string Title { get; set; }
public string AssetId { get; set; }
public bool IsPublic { get; set; }
}
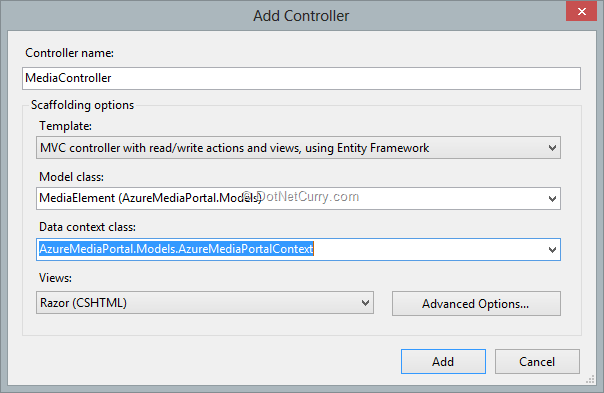
We’ll generate the CRUD pages using the default ASP.NET MVC Scaffolding as follows
- Build the application
- Right click on Controller folder and select ‘Add’ > ’New Controller’
- Update the Template to use Entity Framework and the Model to use the MediaElement entity. Provide a new Data Context Class name and click Add to complete the codegen.
Updating Controller to use Authorization
Once the code is generated open the MediaController class add the Authorize attribute so that all actions can executed only when a user is logged in.
[Authorize]
public class MediaController : Controller
{
…
}
Updating Home Page to include My Media tab
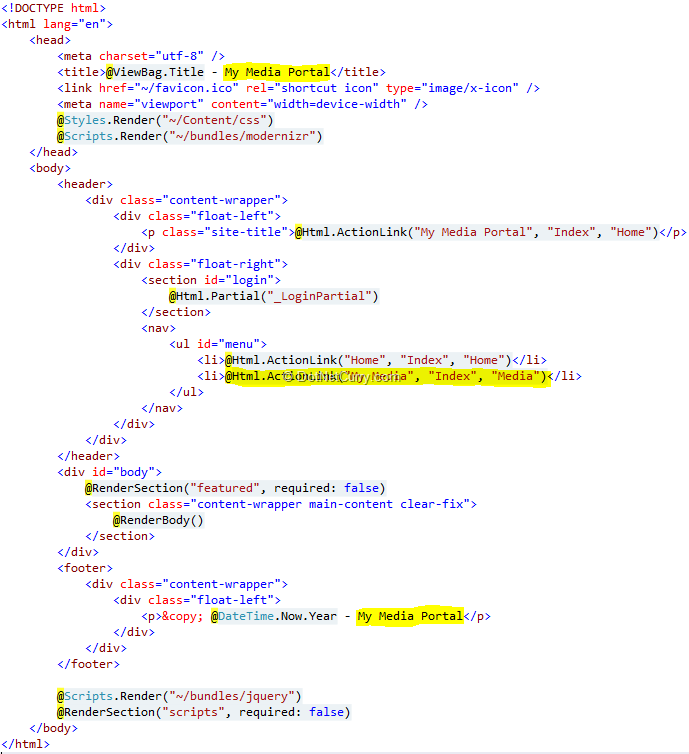
Open the _Layout.cshtml file and add an Action Link to navigate to the Media Browser
<li>@Html.ActionLink("My Media", "Index", "Media")</li>
You can also update the Title, remove the About and Contact links etc.
Update the Index.html for the Home Controller (the landing page) by replacing the generic markup with something indicating that we have a ‘super special’ Media hosting Application.
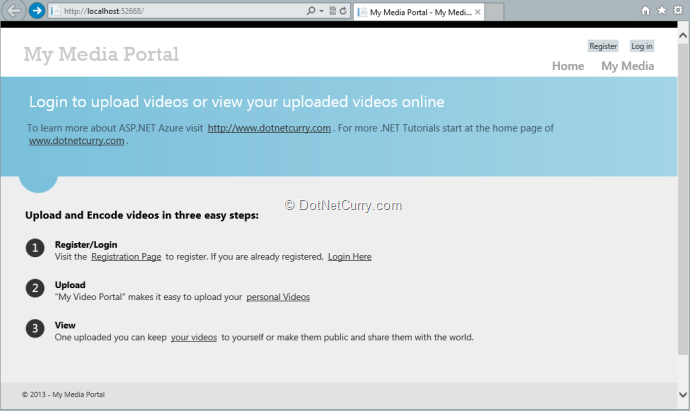
This wraps up the basics, let’s dive in and see how we can implement the Media management part.
Integrating Media Services
Uploading Media files in chunks
As per our architecture diagram, user login has been implemented thanks to ASP.NET project template. Next thing to implement is the uploading of Media.
Media files, especially video files, can be large, spanning hundreds of MBs. As a result, it is not possible to upload these files in one go due to limitation of Request size imposed by IIS. So we will upload the media files in chunks. The topic of uploading files in chunk has been discussed in details in our article Uploading Big files to Azure Storage from ASP.NET MVC. I will use the same technique, so I won’t be reproducing the code here. If you are new to Azure Cloud Storage, I suggest you go through the previous article.
Adding an Upload Client
We will modify the default Application flow by changing the ‘Create’ link to ‘Upload’ in the Index.cshtml and navigating to a New page called Upload.
<p>
@Html.ActionLink("Upload New Media", "Upload")
</p>
Views/Media/Index.cshtml
[HttpGet]
public ActionResult Upload()
{
return View();
}
Controllers/MediaController.cs
@{
ViewBag.Title = "Upload";
}
<h2>Upload New Media</h2>
@using (Html.BeginForm())
{
<fieldset>
<legend>Media Element</legend>
<div class="editor-label">
Select Media File to Upload:
</div>
<div class="editor-field">
<input type="file" id="selectFile" value=" " />
<input type="button" id="fileUpload" value="Upload" />
</div>
<div id="progressBar" style="width: 50%; height: 20px; background-color: grey"></div>
<br />
<label id="statusMessage"></label>
</fieldset>
}
<div>
@Html.ActionLink("Back to List", "Index")
</div>
@section Scripts {
<script src="~/Scripts/media-upload.js"></script>
@Scripts.Render("~/bundles/jqueryui")
@Scripts.Render("~/bundles/jqueryval")
}
Views/Media/Upload.cshtml
Add a JavaScript file media-upload.js and copy the script over from the Chunked Upload sample. Ensure the POST is going to the correct URL i.e. /Media/SetMetaData and /Media/UploadChunk.
Add reference to this script in the Upload.cshtml (as shown above). For the progress bar to show up properly, update the _Layout.cshtml to add the following css bundle
@Styles.Render("~/Content/themes/base/css")
Creating the Blob Storage Connection String
Before we continue we need to build the Blob Storage’s connection string. This is easy once you know the format:
DefaultEndpointsProtocol=<connectionType>;AccountName=<blobStorageAccountName>;AccountKey=<blobStorageAccessKey>
1. ConnectionType is either http or https
2. AccountName is the name of the storage account associated with your Media Service. You can go to your Azure Portal, Select Media Services (1) tab on the left, go to Linked Resources tab (2) and pick the name of the Storage account (3)
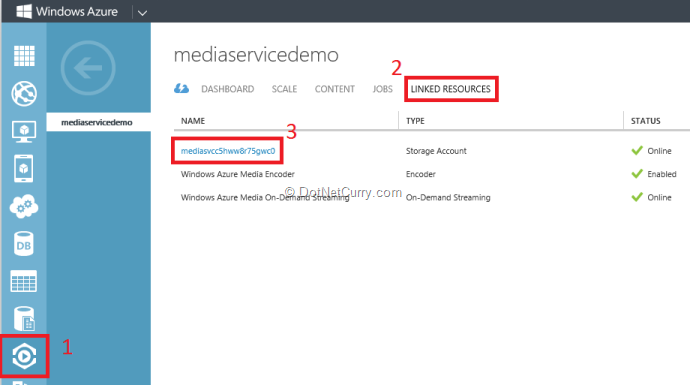
3. Account Key: In the above screen, click on the Storage account name to navigate to Storage Dashboard, from the bottom toolbar, click on ‘Manage Keys’ button to bring up the Key’s dialog, Copy the Primary Access Key.

4. Now that we have got all the three components, add a key to the Web.config’s appSettings section.
<add key="StorageConnectionString" value="DefaultEndpointsProtocol=https;AccountName=mediasvcc5hww8r75gwc0;
AccountKey=o+oXVH9PEVQ3AFC6xWBQHL9diuJ7jecU10oaGyw5wRhMbdLlA9f+lfoeGOsXgYQyaxrgFq8SFSj6nfFJa96cnA==" />
Finishing off the Upload functionality
Now that we’ve got the Storage connection string, add the following keys as well
<add key="StorageContainerReference" value ="temporary-media" />
<add key="MediaAccountName" value="mediaservicedemo"/>
<add key="MediaAccountKey" value="hSpRS8OJuhJIktmSX9HhAeZKD+paOt05W+uSZC6Y2W8=" />
The StorageContainerReference is name of the temporary container to which media will be uploaded. The MediaAccountName is the name of the MediaService that we gave when we created the Service
MediaAccountKey is the access key, you can go to the Media dashboard and use the Manage Keys button like you did from the Storage dashboard, to copy the MediaAccountKey.
Next we add the SetMetadata, UploadCurrentChunk and CommitAllChunks methods into our MediaController.cs. Wherever we are Update the configuration strings appropriately.
If you run the app and try to upload a file, it will get uploaded to the temporary-media storage container. However our work isn’t done yet. We’ve simply uploaded it to blob storage, our Media service still doesn’t know about the video and can’t serve it up, or encode it. Add the following method in the MediaController and add call it from CommitChunks method:
private void CreateMediaAsset(CloudFile model)
{
…
}
This code fetches the media in the blob storage and create a new MediaService Asset out of it and copies it to a container controlled by Media Services. I have broken down the code for the above method in the following steps:
Step 1: Retrieve account keys and names
string mediaAccountName = ConfigurationManager.AppSettings["MediaAccountName"];
string mediaAccountKey = ConfigurationManager.AppSettings["MediaAccountKey"];
string storageAccountName = ConfigurationManager.AppSettings["StorageAccountName"];
string storageAccountKey = ConfigurationManager.AppSettings["StorageAccountKey"];
Step 2: Create the media service context.
CloudMediaContext context = new CloudMediaContext(MediaServicesAccountName,
MediaServicesAccountKey);
Step 3: Create instance of the CloudStorageAccount, this is the storage account associated with the Media Service.
CloudStorageAccount storageAccount = new CloudStorageAccount(new
StorageCredentials(MediaServicesStorageAccountName, MediaServicesStorageAccountKey),
true);
Step 4: Create a Storage Client instance from where we need to copy the file
var cloudBlobClient = storageAccount.CreateCloudBlobClient();
var mediaBlobContainer = cloudBlobClient.GetContainerReference(cloudBlobClient.BaseUri + "temporary-media");
mediaBlobContainer.CreateIfNotExists();
Step 5: Create a new Media Asset and a Write Policy.
IAsset asset = context.Assets.Create("NewAsset_" + Guid.NewGuid(),
AssetCreationOptions.None);
IAccessPolicy writePolicy = context.AccessPolicies.Create("writePolicy",
TimeSpan.FromMinutes(120), AccessPermissions.Write);
Step 6: Create a Destination Location in the Media Service and get the blob handle of the destination file (blob).
ILocator destinationLocator = context.Locators.CreateLocator(LocatorType.Sas, asset,
writePolicy);
// Get the asset container URI and copy blobs from mediaContainer to assetContainer.
Uri uploadUri = new Uri(destinationLocator.Path);
string assetContainerName = uploadUri.Segments[1];
CloudBlobContainer assetContainer =
cloudBlobClient.GetContainerReference(assetContainerName);
Step 7: Get Blob handle of the Source File
string fileName =
HttpUtility.UrlDecode(Path.GetFileName(model.BlockBlob.Uri.AbsoluteUri));
var sourceCloudBlob = mediaBlobContainer.GetBlockBlobReference(fileName);
sourceCloudBlob.FetchAttributes();
Step 8: Check for rudimentary properties to ensure the source file is valid and then create the file in the designation. Initiate copy from Blob.
Note: This is actually a job and takes a few seconds to reflect on the server if you are hitting refresh continuously.
if (sourceCloudBlob.Properties.Length > 0)
{
IAssetFile assetFile = asset.AssetFiles.Create(fileName);
var destinationBlob = assetContainer.GetBlockBlobReference(fileName);
destinationBlob.DeleteIfExists();
destinationBlob.StartCopyFromBlob(sourceCloudBlob);
destinationBlob.FetchAttributes();
if (sourceCloudBlob.Properties.Length != destinationBlob.Properties.Length)
Console.WriteLine("Failed to copy");
}
Step 9: Once the copy is done delete the destination locator and the write policy.
destinationLocator.Delete();
writePolicy.Delete();
Step 10: Refresh the asset by retrieving it from the context
asset = context.Assets.Where(a => a.Id == asset.Id).FirstOrDefault();
var ismAssetFiles = asset.AssetFiles.ToList()
. Where(f => f.Name.EndsWith(".mp4", StringComparison.OrdinalIgnoreCase))
.ToArray();
if (ismAssetFiles.Count() != 1)
throw new ArgumentException("The asset should have only one, .mp4 file");
ismAssetFiles.First().IsPrimary = true;
ismAssetFiles.First().Update();
model.UploadStatusMessage += " Created Media Asset '" + asset.Name + "' successfully.";
model.AssetId = asset.Id;
}
Next we save the new MediaElement details for the current User.
Saving the Media Element
Once we know that the file has been saved to the Media Service, we can save the Title and Asset details to the database. To do this, we first update the CommitAllChunks method to send back the AssetId in the Json that we were returning.
return Json(new
{
error = errorInOperation,
isLastBlock = model.IsUploadCompleted,
message = model.UploadStatusMessage,
assetId = model.AssetId
});
Next we update the Update.cshtml to add a panel with the Title and Save button. This panel becomes visible once the Upload is complete and file saved to the Media Service.
<div id="detailsPanel">
<input type="hidden" id="assetId" />
<label id="statusMessage"></label>
<br />
<div>
Title <input type="text" id="title" />
</div>
<button id="saveDetails">Save</button>
</div>
To toggle it’s visibility, we update the media-upload.js to hide it on document load and show it once the last chunk upload has returned successfully.
Next we add a Save method to the media-upload.js to post the AssetId and Title.
var saveDetails = function ()
{
var dataPost = {
"Title": $("#title").val(),
"AssetId": $("#assetId").val()
}
$.ajax({
type: "POST",
async: false,
contentType: "application/json",
data: JSON.stringify(dataPost),
url: "/Media/Save"
}).done(function (state)
{
if (state.Saved == true)
{
displayStatusMessage("Saved Successfully");
$("#detailsPanel").hide();
}
else
{
displayStatusMessage("Saved Failed");
}
});
}
This posts the data to a Save action method in our MediaController. We don’t have a Save method so far, so we add one to save the data to the database as follows:
[HttpPost]
public JsonResult Save(MediaElement mediaelement)
{
try
{
mediaelement.UserId = User.Identity.Name;
mediaelement.FileUrl = GetStreamingUrl(mediaelement.AssetId);
db.MediaElements.Add(mediaelement);
db.SaveChanges();
return Json(new { Saved = true, StreamingUrl = mediaelement.FileUrl});
}
catch (Exception ex)
{
return Json(new { Saved = false });
}
}
Before we save the Data to the Server, we call the GetStreamingUrl method. This method does the equivalent of ‘Publishing’ data from the Web Portal. It creates an access policy that’s valid for a year and generates an appropriate URL for the uploaded media.
private string GetStreamingUrl(string assetId)
{
CloudMediaContext context = new
CloudMediaContext(ConfigurationManager.AppSettings["MediaAccountName"],
ConfigurationManager.AppSettings["MediaAccountKey"]);
var streamingAssetId = assetId; // "YOUR ASSET ID";
var daysForWhichStreamingUrlIsActive = 365;
var streamingAsset = context.Assets.Where(a => a.Id ==
streamingAssetId).FirstOrDefault();
IAccessPolicy accessPolicy = context.AccessPolicies.Create(streamingAsset.Name,
TimeSpan.FromDays(daysForWhichStreamingUrlIsActive),
AccessPermissions.Read | AccessPermissions.List);
string streamingUrl = string.Empty;
var assetFiles = streamingAsset.AssetFiles.ToList();
var streamingAssetFile = assetFiles.Where(f => f.Name.ToLower().EndsWith("m3u8-aapl.ism")).FirstOrDefault();
if (streamingAssetFile != null)
{
var locator = context.Locators.CreateLocator(LocatorType.OnDemandOrigin,
streamingAsset, accessPolicy);
Uri hlsUri = new Uri(locator.Path + streamingAssetFile.Name + "/manifest(format=m3u8-
aapl)");
streamingUrl = hlsUri.ToString();
}
streamingAssetFile = assetFiles.Where(f =>
f.Name.ToLower().EndsWith(".ism")).FirstOrDefault();
if (string.IsNullOrEmpty(streamingUrl) && streamingAssetFile != null)
{
var locator = context.Locators.CreateLocator(LocatorType.OnDemandOrigin,
streamingAsset, accessPolicy);
Uri smoothUri = new Uri(locator.Path + streamingAssetFile.Name + "/manifest");
streamingUrl = smoothUri.ToString();
}
streamingAssetFile = assetFiles.Where(f =>
f.Name.ToLower().EndsWith(".mp4")).FirstOrDefault();
if (string.IsNullOrEmpty(streamingUrl) && streamingAssetFile != null)
{
var locator = context.Locators.CreateLocator(LocatorType.Sas, streamingAsset,
accessPolicy);
var mp4Uri = new UriBuilder(locator.Path);
mp4Uri.Path += "/" + streamingAssetFile.Name;
streamingUrl = mp4Uri.ToString();
}
return streamingUrl;
}
With that we have all the data we need to keep track of files uploaded by each user. Next up the media player.
Playing uploaded Media in Browser
We will leverage the excellent Player Framework project from Microsoft Media Service team. This is an OSS project on Codeplex and provides a set of clients to serve up Media along with other features like Playlist, Ad insertion and so on.
You have a variety of clients to choose, on the Web you can use HTML5 player and/or the Silverlight player. Today we’ll use the HTML5 player only.
Step 1: Download the Player Framework for HTML5 client from here. This consists of the playerframework.js and the playerframework.css both in their minified form.
Step 2: Add the style reference to _Layout.css (Bundle it as a best practice).
Step 3: Add a new JavaScript file media-player.js. It has only one function, that is to initialize the player framework client and depends on playerframework.js.
var mediaPlayer =
{
initFunction : function (window, sourceUrl)
{
var myPlayer = new PlayerFramework.Player(window,
{
mediaPluginFallbackOrder: ["VideoElementMediaPlugin", "SilverlightMediaPlugin"],
width: "480px",
height: "320px",
sources:
[
{
src: sourceUrl,
type: 'video/mp4;'
}
]
});
}
}
Step 4: Adding the player in the ‘Edit’ page (Edit.cshtml). Update the markup to hide the UserId, AssetId and FileUrl. These are not directly updatable by the user.
@Html.HiddenFor(model => model.Id)
@Html.HiddenFor(model => model.AssetId)
@Html.HiddenFor(model => model.FileUrl, new { id = "fileUrl" })
@Html.HiddenFor(model => model.UserId)
Step 5: Add a <div> that will serve as the container and then use the media-player script to tie the div to the PlayerFramework client. The FileUrl value is passed to the videoPlayer as well.
<div id="videoPlayer">
</div>
<div>
@Html.ActionLink("Back to List", "Index")
</div>
@section Scripts {
<script src="~/Scripts/playerframework.min.js"></script>
<script src="~/Scripts/media-player.js"></script>
@Scripts.Render("~/bundles/jqueryval")
<script type="text/javascript">
mediaPlayer.initFunction("videoPlayer", $("#fileUrl").val());
</script>
}
That’s all that needs to be done to play the video.
Step 6: We can cleanup the Index.cshtml as well to show the Title and Delete options only, with the Title hyperlinked to the Edit page.
@model IEnumerable<AzureMediaPortal.Models.MediaElement>
@{
ViewBag.Title = "My Media Index";
}
<h2>My Media Index</h2>
<p>
@Html.ActionLink("Upload New Media", "Upload")
</p>
<table>
<tr>
<th>
@Html.DisplayNameFor(model => model.Title)
</th>
<th>
@Html.DisplayNameFor(model => model.IsPublic)
</th>
<th></th>
</tr>
@foreach (var item in Model) {
<tr>
<td>
@Html.ActionLink(@item.Title, "Edit", new { id=item.Id })
</td>
<td>
@Html.DisplayFor(modelItem => item.IsPublic)
</td>
<td>
@Html.ActionLink("Delete", "Delete", new { id=item.Id })
</td>
</tr>
}
</table>
Deleting Media
Finally we’ll update the Delete method in the controller to delete Assets from server as well. To do this, we again use the AssetId to create a context and delete the asset. Once the asset is deleted we delete the record from our database as well.
private void DeleteMedia(string assetId)
{
string mediaAccountName = ConfigurationManager.AppSettings["MediaAccountName"];
string mediaAccountKey = ConfigurationManager.AppSettings["MediaAccountKey"];
CloudMediaContext context = new CloudMediaContext(mediaAccountName, mediaAccountKey);
var streamingAsset = context.Assets.Where(a => a.Id == assetId).FirstOrDefault();
if (streamingAsset != null)
{
streamingAsset.Delete();
}
}
[HttpPost, ActionName("Delete")]
[ValidateAntiForgeryToken]
public ActionResult DeleteConfirmed(int id)
{
MediaElement mediaelement = db.MediaElements.Find(id);
DeleteMedia(mediaelement.AssetId);
db.MediaElements.Remove(mediaelement);
db.SaveChanges();
return RedirectToAction("Index");
}
With that we are ready to run our app, Demo Time!
Demo – Our personal Media Portal
Step 1: Run the application, Register yourself the first time and Login.
Step 2: Navigate to the My Media page and click on Upload New Media
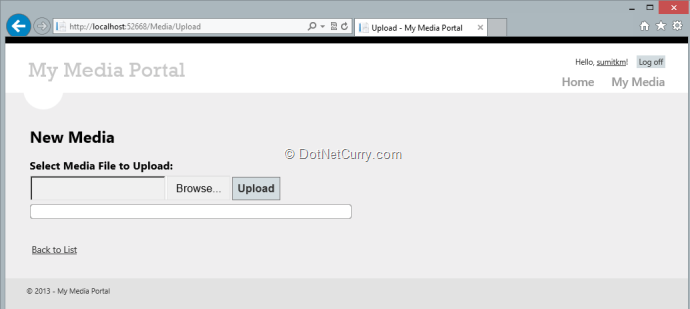
Step 3: Browse and select a media file (only mp4 for this sample). Click upload to begin upload. You’ll notice the upload button gets hidden as the progress shows progress.
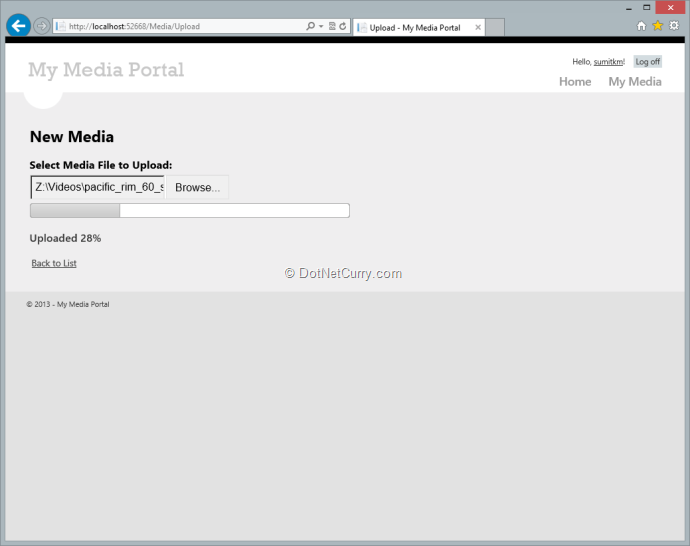
Step 4: After the file is uploaded 100%, you’ll notice a pause as the media is registered with Media Service and AssetID obtained.

Step 5: Once Media is registered with Media Service, you’ll see a Save button and an Input box to Save the Title for the uploaded file. Provide the title and hit Save. Once save completes, you will see a Video panel and be able to preview the uploaded video. Click on ‘Back to List’ to go back to the Index page.
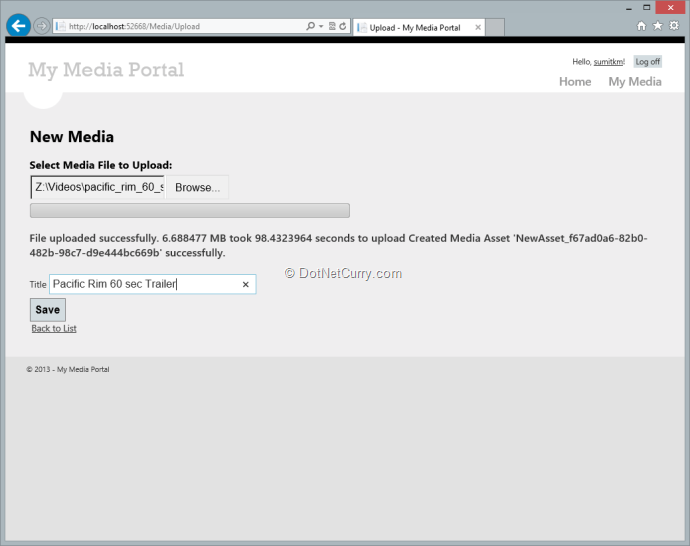
Step 6: After saving you can navigate back to the index page.
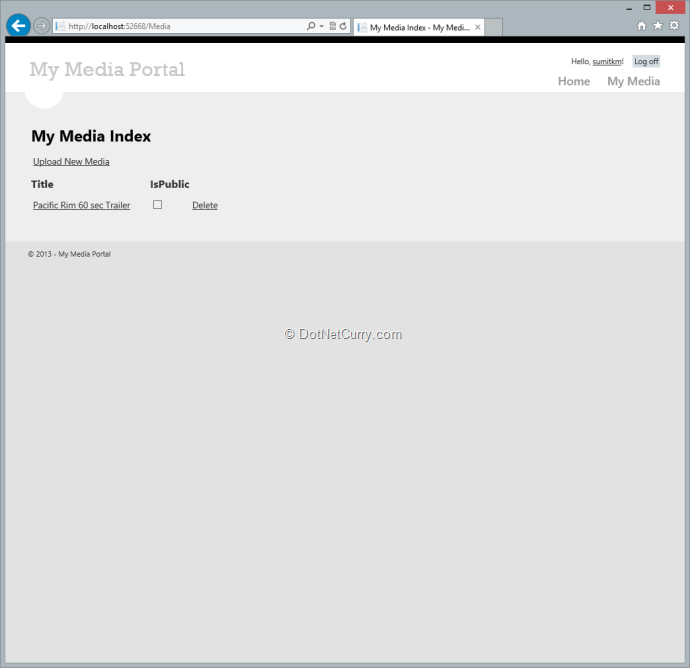
Step 7: From the index page, you can click on the title to navigate to the Edit page.
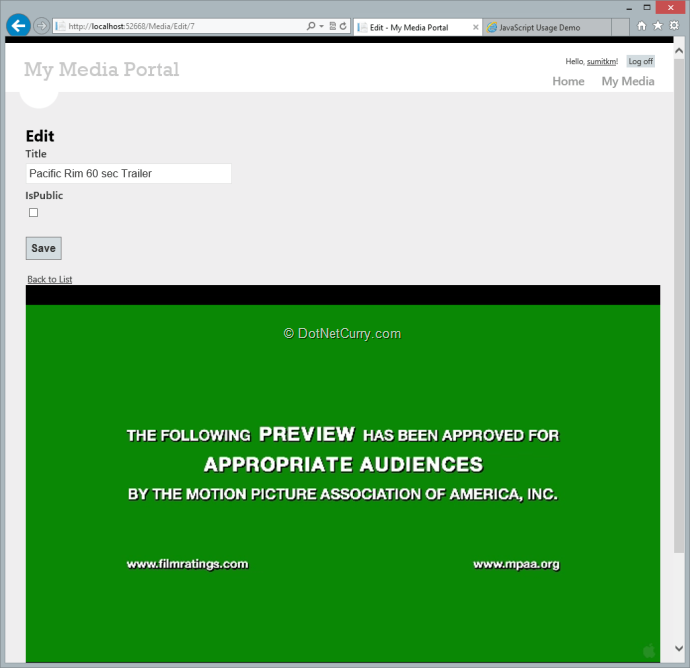
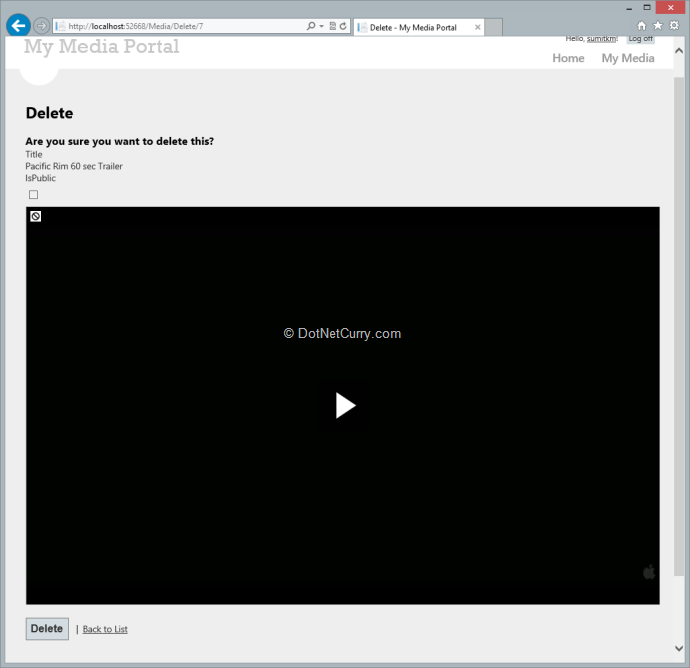
Step 8: Here you can view the media asset as well as change the Title if you want. Save will navigate back to the Index page, from which we can go to the delete page to Delete the asset if no longer required.
More stuff TODO
So far we have seen how to upload asset to Azure Storage and move it to Media service, then generate policies and access the media over a web client (for Modern browsers only, tested in IE10).
We have not tried out encoding to various formats, this we will try in a future article.
Conclusion
The Windows Azure Media Services along with the Player Framework provide us with a big leg up while building Media oriented services. Today we saw how we could build our personal video library with not-too-much effort.
Download the entire source code of this article (Github)
This article has been editorially reviewed by Suprotim Agarwal.
C# and .NET have been around for a very long time, but their constant growth means there’s always more to learn.
We at DotNetCurry are very excited to announce The Absolutely Awesome Book on C# and .NET. This is a 500 pages concise technical eBook available in PDF, ePub (iPad), and Mobi (Kindle).
Organized around concepts, this Book aims to provide a concise, yet solid foundation in C# and .NET, covering C# 6.0, C# 7.0 and .NET Core, with chapters on the latest .NET Core 3.0, .NET Standard and C# 8.0 (final release) too. Use these concepts to deepen your existing knowledge of C# and .NET, to have a solid grasp of the latest in C# and .NET OR to crack your next .NET Interview.
Click here to Explore the Table of Contents or Download Sample Chapters!
Was this article worth reading? Share it with fellow developers too. Thanks!
Sumit is a .NET consultant and has been working on Microsoft Technologies since his college days. He edits, he codes and he manages content when at work. C# is his first love, but he is often seen flirting with Java and Objective C. You can follow him on twitter at @
sumitkm or email him at sumitkm [at] gmail