Using Microsoft Web API from a Windows and WinRT Client Application
Posted by: Sumit Maitra ,
on 3/6/2012,
in
Category Windows Store Apps
Abstract: In this post, we will see how we can create a Windows and WinRT application that connects to Web APIs released with ASP.NET MVC 4 and can retrieve and submit information.
Recently I posted on how the new Web API framework released with MVC4 Beta was designed to enable services over plain HTTP using HTTP verbs. So any Web API we create and expose for our application, is easily accessible from any client that can do an HTTP Post.
In this post, we will see how we can create a Windows and WinRT application that connects to the Web APIs we exposed in our previous post and can retrieve and submit information.
Quick Recap
We have a (Blogging) application that has one Entity BlogPost. It’s built on MVC4 and uses a Repository to do serialization and deserialization. I used the standard Razor views and MVC Controllers for view and routing.
Now this app has become a runaway success and everyone wants to access it and create various clients for it.
We were already aware of our impending success, so we exposed our Get (to get all blog posts), Put (to update blog posts) and Post (to create new blog posts) using methods on the DevController using Web API. This means on the server side we have no more work to do other than telling people that they have to use the following url.
http://<ourbloglocation>/api/dev
Note: To run this example successfully, download the MVC4 app and have it running in the background.
Building a Client Application for Web API
Given the above URL, we will now put ourselves in the shoes of the developers who want to build a client application. What other information do they need?
If we hit the above URL, IE will try to download a file. If you save the file and open it in a text editor, you will see the following

As we see, we have a JSON string that represents an array with two objects. Each object has three keys Id, Post and Title. With this information at hand, let’s try to build a client application that can retrieve the posts, update them and add new ones.
A WinForms Client Application
Let’s quickly build a WinForms application that will connect to our Web API service.
Step 1: Start a new WinForms project
Step 2: Add a new Folder called ViewModel and add a class ViewPost.cs. This will be the class that encapsulates the data on the client side. It has three properties named according to the JSON object above.

Step 3: Add reference to the following dlls, all of which are installed as a part of the MVC4 Beta installation.
- System.Json
- System.Net.Http
- System.Net.Http.Formatting
Step 4: To the default Form1.cs add a Label, a TextBox, a Button, a DataGridView, a MenuStrip and a Timer. The layout looks as follows

Step 5: Assign a click handler for the button and add the following code to it

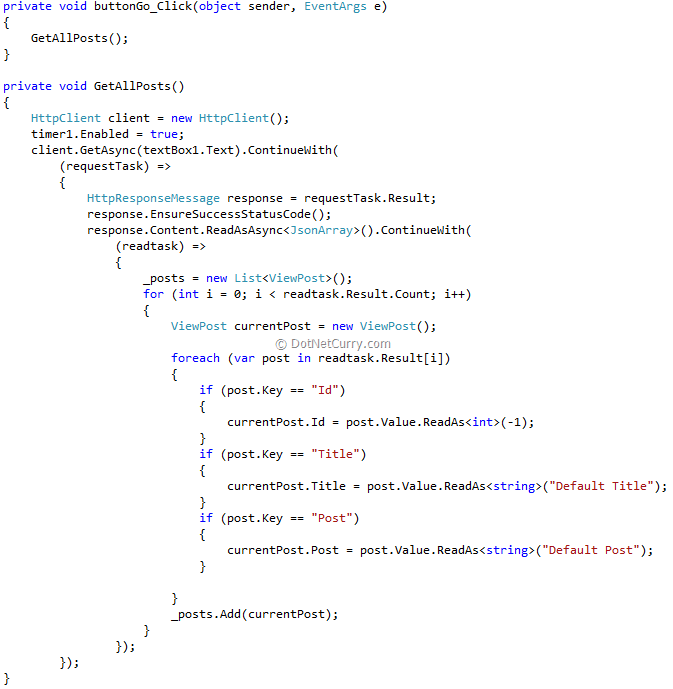
The event handler calls the GetAllPosts method. Let us look at this method closely
- We first initialize the HttpClient.
- Enable the timer (we will see the reason shortly).
- On the client we call the GetAsync method and pass the text in textbox1. This basically is the URL of our service (e.g. http://localhost:1100/api/dev). We are calling the Async method so this is a non-blocking call. As a result if we try to bind the grid to our data source (List<ViewPost> _posts) immediately after this call, it will not have any data. So we have designed a crude polling system using the timer, which will tick every half a second to see if the _posts has any data, and if it does, it binds to the Grid. The code for the time tick event is as follows

- Looking further into the Async call we see, we have put in an anonymous method to be chained once the Async call returns. Code called by ContinueWith executes when the Async task completes.
- We see requestTask is populated once our Async call completes.
- We extract the HttpResponseMessage from the task
- Next we call EnsureSuccessStateCode(). This method will throw an exception if the HTTP response code does not match a success code.
- Next we read the ‘Content’ of the response message. The System.Net.HttpFormatting provide the ReadAsAsync<JsonArray> extension. As we can see this is also an Async call that passes on the Task object to our anonymous method as the readtask parameter.
- The first for loop will be executed as many times as the number of posts available. For example, for the following data it will execute twice

- Then inner foreach enumerates through each property in the JSON object. So for the each object above it will execute thrice, each time updating one property.
- Once the object is updated, the ViewPost is added to our data source. At this point if we run this application we should see the same posts that are in the Web Application, show up in the Grid.

- This demonstrates how to use the HTTP GET verb. Let us continue and do the PUT and POST implementations
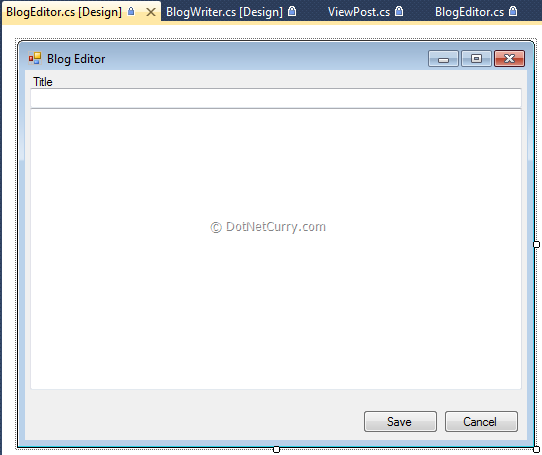
Step 6: Add a new Form to the project and call it BlogWriter. Add a label, two TextBoxes for Title and Post and two buttons for Save and Cancel. The layout looks as follows

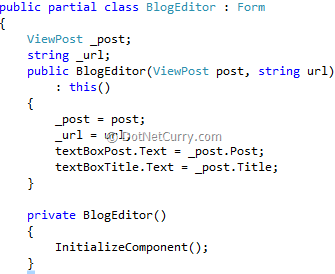
Step 7: Add a new Constructor for this class such that the ViewPost object that it is going to get edited is injected in the constructor itself. Along with it, the url of our Web API is also passed

Step 8: Add a click handler for the Save button. On click we check if the post that is getting edited has a non-zero Id. If it does, that means it’s an update operation and we need to use HTTP PUT. If Id is zero, means it’s a new entry and we should use HTTP POST. The entire code is as follows

1. The SetupClientContent method
- Is responsible for setting up the HttpRequestMessage. We setup the ObjectContent to be of type ViewPost and assign the post object after updating it with latest values from the UI.
- It is extremely important to setup the Header properly, and since we will be posting JSON we setup the ‘Content-Type’ as ‘application/json’.
- This method is used by both the Save and the Create Methods
2. Save method
- Creates the HttpClient object, initializes the content and calls the PutAsync.
- On task completion verifies the Submit was successful by calling EnsureSuccessStatusCode().
- Sets the DialogResult to OK so that the dialog closes itself.
3. Create method
- Create the HttpClient object, initializes the content and calls the PostAsync method.
- On task completion verifies the Submit was successful by calling EnsureSuccessStatusCode().
- Sets the DialogResult to OK so that the dialog closes itself.
Step 9: Hooking up the Post Editor to the main app.
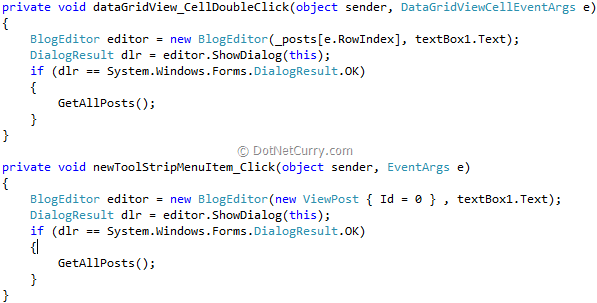
- Add a cell double click even handler to the dataGridView and initiate the BlogEditor using the ViewPost at that cell index.
- Add a Click event handler for the File->New menu item and initiate the BlogEditor using a new ViewPost object.
- In both cases if DialogResult returned is OK call the GetAllPosts() method to refresh the post list.

- We are now ready to run the application. Run it and provide the URL and hit Go, to bring up the current list of Posts.
- Double click on an existing Post, to bring up the Editor. Make some changes and Hit Save.
- Watch as the Data gets refreshed in the list.
In Conclusion
We saw how WebAPI delivers on the promise of services over HTTP. Prior to WebAPI, we would have to do this through Web Services that involved at the very least reference and configuration of the Web Service, proxies and stubs.
In case of WebAPI also, we needed the ‘reference’ URL and a sample of the data type but the contract is much more informal as in we are free to use our POCOs on the client side as long as they get mingled into the same JSON at the time of POST/PUT.
This make WebAPI a very attractive framework to use when we want services of our web application exposed over HTTP.
Exercise – Develop a WinRT application using the same WebAPI
I could have built this client app in WinRT as well. I leave that as an exercise for you dear reader.
The code for a WinRT application will be very similar except that the HttpClient is defined in a System.Net.Http namespace; the JSON object is defined in Windows.Data.Json namespace.
In WinRT we don’t have a JSON DataContractSerializer implemented so instead of ReadAsync<JsonArray> you have to use ReadAsStringAsync<string> and the rebuild the JSON object from the string that is returned. The following is the WinRT version of the code

That’s it for now. Have fun with Web API.
The entire source code of this article can be downloaded over here
This article has been editorially reviewed by Suprotim Agarwal.
C# and .NET have been around for a very long time, but their constant growth means there’s always more to learn.
We at DotNetCurry are very excited to announce The Absolutely Awesome Book on C# and .NET. This is a 500 pages concise technical eBook available in PDF, ePub (iPad), and Mobi (Kindle).
Organized around concepts, this Book aims to provide a concise, yet solid foundation in C# and .NET, covering C# 6.0, C# 7.0 and .NET Core, with chapters on the latest .NET Core 3.0, .NET Standard and C# 8.0 (final release) too. Use these concepts to deepen your existing knowledge of C# and .NET, to have a solid grasp of the latest in C# and .NET OR to crack your next .NET Interview.
Click here to Explore the Table of Contents or Download Sample Chapters!
Was this article worth reading? Share it with fellow developers too. Thanks!
Sumit is a .NET consultant and has been working on Microsoft Technologies since his college days. He edits, he codes and he manages content when at work. C# is his first love, but he is often seen flirting with Java and Objective C. You can follow him on twitter at @
sumitkm or email him at sumitkm [at] gmail