Microsoft’s latest OS Windows 8 brings certain unique OS level features. One of these features is referred to as ‘Charms’. Charms are a set of universal shortcuts that slide out from the right side-of the screen which can be seen when the end-user moves the mouse cursor to the right corner of the screen or by pressing Win Logo + C key. They look as follows:

These charms provide services which are consistently available across all the applications, should each application choose to integrate with them.
In this article, we will see how to design the Windows Store application using JavaScript which makes use of the Share charm.
A Sample Scenario
Let’s assume that the end-user from an HR department, is working with Employee Information details. Now, if the user wants one of the employee details to mail the accounts department for salary calculation, what he should do? He needs to copy the details in the clipboard and the paste it while composing his mail. This involves navigation across multiple applications after selecting and copying the Employee Information from the application. If the application is closed and in between by mistake the Employee data in the clipboard is lost before pasting it in the mail compose, then the user has to start all over again. So what if the Employee Data selected is directly shared with Mail application. This will save the time for copy and paste and will provide better end-user experience.
The Implementation
In Windows store application, data sharing or exchange of contents across application is possible using DataTransferManager class. This class is available under Windows.ApplicationModel.DataTransfer namespace. The method ‘GetForCurrentView’ returns the DataTransferManager object associated with the current view. To this object the datarequested event is added. This event fires when a sharing operation starts i.e. when the user selects the Share charm. This event then provides the information to be shared.
Note: This article explains the Windows 8 programming concepts and it uses simple UI controls, here I haven’t focused much on the Windows Store apps design guidelines.
Step 1: Open VS2012 and create a new Windows Store application using JavaScript. Name this as ‘Store_JS_Search’. You will see the project created. In this project, in the ‘js’ folder, add a new JavaScript file, name this as ‘datafile.js’. This file defines a List containing Employee Information as below:
function () {
"use strict";
var employeeArray = [
{ EmpNo: "101", EmpName: "Mahesh", DeptName: "CTD" },
{ EmpNo: "102", EmpName: "Mohan", DeptName: "IT" },
{ EmpNo: "103", EmpName: "Makrand", DeptName: "CTD" },
{ EmpNo: "104", EmpName: "Mandar", DeptName: "IT" },
{ EmpNo: "105", EmpName: "Milind", DeptName: "CTD" },
{ EmpNo: "106", EmpName: "Manohar", DeptName: "IT" },
{ EmpNo: "107", EmpName: "Mukund", DeptName: "CTD" },
{ EmpNo: "108", EmpName: "Madhav", DeptName: "IT" },
{ EmpNo: "109", EmpName: "Mithilesh", DeptName: "CTD" },
{ EmpNo: "110", EmpName: "Madan", DeptName: "IT" }
];
var empList = new WinJS.Binding.List(employeeArray);
//Create a new namespace to make data publicly accessible
var publicMembers = {
empDataList: empList
};
WinJS.Namespace.define("EmpDataListExample", publicMembers);
})();
Step 2: Open default.html and add the <div> tag for ListView and the <div> tag for the template. It also contains the <div> tag to display the additional Html page to display the selected employee information. You need to refer the datafile.js file in the default.html as below:
<script src="js/datafile.js"></script>
<div id="EmpDataTemplate" data-win-control="WinJS.Binding.Template">
<table>
<thead>
<tr>
<td>EmpNo</td>
<td>EmpName</td>
<td>DeptName</td>
</tr>
</thead>
<tbody>
<tr>
<td>
<label data-win-bind="innerText: EmpNo"></label>
</td>
<td>
<label data-win-bind="innerText: EmpName"></label>
</td>
<td>
<label data-win-bind="innerText: DeptName"></label>
</td>
</tr>
</tbody>
</table>
</div>
<div id="lstViewData"
data-win-control="WinJS.UI.ListView"
data-win-options="{itemDataSource:EmpDataListExample.empDataList.dataSource,itemTemplate:select('#EmpDataTemplate')}">
</div>
<p>
Selected Employee
</p>
<div class="renderingPageControls-renderedControl" id="dvhtml"></div>
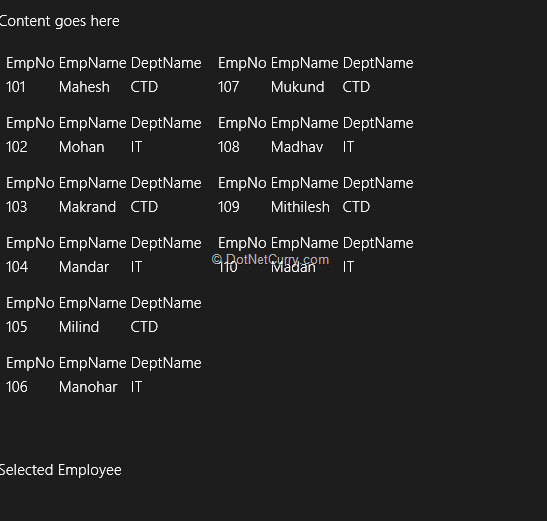
Step 3: Run the application, the result will be as shown below:

Step 4: In the project, add a new style-sheet file in the ‘css’ folder. This file defines classes which we will use in the later part.
.dataeno {
font-family:'Times New Roman';
}
.dataename {
font-family:'Times New Roman';
}
.datadname {
font-family:'Times New Roman';
}
Step 5: In the project, add a new Html page of name ‘EmployeeShared.html’. This is used to display the Employee Information selected by end-user for sharing. The page is as below:
<!DOCTYPE html>
<html>
<head>
<title>The Shared Employee Info</title>
<script src="//Microsoft.WinJS.1.0/js/ui.js"></script>
<script src="js/ShareData.js"></script>
<link href="css/empshare.css" rel="stylesheet" />
</head>
<body>
<div id="emp" style="background-color:chocolate">
<input type="text" id="txteno" class="dataeno"/>
<input type="text" id="txtempname" class="dataename"/>
<input type="text" id="txtdeptname" class="datadname"/>
</div>
</body>
</html>
The <input> type text elements are set to classes which are defined in the style-sheet in Step 4. This is because the information in these text elements is dynamically displayed, so we need to extract these text elements using ‘querySelector’ method of the HTML element to which the CSS class-name selector is passed. To do this, follow the next Step.
Step 6: In the project add a new JavaScript file, name it as ‘ShareData.js’. The code is as shown below:
function(){
"use strict";
var datatxmgr = Windows.ApplicationModel.DataTransfer.DataTransferManager;
var dataitem;
//define the page object
WinJS.UI.Pages.define("/EmployeeShared.html", {
ready: function (ele, options) {
//Read the data passed from the sender page
dataitem = options.item.data;
//Extract text elements of the EmployeeShared.html and add the value attribute
//for displaying the concern data.
ele.querySelector(".dataeno").setAttribute("value", dataitem.EmpNo);
ele.querySelector(".dataename").setAttribute("value", dataitem.EmpName);
ele.querySelector(".datadname").setAttribute("value", dataitem.DeptName);
//Subscribe the event for Data Transfer
datatxmgr.getForCurrentView().addEventListener("datarequested", this.onDataRequested);
},
//Get the information to be shared
onDataRequested: function (d)
{
var req = d.request;
req.data.properties.title = dataitem.title;
req.data.properties.description = "Employee Info";
//Share Employee Info
var einfo = "Employee Info " + dataitem.EmpNo + "\n" + dataitem.EmpName + "\n" + dataitem.DeptName;
//set the text for sharing
req.data.setText(einfo);
},
unload: function () {
WinJS.Navigation.removeEventListener("datarequested", this.onDataRequested);
}
});
})();
As mentioned in the code comments, we create a page object for the Html page EmployeeShared.html. During the page load, the data is received from the sender page (default.html in this case) and it reads the data posted. Using ‘querySelector’ methods, the text elements of the Page objects are extracted and the ‘value’ attribute is set for them to the data value posted from the sender page. Note here the attribute ‘value’ is set in this case because the elements extracted are text elements. This can be extended to other elements e.g. <img> etc.
The event ‘datarequested’ is added to the DataTransferManager object. This event provides the data to be shared across the application.
Step 7: Open default.html and add the below code:
<script type="text/javascript">
WinJS.UI.processAll().then(function () {
//Add Event to the ListView
document.getElementById('lstViewData').addEventListener('iteminvoked', itemselected, false);
})
function itemselected(evt) {
var item = evt.detail.itemPromise._value; //Read the selected value
document.getElementById("dvhtml").innerHTML = ' '; //clear the <div>
//Locate the <div> to host the rendered Html page
var renderHost = document.querySelector(".renderingPageControls-renderedControl");
//render the EmployeeShared.html page in the <div>
WinJS.UI.Pages.render("EmployeeShared.html", renderHost, { item: item });
}
</script>
When the end-user selects Employee record from the ListView, the selected Employee information is displayed in the EmployeeShared.html which is hosted in the <div> set to the class value ‘.renderingPageControls-renderedControl’ . The render method carries the data to be displayed in the EmployeeShared.html using {item:item} expression.
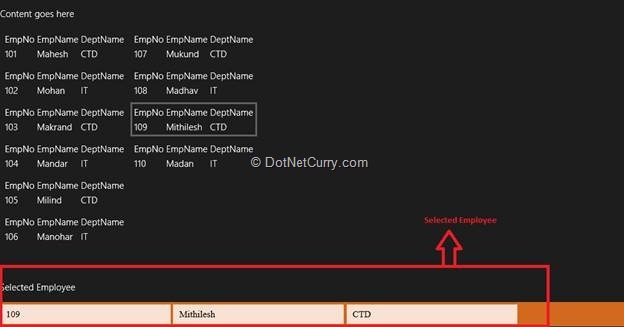
Step 8: Run the application, and select the Employee Info from the List, the result will be as shown below:

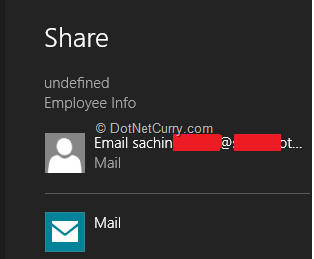
Now press the “Windows Logo Key + C”, or move the mouse cursor to the right top corner of the screen, you will get Charms as in the beginning of the article. Select the Share, you will get the list of the application with which data can be shared as shown below

Here I have ‘Mail’ application, click on it you will find the Employee Information selected in the compose message as below:

That’s it.
Conclusion
Windows 8 provides an easy and consistent way to share information across applications using the Share Charm. This provides an excellent User-Experience to the end-user. Line-of-Business application that frequently share data across application can leverage this feature effectively with minimal code.
Download the source code (Github)
This article has been editorially reviewed by Suprotim Agarwal.
C# and .NET have been around for a very long time, but their constant growth means there’s always more to learn.
We at DotNetCurry are very excited to announce The Absolutely Awesome Book on C# and .NET. This is a 500 pages concise technical eBook available in PDF, ePub (iPad), and Mobi (Kindle).
Organized around concepts, this Book aims to provide a concise, yet solid foundation in C# and .NET, covering C# 6.0, C# 7.0 and .NET Core, with chapters on the latest .NET Core 3.0, .NET Standard and C# 8.0 (final release) too. Use these concepts to deepen your existing knowledge of C# and .NET, to have a solid grasp of the latest in C# and .NET OR to crack your next .NET Interview.
Click here to Explore the Table of Contents or Download Sample Chapters!
Was this article worth reading? Share it with fellow developers too. Thanks!
Mahesh Sabnis is a DotNetCurry author and a Microsoft MVP having over two decades of experience in IT education and development. He is a Microsoft Certified Trainer (MCT) since 2005 and has conducted various Corporate Training programs for .NET Technologies (all versions), and Front-end technologies like Angular and React. Follow him on twitter @
maheshdotnet or connect with him on
LinkedIn