As part of my experiments with Modern UI style app development in Windows 8, I have been exploring its integration with Bing Maps. In this small walkthrough, we will see how to use Bing Maps and the location device location API to show your current location on the map. To use Bing Maps, you must have Bing Map SDK for Windows Store Apps Extensions installed on your machine. This extension can be downloaded from here (it’s a 45.4MB SDK + Components Download). You can also get it from inside Visual Studio using Tools > Packages and Extensions Dialog menu.
Getting started with Bing Maps
To start off with, you need to obtain a credential key to access Bing Maps data. You can get the key from here. Login using the Live/Microsoft ID, and then create a Key which you need configure with your application.

When creating Keys, you have the option of Trial or Basic, select Basic and ‘Application Type’ as WindowsStoreApp.
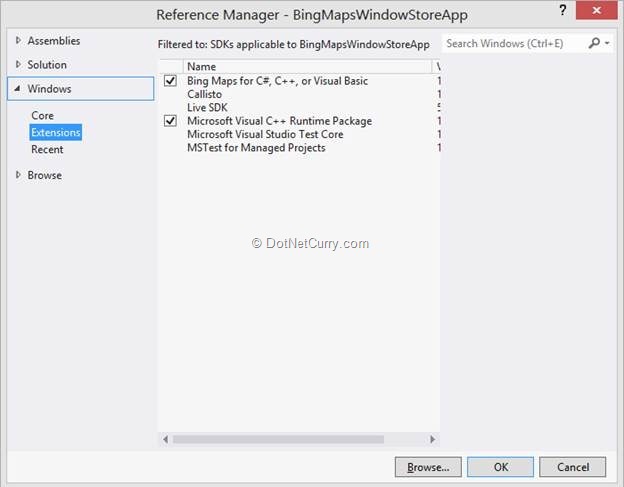
Step 1: Open Visual Studio 2012, and create a new Windows Store application, name it as ‘BingMapsWindowStoreApp’. In this project, add a reference of ‘Bing Maps for C#, C++, or Visual Basic’ as shown below:
Step 2: Open MainPage.xaml and use the Bing Map reference as shown below:
<Page
x:Class="BingMapsWindowStoreApp.MainPage"
xmlns="http://schemas.microsoft.com/winfx/2006/xaml/presentation"
xmlns:x="http://schemas.microsoft.com/winfx/2006/xaml"
xmlns:local="using:BingMapsWindowStoreApp"
xmlns:d="http://schemas.microsoft.com/expression/blend/2008"
xmlns:mc="http://schemas.openxmlformats.org/markup-compatibility/2006"
xmlns:bm="using:Bing.Maps"
mc:Ignorable="d"
Loaded="Page_Loaded_1">
Step 3: Add the Map control as below under the Grid as below:
<bm:Map x:Name="myMap" Credentials="Replace_with_your_Bing_Maps_Key"
Grid.Column="1"></bm:Map>
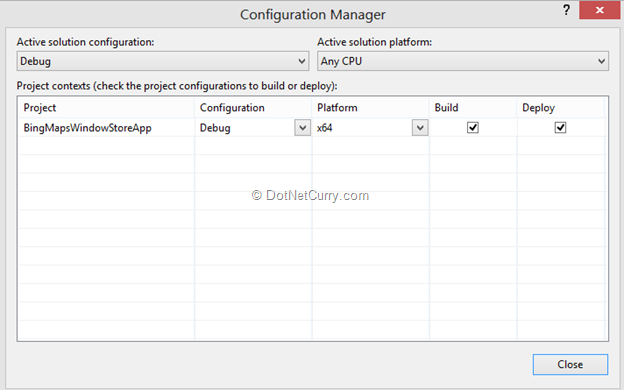
Now make sure you use the account key you need to enter as a value of the Credential property. One important thing here is that the application must target 64 bit platform. So you can set is as shown below:
Step 4: Run the application and the result will be as shown below:

Instead of the map if you see the following:
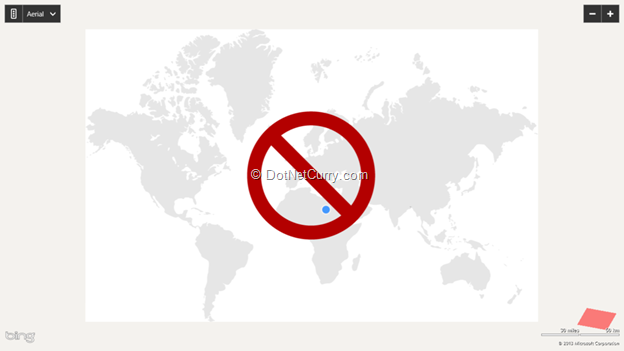
a big red stop sign i.e. circle with a line down the middle), fear not, you didn’t do anything wrong. The Bing Maps control doesn’t work in all regions. To test things out, you can change the Region of your computer as follows:
- Go to Control-Panel > Clock,Language and Region > Change Location. Set Home Location to United States
- Run the sample again
Warning: Changing Region affects Windows 8 Store and may make you ineligible for some apps
Step 5: To get the current location, we need to make use of the following classes:
- Geolocator: Class to access the geographic location.
- Location: Contains coordinates values of the location on the map.
Step 6: Open MainPage.xaml and add Textboxes, TextBlock as shown below:
<Grid Background="{StaticResource ApplicationPageBackgroundThemeBrush}">
<Grid.ColumnDefinitions>
<ColumnDefinition Width="251*"/>
<ColumnDefinition Width="1115*"/>
</Grid.ColumnDefinitions>
<Grid Grid.Column="0" Width="200">
<Grid.ColumnDefinitions>
<ColumnDefinition Width="100"></ColumnDefinition>
<ColumnDefinition Width="100"></ColumnDefinition>
</Grid.ColumnDefinitions>
<Grid.RowDefinitions>
<RowDefinition Height="40"></RowDefinition>
<RowDefinition Height="40"></RowDefinition>
<RowDefinition Height="40"></RowDefinition>
</Grid.RowDefinitions>
<TextBlock Text="Latidude" Grid.Row="0" Grid.Column="0" Width="100"></TextBlock>
<TextBlock Text="Longitude" Grid.Row="1" Grid.Column="0" Width="100"></TextBlock>
<TextBox x:Name="txtlatitude" Grid.Row="0" Grid.Column="1" Width="100"></TextBox>
<TextBox x:Name="txtlongitude" Grid.Row="1" Grid.Column="1" Width="100"></TextBox>
<Button x:Name="btnlocateme" Content="Locate Me" Click="btnlocateme_Click_1"
Grid.Row="2" Grid.Column="0" Grid.ColumnSpan="2" ></Button>
</Grid>
<bm:Map x:Name="myMap" Credentials="AsfBv6NiPxM2kmAWjLbn07HNQo-CLd4pkZ6wwK00LHhKqLgABsj2_VNd6VwiTuU6"
Grid.Column="1"></bm:Map>
</Grid>
Step 7: To set the location display, add a new user control in the project and name it as ‘PositionLocator.xaml’. Add the following Xaml in it as shown below:
<Canvas>
<TextBlock Text="You are here:" FontSize="30" FontFamily="Times New Roman"></TextBlock>
<Rectangle Height="25" Width="25" Fill="Red" Margin="-12.5,-12.5,0,0"></Rectangle>
</Canvas>
Step 8: Open MainPage.xaml.cs and refer the following namespaces:
using Bing.Maps;
using Windows.Devices.Geolocation;
using Windows.UI.Core;
Define the following objects at class level:
//Class for accessing geographic location
Geolocator glocator;
//User control object
PositionLocator pos;
//class for containing coordinates of location on map
Location location;
Set the properties for the Map object in the Loaded event:
private void Page_Loaded_1(object sender, RoutedEventArgs e)
{
//S1: Set the Default display for the MAp Type
myMap.MapType = MapType.Aerial;
//S2: Set the properties for the Map
myMap.ShowBuildings = true;
myMap.ShowTraffic = true;
}
In the MainPage class constructor, create instances for Location and Geolocator as shown below and subscribe for the PositionChanged event of the Geolocator class:
glocator = new Geolocator();
pos = new PositionLocator();
myMap.Children.Add(pos);
//S3: Event of the Position Changed
glocator.PositionChanged += new Windows.Foundation.TypedEventHandler<Geolocator, PositionChangedEventArgs>(glocator_PositionChanged);
Add the method to set the position on the map and read the Longitude and Latitude on the map as below:
/// <summary>
/// Method to get the default position of the application user
/// </summary>
/// <param name="sender"></param>
/// <param name="args"></param>
private void GetMyPosition(object sender, PositionChangedEventArgs args)
{
location = new Location(args.Position.Coordinate.Latitude, args.Position.Coordinate.Longitude);
//S4: Set the Position on the Map using location values and the put the UI for postion (Rectangle)
MapLayer.SetPosition(pos, location);
//S5: Set the Map view for the location values and zoom level
myMap.SetView(location, 18.0f);
//Display the Longitude and Latitude values
txtlatitude.Text = args.Position.Coordinate.Latitude.ToString();
txtlongitude.Text = args.Position.Coordinate.Longitude.ToString();
}
Call this method in the PositionChanged event of the Geolocator class. This event makes call to the GetMyPosition () method asynchronously:
//Async Execution of the event
async void glocator_PositionChanged(Geolocator sender, PositionChangedEventArgs args)
{
await this.Dispatcher.RunAsync(CoreDispatcherPriority.Normal, new DispatchedHandler(
() =>
{
GetMyPosition(this, args);
}));
}
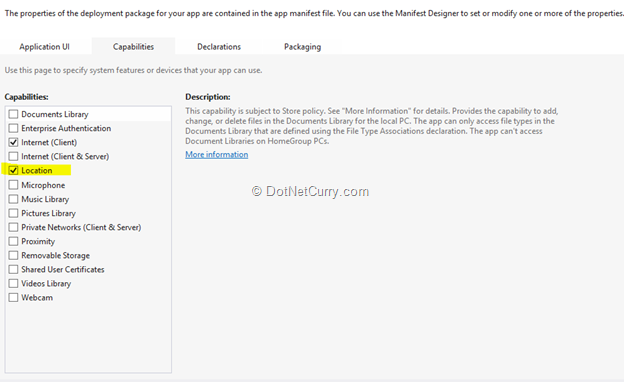
Step 9: To get the position, the application must be configured to get the location. To set access rights for the location, open the ‘Package.appxmanifest’ file and set the application Capabilities as below:
Step 10: Run the application and the result will be as shown below:
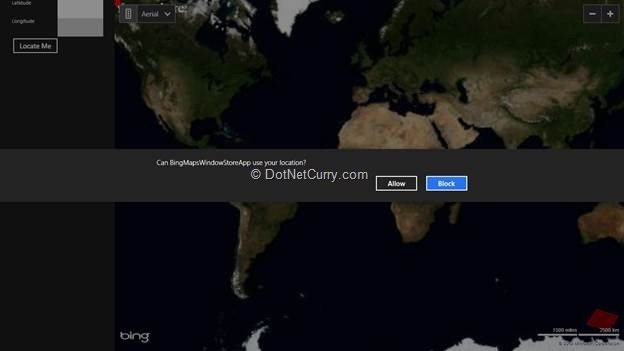
After clicking on ‘Allow’, your current location will be displayed.
Conclusion
Using Bing Maps and location services, developers can easily develop location aware apps. The current Bing Map control has a shortcoming where it prevents it from working for Apps in all Windows 8 supported regions.
The sample code can be downloaded from https://github.com/dotnetcurry/bingmaps-win8-store
This article has been editorially reviewed by Suprotim Agarwal.
C# and .NET have been around for a very long time, but their constant growth means there’s always more to learn.
We at DotNetCurry are very excited to announce The Absolutely Awesome Book on C# and .NET. This is a 500 pages concise technical eBook available in PDF, ePub (iPad), and Mobi (Kindle).
Organized around concepts, this Book aims to provide a concise, yet solid foundation in C# and .NET, covering C# 6.0, C# 7.0 and .NET Core, with chapters on the latest .NET Core 3.0, .NET Standard and C# 8.0 (final release) too. Use these concepts to deepen your existing knowledge of C# and .NET, to have a solid grasp of the latest in C# and .NET OR to crack your next .NET Interview.
Click here to Explore the Table of Contents or Download Sample Chapters!
Was this article worth reading? Share it with fellow developers too. Thanks!
Mahesh Sabnis is a DotNetCurry author and a Microsoft MVP having over two decades of experience in IT education and development. He is a Microsoft Certified Trainer (MCT) since 2005 and has conducted various Corporate Training programs for .NET Technologies (all versions), and Front-end technologies like Angular and React. Follow him on twitter @
maheshdotnet or connect with him on
LinkedIn