Windows 8 Store apps are meant to be geared for an always connected world where our apps are constantly connected (to the internet) and have updates ready for us whenever they are available. Towards this, Windows 8 Store apps have support for a robust Notifications framework that can tell users about updates in various forms like “Toast Notifications”, “Live Tile Updates” and “Lock Screen Updates”. Today we will see how to use these notification types and also the programmatic APIs that we need to use to make best use of the notifications framework.
A quick look at the Windows 8 Notification UI
Before we get deep into how to use notifications in Windows 8 Store apps, let’s quickly look at the types of notifications a user can receive.
The Toast Notification
The ‘Toast Notification’ pops up on the top right hand corner of an application. They have various predefined formats. Below we see a notification from the app ‘Twittelytics LITE’. It’s a twitter client I wrote (and available on Windows 8 Store). Toast notifications can be used at various points to provide update notifications.
Asynchronous Updates
When the user posts a Tweet, instead of blocking the app while the Tweet is sent and an acknowledgement received from Twitter, the Application clears out the input box allowing user to send another Tweet immediately. Once the response from Twitter comes in, we show the update. This is a use case for Asynchronous Update notification using Toasts.

Background Event Notification
Our application may have a background process that either polls for updates or waits for push notifications, in both cases, when the update arrives, we can popup a toast to notify user about the event. This toast can popup even when the application is not in the foreground or if the Main App is not running! For example, here is a toast notification from Twitter’s official app on people responding to my previous tweet. These came in while even though the Twitter client is not running, only the background process is.

Live Tiles
Live Tiles are another way to tell users about updates. Tiles as we know represent an Application in the Windows 8 Start Screen. Tiles are ‘live’ when they show snippets of latest information. There are various formats in which Tiles show updates. I’ve highlighted some of them below
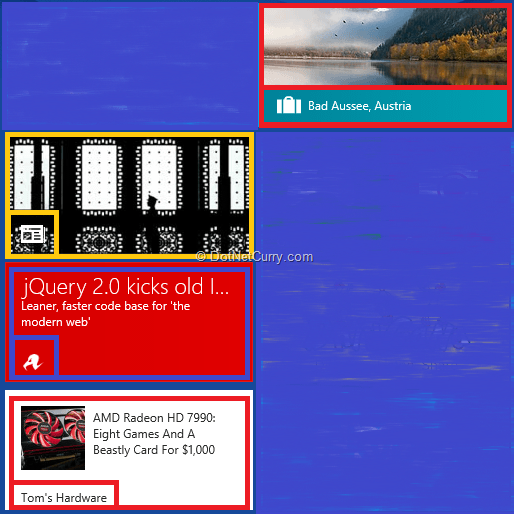
1. First up, top left, marked in Yellow is the Bing News App. It is showing a live tile that alternates between a full tile image and a full text tile. You can see the Applications logo at the bottom left of the tile.
2. Next we have ‘The Register’ digital Magazine’s tile. It uses only text for showing updates. Again the application logo is at the bottom left.
3. Third tile we have is from the app by ‘Tom’s Hardware’. It shows an image and a snippet of text, letting us know about the latest articles available. Instead of app logo, this tile shows the name of the Application.
4. The last one on Top Right is the ‘Bing Travel’ App. It shown us an image update, along with the App logo and an Update Text across the bottom of the tile.
These were only four of the total 46 different combinations supported.
Just like Toast notifications, live tiles can be updated via the application or its background process.
Lock Screen Updates
Always connected is no fun if the computer doesn’t update itself when in power-saving mode or when the screen is locked, is it? Well, Windows 8 can show you updates even when the screen is locked. For example in the image below, the NexGen Reader app is telling me that I have some catching up to do with my RSS subscriptions.
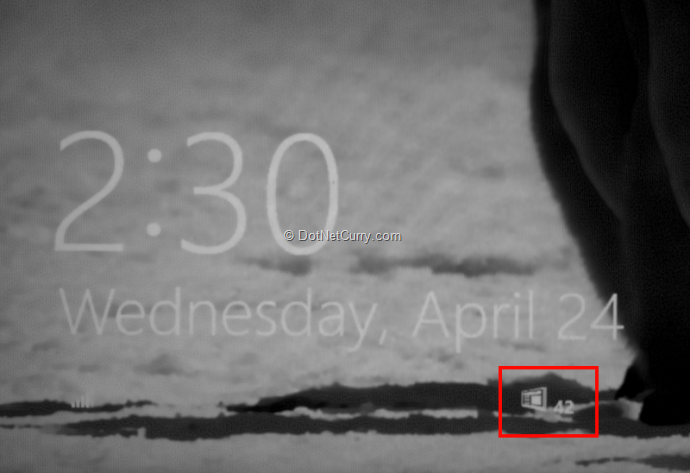
This is a type of Notification that your app can support and if end users desire they can enable it for your app to provide updates in the background. Another app that makes use of this notification is the Mail app.
Notifications, Background Processes and ‘Server Push’
Now that we have seen the various types of Notifications possible in Windows 8, let’s remember there is NO intrinsic relationship between the process of ‘Server Push’ with the UI response of showing Toast or Live Tile. So do not confuse between the two, they are different things: One is a process the other is an outcome. A ‘Server Push’ process may result in other outcomes like downloading emails by a mail client, or updating a calendar by creating a new ToDo in it, OR it may result in a Toast popup telling user about the event.
Similarly, Background Processes have no direct relationship with either ‘Server Push’ or notifications. We use Background Processes for Windows 8 Store Apps to retrieve information even when our app is not running. Fact that the application lifecycle of a Windows 8 Store app is controlled by Windows rather than us, makes it imperative for us to use Background Processes when we want to do long running operations in our app, or we want to periodically check for updates. As a result of the updates we receive during the Background Process, we may raise notification using any of the above methods, but this is not compulsory again.
With the types of notifications and their relationship with Background processes cleared, let us finalize the premise of the application that we are going to build today.
Background Tasks a deeper look
Background tasks in Windows 8 are highly configurable and at the same time have a significant set of requirements that must be met for tasks to register and trigger correctly. Let’s look at it in a little details
Types of Background Tasks based on Trigger types

Types of triggers are further classified based on their requirements/conditions.
Today, we will use a System Trigger called the UserAway trigger. This is triggered when the user steps away from their computer. Windows detects it based on whether the system has been idle or has gone into ‘Locked’ state long enough.
Background Tasks and Lock Screen
The Lock Screen has special treatment when it comes to background tasks. As I showed above, background tasks can update ‘badges’ on the lock screen if updates are happening. However there are only seven slots available as we can see below

In the above PC, two slots are open for assignment to apps that can display lock screen updates (indicated by the +). Thing is users have to do this manually and can very well remove your app from the list and replace it with another app.
You can register to listen for these events in the background.
Now that we’ve taken a look at the notification types as well as how to deliver them, let’s get down to business and build a real application that does all of this.
Demo of Notifications in Windows 8
We will build an app that reads from a Twitter feed in the background. For our app, the background process is actually kicked off when the user locks the screen and moves away from the computer or the computer is idle long enough to lock the screen. The background process now reacts as follows:
1. It opens a streaming connection with Twitter and starts watching the stream for tweets.
2. When it detects tweets that mention the currently logged in user, it updates the Live Tiles.
3. It also shows Toast notifications when a tweet targeting the logged in user is received.
4. It keeps a count of the new tweets that came in and updates the Lock screen ‘badge’ with the count of the new tweets.
The Main Application
1. We start off with a Blank WinRT Application template, and call our project TweetNotifier

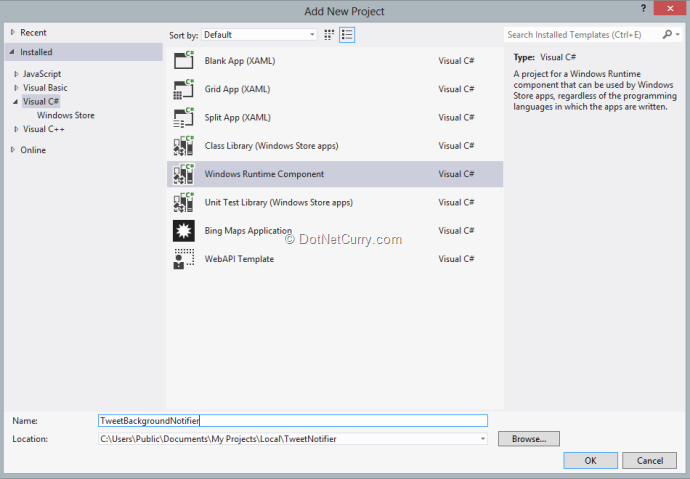
2. Next we add a Windows Runtime Component to the solution that will implement the Background Notifier. We name it ‘TweetBackgroundNotifier’. Selecting Windows Runtime Component is important else you will receive an error (with code) at runtime.
3. To communicate with Twitter we’ll use the LinqToTweeter library. Ideally I would get it from Nuget, but I made some enhancements that are yet to be committed to the main project. They are mainly around dealing with Async loading of the credential information. So in this case I’ve included the dll in the ‘Reference’ folder. We add reference to the dll in our WinRT Component.
Twitter Authentication and Background Token Access
Before we go any further let’s bring up the topic of communication between the Main Application and the Background Process. As a recommended best practice, these two should communicate via local storage only.
When any application wants to Authenticate using OAuth, we normally use the common UI screen that navigates to the provider’s login screen as shown below.

However in case of Background processes, there is no UI screen, so how does the background process authenticate?
Well, the trick is to authenticate using the main app and store the authentication token in a local storage. Next when the Background task is initiated, the background task simply picks up the Authentication token and runs with it. In our app, we have two classes that are dedicated to the authentication piece. In the main app, we have AuthenticateService.cs and in the background process file we have AuthenticateServiceRT.cs There is slight difference in implementation because a WinRT Component has restrictions on use of Async methods. However both read the same authentication token.
The .NET Authentication Service
So in the TweetNotifier project we add the following class under the Common folder.
public class AuthenticationService
{
public const string ConstLocalDataCredentials = "LocalDataCredentials";
public const string ConstAuthorizer = "Authorizer";
WinRtAuthorizer _authorizer;
WinRtCredentials _credentials;
public async Task AuthorizeAsync()
{
Task<WinRtAuthorizer> task = Authenticate();
await task.ContinueWith(wrt =>
{
_authorizer = wrt.Result;
if (_authorizer.IsAuthorized)
{
_credentials.Save();
}
});
}
private async Task<WinRtAuthorizer> Authenticate()
{
_credentials = await
LocalDataCredentials.GetWinRtCredentialsAsync(ApplicationData.Current.LocalFolder);
if (_credentials.ToString().Equals(",,,,,"))
{
_credentials.ConsumerKey = "[Your App’s Consume Key]";
_credentials.ConsumerSecret = "[You App’s Consumer Secret]";
_credentials.AccessToken = "[Your App’s Access Token]";
}
_authorizer = new WinRtAuthorizer
{
Credentials = _credentials,
UseCompression = true,
Callback = new Uri("http://www.twittelytics.com")
};
if (!_authorizer.IsAuthorized)
{
Task<WinRtAuthorizer> task = _authorizer.AuthorizeAsync();
await task.ContinueWith(t =>
{
_authorizer.ScreenName = _credentials.ScreenName;
_authorizer.UserId = _credentials.UserId;
});
if (_authorizer.IsAuthorized)
{
return task.Result;
}
}
return _authorizer;
}
public bool IsAuthorized
{
get
{
if (Authorizer != null && Authorizer.IsAuthorized)
{
return Authorizer.IsAuthorized;
}
else
{
return false;
}
}
}
public WinRtAuthorizer Authorizer
{
get
{
return _authorizer;
}
}
public string AuthorizedUserScreenName
{
get
{
if (_authorizer != null && _authorizer.Credentials != null)
{
return _authorizer.Credentials.ScreenName;
}
return string.Empty;
}
}
}
The very first line of the Authenticate method is pivotal. It tries to load credentials from the local storage. The call to _authorizer.AuthorizeAsync() refreshes the token and confirms it is still valid. If the token is not valid, the Authorizer automatically routes you to the authentication page we saw above. Rest of the methods and properties are primarily utilities for accessing the Authenticated User’s details.
The WinRT Authentication Service
The WinRT authentication service is slightly different, I’ll highlight the difference only.
a. It’s a sealed class because that’s a requirement for a WinRT component
b. The Authorize Async method is renamed to AuthorizeAsyncResult and made private. We have a new public method called AuthorizeAsync that returns an IAsyncAction. This is again a requirement for a WinRT component. WinRT components cannot expose .NET objects publicly, they have to expose the WinRT equivalents.
public IAsyncAction AuthorizeAsync()
{
return AuthorizeAsyncResult().AsAsyncAction();
}
private async Task AuthorizeAsyncResult()
{
Task<WinRtAuthorizer> task = Authenticate();
await task.ContinueWith(wrt =>
{
_authorizer = wrt.Result;
if (_authorizer.IsAuthorized)
{
_credentials.Save();
}
});
}
Apart from the above change, we’ve to change the return type of the Authorizer property because WinRTAuthorizer is not a WinRT component. Hence I return a generic object and cast it wherever required.
public object Authorizer
{
get
{
return _authorizer;
}
}
With the Authorizer set up, we are all set to dive into the Background Task’s code. But before that let’s quickly wire up the UI to login and enable manual Background Task registration.
UI for Logging in and Registration
The UI for demo purposes is very simple

When we tap/click Login, depending on whether the authentication token is available or not, we either navigate to the authentication page or show a success message
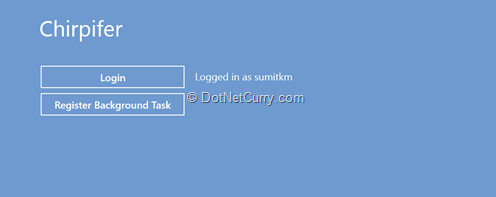
Now we click on ‘Register Background Task’ to register the background task.
The Background Task Util
We have a Util class (BackgroundTasksUtil.cs) that helps register the background task. Let’s look at the relevant code piecemeal.
public const string SampleBackgroundTaskEntryPoint = "TweetBackgroundNotifier.MonitorTweetsTask";
public const string SampleBackgroundTaskName = "MonitorTweetsTask";
The EntryPoint string is the correctly qualified type name of the class that implements IBackgroundTask. If you get this wrong, registration will fail at runtime.
The task name is the string with which it is identified with the BackgroundTaskManager. We use it when we have to unregister the task also.
public static BackgroundTaskRegistration RegisterBackgroundTask(String taskEntryPoint, String name, IBackgroundTrigger trigger, IBackgroundCondition condition)
{
var builder = new BackgroundTaskBuilder();
builder.Name = name;
builder.TaskEntryPoint = taskEntryPoint;
builder.SetTrigger(trigger);
if (condition != null)
{
builder.AddCondition(condition);
}
BackgroundTaskRegistration task = builder.Register();
UpdateBackgroundTaskStatus(name, true);
UpdateBadge();
//
// Remove previous completion status from local settings.
//
var settings = ApplicationData.Current.LocalSettings;
settings.Values.Remove(name);
return task;
}
Next we have the RegisterBackgroundTask method. This takes an entry point string, name of task, the instance of the trigger to which the task should be latched on to and any particular condition. Conditions are instances of type BackgroundCondition. One example of condition is InternetAvailable. This condition imposes the requirement that the BackgroundTask should latch on after Internet becomes available.
BackgroundTaskBuilder is a helper class provided by the Background API to help us setup the Background Task. The helper class also has additional methods to Unregister all the background task instances. This is important because when the application closes or is terminated by Windows 8, its association with the background task is broken. Next time when it starts, if you don’t unregister the tasks, you potentially can register the task twice.
public static void UnregisterBackgroundTasks(string name)
{
//
// Loop through all background tasks and unregister any with SampleBackgroundTaskName or
// SampleBackgroundTaskWithConditionName.
//
foreach (var cur in BackgroundTaskRegistration.AllTasks)
{
if (cur.Value.Name == name)
{
cur.Value.Unregister(true);
}
}
UpdateBackgroundTaskStatus(name, false);
}
Project Manifest Updates
Apart from code to kick off the Background process, we also need to configure our Application Manifest file. Open the Package Manifest file and navigate to the Declarations Tab. Select ‘Background Tasks’ from the ‘Available Declarations’ dropdown and select ‘Add’. Next select ‘System event’ and ‘Timer’. Even though we won’t be using the ‘Timer’ event, we need to select it so that we can support badge alert updates.
Next, we setup the Entry Point to the fully qualified class name that implements the IBackgroundTask interface which will handle this task.

While you are updating the Declarations, you will see red crosses popup all over the Manifest. Fear not, BackgroundTasks have some requirement for Logos and images that MUST be provided. So switch over to the ‘Application UI’ tab.
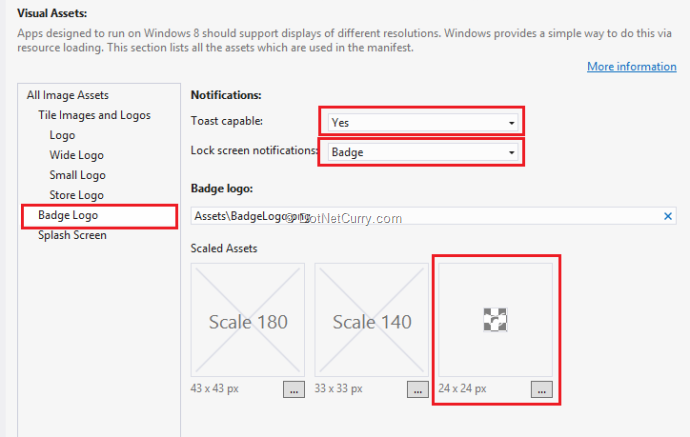
At the very minimum, setup the Badge Logo by selecting Toast Capable = yes, Lock Screen Notifications to ‘Badge’ and provide a 24x24 image that has only White color on it (yes, the white is a requirement for badge logo). You can either stop here, or while you are at it, assign atleast the default size for Logo, Wide Logo, Small Logo, Store Logo and a Splash Screen. This will help the App have a nice polished look.
Invoking the Task Registration Process
The background task registration is invoked when we click on the ‘Register Background Task’ button. This is for demo purposes. Ideally you would do it on launch or when a setting for your app is enabled.
BackgroundTaskUtils.UnregisterBackgroundTasks(BackgroundTaskUtils.SampleBackgroundTaskName);
var task =
BackgroundTaskUtils.RegisterBackgroundTask(
BackgroundTaskUtils.SampleBackgroundTaskEntryPoint,
BackgroundTaskUtils.SampleBackgroundTaskName,
new SystemTrigger(SystemTriggerType.UserAway, false),
null);
The single line above sets the process of registering a task in motion. As we can see, we have used the string constants we saw earlier in the Utils class. The trigger is a SytemTrigger of type UserAway. We are not passing any additional conditions thus passing null for conditions.
This registers the task. Now it’s a matter of the trigger condition getting fired. In our case that means after we have locked the computer we should wait till it switches the monitors etc. off. This is sufficient condition for UserAway trigger to fire and set the task in motion. Once the event starts firing it will update the ‘Badge’. Now the badge is present at two places, one of course is the lock screen. Next is the Bottom Right corner of the application’s Live Tile.
Inside the Task Notifier
Now that we have seen how to setup the task, let’s see what the Task actually does. Any background task implements the IBackgroundTask method (from the Windows.ApplicationModel.Background namespace). It has one method Run that gets an instance of IBackgroundTaskInstance implementation.
public sealed class MonitorTweetsTask : IBackgroundTask
{
public void Run(IBackgroundTaskInstance taskInstance)
{
…
}
…
}
The Run function
The class level fields used and the Run method is implemented as follows:
AuthenticationServiceRT _authenticationService = new AuthenticationServiceRT();
TwitterContext twitterCtx = null;
BackgroundTaskDeferral _deferral = null;
IBackgroundTaskInstance _taskInstance = null;
volatile bool _cancelled = false;
StreamContent _currentStream;
public void Run(IBackgroundTaskInstance taskInstance)
{
Debug.WriteLine("Background " + taskInstance.Task.Name + " Starting...");
taskInstance.Canceled += new BackgroundTaskCanceledEventHandler(OnCanceled);
_deferral = taskInstance.GetDeferral();
_taskInstance = taskInstance;
Login();
}
private void OnCanceled(IBackgroundTaskInstance sender, BackgroundTaskCancellationReason reason)
{
_cancelled = true;
if (_currentStream != null)
{
_currentStream.CloseStream();
}
}
We put hook into the taskInstance’s Canceled event, save a deferral for the taskInstance and the save the taskInstance and call the Login() function. We need to save a deferral because Windows considers the Background Task to be over once the execution exits the Run method. Since we will be hooking on to an async Twitter feed that will feed us data as it is made available, we need to keep the deferral around till request to cancel the task is received.
In the cancelled event, we check if there is a Twitter stream open. If it is, we close the stream.
The Login Function
The login function attempts to Log in to Twitter using the existing OAuth token saved by the main application. This is done by the _authenticationService. Once Authenticated, it calls to ConnectToStream(…) and waits for tweets to come in. If authorization fails for some reason, it shows a toast notification informing the user of the failure.
public void Login()
{
try
{
Task t = _authenticationService.AuthorizeAsync().AsTask();
t.Wait();
if (_authenticationService.IsAuthorized)
{
ConnectToStream();
}
else
{
SendToastNotification("ALERT: Failed to Authenticate with Twitter, please log in again", "");
}
}
catch (Exception ex)
{
SendToastNotification("ERROR: Authentication aborted. Exception - " + ex.Message, "");
Debug.WriteLine("Logged in blew up " + ex.Message);
}
}
The ConnectToStream function
This function creates an instance of TwitterContext (which is like a DB context only it’s for access twitter data feeds). We hook into the User stream to watch for all activities from the accounts the logged in user is following. When we get tweets in our stream, we deserialize the JSON and check if the tweet contains the screen name of the currently logged in user. If it does, we update the tile and send out a toast. If it does not, we simplly increment the count and update the badge indicating the number of tweets we can missed.
private string ConnectToStream()
{
try
{
JsonSerializerSettings settings = new JsonSerializerSettings();
settings.MissingMemberHandling = Newtonsoft.Json.MissingMemberHandling.Ignore;
twitterCtx = new TwitterContext((WinRtAuthorizer)_authenticationService.Authorizer);
Debug.WriteLine("\nStreamed Content: \n");
int count = 0;
(from strm in twitterCtx.UserStream
where strm.Type == UserStreamType.User &&
strm.With == "followings"
select strm)
.StreamingCallback(strm =>
{
Debug.WriteLine(strm.Content + "\n" + strm.Error);
if (strm.Error == null && !string.IsNullOrEmpty(strm.Content))
{
Tweet currentTweet = JsonConvert.DeserializeObject<Tweet>(strm.Content, settings);
count++;
if (strm.Content.Contains(@"@" + _authenticationService.AuthorizedUserScreenName))
{
SendToastNotification(currentTweet.text, "");
SendTileTextNotification(currentTweet.text);
}
SendBadgeNotification(count);
}
}).SingleOrDefault();
}
catch (TwitterQueryException ex)
{
message = ex.Message;
}
return message;
}
The Notification Helper Methods
Finally we have the notification helper methods to update the tile, the badge or the toast. Note we are using only one of multiple combinations possible. For badge, we use the BadgeTemplateType.BadgeGlyph, for Toast we use the ToastImageAndText01 and for the Title we use TitleWideText03 style. Feel free to pick and choose the one that’s most appropriate for your usecase.
private void SendBadgeNotification(int count)
{
XmlDocument badgeXml =
BadgeUpdateManager.GetTemplateContent(BadgeTemplateType.BadgeGlyph);
XmlElement badgeElement = (XmlElement)badgeXml.SelectSingleNode("/badge");
badgeElement.SetAttribute("value", count.ToString());
BadgeNotification badge = new BadgeNotification(badgeXml);
BadgeUpdateManager.CreateBadgeUpdaterForApplication().Update(badge);
}
public void SendToastNotification(string message, string imageName)
{
var notificationXml =
ToastNotificationManager.GetTemplateContent(ToastTemplateType.ToastImageAndText01);
var toastElements = notificationXml.GetElementsByTagName("text");
toastElements[0].AppendChild(notificationXml.CreateTextNode(message));
if (string.IsNullOrEmpty(imageName))
{
imageName = @"Assets/Logo.png";
}
var imageElement = notificationXml.GetElementsByTagName("image");
imageElement[0].Attributes[1].NodeValue = imageName;
var toastNotification = new ToastNotification(notificationXml);
ToastNotificationManager.CreateToastNotifier().Show(toastNotification);
}
private static void SendTileTextNotification(string tweet)
{
var tileXml = TileUpdateManager.GetTemplateContent(TileTemplateType.TileWideText03);
var tileAttributes = tileXml.GetElementsByTagName("text");
tileAttributes[0].AppendChild(tileXml.CreateTextNode(tweet));
var tileNotification = new TileNotification(tileXml);
TileUpdateManager.CreateTileUpdaterForApplication().Update(tileNotification);
}
Debugging Notes
Before we call it a wrap, it’s worth noting that debugging background tasks is rather neat in Visual Studio. If your task is setup correctly with all its conditions met, put a breakpoint in the ‘Run’ method of your Task, select the ‘Suspend’ Toolbar item and from the pull down and click on the name of the Background Task to debug. Visual Studio will break into the debugger.

This is a real timesaver when it comes to getting Tasks to get triggered while debugging.
The Notifications – Final Result
Phew! That’s nearly a wrap! Let us now see how our notification system looks when in action.
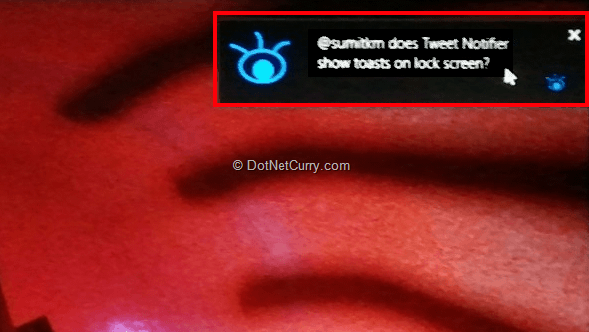
1. When the screen is locked and a new notification arrives we see the notification
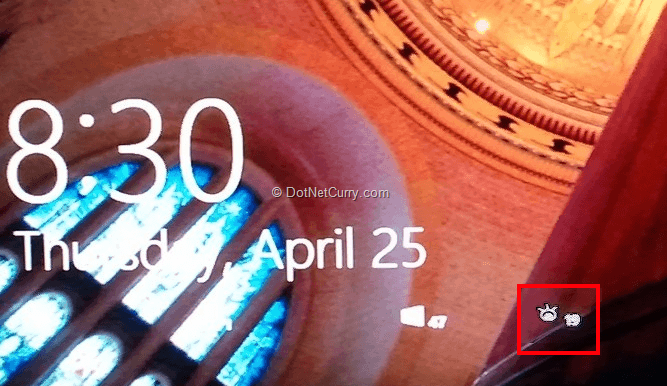
2. When the screen is locked the badge is updated
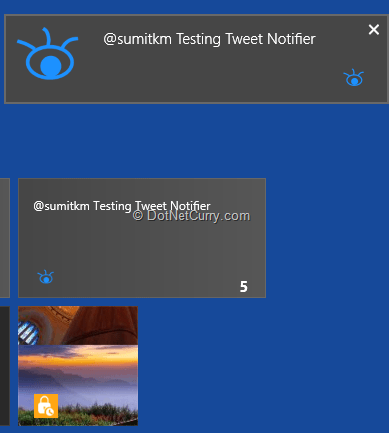
3. Live tiles change if tweets mention logged in user
Pretty neat eh! So we just saw all the types of notifications in action. These can be put to use from various parts of your Windows 8 Store app. For our demo, we have managed to squeeze in a Background Task and initiate all these notifications from the task. However that is not a pre-requisite for the notifications.
Background Tasks on the other hand are pretty involved themselves. If you want a deeper look at best practices, dos and don’ts I strongly suggest you go through this whitepaper from MSDN.
Download the entire source code of this article (Github)
This article has been editorially reviewed by Suprotim Agarwal.
C# and .NET have been around for a very long time, but their constant growth means there’s always more to learn.
We at DotNetCurry are very excited to announce The Absolutely Awesome Book on C# and .NET. This is a 500 pages concise technical eBook available in PDF, ePub (iPad), and Mobi (Kindle).
Organized around concepts, this Book aims to provide a concise, yet solid foundation in C# and .NET, covering C# 6.0, C# 7.0 and .NET Core, with chapters on the latest .NET Core 3.0, .NET Standard and C# 8.0 (final release) too. Use these concepts to deepen your existing knowledge of C# and .NET, to have a solid grasp of the latest in C# and .NET OR to crack your next .NET Interview.
Click here to Explore the Table of Contents or Download Sample Chapters!
Was this article worth reading? Share it with fellow developers too. Thanks!
Sumit is a .NET consultant and has been working on Microsoft Technologies since his college days. He edits, he codes and he manages content when at work. C# is his first love, but he is often seen flirting with Java and Objective C. You can follow him on twitter at @
sumitkm or email him at sumitkm [at] gmail