Windows 8 introduced the new Store Apps development model, aimed at building apps for touch centric devices as well as desktops. As always, Line of Business Apps is one horizontal that the Store Apps will cover. Typically consumers for these applications are always expected to be connected to the remote servers for fetching and storing data.
Fortunately the Windows Store Apps can leverage the robust HttpClient library to connect with remote Web services. Leapfrogging WCF, the next generation of Remote Services can now be built using ASP.NET Web API. Web API allows users to build services that use HTTP constructs like Content Negotiation, HTTP Verbs to build light weight services without too much of an overhead. Web API service returns data as JSON or XML by default.
ASP.NET WEB API makes building HTTP Services easy and any client that can communicate over HTTP, can potentially connect to Web API based services.
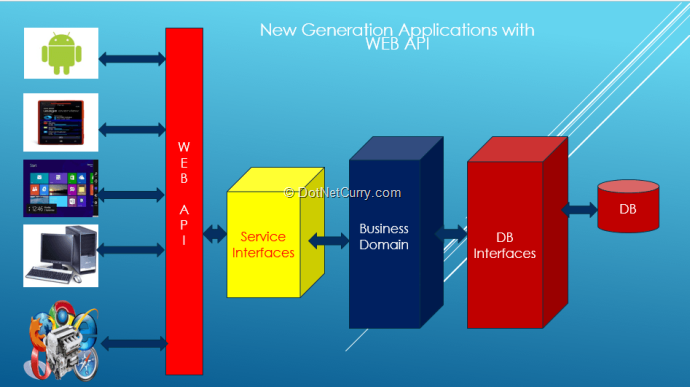
The above diagram shows how Web API can help build common interfaces over HTTP that multiple clients can access.
The Premise
For this article, I have chosen a scenario where a Medicine Sales representative wants to book orders for medicine. He has a Windows 8 device with a Windows Store App that can add, edit or delete orders. Since the order needs to be stored on the centralized database server, we will be using WEB API framework. To make call to WEB API, the ‘HttpClient’ class is used with following methods:
- GetAsync()
- PostAsync()
- PutAsync()
- DeleteAsync()
The Web API Service
Before we build the Client App, lets setup the Web API service.
Step 1: Open VS 2012 and create a new Blank solution, name it as ‘Store_CS_WebAPI_Client_CRUD’. In this solution, add a new ASP.NET MVC 4 application, name it as ‘WEBAPI_Server_App’. Select the ‘WEB API’ template as below:

Step 2: In this solution, add a new Sql Server database name it as ‘OrderApplication.mdf’. Double click on it, it will get opened using the ‘Server Explorer’. Add a new table in this database, name it as ‘Order’. The script is as below:
CREATE TABLE [dbo].[Order] (
[OrderId] INT IDENTITY (1, 1) NOT NULL,
[CustomerName] VARCHAR (50) NOT NULL,
[OrderedItem] VARCHAR (50) NOT NULL,
[OrderedQuantity] INT NOT NULL,
[UnitPrice] INT NOT NULL,
[TotalBill] INT NOT NULL,
[OrderedDate] VARCHAR (50) NULL,
PRIMARY KEY CLUSTERED ([OrderId] ASC)
);
Step 3: Build the project. In this project, add a new ADO.NET EF edmx in the Models folder, name it as ‘OrderApplicationEDMX.edmx’. Select the OrderApplication database created in the above Step and complete the wizard. After completing the Wizard, the mapping will be generated as shown here:
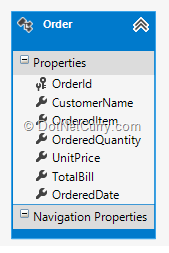
Build the application.
Step 4: Right click on the Controllers folder and add a new API controller using ADO.NET EF. Name it as ‘OrderController’ as seen here:

Step 5: Build the project and run it, you should see a Help page as below:
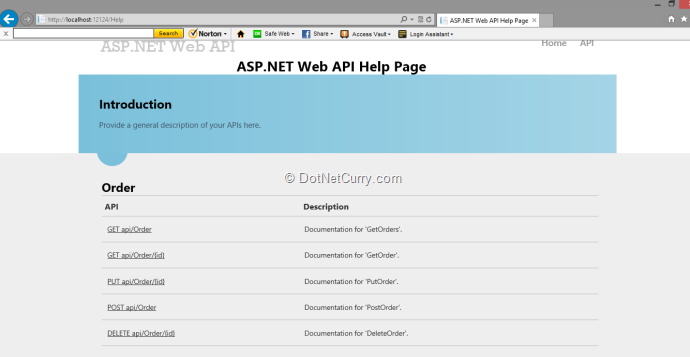
You can host the WEB API application on IIS.
Creating the Windows Store App Client Application using C# and XAML
Step 1: Create a new Windows Store App project using C#, name it as ‘Store_CS_WebAPI_Client’. In this project, add 3 folders of name, ‘Model’, ‘Infrastructure’ and ‘ViewModel’.
Step 2: To perform CRUD operations, we need to have a compatible object map from the client application. This object map is actually a CLR class which is exposed by WEB API. In this case, we have Order class exposed from the WEB API using ADO.NET EF in the WEB API project. So to have the same class in this client application, add a new class in the Model folder of the client application and name it as ‘Order.cs’. Write the class as shown here:
namespace Store_CS_WebAPI_Client.Model
{
public class Order
{
public int OrderId { get; set; }
public string CustomerName { get; set; }
public string OrderedItem { get; set; }
public int OrderedQuantity { get; set; }
public int UnitPrice { get; set; }
public int TotalBill { get; set; }
public string OrderedDate { get; set; }
}
}
The above Order class has same properties with data type matching with the Order class exposed by the WEB API.
Step 3: We will use Commanding to avoid code-behind in the MainPage.xaml. To define the command object, add a new class in the ‘Infrastructure’ folder, name it as ‘RouteCommand’. Implement the ICommand interface as follows:
using System;
using System.Windows.Input;
namespace Store_CS_WebAPI_Client.Infrastructure
{
/// <summary>
/// The Command Object for performing Operation for methods with input parameter and out parameter
/// </summary>
public class RoutedCommand : ICommand
{
private Action< object> _handlerExecution;
private Func< object, bool> _canHandleExecution;
public RoutedCommand(Action< object> h ,Func< object,bool> c=null)
{
_handlerExecution = h;
_canHandleExecution = c;
}
public bool CanExecute(object parameter)
{
return (_canHandleExecution == null) ||
_canHandleExecution.Invoke(parameter);
}
public event EventHandler CanExecuteChanged;
public void Execute(object parameter)
{
_handlerExecution.Invoke(parameter);
}
}
}
Step 4: Add a new class in the ViewModel folder, name it as ‘OrderViewModel’. This class is used for model binding with the UI. The class implements ‘INotifyPropertyChanged’ interface for property changed notification. It contains public properties like ‘Orders’ - an observable collection used for binding orders received from the HTTP GET class to WEB API to ListView. Properties ‘Order’ and ‘SelectedOrder’ are used for creating new order and Update/Delete order respectively. Properties ‘OrderId’ and ‘TotalBill’ are used for displaying the generated OrderId and the calculated TotalBill for the order respectively. The class contains the following methods:
- NewOrder() - This defines an instance of the Order object property. This is bound with TextBoxes in the UI.
- LoadOrders() - This method makes an HTTP GET call to WEB API using GetAsync method of the HttpClient class. This store data into the ‘Orders’ observablecollection.
- CreateOrder() - This makes an HTTP POST call to WEB API using PostAsync method of the HttpClient class. This method passes the ‘Order’ object to WEB API received from the UI as a Command parameter.
- EditOrder() - This makes an HTTP PUT call to WEB API using PutAsync method of the HttpClient class. This method passes the ‘Order’ object to WEB API received from the UI as a Command parameter based upon the OrderId.
- RemoveOrder() - This makes an HTTP DELETE call to WEB API using DELETE Async method of the HttpClient class. This method passes the ‘OrderId’ to WEB API received from the UI.
The class is as follows:
using Store_CS_WebAPI_Client.Infrastructure;
using Store_CS_WebAPI_Client.Model;
using System;
using System.Collections.Generic;
using System.Collections.ObjectModel;
using System.ComponentModel;
using System.IO;
using System.Net.Http;
using System.Runtime.Serialization.Json;
using System.Windows.Input;
namespace Store_CS_WebAPI_Client.ViewModel
{
/// <summary>
/// The View Model class.
/// This defines the public properties used for Databinding with UI. It also defines
/// asunchronous methods making call o WEB API for performing
/// HTTP GET|POST|PUT|DELETE operations. The command objects are
/// declared which are bind with the Button on UI
/// </summary>
public class OrderViewModel : INotifyPropertyChanged
{
//The URL for WEB API
string remoteURL = "http://localhost:12124/api/";
public event PropertyChangedEventHandler PropertyChanged;
void OnPropertyChanged(string pName)
{
if (PropertyChanged != null)
{
PropertyChanged(this, new PropertyChangedEventArgs(pName));
}
}
ObservableCollection<Order> _Orders;
/// <summary>
/// Orders collection to display in the ListView
/// </summary>
public ObservableCollection<Order> Orders
{
get { return _Orders; }
set
{
_Orders = value;
OnPropertyChanged("Orders");
}
}
Order _Order;
/// <summary>
/// The Object for the new Order
/// </summary>
public Order Order
{
get { return _Order; }
set
{
_Order = value;
if (Order != null)
{
OrderId = Order.OrderId;
TotalBill = Order.TotalBill;
}
OnPropertyChanged("Order");
}
}
Order _SelectedOrder;
/// <summary>
/// The object for the Selected Order to Update and Delete order
/// </summary>
public Order SelectedOrder
{
get { return _SelectedOrder; }
set
{
_SelectedOrder = value;
Order = _SelectedOrder;
OnPropertyChanged("Order");
}
}
int _OrderId = 0;
/// <summary>
/// OrderId generated when the new order is added
/// </summary>
public int OrderId
{
get { return _OrderId; }
set
{
_OrderId = value;
OnPropertyChanged("OrderId");
}
}
int _TotalBill = 0;
/// <summary>
/// The total bill calculated aftre order is created or updated
/// </summary>
public int TotalBill
{
get { return _TotalBill; }
set
{
_TotalBill = value;
OnPropertyChanged("TotalBill");
}
}
//Command objects
public ICommand NewOrders { get; private set; }
public ICommand AddOrder { get; private set; }
public ICommand UpdateOrder { get; private set; }
public ICommand DeleteOrder { get; private set; }
public OrderViewModel()
{
NewOrders = new RoutedCommand(NewOrder);
AddOrder = new RoutedCommand(CreateOrder);
UpdateOrder = new RoutedCommand(EditOrder);
DeleteOrder = new RoutedCommand(RemoveOrder);
LoadOrders();
Order = new Order();
}
/// <summary>
/// Method to Load all The Orders
/// S1: Create an object of HttpClient
/// S2: Make asn async call to WEB API using 'GetAsync' method.
/// S3: Read the response stream and read the data to the Ordes collection
/// </summary>
async void LoadOrders()
{
using (HttpClient client = new HttpClient())
{
var Response = await client.GetAsync(new Uri(remoteURL+"Order"));
using (var responseStream = await Response.Content.ReadAsStreamAsync())
{
var OrdersList = new DataContractJsonSerializer(typeof(List<Order>));
Orders = new ObservableCollection<Order>((IEnumerable<Order>)OrdersList.ReadObject(responseStream));
}
}
}
/// <summary>
/// Method to Create a new Order
/// S1: Create an object of HttpClient
/// S2: Make asn async call to WEB API using 'PosttAsync' method and pass the 'Order' object.
/// </summary>
/// <param name="o"></param>
async void CreateOrder(object o)
{
Order.TotalBill = Order.OrderedQuantity * Order.UnitPrice;
Order.OrderedDate= DateTime.Now.ToString();
using (var client = new HttpClient())
{
using (var memStream = new MemoryStream())
{
var data = new DataContractJsonSerializer(typeof(Order));
data.WriteObject(memStream, Order);
memStream.Position = 0;
var contentToPost = new StreamContent(memStream);
contentToPost.Headers.ContentType = new System.Net.Http.Headers.MediaTypeHeaderValue("application/json");
var response = await client.PostAsync(new Uri(remoteURL + "Order"),contentToPost);
var dataReceived = response.EnsureSuccessStatusCode();
var dRec = new DataContractJsonSerializer(typeof(Order));
var str = await dataReceived.Content.ReadAsStreamAsync();
var RecData = dRec.ReadObject(str) as Order;
OrderId = RecData.OrderId;
TotalBill = Order.TotalBill;
}
}
LoadOrders();
}
/// <summary>
/// The new Order
/// </summary>
/// <param name="o"></param>
void NewOrder(object o)
{
Order = new Order();
}
/// <summary>
/// The Edit Order
/// S1: Create an object of HttpClient
/// S2: Make an async call to WEB API using 'PutAsync' method and pass the 'Order' object.
/// </summary>
/// <param name="o"></param>
async void EditOrder(object o)
{
Order.TotalBill = Order.OrderedQuantity * Order.UnitPrice;
using (var client = new HttpClient())
{
using (var memStream = new MemoryStream())
{
var data = new DataContractJsonSerializer(typeof(Order));
data.WriteObject(memStream, Order);
memStream.Position = 0;
var contentToPost = new StreamContent(memStream);
contentToPost.Headers.ContentType = new System.Net.Http.Headers.MediaTypeHeaderValue("application/json");
var response = await client.PutAsync(new Uri(remoteURL + "Order/" + Order.OrderId), contentToPost);
TotalBill = Order.TotalBill;
}
}
LoadOrders();
}
/// <summary>
/// The Delete Order
/// S1: Create an object of HttpClient
/// S2: Make an async call to WEB API using 'DeleteAsync' method and pass the 'OrderId'.
/// </summary>
/// <param name="o"></param>
async void RemoveOrder(object o)
{
using (var client = new HttpClient())
{
var response = await client.DeleteAsync(new Uri(remoteURL + "Order/" + Order.OrderId));
response.EnsureSuccessStatusCode();
}
Order = new Order();
LoadOrders();
}
}
}
Step 5: Add the following XAML in the MainPage.Xaml:
<Page
x:Class="Store_CS_WebAPI_Client.MainPage"
xmlns="http://schemas.microsoft.com/winfx/2006/xaml/presentation"
xmlns:x="http://schemas.microsoft.com/winfx/2006/xaml"
xmlns:local="using:Store_CS_WebAPI_Client"
xmlns:d="http://schemas.microsoft.com/expression/blend/2008"
xmlns:mc="http://schemas.openxmlformats.org/markup-compatibility/2006"
xmlns:vm="using:Store_CS_WebAPI_Client.ViewModel"
mc:Ignorable="d">
<Page.Resources>
<vm:OrderViewModel x:Key="vmDs"></vm:OrderViewModel>
<DataTemplate x:Key="orderTemplate">
<StackPanel Orientation="Horizontal" Width="600">
<TextBlock Text="{Binding OrderId}" Width="100"></TextBlock>
<TextBlock Text="{Binding CustomerName}" Width="100"></TextBlock>
<TextBlock Text="{Binding OrderedItem}" Width="100"></TextBlock>
<TextBlock Text="{Binding OrderedQuantity}" Width="100"></TextBlock>
<TextBlock Text="{Binding UnitPrice}" Width="100"></TextBlock>
<TextBlock Text="{Binding TotalBill}" Width="100"></TextBlock>
</StackPanel>
</DataTemplate>
</Page.Resources>
<Grid Background="{StaticResource ApplicationPageBackgroundThemeBrush}" DataContext="{Binding Source={StaticResource vmDs}}"
x:Name="MainGrid">
<Grid HorizontalAlignment="Left" Height="504" Margin="69,114,0,0" VerticalAlignment="Top" Width="680"
DataContext="{Binding Path=Order,Mode=TwoWay}">
<Grid.RowDefinitions>
<RowDefinition Height="74*"/>
<RowDefinition Height="72*"/>
<RowDefinition Height="71*"/>
<RowDefinition Height="69*"/>
<RowDefinition Height="70*"/>
<RowDefinition Height="67*"/>
<RowDefinition Height="96*"/>
</Grid.RowDefinitions>
<Grid.ColumnDefinitions>
<ColumnDefinition Width="101*"/>
<ColumnDefinition Width="109*"/>
</Grid.ColumnDefinitions>
<TextBlock TextWrapping="Wrap" Text="Order Id" FontFamily="Segor UI" FontSize="30"/>
<TextBlock Grid.Row="1" TextWrapping="Wrap" Text="Customer Name" FontFamily="Segoe UI" FontSize="30"/>
<TextBlock Grid.Row="2" TextWrapping="Wrap" FontFamily="Segoe UI" FontSize="30" Text="Ordered Item"/>
<TextBlock Grid.Row="4" TextWrapping="Wrap" Text="Unite Price" FontFamily="Segoe UI" FontSize="30" Margin="0,0,0,1"/>
<TextBlock Grid.Row="3" TextWrapping="Wrap" Text="Ordered Quantity" FontFamily="Segoe UI" FontSize="30" Grid.RowSpan="2"/>
<TextBlock Grid.Row="5" TextWrapping="Wrap" Text="Total Price" FontFamily="Segoe UI" FontSize="30"/>
<TextBox x:Name="txtordid" Grid.Column="1" TextWrapping="Wrap" Height="55"
FontSize="30" IsEnabled="False" Text="{Binding Source={StaticResource vmDs},Path=OrderId}" Width="300"/>
<TextBox x:Name="txtcustname" Grid.Column="1" Grid.Row="1" TextWrapping="Wrap" Height="55"
FontSize="30" Text="{Binding CustomerName,Mode=TwoWay}" Width="300"/>
<TextBox x:Name="txtorditem" Grid.Column="1" Grid.Row="2" TextWrapping="Wrap" Height="55"
FontSize="30" Text="{Binding OrderedItem,Mode=TwoWay}" Width="300"/>
<TextBox x:Name="txtortqty" Grid.Column="1" Grid.Row="3" TextWrapping="Wrap" Height="55"
FontSize="30" Text="{Binding OrderedQuantity,Mode=TwoWay}" Width="300"/>
<TextBox x:Name="txtunitprice" Grid.Column="1" Grid.Row="4" TextWrapping="Wrap" Height="55"
FontSize="30" Text="{Binding UnitPrice,Mode=TwoWay}" Width="300"/>
<TextBox x:Name="txtutotalbill" Grid.Column="1" Grid.Row="5" TextWrapping="Wrap" Height="55"
FontSize="30" Text="{Binding Source={StaticResource vmDs},Path=TotalBill}" IsEnabled="False" Width="300"/>
</Grid>
<ListView x:Name="lstorders" HorizontalAlignment="Left"
Height="504" Margin="749,123,0,0" VerticalAlignment="Top" Width="587"
ItemsSource="{Binding Orders}"
SelectedItem="{Binding Source={StaticResource vmDs},Path=SelectedOrder,Mode=TwoWay}"
ItemTemplate="{StaticResource orderTemplate}"/>
<StackPanel Grid.ColumnSpan="2" HorizontalAlignment="Left" Height="96" Grid.Row="6" VerticalAlignment="Top"
Width="840" Orientation="Horizontal">
<Button Name="btnnew" Content="New" HorizontalAlignment="Stretch" VerticalAlignment="Stretch" Width="168"
FontSize="30" Command="{Binding Path=NewOrders}" CommandParameter="{Binding Order}"/>
<Button Name="btnadd" Content="Add" HorizontalAlignment="Stretch" VerticalAlignment="Stretch" Width="168"
FontSize="30" Command="{Binding Path=AddOrder}" CommandParameter="{Binding Order}"/>
<Button Name="btnupdate" Content="Update" HorizontalAlignment="Stretch" VerticalAlignment="Stretch" Width="168"
FontSize="30" Command="{Binding UpdateOrder}" CommandParameter="{Binding Order}"/>
<Button Name="btndelete" Content="Delete" HorizontalAlignment="Stretch" VerticalAlignment="Stretch" Width="168"
FontSize="30" Command="{Binding DeleteOrder}" CommandParameter="{Binding Order}"/>
</StackPanel>
<TextBlock HorizontalAlignment="Left" Height="46" Margin="928,50,0,0" TextWrapping="Wrap" Text="List of Orders" VerticalAlignment="Top" Width="395" FontFamily="Segoe UI" FontSize="30"/>
</Grid>
</Page>
In the above xaml code, register the ViewMode using the following statement:
xmlns:vm="using:Store_CS_WebAPI_Client.ViewModel"
The page resource dictionary defines an instance of the OrderViewModel class using key ‘vmDs’. The datatemplate ‘orderTemplate’ defines the StackPanel with TextBlock inside it, these are bound with the properties in the Order class. This datatemplate is bound with the ListView using its ItemTemplate property. The Xaml contains TextBoxes which are bound with the properties from the Order class. Textboxes for OrderId and TotalBill are bound with the OrderId and TotalBill properties from the ViewModel class. The UI has Buttons which are set with their command properties declared in the ViewModel class.
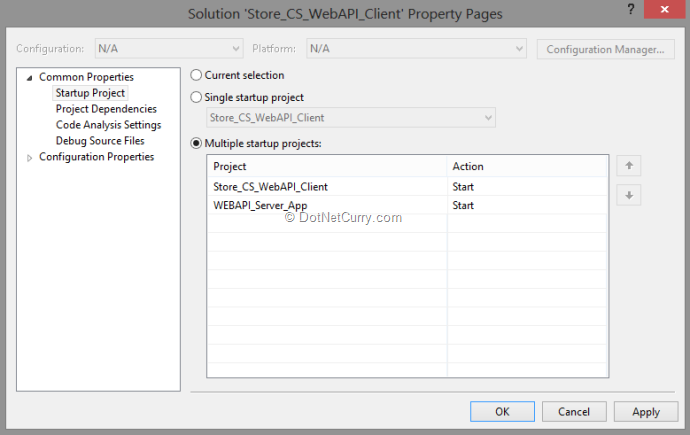
Step 6: If you have both the projects in the same solution, right click on the Solution and from ‘Properties’ select Multiple Startup projects. Set the WEB API project as start first and then the Windows Store App as below:
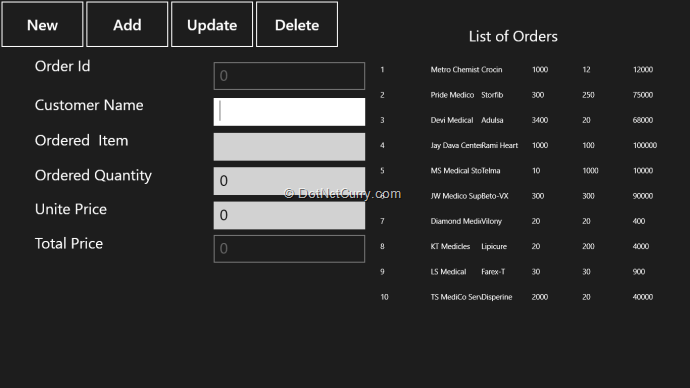
Step 7: Run the application, since ‘LoadOrder()’ method is called in the constructor of the ViewModel class, when the UI is loaded, this method will be executed, and the received Orders will be shown in the ListView as below:
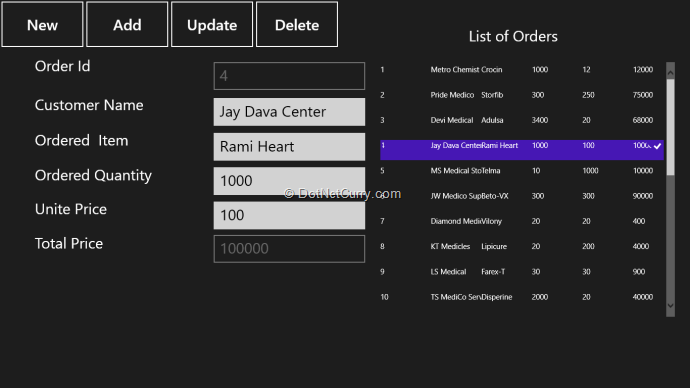
Select Record from the ListView, it will be displayed in the textboxes as shown below:
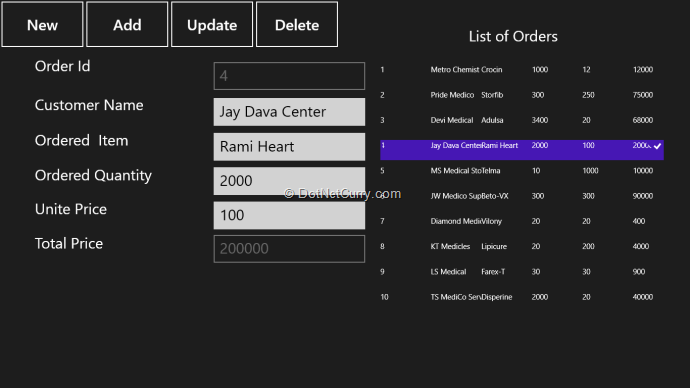
Now you can change the value for the “Ordered Quantity” and click on the Update button. You will find the Total Bill Changed as below:
Similarly you can Add or Delete orders as well.
Conclusion
Developers can easily make use of WEB API for performing CRUD operations for client applications running on devices. We built a Windows 8 Store app and used the HTTPClient object to easily communicate with a Web API service.
Download the entire source code over here (Github)
This article has been editorially reviewed by Suprotim Agarwal.
C# and .NET have been around for a very long time, but their constant growth means there’s always more to learn.
We at DotNetCurry are very excited to announce The Absolutely Awesome Book on C# and .NET. This is a 500 pages concise technical eBook available in PDF, ePub (iPad), and Mobi (Kindle).
Organized around concepts, this Book aims to provide a concise, yet solid foundation in C# and .NET, covering C# 6.0, C# 7.0 and .NET Core, with chapters on the latest .NET Core 3.0, .NET Standard and C# 8.0 (final release) too. Use these concepts to deepen your existing knowledge of C# and .NET, to have a solid grasp of the latest in C# and .NET OR to crack your next .NET Interview.
Click here to Explore the Table of Contents or Download Sample Chapters!
Was this article worth reading? Share it with fellow developers too. Thanks!
Mahesh Sabnis is a DotNetCurry author and a Microsoft MVP having over two decades of experience in IT education and development. He is a Microsoft Certified Trainer (MCT) since 2005 and has conducted various Corporate Training programs for .NET Technologies (all versions), and Front-end technologies like Angular and React. Follow him on twitter @
maheshdotnet or connect with him on
LinkedIn